Problem
Almost every business has a website in the digital age. Over 30% of all websites on the internet use WordPress, a robust open-source content management system (CMS) that allows beginners to create a quality website quickly (Messenlehner & Coleman, 2019). Due to ease of use, many companies do not hire web developers to maintain their WordPress websites. Business users in these companies utilize the WordPress dashboard to update the web content. When these non-technical users cannot implement new business requirements or fix technical errors, they often ask IT professionals who are not web developers to take care of the websites. These professionals may be new to web development. They may want to install WordPress locally to explore new themes and plugins, test websites, and practice coding techniques. How do they establish a WordPress development environment locally?
Solution
We build a WordPress development environment on our local computers. Since WordPress is still mainly PHP, we first install XAMPP, the most popular PHP development environment, on Windows. The free all-in-one cross-platform installation package installs Apache distribution containing MariaDB, PHP, and Perl (apachefriends, 2023). However, we do not recommend XAMPP for production web servers. Then, we download the WordPress installation package and build a local WordPress website.
After we set up a WordPress website for the first time, the website uses a default theme. We can use the thousands of WordPress themes or create our own. This exercise uses Astra's starter templates to create a restaurant website. We often use one theme to manage the front-end code. Avada, Vantage and Blocksy are other popular themes.
Visual Studio Code (VS Code), a powerful and easy-to-use code editor, has become very popular among web developers (Johnson, 2019). This code editor is free, cross-platform, and highly customizable. By default, VS Code does not support WordPress development. Nevertheless, we can install some extensions to do full-stack development. In this exercise, we install the PHP Debug extension, a PHP debug adapter for Visual Studio Code (Marketplace, 2023).
We tested this solution on a Windows 10 Pro machine with XAMPP Control Panel v3.3.3 installed. The website created in this tip uses WordPress 6.4.2. We used the Microsoft Edge browser Version 112.0.1722.39 (Official Build) (64-bit) to test the website. The version of Visual Studio Code is Version 1.85.1 with the extension PHP Debug v1.34.0 installed.
1 – Building a Local WordPress Development Website
WordPress offers two versions of its software (Sabin-Wilson, 2021):
- The hosted version at https://wordpress.com
- The self-installed version at https://wordpress.org
WordPress.com, like some web hosting providers, allows us to create a website without writing any code and configuring the web server. However, WordPress.com has some limitations; for example, we cannot install our own plugins or themes (Sabin-Wilson, 2021). This exercise uses the self-installed version. We download the WordPress installation package from the wordpress.org website and install it on a local computer. We then have full power over the WordPress website.
1.1 Using the XAMPP Installation Package to Install PHP, MySQL, and Apache
XAMPP (an acronym for cross (x)-platform, Apache, MySQL, PHP, and Perl) is a fully functional web server package allowing us to create and test web applications on a local computer. As the name implied, the package includes:
- An easy-to-setup web server (Apache).
- Database server (MySQL).
- A server-side scripting language (PHP).
All these enable us to run a WordPress website on a local machine.
1.1.1 Download XAMPP Installer for Windows
Go to the Apache Friends website (https://www.apachefriends.org/). Then, select the download link XAMPP for Windows on the landing page, as shown in Figure 1.

Figure 1 The XAMPP downloading page
The downloading process should start automatically. We can locate the installer in the local download folder. The install name looks like xampp-windows-x64-8.2.12-0-VS16-installer.exe.
1.1.2 Run the XAMPP Installer
Double-click on the download file to launch the XAMPP Installer. The XAMPP Setup Wizard should look like Figure 2. Then, click the Next button to continue.
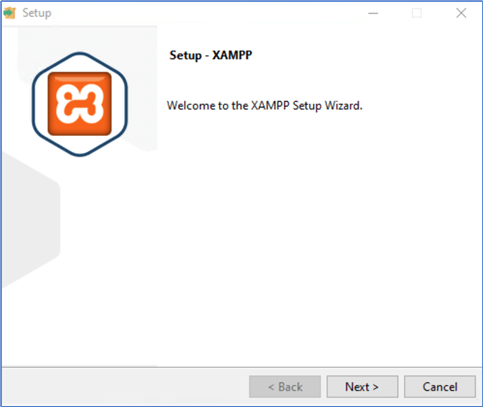
Figure 2 The first page of the XAMPP setup wizard
1.1.3 Select Components
The second page allows us to select components to install. In addition to the required components, we also install MySQL and PHPMyAdmin (Colin, 2023). We use phpMyAdmin to manage the MySQL database. Figure 3 illustrates the selected components. Then, we click the Next button to the next step.
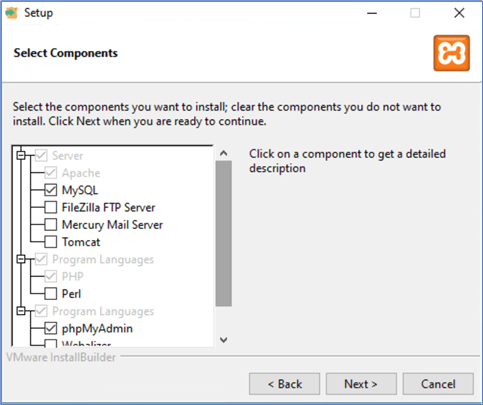
Figure 3 Select the components we want to install
1.1.4 Choose a Destination Folder to Install XAMPP
Without loss of generality, we select C:\XAMPP\ as the Installation folder, as shown in Figure 4.

Figure 4 Choose the installation folder
Then, click the Next button to bring up the language setting page. We accept the default selection. Next, click the Next button to access the Ready to Install page.
1.1.5 Launch the Installation Process
Click the Next button again to start the installation. The progress bar appears, as shown in Figure 5.

Figure 5 Installing XAMPP
1.1.6 Complete the XAMPP Setup Process
After completing the installation, we reach the last page of the setup wizard, as shown in Figure 6.

Figure 6 Completing the XAMPP setup
We click the Finish button to start the XAMPP control panel. Alternatively, we can start the control panel from the Windows startup programs. The control panel should look like Figure 7.

Figure 7 The XAMPP Control Panel
1.1.7 Change the XAMPP Apache Server Port
By default, Apache uses the port 80. However, other programs on our computer, such as IIS, may already use the port. We review all ports by clicking the Netstat button on the XAMPP control panel. In this exercise, we chose a free port number: 8080. We then click the Config button to open the drop-down menu, as shown in Figure 8.

Figure 8 Update the Apache httpd.conf settings
Select the Apache (httpd.conf) menu item to open the httpd.conf in a text editor. Search for the line: Listen 80 in the file. Change the line to Listen 8080. Furthermore, search for the line: ServerName localhost:80. Change the line to ServerName localhost:8080. Save the settings and then click the two Start buttons to start Apache web server and MySQL database server. The control panel should look like Figure 9.

Figure 9 Start the web server and the database server
1.1.8 Test the Local Web Server
The Apache web server is up and running. We can access the XAMPP dashboard through this URL: http://localhost:8080/. The dashboard should look like Figure 10.

Figure 10 The XAMPP dashboard
1.2 Create a MySQL Database for WordPress
WordPress is a data-driven content management system. The CMS uses MySQL to store all data, including but not limited to posts, pages, users, comments, and site-wide settings. Before building a WordPress website, we should create a database for it. The installation process creates database tables and stores default installation data inside those tables.
1.2.1 Launch phpMyAdmin from the XAMPP Control Panel
Start the XAMPP Control Panel if it is closed. We then start MySQL. Next, we access the phpMyAdmin interface through the URL: http://localhost:8080/phpmyadmin/. The landing page should look like Figure 11.

Figure 11 The phpMyAdmin interface
1.2.2 Create a New MySQL Database
Click the New button to activate the Databases tab. Then, give the new database a name, as shown in Figure 12. Next, click the Create button to create the new database.

Figure 12 Create a new database
Since our goal is to create a development environment, we can skip adding users and setting permissions for the database. We should not skip any security configuration on a production server. In addition, we should have some basic knowledge of MySQL, which helps us understand how WordPress woks behind the scenes (WPBeginner, 2023).
1.3 Build a WordPress Website on the Local Web Server
Installing a WordPress website on a local web server can benefit us (Will, 2023). Let us go through a step-by-step process to build a website. We first download and install WordPress. We then create a website. Next, we download pre-made website templates.
1.3.1 Install WordPress on the Local Server
Access https://wordpress.org/download/ to get the latest version of WordPress. Then, unzip the WordPress package. The unzipped directory contains a folder called wordpress. Next, copy the wordpress folder into the C:\xampp\htdocs folder, the web root directory for the Apache web server. The folder structure should look like Figure 13.

Figure 13 The htdocs folder structure
1.3.2 Set up the WordPress Website
Make sure both the Apache and MySQL servers are up and running. We access the local WordPress website through the URL: http://localhost:8080/wordpress/. The landing page should look like Figure 14.

Figure 14 The landing page of the WordPress website setup
After selecting a language, we click the Continue button. We then follow the instructions on the next web page and click the Let’s go! button to land on a page that asks for the database connection details. We enter the connection information, as shown in Figure 15. Then click the Submit button.

Figure 15 The database connection details
Next, we follow the instructions on the web pages to continue the installation. We then land on a page asking for some information about the website. The page looks like Figure 16.
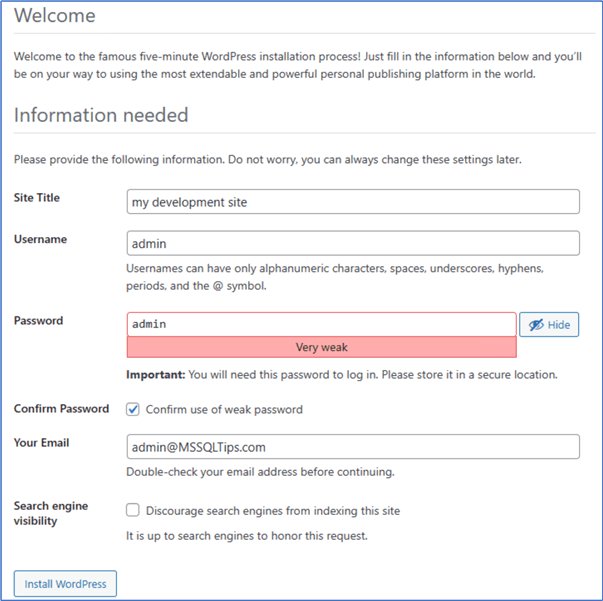
Figure 16 Provide the website information
After clicking the Install WordPress button, we arrive at the confirmation page, as shown in Figure 17.

Figure 17 The installation confirmation page
We click on the Log In link to open the login page. Enter the username and password to access the WordPress dashboard, as shown in Figure 18.

Figure 18 The WordPress website dashboard
1.3.3 Install the WordPress Astra Theme
We use a WordPress theme to control the overall appearance of our websites. There are thousands of free website themes. With a suitable theme, we can create a well-organized website in a short time. We use the Astra theme in this exercise. The theme has many starter templates that help simplify the web-building process (Pawar, 2023).
Find the Appearance menu item on the left pane in the dashboard. Select Appearance -> Theme to view all installed themes. Click the Add New Theme button to access the Add Themes tab. Search for the WordPress Astra theme; the search results should look like Figure 19.

Figure 19 Search for the WordPress Astra theme
The Install button displays when we move the mouse over the Astra icon, as shown in Figure 20.

Figure 20 The WordPress Astra theme installation page
Click on the Install button to install the theme. After completing the theme installation, we click the Activate button to activate the theme. We then see the installation confirmation page, as shown in Figure 21. The page contains the button Install Starter Templates that allow us to import ready-made designs.

Figure 21 The installation confirmation page
Click the Install Starter Templates button. We then land on the Select Page Builder page, as shown in Figure 22.

Figure 22 Select a page builder.
Select Elementor to bring up a new page to select a type of website. Elementor is a visual WordPress website builder that allows us to create complex layouts visually (Pines, 2021). After exploring these templates, we choose a pre-made website close to our design. We select the Deli Restaurant for demonstration, as shown in Figure 23.

Figure 23 Select a type of our website
Click the icon of the website to install the templates. We follow the instructions on the web pages to continue the installation. We then reach the last step of building the website. Select all the advanced options, as shown in Figure 24.

Figure 24 The last step to build the website
Click the Submit & Build My Website button to build the website. Figure 25 shows the confirmation after we build the website successfully.

Figure 25 The successful confirmation of building a website
Click the View Your Website button or access the URL: http://localhost:8080/wordpress/. We then land on the website as shown in Figure 26. A toolbar is at the top of each page since we log in to the admin interface as site administrators. We can use the tools on the bar to modify the page content.

Figure 26 The website home page
We access the WordPress dashboard through the URL: http://localhost:8080/wordpress/wp-admin/. After the installation, we can see some settings added to the admin dashboard, as shown in Figure 27.

Figure 27 The installation adds settings to the Dashboard
The installation process adds a theme and some plugins into the C:\xampp\htdocs\wordpress\wp-content folder. Figure 28 illustrates the folder structure. We often use one main plugin to store the core app code and one theme to manage the frontend code (Messenlehner & Coleman, 2019). When adding new features to the website or fixing errors, we mostly spend time on scripts in the web-content folder.

Figure 28 The web-content folder
1.4 Install Xdebug for XAMPP
Xdebug is a PHP extension providing a range of features to improve the PHP development experience. The development server should support Xdebug because we want to debug PHP scripts. Access the XAMPP dashboard via the URL: http://localhost:8080/dashboard/phpinfo.php. View the page source. The page should look like Figure 29.
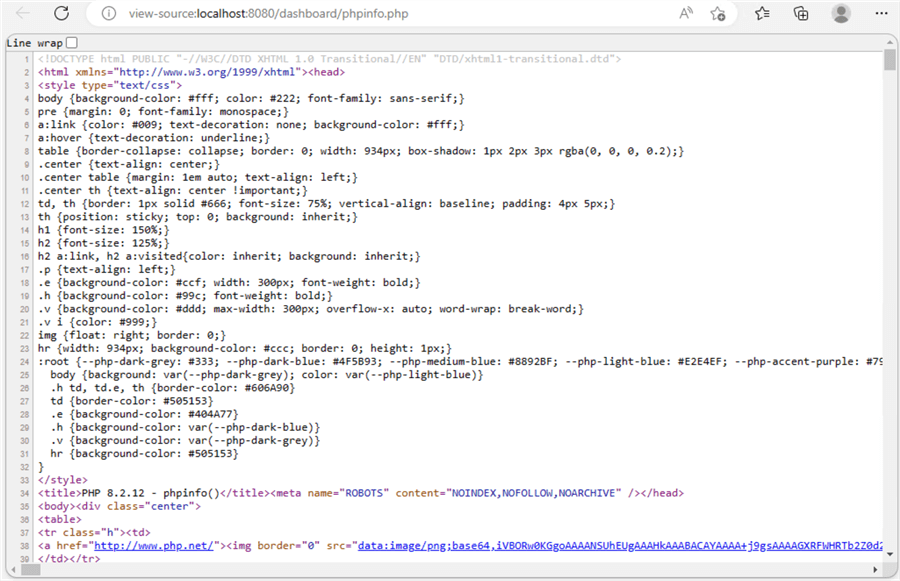
Figure 29 The source code of the PHP information page
Copy the page source to the Installation Wizard tool (https://xdebug.org/wizard), as shown in Figure 30. We use this tool to find the download and installation instructions.

Figure 30 The Xdebug installation wizard tool
Click the Analyse my phpinfo() output button. Figure 31 illustrates the output page from the analysis. We follow the 4-step instructions on the out page to complete the Xdebug installation.

Figure 31 The output from the wizard tool
To use Visual Code to debug the WordPress website, we also need to enable remote debugging in the php.ini file. The new section we just added should look like Figure 32. We should restart the Apache webserver after the changes.

Figure 32 The new section in the php.ini file
2 – Setting up Visual Studio Code for WordPress Development
Companies may hire WordPress developers to create plugins and themes for their specific requirements or may purchase plugins and themes. After the websites are up and running, they ask their IT professionals, who are not WordPress developers, to maintain them. They need to fix bugs or add new features. Many code editors allow them to view and modify the source code. However, we highly recommend a dedicated code editor, for example, Visual Studio Code (https://code.visualstudio.com/), to make the development work productive. One of the key features of Visual Studio Code is its great debugging support.
2.1 Install Visual Studio Code
Access the URL: https://code.visualstudio.com/. We land on a page that should look like Figure 33.

Figure 33 The Visual Studio Code download page
Click the Download for Windows button to download the installer, for example, VSCodeUserSetup-x64-1.85.1.exe. After downloading, we double-click the execution file to run the installer. We accept the license agreement and then follow the instructions on the wizard. When landing on the Select Additional Tasks dialog, we select two options for the sake of simplicity, as shown in Figure 34.

Figure 34 The Select Additional Tasks dialog
Click the Next button to continue the installation. Figure 35 illustrates the confirmation page. Click the Finish button to complete the installation and launch Visual Studio Code.

Figure 35 Visual Studio Code installation confirmation dialog
2.2 Install Extensions
Click the Extension icon in the activity bar to open the Extension pane that includes search capabilities. Enter PHP Debug into the search text box at the top of the pane. Figure 36 illustrates the search results. Select the PHP Debug extension. We can find detailed information about the extension.

Figure 36 PHP Debug Adapter for Visual Studio Code
Click the Install button to install the extension. Figure 37 confirms of the installation, which includes constructions to modify the settings in the php.ini file. We have already updated the file, as shown in Figure 32.

Figure 37 The PHP Debug installation instructions
2.3 Debug PHP in Visual Studio Code
Select the menu item File -> Open Folder… as shown in Figure 38, to bring up the Open Folder dialog.

Figure 38 Open the WordPress folder
We locate the C:\xampp\htdocs\wordpress folder. The Open Folder dialog should look like Figure 39.

Figure 39 The Open Folder dialog
Click the Select Folder button to open the WordPress website in Visual Studio Code. Open the index.php file for demonstration purposes and set a breakpoint at line 14, as shown in Figure 40.

Figure 40 Set breakpoint in the Index.php file
Click the Run and Debug icon in the activity bar to open the Run and Debug pane. When there is no launch.json in the .vscode folder, Visual Studio Code displays the Run start view, as shown in Figure 41. We need to create a launch configuration file so that we can save debugging setup details.

Figure 41 The Run and Debug pane
Click the create a launch a launch.json file link to create a new PHP debug configuration, as shown in Figure 42. Note that we select Listen for Xdebug in the configuration setting dropdown list.

Figure 42 The launch.json file
The arrow button beside the configuration setting dropdown is the Start Debugging button. Click the button to start debugging. We then launch the website via http://localhost:8080/wordpress/ in a web browser, for example Microsoft Edge. The runtime pauses at the breakpoint, as shown in Figure 43. We then can step through the PHP code line by line (VSCode, 2023).

Figure 43 Step through source code of a WordPress website
Summary
We walked through steps to create a development environment for IT professionals who are not web developers. We first installed XAMPP, which includes an Apache web server and a MySQL database server. We covered the steps to create a new database on the database server through the phpMyAdmin interface.
Next, we downloaded and unzipped the WordPress package from https://wordpress.org. We then ran the setup process to build a WordPress website. The article also introduced the Astra theme and the starter templates, which helped us build a website quickly.
After exploring the process of installing Xdebug for XAMPP, we demonstrated how to install Visual Studio Code. We looked at the Extension pane and installed the PHP Debug extension. Then, we set a breakpoint and observed that the PHP runtime paused at the breakpoint.
Reference
Apachefriends. (2023). XAMPP Apache + MariaDB + PHP + Perl. https://www.apachefriends.org/index.html.
Colin, N. (2023). How to Install XAMPP and WordPress Locally on Windows PC. https://themeisle.com/blog/install-xampp-and-wordpress-locally/.
Johnson, B. (2019). Visual Studio Code: End-to-End Editing and Debugging Tools for Web Developers. Boston, MA: Addison-Wesley Professional.
Marketplace. (2023). PHP Extension Pack. https://marketplace.visualstudio.com/items?itemName=xdebug.php-debug.
Messenlehner, B. & Coleman, J. (2019). Building Web Apps with WordPress, 2nd Edition. Sebastopol, CA: O'Reilly Media.
Pawar, S. (2023). Starter Templates 2.0 — Building Websites Just Got Lot More Easier! https://wpastra.com/updates/starter-templates-2-0/.
Pines, B. (2021). The Complete Guide to Using Elementor in WordPress. https://elementor.com/blog/what-is-elementor-for-wordpress/
Sabin-Wilson, L. (2021). WordPress For Dummies, 9th Edition. Hoboken, NJ: John Wiley & Sons, Inc.
Sole, B. A. (2021). Visual Studio Code Distilled: Evolved Code Editing for Windows, macOS, and Linux. New York, NY: Apress.
VSCode. (2023). Debugging. https://code.visualstudio.com/docs/editor/debugging.
Will, M. (2023). How to Install WordPress Locally (3 Methods). https://www.hostinger.com/tutorials/install-wordpress-locally.
WPBeginner. (2023). Beginner’s Guide to WordPress Database Management With phpMyAdmin. https://www.wpbeginner.com/beginners-guide/beginners-guide-to-wordpress-database-management-with-phpmyadmin/.
Next Steps
- The Author provides a quick way to set up a WordPress development environment. The setup process introduced in this tip is not for building a production environment. After creating a local development environment, we can explore and test all free themes and plugins. We can use website builders like Elementor to design web pages. These tools allow us to create beautiful and functional designs without writing any code. We can also develop custom themes and plugins, adding more advanced website features and capabilities. We may also practice the Debug Driven Development coding strategy. In addition, we should learn some basics of PHP and MySQL, which help us troubleshoot problems.
- Check out these related tips:
- Simple Web Based Content Management System using SQL Server, Python and Flask
- Create a Python Django Website with a SQL Server Database
- Managing your active SQL Server instance list using PHP
- Build a SQL Server and PHP Environment
- Configure web application permissions for SQL Server Master Data Services
- Create Your First REST API using Python, Flask, and HTML Code

Nai Biao Zhou has twenty years of experience in software development, with strong analytical skills and a broad range of computer expertise.
He has fifteen years of experience in development and maintenance of database applications on SQL Server in OLTP/OLAP/BI environments.
He has a master’s degree in Control Engineering and is pursuing a Master of Science degree in Predictive Analytics.
Knowledge/Skills
Advanced computer programming skills and well versed with C/C#, Java, ASP.NET, JavaScript, and SQL.
In depth knowledge of Solution Architecture, and Software Development Life Cycle (SDLC).
Microsoft Certified Application Developer (MCAD) since 2004.
- MSSQLTips Awards: Author of the Year – 2021 | Rising Star (50+ tips) – 2024 | Author Contender – 2020, 2023