Problem
Seeing how software technologies are evolving each day, you realize that when creating web applications, it is important that your application’s data is sharable with other developers, flexible, and future-proofed. So, how would you go about creating such applications?
Solution
You can use REST APIs as a central data repository for your web applications. APIs offer flexibility by allowing you to use the same data repository to create web, mobile, AV/VR, and IoT applications. This will also ensure that your applications are future-proof since all new technologies can communicate through APIs, increasing your application’s ability to integrate with third-party applications and services.
REST stands for Representational State Transfer and is an architectural style used in modern web development. It controls how data is retrieved or sent in a web application by defining rules used to serialize database and application values.
Prerequisites
- Windows 10
- Python
- Flask
- Visual Studio code
- Basic Python knowledge
- Basic Flask knowledge
Using the Flask Framework
Flask is a Python framework for web development, which means it has predefined functions intending to make web development using Python easier. In this tutorial, we use Flask and Flask-RESTful. Flask-RESTful is an extension of Flask made to handle API functions and makes it easy to relate your resources to your endpoints.
Use the following command to install Flask and Flask-RESTful on your environment:
pip install flask Flask-RESTful
Creating a Database and Table
Flask-RESTful can work with different databases, with SQLite being the default. But this tutorial employs a SQL Server database which you will manually create. Keeping track of your naming is important since a simple spelling mistake can cause errors in your code.
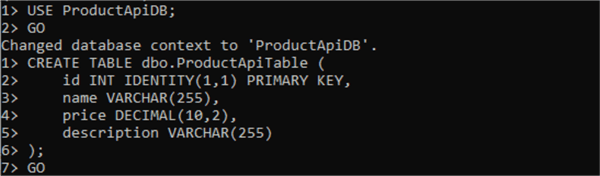
To create a database and tables we will use SQLCMD. Search “cmd” on your machine and open the command prompt. Once CMD is open, use sqlcmd to connect to your SQL Server using a trusted connection as shown below:
sqlcmd -S PC-Name\Server-Name –E
Now use the following sqlcmd command to create a new database:
CREATE DATABASE database-name;
GO

After creating the database, create the table using the following code. The IDENTITY command is used to make the table increment the id column automatically.
CREATE TABLE dbo.ProductApiTable (
    id INT IDENTITY(1,1) PRIMARY KEY,
    name VARCHAR(255),
    price DECIMAL(10,2),
    description VARCHAR(255)
);
GO
After creating the database, create a Python file named dbconn.py with the following code:
import sqlalchemy as sa
from sqlalchemy import create_engine
import urllib

conn_str = urllib.parse.quote_plus(
    'Data Source Name=KNITNETDS;'
    'Driver={SQL Server};'
    'Server=PC-Name\Server-Name;'
    'Database=ProductApiDB;'
    'Trusted_connection=yes;'
)

try:

    ApiSQLEngine = create_engine('mssql+pyodbc:///?odbc_connect={}'.format(conn_str))
    print("Passed")

except:
    print("failed!")
You can learn how to Connect to SQL Server with Python to Create Tables, Insert Data and Build Connection String if you have issues with your connection string.
Defining Endpoints
Flask-RESTful helps with defining endpoints using resources. Create a file named App.py. In this file, create a resource and an endpoint with the following code:
from flask import Flask, render_template, redirect, request, jsonify, current_app, g
from flask_marshmallow import Marshmallow
from dbConn import ApiSQLEngine
from sqlalchemy import text
from flask_sqlalchemy import SQLAlchemy
import os
from sqlalchemy import text
from flask_restful import Resource, Api, abort,reqparse
import json
# initialize app
app = Flask(__name__)
with app.app_context():
    # your code that needs the application context here

      # create product Model
      class Product(ApiDb.Model):

            id = ApiDb.Column(ApiDb.Integer, primary_key=True)
            name = ApiDb.Column(ApiDb.String(200), unique=True)
            price = ApiDb.Column(ApiDb.Float)
            description = ApiDb.Column(ApiDb.String(300))

            def __init__(self, name, price, description):
                  self.id = id
                  self.name = name
                  self.price = price
                  self.description = description

            def __repr__(self):
                  return f"Product(name={self.name}, description={self.description}, price={self.price})"
      # Define a Flask route for serving an HTML page
      @app.route('/')
      def index():
            productList = []
            conn = ApiSQLEngine.connect()
            result = conn.execute(text("SELECT * FROM dbo.ProductApiTable"))
            for row in result.fetchall():
                productList.append({"id": row[0], "name": row[1], "price": row[2], "description": row[3]})

            return render_template('index.html', productList = productList)

      class Square(Resource):

        def get(self, num):

            return jsonify({'square': num**2})
      # Create Flask-RESTful resource to interact with your database
      @app.route('/products')
      def productindex():
            productList = []
            conn = ApiSQLEngine.connect()
            result = conn.execute(text("SELECT * FROM dbo.ProductApiTable"))
            for row in result.fetchall():
                productList.append({"id": row[0], "name": row[1], "price": row[2], "description": row[3]})

            return render_template('index.html', productList = productList)

      class ProductResource(Resource):

           # Get a product by ID
          def get(self):
                conn = ApiSQLEngine.connect()
                result = conn.execute(text("SELECT * FROM dbo.ProductApiTable"))

                return jsonify(result)
          # Create a new product
          def post(self):

                data = request.form.to_dict()
                name = data["name"]
                price = data["price"]
                description =data["description"]

                conn = ApiSQLEngine.connect()

                stmt = text('INSERT INTO dbo.ProductApiTable (name, price, description) VALUES (:name, :price, :description)')
                insert = conn.execute(stmt, {'name': name, 'price': price, 'description': description})
                conn.commit()
                response_data = {'message': 'Data received and stored successfully'}
                return response_data, 201
          # Update an existing product
          def put(self, product_id):
              parser = reqparse.RequestParser()
              parser.add_argument('name', type=str)
              parser.add_argument('description', type=str)
              parser.add_argument('price', type=float)
              args = parser.parse_args()
              product = Product.query.filter_by(id=product_id).first()
              if product is None:
                  abort(404, message="Product not found")
              if args['name']:
                  product.name = args['name']
              if args['description']:
                  product.description = args['description']
              if args['price']:
                  product.price = args['price']
              ApiDb.session.commit()
              return {'id': product.id, 'name': product.name, 'description': product.description, 'price': product.price, 'message': 'product updated'}
          # Delete a product
          def delete(self, product_id):
              product = Product.query.filter_by(id=product_id).first()
              if product is None:
                  abort(404, message="Product not found")
              ApiDb.session.delete(product)
              ApiDb.session.commit()

              return {'message': 'Product deleted successfully.'}

# Add the resource to the API
api = Api(app)
api.add_resource(ProductResource, '/products')
api.add_resource(Square, '/square/<int:num>')

# product Schema
class appSchema(ApiMa.Schema):
    class Meta:
        fields    = ('id', 'name', 'price', 'description')
# Initialize Schema
product_schema    = appSchema()
app_schema        = appSchema(many=True)
# Creation of the database tables within the application context.
if __name__ == "__main__":
    with app.app_context():
      ApiDb.create_all()
      app.run(debug=True)
Before running the script, you must create an HTML file under a folder named “templates,” which you must also create. You will be using these HTML templates to interact with your API.
Create an HTML file named index.html under your templates folder and add the following code:
<!DOCTYPE html>
<html>
  <head>
    <meta charset="UTF-8">
    <title>Product Manager</title>
    <style>
      body {background-color: powderblue;display: flex;flex-direction: column;align-items: center;}
      h1   {color: white;}
      p    {color: red;}
      #addProduct {background-color: rgb(41, 177, 177); width: 40%; align-items: center;color: aliceblue;align-content: center;display: flex;flex-direction: column;}
      #productList {background-color: rgb(57, 181, 139);width: 40%;color: aliceblue;}
      .form-group {padding: auto;margin: 5px;}
      .form-control {float: right;margin-left: 5px;}
      .btn {color: white;background-color: cadetblue;margin: 8px;text-align: center;padding: 5px;border-radius: 25px;}
      .table {margin: 0px;width: 100%;}
      td, th {
              border: 1px solid #dddddd;
              text-align: left;
              padding: 8px;
            }
      tr:nth-child(even) {
        background-color: #dddddd;
      }
      </style>
  </head>
  <body>
    <h1>Product Manager</h1>


    <div id="addProduct">
      <h1>add product</h1>
      <form action="/products" method="post">
        <div class="form-group">
            <label for="name">Name</label>
            <input type="text" class="form-control" name="name" id="Username" >
        </div>
        <div class="form-group">
            <label for="title">Price</label>
            <input type="text" class="form-control" name="price" id="BlogTitle" >
        </div>
        <div class="form-group">
            <label for="desc">Description</label>
            <input type="text" class="form-control" name="description" id="BlogDescription" >
        </div>
        <div id="submit">
          <button type="btnAdd" class="btn">Submit</button>
          <a href="/" class="btn btn-primary">Cancel</a>
        </div>

      </form>
    </div>

    <!-- JavaScript code -->
    <script src="https://code.jquery.com/jquery-3.6.0.min.js"></script>
    <div id="productList">
      <h2>Product List</h2>

      <table class="table">
        <thead>
            <tr class="tb">
            <th  class="intb">Id</th>
            <th  class="intb">Name</th>
            <th  class="intb">PRICE</th>
            <th  class="intb">DESCRIPTION</th>
            </tr>
        </thead>
        <tbody >
            {% for product in productList %}
                <tr class="tb" style="margin-left: 15px;">
                    <td class="intb">{{ product.id }}</th>
                    <td class="intb">{{ product.name }}</td>
                    <td class="intb">{{ product.price }}</td>
                    <td class="intb">{{ product.description }}</td>
                </tr>
            {% endfor %}
        </tbody>
      </table>
      </div>

  </body>
</html>
Test the API
You can use software like Postman to test your API. However, to make the test more visual and practical, you can use the HTML file to post and get data to the SQL Server database.
First, run the script using the following command on your terminal:
python yourAppName.py
The image below shows a URL and port where Python is serving your API.

Once the app is running, hold CTRL and click on the http://127.0.0.1:5000 link to view your application. You will see the default index as shown below.

After successfully posting a new product, you will be redirected to a JSON message.

When you refresh the index page (default route), you should see the new product on the list.

Conclusion
Creating an API can boost the use spectrum of your data, especially since you can distribute your data to multiple different applications which can integrate with APIs. Multiple front-end technologies use APIs to perform CRUD tasks on their applications without connecting directly to the database. This also increases your data security since you can manage your API authorization systems as a second layer of protection on your database.
Next Steps
- Create a Real-Time Data Validation API for SQL Server using Power Apps and Python
- You can learn how to Load Data Asynchronously to SQL Server via an API and Python

Levi Masonde is a developer passionate about analyzing large datasets and creating useful information from these data. He is proficient in Python, ReactJS, and Power Platform applications. He is responsible for creating applications and managing databases as well as a lifetime student of programming and enjoys learning new technologies and how to utilize and share what he learns.
- MSSQLTips Awards:
Trendsetter (25+ tips) – 2025 | Author of the Year Contender – 2023 | Rookie of the Year Contender – 2022


from dbConn import ApiSQLEngine
– failed…trying to: pip install dbConn, failed. No matching distribution found for dbConn
“ApiDb” is not defined
I see this error : NameError: name ‘ApiDb’ is not defined
where is ApiDb is defined in your code?
Seems like this is incomplete code.