Problem
Healthy code should not include passwords, keys, or secrets in the source code. Sometimes, developers hard-code sensitive information while testing new features but forget to remove it afterward.
How can we validate code without including sensitive information so we can take action before we publish or share code?
Solution
There are multiple options we can use to accomplish this, and we can combine these options, as some security features complement each other. There are security features already in GitHub, including third-party tools. We will discuss some of them to help you understand how to configure and secure your code repositories. Please keep in mind that some advanced features in GitHub are only available on high-tier subscriptions or need the repository to be public.
This tip will discuss how to complement these features with custom GitHub Actions to validate code for forbidden words and take further actions to review and secure the code.
Things in GitHub To Always Enable
Regardless of the purpose of the GitHub repository, there are best practices that you should use, like always enabling:
- gitignore files: They allow you to ignore files to being committed to your repository, even if the file exists in your working folder, such as log files, compiled files, terraform secrets, ssh keys, etc. If you configure this file, you do not have to worry about committing files that are not supposed to be published.
- Security settings: They can vary depending on the type of license. But, in GitHub, you have the following security settings included in your plan (you just need to enable them):

We will discuss:
- Option 1: GitHub Code and Secrets Scans
- Option 2: Using GitHub Actions
- Option 3: Git Hooks
Option 1: GitHub Code and Secrets Scans
- Pros: Already available in GitHub. You do not have to configure anything. You can extend functionality at a certain level by adding more tools in code checks.
- Cons: Only available in public repositories on Free and Pro subscriptions. If you want to use it for private repositories, you must acquire the Enterprise subscription. In this tier, advanced security scans are also available for an additional fee. You are restricted to what the scanning tools scan.
GitHub code scans integrate automated security review into your pull requests with CodeQL. Then, they find and fix vulnerabilities in your repositories.
GitHub secrets detect credentials exposed in your git history, comments, or discussions. They prevent further exposures with push protection, which proactively blocks secrets from being pushed into your code.
To enable code scanning, you need to make sure your repository is public if you are using the Free or Pro subscriptions.
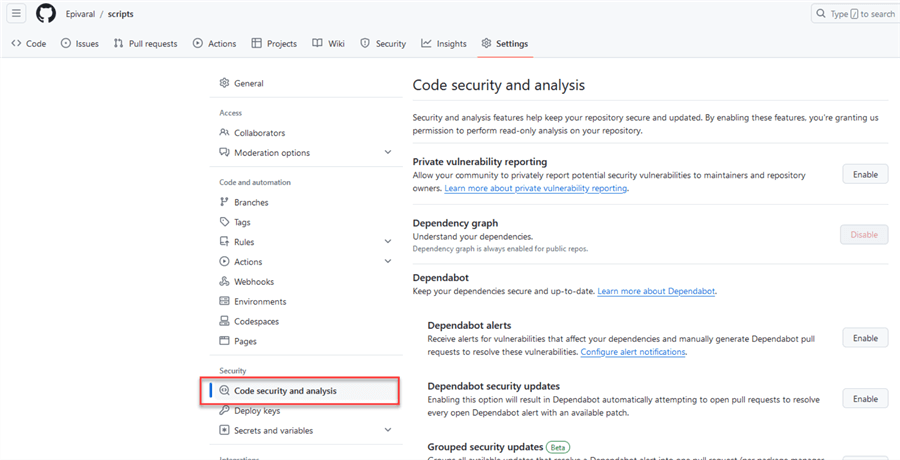
Go to Settings:

Then, go to Code security and analysis:
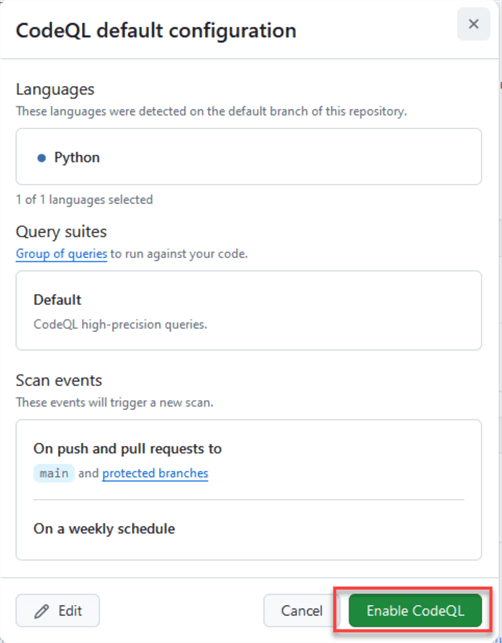
Scroll down to Code scanning, click on Set up, and select Default.
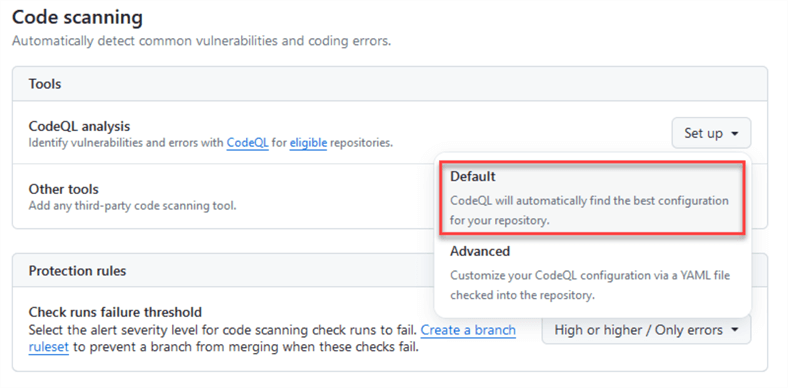
You will see that you cannot change the options in the Free tier. The Language list can change since this is automatically detected, but not all languages are supported. Click on Enable CodeQL.
To enable secret scanning, scroll down to find Secret scanning and click Enable:

To prevent commits if a scan is not passed, enable Push protection as well:

You can see the list of supported secrets here.
Once enabled, your repo security settings should look like this:

Option 2: Using GitHub Actions
- Pros: If you can imagine and code it, you can validate it. Used in workflows, it can prevent subsequent releases of deployments if the scan fails. You can use Public or Private repos regardless of your subscription tier.
- Cons: Since actions are triggered after committing, you cannot prevent the commits with actions. However, you can prevent a commit to Main branch if combined with Brach protection rules (again, not available on Private repos for Free and Pro tiers).
We can use GitHub Actions to trigger pipelines, actions, or events after a commit to the repository.
If you are new to GitHub Actions, you should know that actions are set up by adding a folder named .github/workflows/ and then the actions are declared via .yml files.
There are multiple actions available on the marketplace, or you can define your own. If you already have actions configured, create the file described below and commit it to the main branch. If you do not have any action already configured, go to your repository and click Actions:

Then click set up a workflow yourself:

Next, commit the following file: validate-content.yml
name: Validate File Content

on:
  push:
    branches:
      - '*'
  pull_request:

jobs:
  validate-content:
    runs-on: ubuntu-latest

    steps:
      - name: Checkout repository
        uses: actions/checkout@v2

      - name: Search for "password" in text files
        run: |
          forbidden_word="password"
          files_with_forbidden_word=$(grep -rl "$forbidden_word" . --exclude=validate-content.yml --exclude-dir=.git || echo "")

          if [ -n "$files_with_forbidden_word" ]; then
            echo "Commit rejected: Found the word '$forbidden_word' in the following files:"
            echo "$files_with_forbidden_word"
            exit 1
          else
            echo "No files found with the forbidden word."
          fi
Using Unix commands and a simple grep command, we will search for the word “password” in the files. You can add more words or variations to the code using the forbidden_word variable. As stated earlier, as long as you can code it, you can validate it. Your file should look like this:

Now, commit it. As soon as you commit it, the action will trigger with every file we commit, as you can see in the code. The .git directory and the validation file are excluded from the scan.
Testing It!
Now, we can commit a file with an obvious password on it:

Once we commit it, the workflow will run. After a few seconds, we will see it fails:

If we look at the details, we can see that the word “password” has been detected and the workflow failed:

We can go back to the file, remove that line, and commit again:

We can see that the workflow is successful this time:

A Few Things You May Have Already Noticed
This current solution will not validate for pwd or secretkey or something similar since we did not configure the file to do that. Also, even proper secure variables like password = env.secretpwd will be detected since we only search for the words in the files. Nothing prevents the developer from using another variable name like p_assword = P$ss1234 or MySupersecret = P$ss1234, since this will not capture them. For all those issues, you must modify the files using your own patterns, rules, secret words, or regular expressions.
Also, even if proper secure variables are captured, you can enforce a human review for failed workflows to make sure that detected variables are properly secured before committing to the Main branch.
You can enforce human reviews on failed workflows or rejected merges with other branches using branch protection rules, and are available for Public repositories with GitHub Free and GitHub Free for organizations and in public and private repositories with GitHub Pro, GitHub Team, GitHub Enterprise Cloud, and GitHub Enterprise Server.
If your repository is eligible for branch protection rules with your workflow up and running, go to Settings, select Branches, and then Add branch protection rule:

For branch name patterns, use an *, and it will validate all branches:

To enable validation checks to pass before merging, scroll down and locate Require status checks to pass before merging and check it:

Next, use the text field to add the checks you want to enforce:

Type the name of the check we created earlier in this tip, i.e., validate-content:

Note: You can type any number of checks you want to enforce if you have more than one configured.
To enable approvers before merging, enable Require a pull request before merging option, and enable Require approvals:

You can select the number of approvals you need; the default is one.
Once done, click Create to put the rule place:

Notice that the rule is not enforced since I used a Private repository on a Free tier.
Option 3: Git Hooks
- Pros: They prevent commits if the validations are not successful. If you can imagine and code it, you can validate it.
- Cons: They must be configured on the client side using Git. They are not fully supported using GitHub or completely ignored if you commit via the website.
Git Hooks are outside of the scope of this tip, but you can learn more about Git Hooks here.
Next Steps
- Check out GitHub Actions documentation.
- Check out security features available on different GitHub tiers.
- This action can work with other actions configured on your repository so that you can chain multiple action files, such as validations or IaC deployments.

Eduardo Pivaral is an MCSA, SQL Server Database Administrator and Developer with over 15 years of experience working in large environments.
- MSSQLTips Awards: Trendsetter (25+ tips) – 2020 | Author of the Year Contender – 2019 | Rookie of the Year – 2018
