Problem
In this tip, we will review different ways to download and install PostgreSQL—on different Linux flavors and containerized on Docker. We will also take a look at the main parameters that can be modified to configure it.
Solution
Download and Install PostgreSQL on Ubuntu
The first setup that we will review is the one on Ubuntu Linux, one of the most common Linux distributions. The first step for all installations (except for containers) is to go to the PostgreSQL download page.
From this page, we chose the Linux icon, and then Ubuntu:

Or to save some time, go directly to the Unbuntu download page.
Here, we have all the scripts to download and install PostgreSQL:
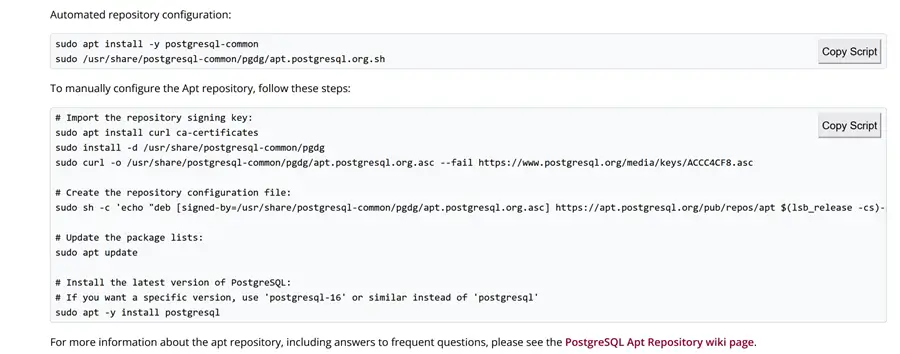
My suggestion is to copy these scripts and complete the installation from the downloaded and updated repository in order to choose the version of PostgreSQL and have the latest one available.
That’s it…very simple!!
Now the interesting part comes with the configuration of PostgreSQL. But first, let me show the setup on another Linux distribution and on Docker!
Install PostgreSQL on RedHat
With RedHat, the steps are different. We need to always download and install, but in this case, the PostgreSQL database cluster is not initialized. Similar to Ubuntu, here is the RedHat download page to download PostgreSQL.
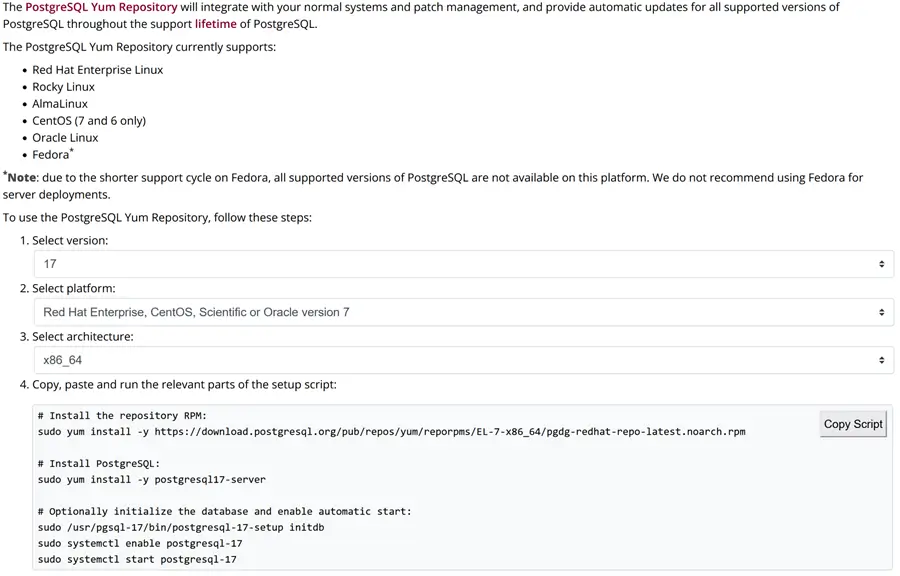
In this case, we must fill in the form with the desired PostgreSQL version and RedHat OS platform. The page then automatically creates all the scripts needed to download and install PostgreSQL. The last script with the command initdb initializes the PostgreSQL Cluster, creating the Postgres system database and all the objects. The initdb command has several options and parameters in it that can be used to further personalize our PostgreSQL cluster from the beginning. Let’s dive in briefly!
The initdb Command
As the official documentation says, the initdb command is used to create the database cluster:
Creating a database cluster consists of creating the directories in which the cluster data will live, generating the shared catalog tables (tables that belong to the whole cluster rather than to any particular database), and creating the postgres, template1, and template0 databases.
Basically, it prepares the environment to be used, like I was saying above. There are several parameters that can help us set up our PostgreSQL Cluster.
One of the most used and most important parameters is the -D, which allows us to specify a data directory where all our database files will be stored. For example:
initdb -D /PGDATAThis specifies a volume /PGDATA as our data directory. It is important to ensure that the Postgres user has all permissions on this directory. So, prior to launch, the initdb command better issue a:
chown postgres:postgres /PGDATAThis gives ownership of this specific directory to OS user postgres. It is also advisable to set permissions to this data directory to 700 in order to prevent other users from accessing the sensitive cluster data:
chmod 0700 /PGDATAImportant Parameters
Other very important parameters are the one regarding the Write Along Log (WAL):
- -X identifies the directory in which WAL files are stored. It is good practice to separate WAL files from data files (transaction log from data for SQL Server folks!).
- –wal-segsize= gives the possibility to specify a different size for the WAL files segments, the default being 16 Mb. But in a busy transactional environment, this can lead to a very high number of segments. Thus, having a larger size can help the performance of our PostgreSQL cluster.
- –wal-level is used for replication purposes. By default, a cluster is initialized with wal_level = replica, which is enough for starting a physical replica, but not a logical (transactional replica). In this case, we need it at logical. It identifies the level of transaction log, in PostgreSQL WAL. This parameter can be changed modifying the postgresql.conf configuration file. Anyway, it requires a restart of the cluster to be applied.
For example, we can set our database from the beginning with:
initdb -D /PGDATA -X /PGWAL --wal-segsize=32 --wal-level=logicalThis sets a distinct directory for data and WAL, which is recommended. By the way, a WAL segment size of 32 Mb instead of the default 16 and the WAL level to logical.
Install PostgreSQL Official Docker Image
This is the easiest of all the installations. We have already downloaded and installed on our Docker environment and we can use our own Windows machine.
In this case, we need to search for the PostgreSQL official image from our Docker Desktop and do a pull request:

Once we finish downloading, we will find the newer image in the Images tab:

And we can run the image creating a container, open the optional settings, and add a container name, a port, and a password for the Postgres superuser:

Hit Run and we will have a PostgreSQL cluster initialized and ready for use:

Checking on the container page, we can see it:

At this point, we can connect to it from our pgAdmin specifying the port that we mapped on the container and the Postgres password that we choose:

And here we have our new PostgreSQL cluster:

Now it is time to change the settings of our PostgreSQL cluster. Let me introduce you to two very important configuration files: pg_hba.conf and postgresql.conf.
Configuring Access to PostgreSQL Cluster using pg_hba.conf
The configuration file pg_hba.conf is responsible for all the access setup to PostgreSQL cluster. In it we can find all the parameters for limiting or giving access. This file is automatically created with the PostgreSQL initialization (initdb) together with the other configuration file postgresql.conf. It can be found in the installation directory. So, if we have specified in our initdb a directory like in the example above, we will found pg_hba.conf under /PGDATA. Otherwise, the default location of both pg_hba.conf and postgresql.conf is under: /etc/postgresql/16/main, with the number 16 representing the PostgreSQL version.
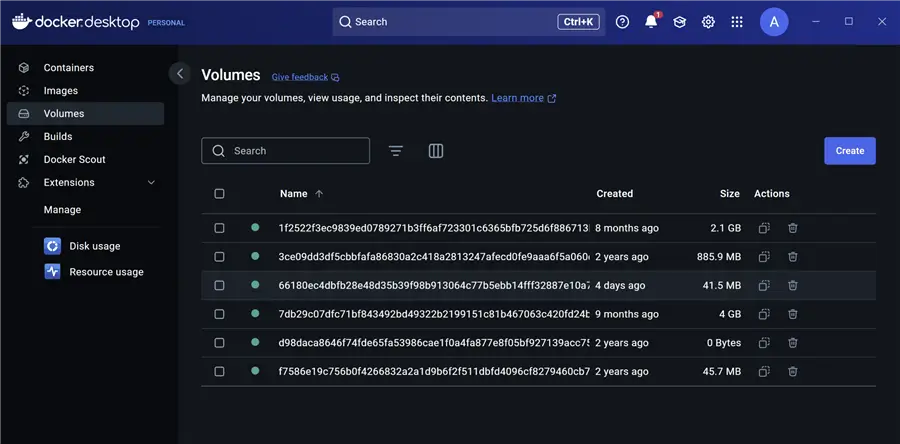
In case of a Docker installation, the files will be found on the persisted volume of the container – in this case, a Windows 10 with latest version of Docker Desktop: \\wsl$\docker-desktop\mnt\docker-desktop-disk\data\docker\volumes\66180ec4dbfb28e48d35b39f98b913064c77b5ebb14fff32887e10a749119394\_data
In general, under volumes, we can find all our Docker persisted volumes. Here our volume started with the PostgreSQL official images; we can see also from Docker Desktop under the Volumes page:
Review the pg_hba.conf File
Now, back to our pg_hba.conf file that we can open with a text editor (like Notepad++):

The first part is a good explanation of this file, but what interests us lies at the end of the file:

Here we have all the authentication management for our PostgreSQL cluster. Each line gives us an authorized host in case of TCP/IP connection and an authentication method. Local is for Unix domain socket connections only, as written in the comment. Type can be host or local only. The column DATABASE can be used to restrict access to only one database or list of databases. In the case of the last three rows of the default, it is used for replication, in order to allow it. USER has the same purpose – to allow only selected users or all. ADDRESS is the IP address of the host.
METHOD is the authentication method, with trust allowing connections unconditionally so even without providing a password. The last line added means that it allows connection from all hosts to all databases, for all users providing a password using scram-sha-256 encryption. In the default entries, there are one for IPv4 and one for IPv6, allowing connections from localhost without using a password. That should be modified for production environments.
Review pg_hba_file_rules
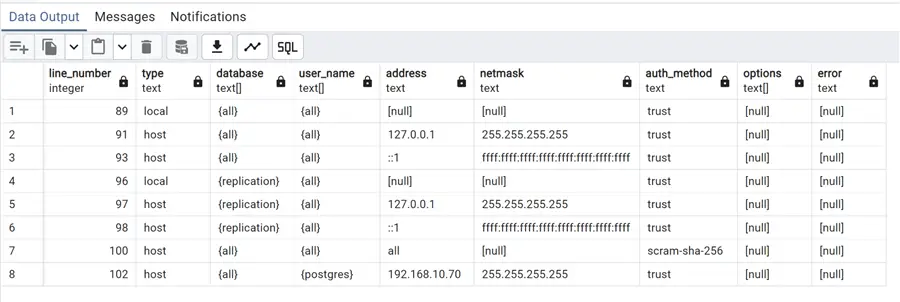
All the information can also be checked directly from the PostgreSQL cluster using the view pg_hba_file_rules. Let’s see an example from the same source:
--MSSQLTips.com

select *
from pg_hba_file_rules;
As we can see, it is possible to also add to the records the netmask for the IP address and options for the authentication method. The last column, error, is very important as it indicates if the row cannot be processed and the reason.
For example, if we add a new row to the file pg_hba because we want to grant access from a specific IP address, using superuser postgres, without any password:

We must save the file and reload the configuration in order to apply the changes. But prior to this, let’s check the view with the same query above again:

We can see that our new rule is not acceptable because we did not write it properly as we need to specify a netmask if we write an IP Address; otherwise the next column is interpreted as the mask, in this case trust.
So, let’s rewrite the row:

And check it again in the view:
Now it can be applied. In this case, we will restart the Docker container:

And this new authentication rule is now in place.
Let’s check the most important configuration file, where all parameters of our PostgreSQL cluster can be specified and modified: postgresql.conf!
Configuring PostgreSQL Cluster using postgresql.conf
In the same location on which we found pg_hba.conf, we can also find the configuration file that contains all the parameters of our PostgreSQL Cluster: postgresql.conf.

We have many analogies with pg_hba.conf files:
- # is used for comments.
- Parameters are case-insensitive.
- Normally stored in data directory.
- Initdb installs default copy.
But we have also some specific points:
- Some parameters only take effect on server restart (pg_ctl restart).
- One parameter per line.
- Use include directive to read and process another file.
- Can also be set using command line or GUI: basically any query window.
Modify postgresql.conf
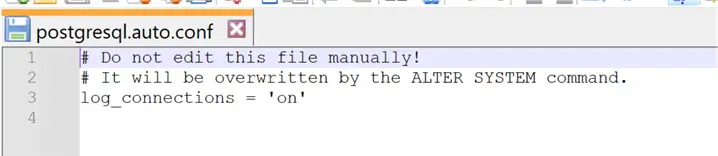
When we modify the postgresql.conf file, we change parameters at a cluster level. Bear in mind that the parameters can be also changed for a single database or at session level. This can be done using ALTER DATABASE in the first case or SET in the second. Instead, if we want to change the parameters at a cluster level, we can use ALTER SYSTEM command without editing postgresql.conf. ALTER SYSTEM writes the new settings to the postgresql.auto.conf file, which is read last during server restarts and overrides postgresql.conf. The location of this last file is the same as the other configuration ones.
Let’s do a couple of modifying parameters at cluster level examples with both techniques and at the same time, we will see different ways to read these parameters:
Two very important parameters are in the CONNECTIONS AND AUTHENTICATION section.

The first is the listen_addresses which is already set at ‘*’ thus accepting connections from any addresses. This is independent from what we have set in pg_hba.conf file. The other is the max_connections that we can raise to 200. Notice that all these parameters require a restart of the cluster in order to apply:

Now we need to restart our docker and check:

In order to check the parameter, we can issue a simple SHOW command:
--MSSQLTips.com

show max_connections;
We have a lot of sections and parameters that we can edit with postgresql.conf. An example would be the memory settings for the various maintenance and autovacuum workers, but also query planning, WAL, and log settings. So, we can control a lot of behaviors from postgresql.conf!
pg_stat_statements for Query Statistics and Executions
Let’s do another example. One of the most important PostgreSQL extensions is pg_stat_statements that give us the possibility to effectively monitor query statistics and executions in PostgreSQL. I will return to this subject in a future article. In order for this extension to work, we need to add pg_stat_statements to the shared_preload_libraries because it requires additional shared memory. We find this parameter in the CLIENT CONNECTION DEFAULTS section:

Changed pg_stat_statements, so we need to restart PostgtreSQL in order to apply it.

We can now create the extension in the PostgreSQL cluster.
--MSSQLTips.com

create extension pg_stat_statements;
Another very important group of parameters is the one controlling AUTOVACUUM. If you remember in my tip about it, we modified these parameters at table level: PostgreSQL VACUUM, AUTOVACUUM and ANALYZE Processes.
Anyway, this can be done also at the cluster level in postgresql.conf:

log_connections
Let’s do another example now on the log section, this time using ALTER SYSTEM statement. First, we check the parameter log_connections in another way - using pgAdmin GUI.
From the Dashboard tab, we take the configuration subtab:

Easily we can see all the parameters of our selected PostgreSQL cluster. Also, we have the ability to search for specific ones. In this case, we see that the log_connections parameter is set to off, thus we are not logging every session successful connection. This is the default behavior. We can now change it:
--MSSQLTips.com

alter system set log_connections='on';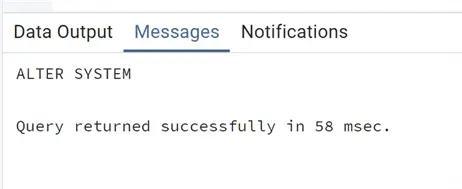
Again, we can check the parameters after a restart:

We can see that the log_connections parameter is now set to on. We can also check postgresql.conf and postgresql.auto.conf files to see that in the first there are no modifications:

While in the other file we have the parameter override as expected:
Conclusion
In this tip, we discussed how to download, install and setup a PostgreSQL cluster, paying particular attention to its configuration using parameters and configuration files.
Next Steps
As always, below are links to PostgreSQL official documentation:
- initdb command
- pg_hba.conf file
- pg_hba_file_rules view
- postgresql.conf file and in general setting parameters
Additionally, here are some links to other tips regarding installation of SQL Server components:
- SSRS 2022 Install, Setup and Configuration
- Install SQL Server 2022 on Windows Server 2022 Failover Cluster WSFC
- Setup SQL Server and Docker on a MacBook

Andrea Gnemmi is a Database and Data Warehouse professional with almost 20 years of experience, having started his career in Database Administration with SQL Server 2000.
His expertise ranges from SQL Server to Oracle and Postgres for database administration and from SAP BO to SSIS, SSRS and Power BI regarding BI and ETL.
He has worked both in SQL Server and Oracle mostly in multinational environments with very high transaction volumes and large datasets. Performance tuning, indexing techniques and in general Database administration are his hot topics. Ensuring a 24/7 uptime of the various databases in shop is his main responsibility, as well as the best possible performances of all queries run on the databases. He has started working with PostgreSQL two years ago loving many of the features of this RDBMS.
- MSSQLTips Awards: Trendsetter (25+ tips) – 2024 | Rookie of the Year – 2021


