Overview
In the previous parts of the tutorial, we’ve covered all the building blocks for a pipeline: linked services, datasets and activities. Now let’s create a pipeline from scratch.
Explanation
Prerequisites
We’ll be using objects that were created in the previous steps of the tutorial. If you haven’t created these yet, it is best you do so if you want to follow along.
We will be reading the Excel file from the Azure blob container and store the data in a table in the Azure SQL database. We’re also going to log some messages into a log table.
When logged in into the database, execute the following script to create the destination table:
DROP TABLE IF EXISTS dbo.Tutorial_Excel_Customer;

CREATE TABLE dbo.Tutorial_Excel_Customer(
   [Title] [NVARCHAR](10) NULL,
   [FirstName] [NVARCHAR](50) NULL,
   [MiddleName] [NVARCHAR](50) NULL,
   [LastName] [NVARCHAR](50) NULL,
   [Suffix] [NVARCHAR](10) NULL,
   [CompanyName] [NVARCHAR](100) NULL,
   [EmailAddress] [NVARCHAR](250) NULL,
   [Phone] [NVARCHAR](25) NULL
);
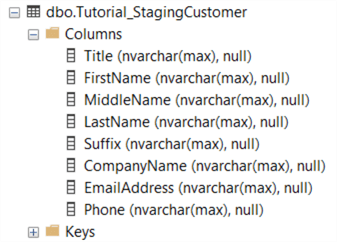
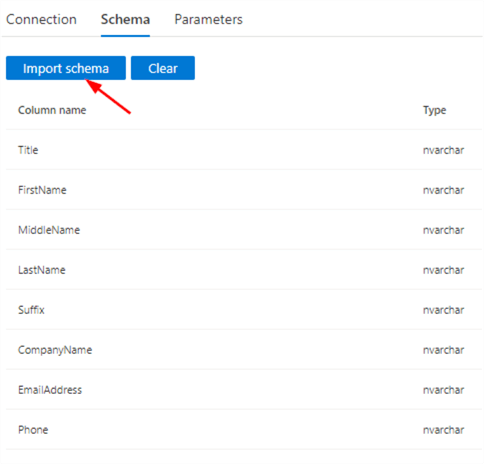
We’re explicitly creating the table ourselves, because if ADF reads data from an semi-structured file like Excel or CSVs, it cannot determine the correct data types and it will set all columns to NVARCHAR(MAX). For example, this is the table that was created with the Copy Data tool:
We’re also going to create a logging table in a schema called “etl”. First execute this script:
CREATE SCHEMA etl;
Then execute the following script for the log table:
CREATE TABLE etl.logging(
     ID         INT IDENTITY(1,1) NOT NULL
    ,LogMessage VARCHAR(500) NOT NULL
    ,InsertDate DATE NOT NULL DEFAULT SYSDATETIME()
);
Since we have a new destination table, we also need a new dataset. In the Author section, go to the SQL dataset that was created as part of the Copy Data tool (this should be “DestinationDataset_eqx”). Click on the ellipsis and choose Clone.
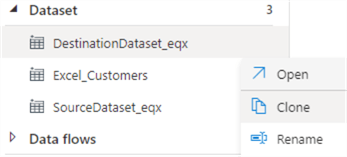
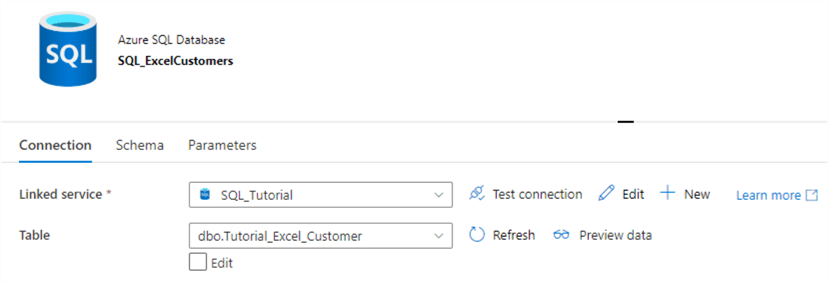
This will make an exact copy of the dataset, but with a different name. Change the name to “SQL_ExcelCustomers” and select the newly created table from the dropdown:
In the Schema tab, we can import the mapping of the table.
Publish the new dataset.
Building the Pipeline
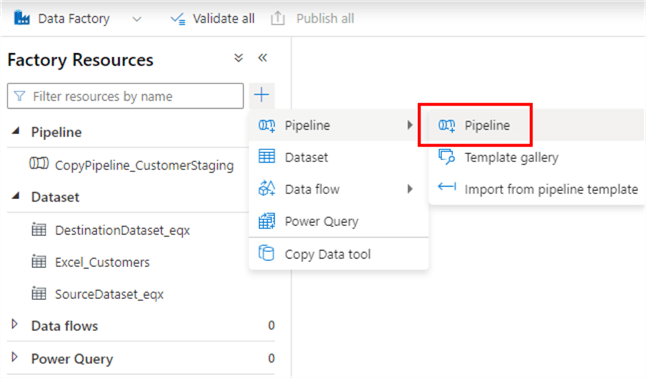
Go to the Author section of ADF Studio and click on the blue “+”-icon. Go to pipeline > pipeline to create a new pipeline.
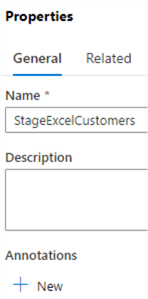
Start by giving the new pipeline a decent name.
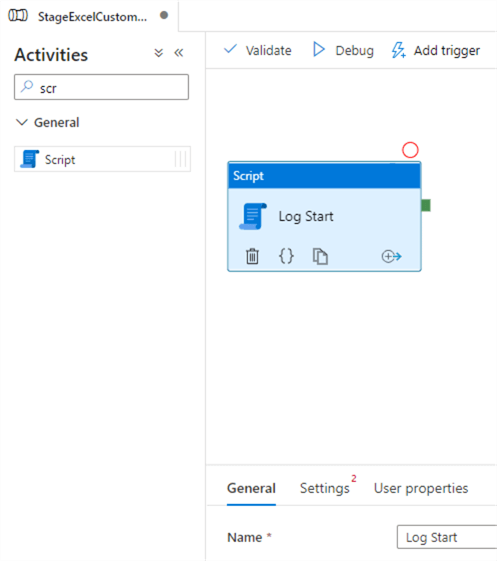
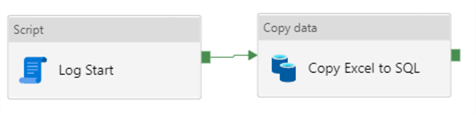
Next, add a Script activity to the canvas and name it “Log Start”.
In the General tab, set the timeout to 10 minutes (the default is 7 days!). You can also set the number of retries to 1. This means if the Script activity fails, it will wait for 30 seconds and then try again. If it fails again, then the activity will actually fail. If it succeeds on the second attempt, the activity will be marked as succeeded.

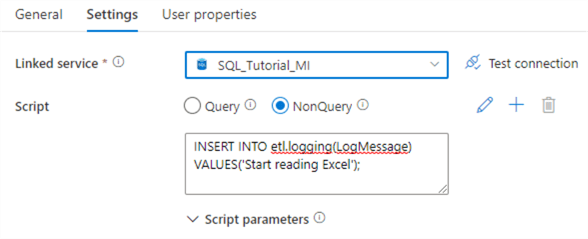
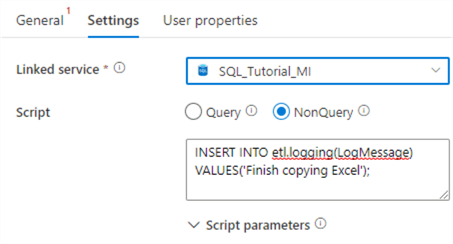
In the Settings tab, choose the linked service for the Azure SQL DB and set the script type to NonQuery. The Query option means the executed SQL script will return one or more result sets. The NonQuery option means no result set is returned and is typically used to execute DDL statements (such as CREATE TABLE, ALTER INDEX, TRUNCATE TABLE …) or DML statements that modify data (INSERT, UPDATE, DELETE). In the Script textbox, enter the following SQL statement:
INSERT INTO etl.logging(LogMessage)
VALUES('Start reading Excel');
The settings should now look like this:
Next, drag a Copy Data activity to the canvas. Connect the Script activity with the new activity. Name it “Copy Excel to SQL”.
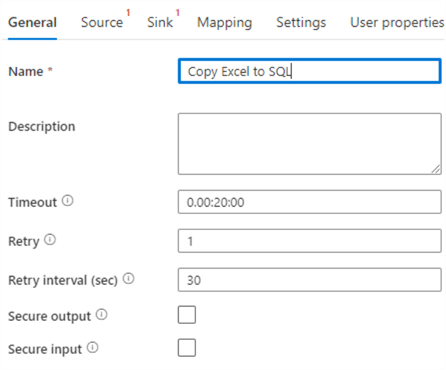
In the General tab, change the timeout and the number of retries:
In the Source tab, choose the Excel dataset we created earlier. Disable the Recursively checkbox.
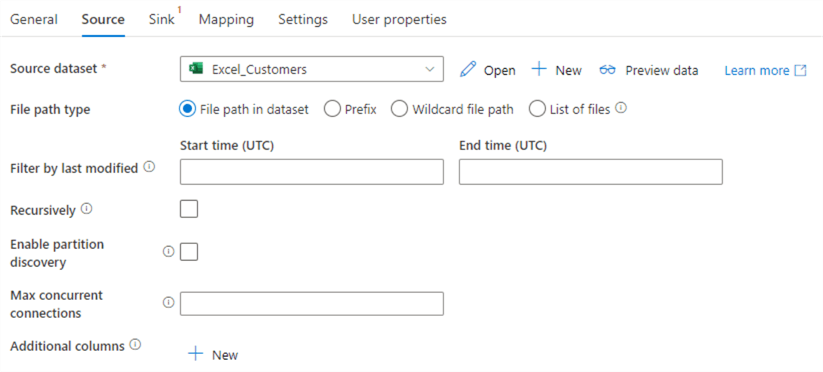
In this example we’re reading from one single Excel file. However, if you have multiple Excel files of the same format, you can read them all at the same time by changing the file path type to a wildcard, for example “*.xlsx”.
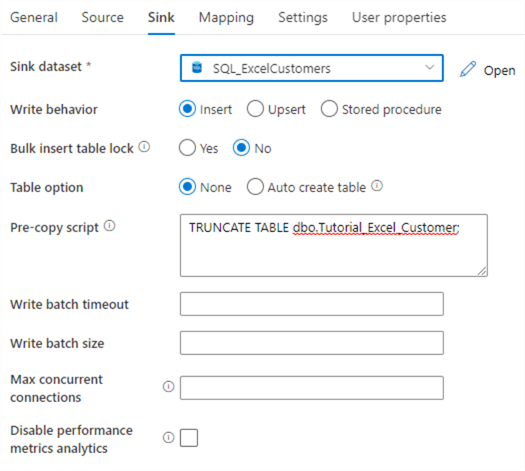
In the Sink tab, choose the SQL dataset we created in the prerequisites section. Leave the defaults for the properties and add the following SQL statement to the pre-copy script:
TRUNCATE TABLE dbo.Tutorial_Excel_Customer;
The Sink tab should now look like this:
In the Mapping tab, we can explicitly map the source columns with the sink columns. Hit the Import Schemas button to let ADF do the mapping automatically.
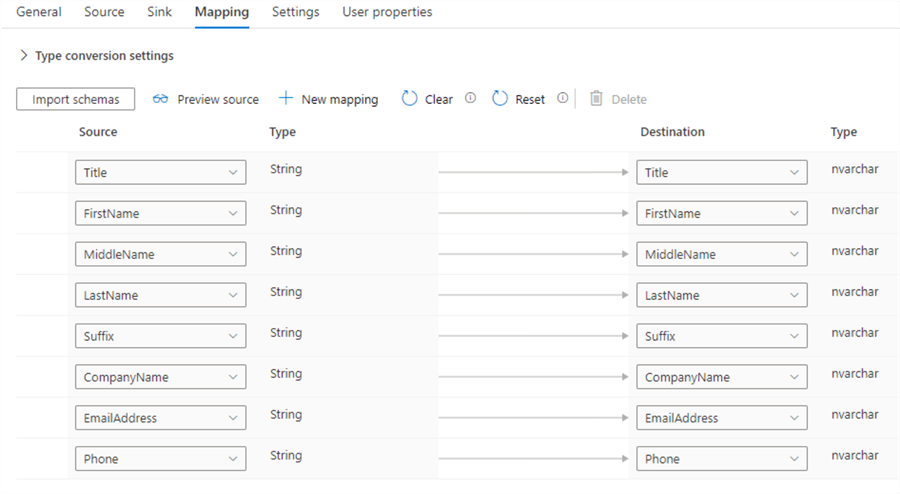
In this example, doing the mapping isn’t necessary since the columns from the source map 1-to-1 to the sink columns. They have the same names and data types. If we would leave the mapping blank, ADF will do the mapping automatically when the pipeline is running. Specifying an explicit mapping is more important when the column names don’t match, or when the source data is more complex, for example a hierarchical JSON file.
In the Settings tab we can specify some additional properties.
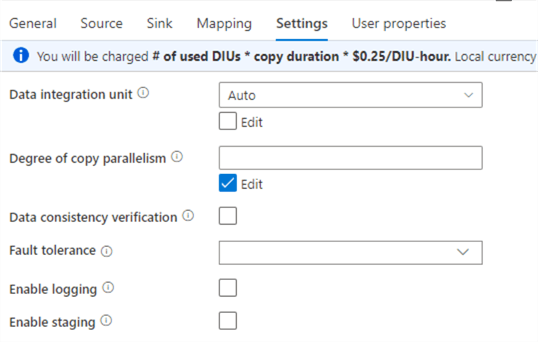
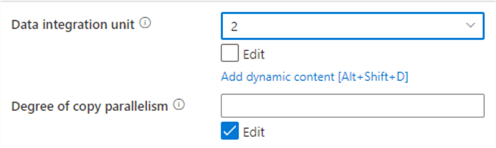
An important property is the number of data integration units (DIU), which are a measure of the power of the compute executing the copy. As you can see in the informational message, this directly influences the cost of the Copy data activity. The price is calculated as $0.25 (this might vary on your subscription and currency) * the copy duration (remember this is always at least one minute and rounded up to the next full minute!) * # used DIUs. The default value for DIU is set to Auto, meaning ADF will scale the number of DIUs for you automatically. Possible values are between 2 and 256. For small data loads ADF will start with minimum 4 DIUs. But, for a small Excel file like ours this is already overkill. If you know your dataset is going to be small, change the property from Auto to 2. This will reduce the price of your copy data activities by half!
As a final step, copy/paste the Script activity. Change the name to “Log End” and connect the Copy Data activity with this new activity.

In the Settings tab, change the SQL script to the following statement:
INSERT INTO etl.logging(LogMessage)
VALUES('Finish copying Excel');
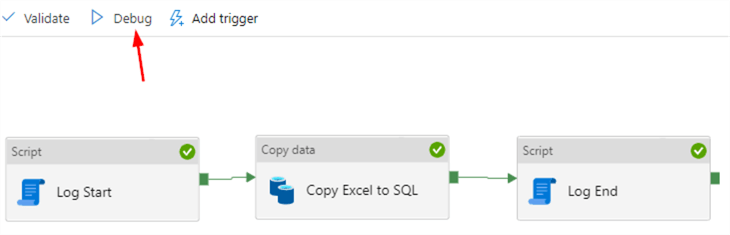
The pipeline is now finished. Hit the debug button to start executing the pipeline in debug mode.
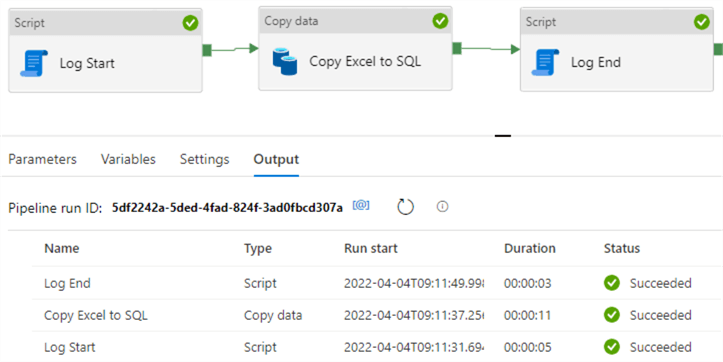
After a while the pipeline will finish. You can see in the Output pane how long each activity has been running:
If you hover with your mouse over a line in the output, you will get icons for the input & output, and in the case of the Copy Data activity you will get an extra “glasses” icon for more details.

When we click on the output for the “Log End” activity, we get the following:
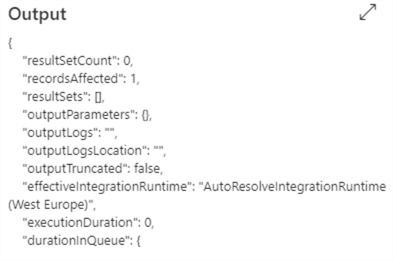
We can see 1 row was inserted. When we go to the details of the Copy Data, we get the following information:
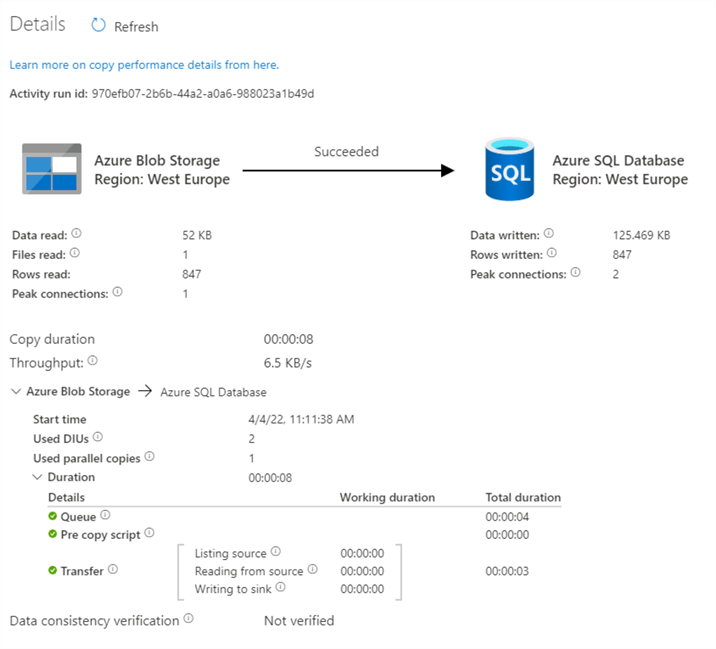
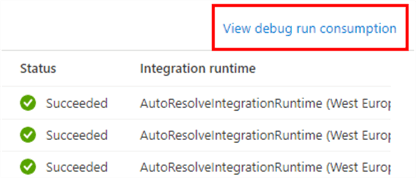
A lot of information has been kept, such as the number of rows read, how many connections were used, how many KB were written to the database and so on. Back in the Output pane, there’s link to the debug run consumption.
This will tell us exactly how many resources the debug run of the pipeline consumed:
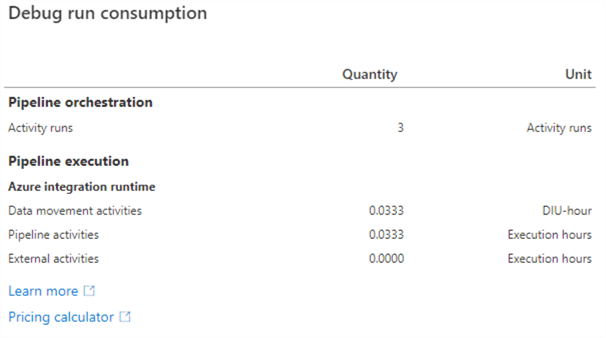
0.0333 corresponds with two minutes (1 minute of execution rounded up * 2 DIU). Since our debug run was successful, we can publish everything.
Why do we need to Publish?
When you create new objects such as linked services, datasets and pipelines, or when you modify existing ones, those changes are not automatically persisted on the server. You can first debug your pipelines to make sure your changes are working. Once everything works fine and validations succeeds, you can publish your changes to the server. If you do not publish your changes and you close your browser sessions, your changes will be lost.
Additional Information
- You can read about some more complex features of the Copy Data activity in the tip Managing schema drift within the ADF copy activity.
- More tips about pipelines:

Koen Verbeeck is a seasoned business intelligence consultant with over a decade of experience with the Microsoft Data Platform. He holds several certifications, including Azure Data Engineer. He’s a prolific writer, with over 375 articles on technologies such as Microsoft Fabric, SSIS, ADF, SSAS, SSRS, MDS, Power BI, Snowflake and Azure services. He has spoken at various events such as PASS, SQLBits, dataMinds Connect and many others. He frequently delivers educational webinars on MSSQLTips.com. For his efforts, Koen has been awarded the Microsoft MVP data platform award for many years.
- MSSQLTips Awards:
- Leadership Award (200+ Tips) – 2021
- Author of the Year – 2014/2020/2022
- Author Contender – 2024/2025