By: Bru Medishetty | Comments (6) | Related: 1 | 2 | 3 | 4 | > Tools
Problem
I am a SQL Server Database Administrator responsible for multiple SQL Servers. To perform administrative tasks on these SQL Servers, I login to those servers, using Remote Desktop. In doing so, my desktop is overlapped with the remote Server's desktop. This causes an inconvenience for me to access the active programs on my workstation. I would like to perform as much SQL Server administration as possible from my workstation and avoid using Remote Desktop as much as possible. Do you have any suggestions?
Solution
To perform some administrative tasks such as starting and stopping SQL Server, change the SQL Server startup type and change the logon on account, you can use the services snap-in from your local machine. There are multiple ways to launch the services snap-in. You can click on the Start button and in the search box, type services.msc and press the Enter key. You can also open the Services snap-in from Administrative Tools.
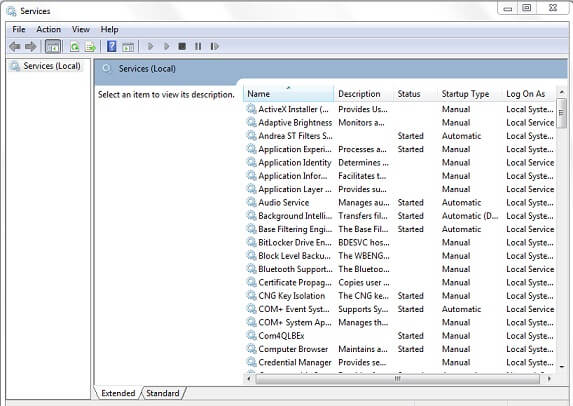
Since SQL Server is installed as a service on the Windows Server, it is possible to administer few things related to SQL Server from Services console. The image displayed below is of the Services MMC snap-in displaying the services of the local machine. You can identify this by looking at Services (Local) in the left section of the snap-in.
Logging on to Services of a Remote System
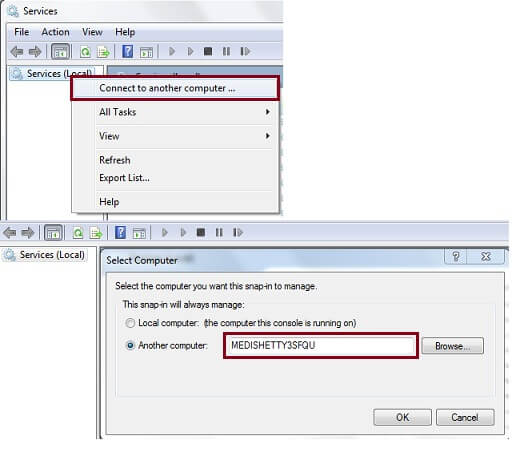
As shown in the picture below, right click on the Services (Local) and from the pop-up menu choose Connect to another computer.... Then a dialog box is displayed, where you can select the option: "Another computer" and there you can type in the name of the Remote Windows Server on which SQL Server is installed. You can also browse for the remote server by choosing browse.
The remote system's services are displayed in the Services snap-in, which can be found looking at the Services (Remote System Name) on the left side of the snap-in. The image displayed is the list of services that are currently configured on the remote server. Scroll down the services list in order to display the services related to SQL Server. Notice that there are 4 named instances of SQL Server, with its respective SQL Server Agent and other SQL Server components such as Full Text Search, Analysis Services, Reporting Services, etc.
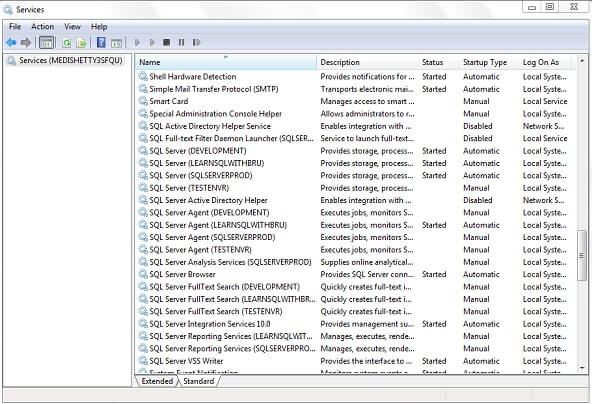
You can monitor the Status, Startup Type and the Log On account information for the SQL Server Services and modify the respective settings from the Services snap-in. Let's see how we can take care of each of those items in the sections below.
Starting SQL Server
You can connect to a SQL Server from Management Studio only if the SQL Server instance is started. One way to start the service is by using the Services.msc application. In the Services.msc application, right click on SQL Server service which needs to be started (in this case the SQL Server TESTENVR).
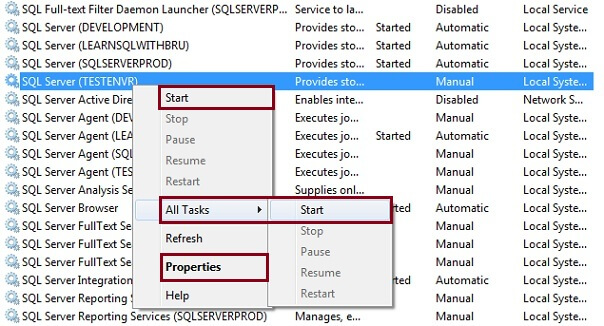
You can start a SQL Server from the popup menu by choosing start or choosing All Tasks and then Start. The other menu options cannot be chosen, since they are context sensitive. That is, if you right click on a SQL Server Service which is currently running or whose status is started, the other menu options such as Stop, Pause and Restart would be enabled and available to choose.
This way the SQL Server can be started, stopped, paused, resumed or restarted depending on its current status.
Changing the startup type of a SQL Server Service
The image in the previous step has a menu option "Properties", which can be used to look at how that SQL Server service is configured and if needed can be modified. This step starts with choosing the properties option in the above displayed screen.
The below displayed properties box is displayed when the Properties option is chosen, "General" tab is displayed by default. In this tab, general properties of the service are displayed, such as the Service name, Display name, Description, location of the executable for the service and the current startup type is displayed, in this case it is "Manual". If this service has to start automatically with Windows Server, then we need to set that option here by choosing "Automatic" from the dropdown list.
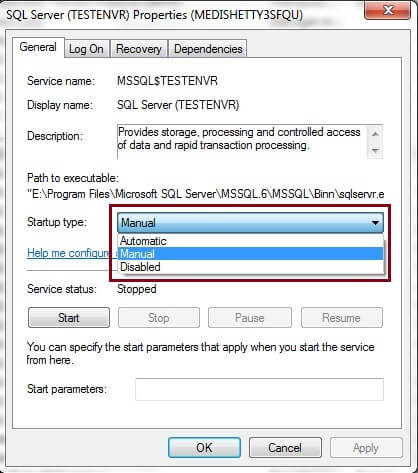
Notice that you have options to Start, Stop, Pause and Resume from this dialog box also. When done with choosing the startup type, click OK button for the settings to be saved.
Changing the log on account for a SQL Server
In order to review the Log on Account details for the SQL Server service, click on the "Log On" tab from the properties dialog box. In this example, I am changing the current Log on account to a specific service account which is a local account on the machine, so I selected the option "This account" and typed in the account name, password and retyped the password.
If the account is a domain account, it needs to be in the format of Domain\AccountName. Here in this example it is .\AccountName and the "." indicates it is the local machine domain.
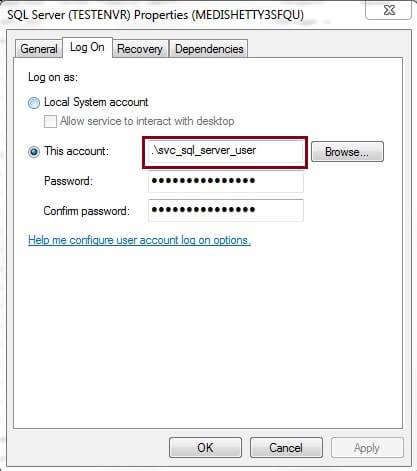
Once all the changes are done, click "OK" for all the changes to be saved and will be effective from the next time that service starts. The image displayed below shows that the settings which we have made such as the startup type and the log on account.

Next Steps
- For Administering Servers with SQL Server Management Studio Books Online
- For Managing Services How-to Topics (SQL Server Configuration Manager) Books Online
About the author
 Bru Medishetty focuses on Performance Monitoring and Tuning as well as planning and implementing Disaster Recovery solutions.
This author pledges the content of this article is based on professional experience and not AI generated.
View all my tips


