Problem
You need to connect to a SQL Server instance using sqlcmd. At first it seems to be an easy task, but sometimes things can get complicated. To mention a few of these things: How do you connect to a SQL Server instance that does not listen on a TCP port? How do you connect to a SQL Server instance if your host machine cannot resolve the server DNS? What about named instances? Keep reading this tip, so you can answer these questions.
Solution
Those of us that have been in the SQL Server world for many years often disregarded sqlcmd. Let’s face it; we are used to graphic user interfaces, like SQL Server Management Studio (SSMS). But now that SQL Server has entered the Linux world we must adapt to use the command line, usually referred to as a shell amongst the Linux community.
We need to get used to seeing more SQL Server instances on Linux in the coming years. Usually production Linux servers do not have a graphical interface and there is no Remote Desktop Connection, so everything is done within a SSH connection.
SQL Server Connection Protocols
SQL Server allows three different connection protocols that I will describe later in this tip:
- TCP/IP
- Named Pipes
- Shared Memory
When we connect to a SQL Server instance using SSMS, we just enter the server name in the log in screen, select the authentication method and then connect and then we can start using SSMS.
If we want to use a specific protocol when connecting with SSMS we just need to select the appropriate protocol from a combo box like on the image below.

But when we use the console to connect and need to use a specific protocol, we must do this without a combo box.
Connecting with sqlcmd using a Specific Protocol
Most of the time when we connect to a SQL Server instance we don’t specify a protocol and you may think that you are using the TCP/IP protocol. Well, let me tell you that if you don’t specify the connection protocol then you don’t have a guarantee that you are using TCP/IP. There is a protocol order that SSMS and sqlcmd have which is determined by the protocol order in SQL Server Configuration Manager.
On the following image I show you my protocol order. But there is something really important! Please realize that there are two Client Configurations. One is for 32 bit applications and the other is for 64 bit applications. This is especially important if you are using SQL Server Integration Services, because you may be using a 32 bit connector, but if the package runs on 64 bit version and you haven’t configured the 64 bit settings, the package will fail.

SQL Server TCP/IP Connection with sqlcmd
TCP/IP is well known to us. In order to connect to a SQL Server instance using the TCP/IP protocol you need the server’s IP address or the host name and the listening port if your instance doesn’t run on the default port.
We just need to specify the server name or its IP address and in some cases the port number. The following is the general syntax to connect using TCP/IP:
sqlcmd -S tcp:<computer name>,<port number>
Notice that we add tcp: prior to the server address. I mean, if you just enter an IP address you don’t have a guarantee that you will use the TCP/IP protocol. For example if you want to connect using the TCP/IP protocol to a server named SQL-A using SQL Server’s default instance with Windows Authentication, the syntax will be as follows:
sqlcmd -S tcp:SQL-A
If you want to use SQL Server authentication then you need to specify the user name and password as follows:
sqlcmd -S tcp:SQL-A -U sa -P Pa$$w0rd
When you cannot resolve the host name of the server you should use the IP address instead of the host name. In such case, all the previous commands will look like this assuming 10.10.10.10 is the server’s IP address:
sqlcmd -S tcp:10.10.10.10
sqlcmd -S tcp:10.10.10.10 -U sa -P Pa$$w0rd
For a named instance (in this case an instance named TEST) the previous commands are as follows:
sqlcmd -S tcp:SQL-A\TEST
sqlcmd -S tcp:SQL-A\TEST -U sa -P Pa$$w0rd
Also, you may need to specify the listening port. In such case you must specify the port after a comma. For example, suppose that my default instance uses port 1433 and the TEST instance runs on port 51613, then your connection string will be as follows:
sqlcmd -S tcp:SQL-A,1433
sqlcmd -S tcp:SQL-A,1433 -U sa -P Pa$$w0rd

sqlcmd -S tcp:10.10.10.10,1433
sqlcmd -S tcp:10.10.10.10,1433 -U sa -P Pa$$w0rd

sqlcmd -S tcp:SQL-A,51613
sqlcmd -S tcp:SQL-A,51613 -U sa -P Pa$$w0rd

sqlcmd -S tcp:10.10.10.10,51613
sqlcmd -S tcp:10.10.10.10,51613 -U sa -P Pa$$w0rd

SQL Server Named Pipes Connection with sqlcmd
A named pipe is a named, one-way or duplex pipe for communication amongst a server and a client. Internally, all instances of a named pipe have the same pipe name, but they keep their own buffers that allow message-based communication and client impersonation. Named Pipes relies on Inter Process Communication (IPC). There is something to note which is the fact that if you connect to a local instance using Named Pipes, that pipe will run in Kernel mode as a Local Procedure Call (LPC).
Usually this protocol is not used because when connecting to a remote SQL Server instance it is preferred to use the TCP/IP protocol. On the other hand, when connecting to a local instance Shared Memory is often the protocol of choice.
The syntax of a named pipe connection for the default instance is as follows:
\\[COMPUTER NAME OR IP ADDRESS]\pipe\sql\query
For example, a named pipe to the default instance of server MYSERVER will be like this:
\\MYSERVER\pipe\sql\query
On the other hand, the syntax for a named instance looks as follows:
\\[COMPUTER NAME OR IP ADDRESS]\pipe\MSSQL$[SQL Server Instance Name]\sql\query
As an example, if we want to use a named pipe to the SQL Server instance TEST on server SQL-A, the syntax will be like this:
\\SQL-A\pipe\MSSQL$TEST\sql\query
Connecting to a SQL Server instance by using the named pipes protocol is not too different than using TCP/IP. I can say that we must add np: prior to the server address, but it is incorrect or at least incomplete. When you connect using named pipes you don’t connect to a server. Instead you connect to a pipe, that’s why this protocol is called named pipes.
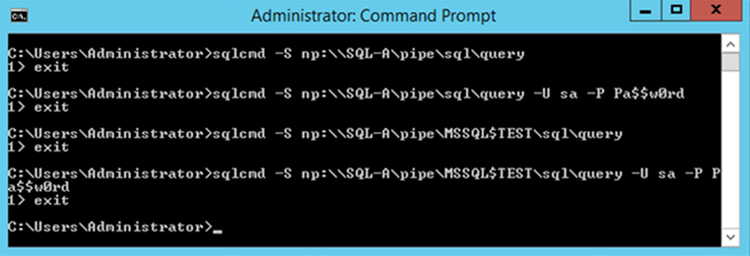
In the previous section I explained how to build a pipe, now in the following piece of code I will show you the way to connect to a SQL Server default instance and to a named instance using both Windows and SQL Server authentication.
sqlcmd -S np:\\SQL-A\pipe\sql\query
sqlcmd -S np:\\SQL-A\pipe\sql\query -U sa -P Pa$$w0rd
sqlcmd -S np:\\SQL-A\pipe\MSSQL$TEST\sql\query
sqlcmd -S np:\\SQL-A\pipe\MSSQL$TEST\sql\query -U sa -P Pa$$w0rd
SQL Server Shared Memory Connection with sqlcmd
This protocol only can be used when the client connecting runs on the local server. Basically it is a Local Procedure Call (LPC) that runs in Kernel Mode. Also, if we think about the previous explanation of named pipes, we can easily realize that shared memory is a special case of named pipes.
Something to note is that if you are using MDAC 2.8 or earlier, you cannot use the shared memory protocol. If you try to use this protocol, sqlcmd will automatically switch to the named pipes protocol.
If we think about it, the fact that MDAC 2.8 automatically translates shared memory to named pipes makes sense with the idea that shared memory is a special case of a named pipe.
The prefix to use Shared Memory is lpc:. Remember I told you that Shared Memory is a Local Procedure Call. In this case we don’t need to worry about if we are able to resolve the host name, shared memory only works locally and you will always resolve to the local server name.
sqlcmd -S lpc:SQL-A
sqlcmd -S lpc:SQL-A -U sa -P Pa$$w0rd
sqlcmd -S lpc:SQL-A\TEST
sqlcmd -S lpc:SQL-A\TEST -U sa -P Pa$$w0rd

Next Steps
- If this was the first time you heard of sqlcmd, my previous tip will serve as an introduction: Introduction to SQL Server’s sqlcmd utility.
- Check out this tip where we covered the basics on how to connect to SQL Server with sqlcmd: Connecting to SQL Server Using SQLCMD Utility.
- You can get more information about the connection protocols of SQL Server in this tip: Understanding SQL Server Net Libraries
- If you are running Linux then this tip will guide you to install sqlcmd: Install SQL Server Tools to Establish a Database Connection from an Ubuntu Server.
- You can also use sqlcmd in SQL Server Management Studio by using the sqlcmd mode: SQL Server Management Studio SQLCMD mode option.
- In case you need to audit the connection protocols allowed by each of your SQL Server instances, the following tip will serve as a starting point: Automated way to get all port information for SQL Server instances.

Daniel Farina was born in Buenos Aires, Argentina. Self-educated, since childhood he showed a passion for learning. He studied at Universidad de Buenos Aires. Daniel started working as a programmer at a young age. Over the years he specialized in databases, particularly SQL Server and Oracle. Now with 30 years of age, his work experience includes working with various technologies like VB, C, .NET, web development, Windows and Linux systems. He likes to read about science, psychology, philosophy and many other things. In his spare time, he trains powerlifting aiming to compete.
- MSSQLTips Awards: Author of the Year – 2018 | Champion (100+ tips) – 2018 | Author Contender – 2015-2017, 2019