By: Adam Bertram | Comments (2) | Related: > Azure SQL Database
Problem
One way that organizations are storing data in the cloud is by transferring typical database services to cloud providers. What once meant building an entire physical server, patching it, installing software like Microsoft SQL Server, tuning it to meet performance SLAs and managing it now is as simple as a couple keystrokes or mouse clicks to get access to a high-performance SQL database. The organization can now focus on developing a high-quality software product without having to worry about doing much managing of the backend.
One of the most popular cloud services is Microsoft Azure. Azure, although #2 in the cloud market, has been catching up to AWS as of late and now has a full lineup of cloud services. One of those cloud services is called Azure SQL Database. As you might have guessed, this is Microsoft's solution to providing a SaaS option for Microsoft SQL Server environments. It allows an organization to simply provision a database; not an entire server or SQL instance. Once an Azure SQL database has been provisioned and data is stored in it's tables, it can then be managed just like an on-premises SQL database through tools like SQL Server Management Studio. This works, but what if you need to routinely extract data from this database or the data inside is part of some external process that you need to automate? Typical GUI access won't cut it. This is when you need to focus on automation tools like Windows PowerShell.
By creating a PowerShell script just one time to access your Azure SQL database, this script will allow you to then plug this functionality in anywhere you'd like. To do this, you'll need to get your PowerShell code written and tested. This is what we'll be working on in this tip.
Azure SQL databases are essentially treated as equal to your traditional SQL databases. You can manage them exactly as you can your own on-premises SQL databases through SQL Server Management Studio. To manage both traditional SQL databases and Azure SQL databases through PowerShell requires a PowerShell module; the sqlps module. Although included with the SQL Server Management Studio already, there are times when you can't depend on the full software of Management Studio being installed. In this case, you'll need to install the just the bits you need.
Solution
To query any SQL database from PowerShell you need to have the SQLPS module installed along with a few supporting packages. I'm going to be focusing on the SQL Server 2012 packages in this tip. These will allow you to query your Azure SQL database. You will need:
- Microsoft® System CLR Types for Microsoft® SQL Server® 2012
- Microsoft® SQL Server® 2012 Shared Management Objects
- Microsoft® Windows PowerShell Extensions for Microsoft® SQL Server® 2012
Once you've got all three SQL components installed, it's now time to setup the Azure PowerShell prerequisite; the Azure PowerShell module. I'm not going to go through the step-by-step in this tip. Refer to the links for exact instructions.
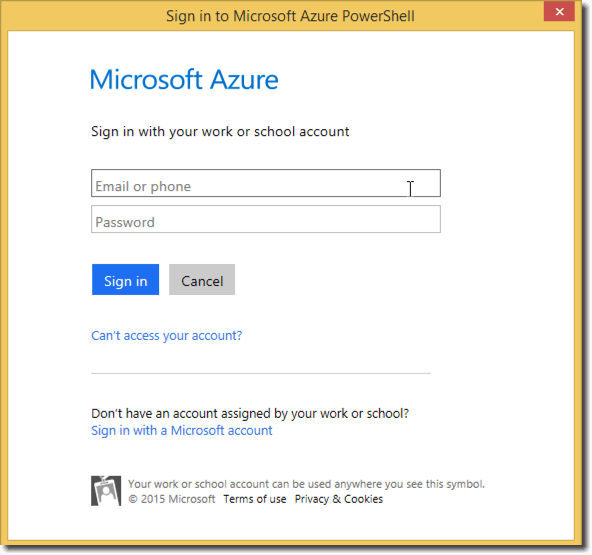
By this point, we now have the majority of the functionality available to query Azure SQL databases. It's now time to connect to our Azure subscription and associate our account in the current PowerShell session. To do this, we'll use the Add-AzureAccount cmdlet. Simply calling this by itself brings up a graphical box that prompts you to input your Azure email and password.

Once successful, you should then receive output that displays your user ID, subscription ID and tenant ID. If you see this, you've authenticated successfully!

Although this next step might have been set for other reasons, you must have a server firewall rule setup to allow incoming SQL connections from your client to your Azure SQL database. Again, you can do this via the Azure portal, but a couple lines in PowerShell will do it just as easily.
To do it via PowerShell, you'll need your Azure SQL database server name. To get this, you can use the Get-AzureSqlDatabaseServer cmdlet. You can see here that I have a single server called adamazuresql that I will need to use.
Get-AzureSqlDatabaseServer

Next, you'll need to create the rule to allow one or a block of IP addresses. If you'd like to simply allow the public IP address you're coming from (if the computer you're working on has a NATed IP address) you can use Invoke-WebRequest again to query an external web service and parse out the IP address.
$ipAddress = (Invoke-WebRequest 'http://myexternalip.com/raw').Content -replace "`n"
Next, we'll create the firewall rule using the New-AzureSqlDatabaseServerFirewallRule cmdlet. This is where you'll need to use the server name you found earlier, specify a rule name and specify the start and end IP address. In our case, they will be the same since we're just allowing a single IP address.
New-AzureSqlDatabaseServerFirewallRule -ServerName $serverName -RuleName 'ClientRule' -StartIpAddress $ipAddress -EndIpAddress $ipAddress
At this point, we have everything in place to begin querying data from our Azure SQL Server database. You'll now need your database name, the Azure SQL server instance name, the username and password with access to the database and the table name you'd like to query.
To find the database name you can pipe the output of Get-AzureSqlDatabasServer directly to Get-AzureSqlDatabase. You can see here that I'll be using a database name of myazuredatabase.

You can find all of the other information required on the Azure portal. Once you have all of the criteria needed it's simply a matter of passing all of these parameters to the Invoke-SqlCmd cmdlet. This cmdlet comes from the SQLPS module we installed earlier.
$params = @{
      'Database' = 'myazuredatabase'
      'ServerInstance' = 'yoursqinstance.database.windows.net'
      'Username' = 'adam'
      'Password' = 'mysecretpassword'
      'OutputSqlErrors' = $true
      'Query' = 'SELECT * FROM Users'
}
Invoke-Sqlcmd @params
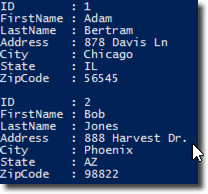
You can see from the above example that I'm passing the T-SQL query "SELECT * FROM Users" which is retrieving all rows from the Users table in the database myazuredatabase which is located on the yoursqlinstance.database.windows.net server instance using my pre-created username and password. This gives me an output that looks like the below screenshot.

By using a single tool like PowerShell, you can access your data wherever it is stored. It doesn't matter if it's in the cloud in an Azure SQL database or in an on-premises MS-SQL server, MySQL or even inside an Oracle or Postgres database. Chances are there's a PowerShell module that allows you to hook into that data.
Next Steps
- Check out all of the PowerShell tips on MSSQLTips.com to continue your learning.
About the author
 Adam Bertram is an independent consultant, technical writer, trainer, and presenter. Adam specializes in consulting and evangelizing all things IT automation.
 This author pledges the content of this article is based on professional experience and not AI generated.
View all my tips


