Problem
There has been a trend at Microsoft towards developing new software capabilities in the cloud first and then bringing these advances to the on premise versions later on. This is due to the fact that Microsoft’s chief executive Satya Nadella promised a “mobile first, cloud first” strategy. Please see this PC World article.
Since many of my new T-SQL articles are related to SQL Server 2016, I thought it would be great to review Azure SQL Database deployments using the Azure Resource Management (ARM) model. The ARM model is new and should be used in place of the classic deployment model going forward.
Solution
PowerShell has always been the language of choice to automate system deployment and configuration. It is not surprising that we have a series of cmdlets to help us deploy Azure SQL databases using the resource manager model. Here is a reference to the cmdlets.
Business Problem
Automate the deployment of the NASA95 schema to Azure SQL Database. This was the sample database used in my STRING_SPLIT() tip.
Azure Portal
Our first task is to login to the Azure portal and see if there are any deployed objects.
The dashboard below shows us that the craftydba@outlook.com is the account associated with the Visual Studio Enterprise subscription. This subscription gives us a $150 dollars a month to try out Azure. Right now, we have 8 days left on this monthly subscription with about $116 to spend.

If we click on the all resources menu option on the left, we can see if any objects have been deployed. Currently, we do not have any objects deployed.

List Azure Subscriptions
We must log in with a valid subscription owner before we can do any work. The Add-AzureRmAccount cmdlet will prompt you for credentials.

An account might have several subscriptions associated with it. Use the Get-AzureRmSubscription cmdlet to list the subscriptions associated with craftydba@outlook.com.
The output from this command shows two subscriptions. Since the Developer Program Benefit only has $25 associated with it, we want to make sure any new deployments are on the Visual Studio Enterprise subscription.
Last but not least, use the Set-AzureRmContext cmdlet to choose the correct subscription.

The PowerShell code below logs into the portal, lists the subscriptions and selects the correct subscription. Of course, manual intervention is needed for the sign on.
#
# Azure Subscriptions
#
# Prompts you for azure credentials
Add-AzureRmAccount
# List my subscriptions
Get-AzureRmSubscription
# Pick my MSDN one
Set-AzureRmContext -SubscriptionId '26efaaba-5054-4f31-b922-84ab9eff218e'
Choosing a data center
Not all data centers support the Platform As A Service (PAAS) version of SQL Server known as Azure SQL Database. Regardless of what service you want to deploy, you should check the availability of the service at a particular location.
The Get-AzureRmResourceProvider cmdlet can be filtered to list all data centers for a particular service. The PowerShell script below lists data centers for Azure SQL Database.
#
# Data Centers with my service
#
# Get data centers with Azure SQL database
$AzureSQLLocations = (Get-AzureRmResourceProvider -ListAvailable | `
    Where-Object {$_.ProviderNamespace -eq 'Microsoft.SQL'}).Locations
# Show the results
$AzureSQLLocations
Output from PowerShell script listing data centers with Azure SQL database service.

Resource Group
The concept behind the Resource Manager model is that all Azure components that make up a solution are created or destroyed as a group. Thus, the key object that binds all the items together is a resource group.
When working with resource groups, there are three cmdlets you should know:
- New-AzureRmResourceGroup cmdlet creates a named group in a location that you select
- Get-AzureRmResourceGroup cmdlet lists all resource groups defined for an account
- Remove-AzureRmResourceGroup cmdlet removes a named resource group
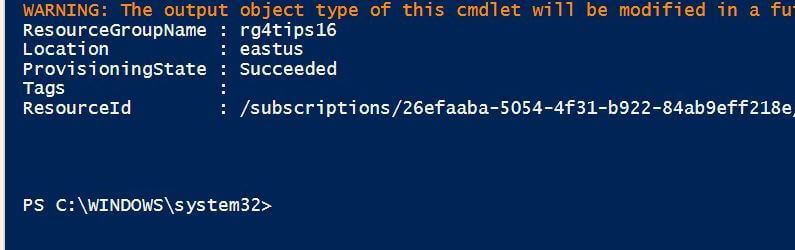
The PowerShell script below creates a resource group named rg4tips16 in the East US location.
#
# Create a resource group
#
# New resource group
New-AzureRmResourceGroup -Name "rg4tips16" -Location "East US"
# List resource groups
Get-AzureRmResourceGroup
Output for PowerShell script showing newly created resource group.
SQL Server
A logical SQL Server needs to be created before any databases can be deployed. The administrator user name and password needs to be supplied as credentials. There are some limitations around this logical server. For instance, it can only have 5000 databases associated with it and a maximum of 45,000 Database Transaction Units (DTU).
When working with SQL Server, there are three cmdlets you should know:
- New-AzureRmSQLServer cmdlet creates a SQL Server in a location that you select
- Get-AzureRmSQLServer cmdlet lists all SQL Servers defined for an account
- Remove-AzureRmSQLServer cmdlet removes a named SQL Server
The PowerShell script below creates a SQL Server named mssqltips16 in the East US location.
#
# Create a new logical server
#
# User & Password
$User = "jminer"
$Pword = ConvertTo-SecureString -String 'MS#tips$2016' -AsPlainText -Force
# Create a credential
$Credential = New-Object -TypeName System.Management.Automation.PSCredential `
    -ArgumentList $User, $Pword
# New SQL server
New-AzureRmSQLServer -ResourceGroupName "rg4tips16" -ServerName "mssqltips16" `
    -Location "East US" -ServerVersion "12.0" -SQLAdministratorCredentials $Credential
# List SQL Servers
Get-AzureRmSQLServer -ResourceGroupName "rg4tips16"
Output for PowerShell script showing newly created SQL Server.

Firewall Rule
Azure SQL Server prevents unauthorized logins thru the use of firewall rules. A newly created Azure SQL Server does not allow any connections. Thus, to gain access to the server, you need to add your laptop’s IP to a firewall rule white list. You can either obtain this information from the Azure Portal or talk to your system administrator that knows the range of internet IP’s associated with your company.
When working with firewall rules, there are three cmdlets you should know:
- New-AzureRmSQLServerFirewallRule cmdlet creates a new firewall rule for a selected server
- Get-AzureRmSQLServerFirewallRule cmdlet lists all the firewall rules for a named server
- Remove-AzureRmSQLServerFirewallRule cmdlet removes a named firewall rule
The PowerShell script below creates a firewall rule named fr4laptop for SQL server named mssqltips16.
#
# Add laptop ip to firewall
#
# Create new firewall rule
New-AzureRmSQLServerFirewallRule -ResourceGroupName "rg4tips16" `
    -ServerName "mssqltips16" -FirewallRuleName "fr4laptop" `
    -StartIpAddress "167.220.148.149" -EndIpAddress "167.220.148.149"
# Clear the screen
Clear-Host
# List firewall rules
Get-AzureRmSQLServerFirewallRule -ResourceGroupName "rg4tips16" -ServerName "mssqltips16"
Output for PowerShell script showing newly created firewall rule.

SQL Database
This whole article has been leading up to the point in which we create a Azure SQL Database. Let’s get it done!
There are currently three different service tiers: Basic, Standard and Premium. Each tier may have one or more different levels. Each level is governed by limits on database size, total database transaction units and number of connections.
Again, we are just talking about regular databases, not elastic pool service databases. I will talk about those at another time.
When working with SQL server, there are three cmdlets you should know:
- New-AzureRmSQLDatabase cmdlet creates a SQL database on a SQL Server you select
- Get-AzureRmSQLDatabase cmdlet lists all SQL databases on a named SQL Server
- Remove-AzureRmSQLDatabase cmdlet removes a named SQL database.
The PowerShell script below creates a SQL server database named NASA95 on the mssqltips16 logical server.
#
# Make the new database
#
# Create a new database
New-AzureRmSQLDatabase -ResourceGroupName "rg4tips16" -ServerName "mssqltips16" `
    -DatabaseName "NASA95"
# List the new database
Get-AzureRmSQLDatabase -ResourceGroupName "rg4tips16" -ServerName "mssqltips16"
By default, every new SQL Server gets a master database created with an edition listed as none.

Because we did not specify a service tier, the cmdlet defaults the NASA95 database to Standard SO tier.

Scaling Up
The cloud has the ability to scale up or scale down on demand. You just need to pay for additional resources when going to a higher service level and save money when going to a lower service level.
For instance, we might want to scale up the NASA95 database to a S2 level with a size limit of 2 GB.
How do we do this task?
The Set-AzureRmSQLDatabase cmdlet allows you to change the characteristics of the database at any time. The Login-AzureRmAccount cmdlet allows you to reconnect to Azure with credentials to execute a script.
The PowerShell script below performs this requested task.
#
# Change the database size (s2)
#
# Login With Credentials
Login-AzureRmAccount
# Give database size quota
$TwoGb = (1024 * 1024 * 1024 * 2)
Set-AzureRmSQLDatabase -ResourceGroupName "rg4tips16" `
    -ServerName "mssqltips16" -DatabaseName "NASA95" `
    -Edition "Standard" -RequestedServiceObjectiveName "S2" `
    -MaxSizeBytes $TwoGb
Output for PowerShell script showing database service level change.

Azure Portal showing database quota is now associated with the NASA95 database.

Scaling Down
Last but not least, always scale down your databases to a Basic BO or Standard S0 service tier depending upon size. The former has a 2 GB database size limit and the later has a 250 GB database size limit. Since this was a demonstration, I am going to scale it down to B0 which will save me money on my subscription to try other services.
The PowerShell script below performs this requested task.
#
# Change the database size (basic)
#
Set-AzureRmSQLDatabase -ResourceGroupName "rg4tips16" `
    -ServerName "mssqltips16" -DatabaseName "NASA95" -Edition "Basic"
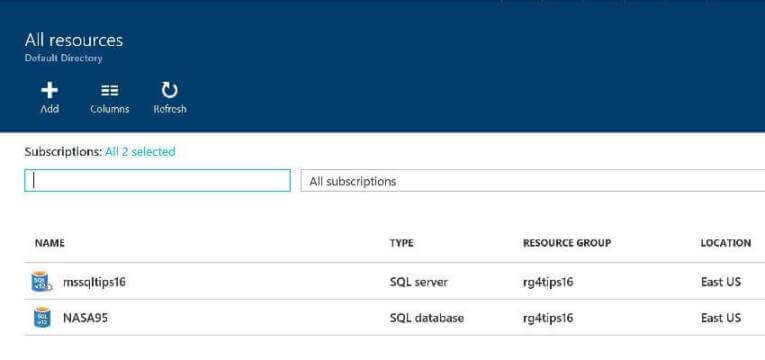
If we take one more look at the Azure Portal under the all resources menu option, we can see the SQL Server and SQL Database that we created using PowerShell.
Summary
Today, we demonstrated the PowerShell steps and commands necessary to deploy a Azure SQL Server with a blank Azure SQL Database. The Azure Resource Manager is the new deployment model to use when creating objects and/or services in Azure. During each step, I gave you the cmdlet to Remove each Azure object. Executing the steps in reverse with each remove cmdlet will result in a subscription without any objects.
Next Steps
- Read more tips relate to Azure

John Miner is a Senior Data Architect at Insight Digital Innovation helping corporations solve their business needs with various data platform solutions.
He has over thirty years of data processing experience, and his architecture expertise encompasses all phases of the software project life cycle, including design, development, implementation, and maintenance of systems.
His credentials include undergraduate and graduate degrees in Computer Science from the University of Rhode Island. Also, he has earned certificates from Microsoft for Database Administration (MCDBA), System Administration (MCSA), Data Management & Analytics (MCSE), Data Science (MPP), Databricks Certified, and Fabric Certified.
John has been recognized with the Microsoft MVP award nine times for his outstanding contributions to the Data Platform community.
When he is not busy talking to local user groups or writing blog entries on new technology, he spends time with his wife and daughter enjoying outdoor activities. Some of John’s hobbies include wood working projects, crafting a good beer and playing a game of chess.
- MSSQLTips Awards: Author of the Year – 2019, 2022, 2023 | Champion (100+tips) – 2023

