Problem
You have a deployment of SQL Server on a Virtual Machine hosted in Windows Azure. You wish to take steps to secure the deployment so that only authorized users have access to log in to SQL Server or use Remote Desktop Services to log into the server, by implementing port forwarding and IP address filtering.
Solution
This tip will demonstrate how to secure SQL Server in Azure using a real, deployed virtual machine by configuring the endpoint ports and Access Control Lists (ACLs) on each endpoint.
Modifying Endpoint Ports on Azure
We’ll first demonstrate two methods of showing the endpoint configurations, one using the existing Azure portal and another using the new Azure portal which is available as a side-by-side service provided by Microsoft.
Using the Existing Azure Portal
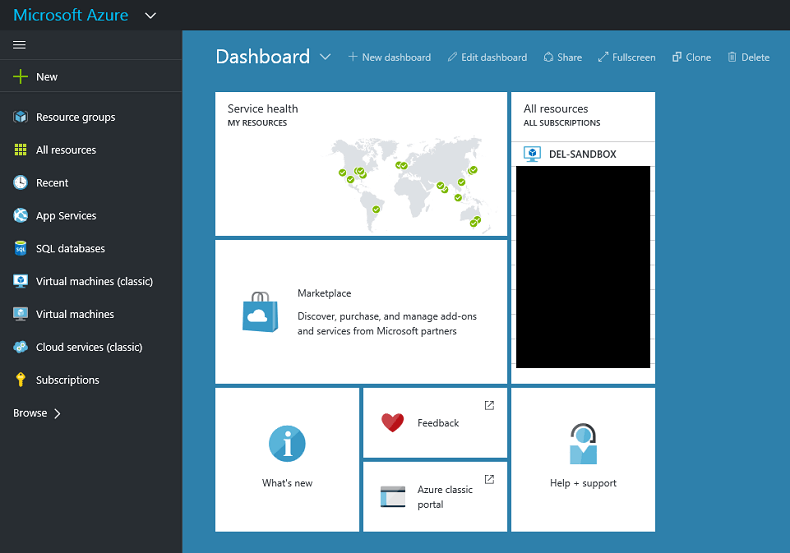
Once you are logged in, you’ll be greeted with the home page of the management interface, as shown below. I have blanked out some details of my implementation for confidentiality:

1: Click on Virtual Machines, on the left, then the name of the VM that you wish to administer. This will be the VM with your installation of SQL Server installed:

2: Now click on Endpoints, in the top banner menu. It is indicated by a red circle in the screenshot above. This will bring you to the following screen:

Windows Azure has the capability of providing what it calls private and public ports for services. So, for endpoints, the public port – that is, the port that is accessible to anyone outside the virtual network (i.e. everyone) is specified as 1433 for SQL Server and 3389 for Remote Desktop in the example above. The private port is accessible to any machine in the virtual network but not to the public.
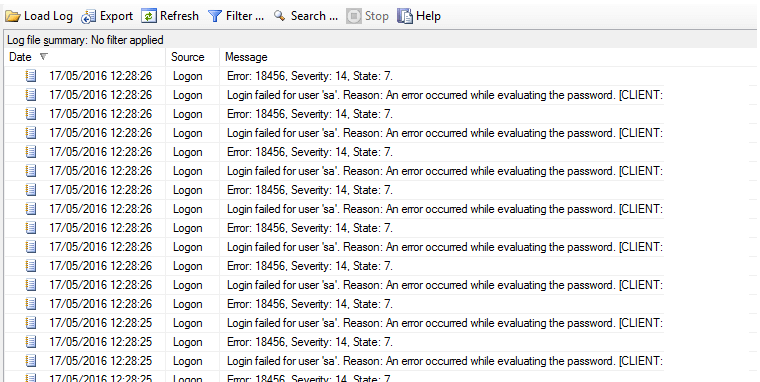
The problem with having default port settings like this is that there are many would-be hackers in the world who routinely scan batches of IP addresses for open ports like this, and try brute-force attacks to gain access. Here is a real-life example from one of my clients of such an attack and how it manifests itself in the SQL Server error logs. Some details have been omitted for confidentiality. In this example, there were an estimated 1.5M attempts on the ‘sa’ account in a 6 month period:
So the first thing we should do is change the public ports. Some caution here – any external (i.e. resource not in your Azure virtual network) resources, like application servers or linked SQL Servers, will need to use the new port number. This is easy to configure in a connection string – simply append :NNNN where NNNN is your new port number.
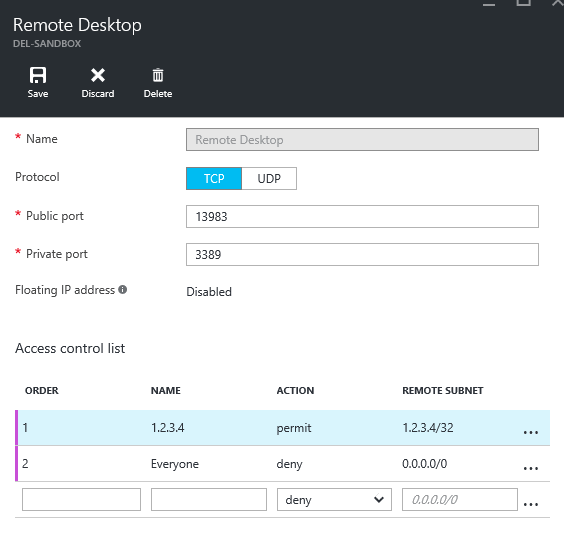
We will change the RDP port from 3389 to some unused port value, 13983, and the SQL Server port number from 1433 to 2380 like so.
3: Click on Remote Desktop Services in the Endpoints window and then Edit in the bottom banner bar. You will be presented with a dialog box as shown below:

4: Change the port number in the public field, then click the tick icon. The change will take a minute or two to implement.
5: Now repeat the process for the SQL Server endpoint.
Once done, you should see the following shown on your Endpoints view:

Using the New Azure Portal
The new portal home screen is a little different from the existing portal. After logging in and clicking ‘Check out the new portal’ then ‘Launch’, you’ll be presented with a screen similar to the following:
The new portal is a little different from the existing one, in that drill-down windows are shown as side-loading windows. When you click on an asset in this view, details of that asset will load from the right-hand side. Consequently, we can find our endpoint configuration by drilling down as so:
1: Click on ‘Virtual Machines (classic)’ on the left menu, then the name of the virtual server which you wish to administer. You’ll be brought to the following screen.

2: I have circled the Endpoints link in the menu on the right. Click this link to be taken to the Endpoints screen, and in the Endpoints screen click the Remote Desktop endpoint name. The following screen will be shown, which is a little different from the old portal:
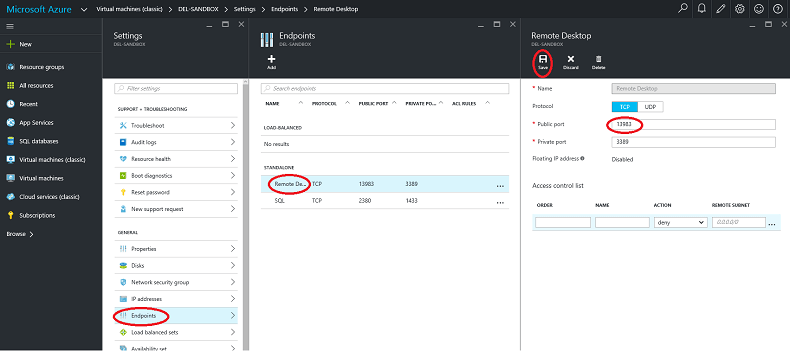
3: In the public port field, circled, change the port number to 13983 then click Save.
4: Repeat the process for the SQL Server endpoint.
Modifying the ACLs
An ACL is an Access Control List, and is used to determine who may, and may not, connect to a particular port, determined by IP address. Now we have configured the public ports, we are less likely to get malicious agents trying connections, but it is relatively simple to determine the port numbers open on any particular server. Azure has some protection against port scanning, but this shouldn’t be relied upon.
A whitelist is a collection of IP addresses that are allowed access to a server. A blacklist is a collection of IP addresses that are not allowed access to a server. Some thought will show that given the number of IP addresses that are not allowed access to a server is virtually unlimited, we should implement a whitelist rather than a blacklist.
To do this, you’ll need to collect a list of allowed IPs that can connect to your server. One way of doing this is to speak to your business and compile a list of allowed servers or user machines. Another is to use SQL Profiler to capture IP addresses over a period (e.g. 1 week or 1 month) and take this distinct list as the whitelist. Yet another is to determine an IP range, and use this range in the whitelist rather than individual IPs.
Modifying the ACL Using the Existing Azure Portal
1: From the Endpoints menu in the existing portal, click the ‘Manage ACL’ icon at the bottom of the screen as shown in the following screenshot:

Before continuing, a note about CIDP notation. IP addresses are specified in the ACL using ‘Classless Inter-Domain Routing’ notation, a long-running standard that allows the specification of a range of IP addresses in a single string. More information is available on the notation here: https://en.wikipedia.org/wiki/Classless_Inter-Domain_Routing#CIDR_notation
For specifying individual IP addresses, simply specify the IP address followed by /32, like this: 192.168.0.1/32.
For specifying every IP address (useful when setting Deny rules), use 0.0.0.0/0.
Note that ACLs will implement rules in order and the first rule encountered ‘wins’, so make sure your Deny rules appear after your Permit rules, or you may inadvertently deny access to legitimate connectors.
2: Fill in your ACL rules as shown. I have implemented two rules – I am allowing the IP address 1.2.3.4 to connect to the port, and denying everyone. Because the permit rule is executed before the deny rule, 1.2.3.4 will be allowed to connect even if subsequently denied by the deny rule.
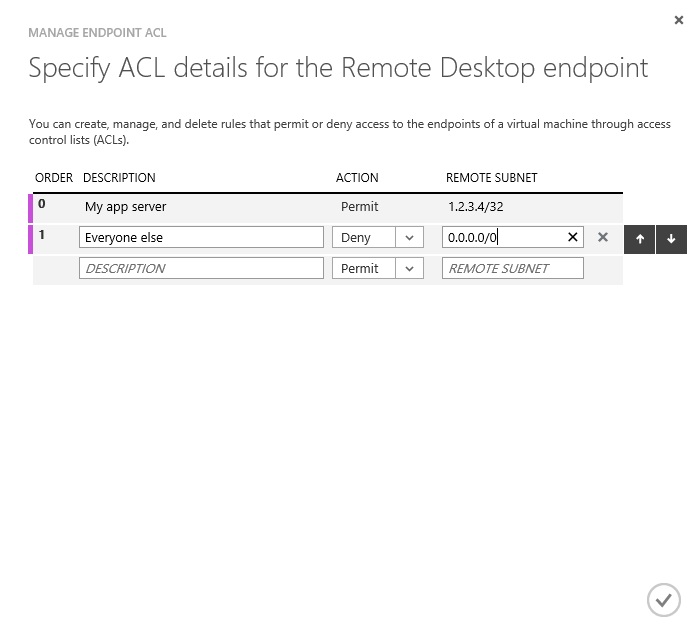
3: Click the tick icon to implement these.
4: Repeat for the SQL Server port.
Modifying the ACL Using the New Azure Portal
1: From the Endpoints button, click through the Remote Desktop link to the Endpoints configuration window that you have already seen when you configured your public/private ports in the new portal.
2: In the new portal, the ACL configuration is contained in the same screen as the endpoint port configuration. Add your rules in the same fashion as in the old portal, as shown below, then Save.
Next Steps
Hopefully this has been a short but useful tip on Azure port and ACL configuration. Note that these configurations don’t take the place of managing security in SQL Server – make sure that your SQL Server logins and users are appropriate and adequate to the tasks required of them, using the principles of least privilege. Use Windows authentication for preference, disable your sa account and use role-based security whenever possible.
The following Next Steps and links will guide you in finding further information about Azure security, SQL Server security and other concepts referenced in this tip.
- MSSQLTIPS, SQL Server Security Tips
- MSSQLTIPS (webcast), Microsoft Azure SQL Database Security and Compliance, Microsoft Azure SQL Database Security and Compliance
- CIDP Notation, Wikipedia, CIDP Notation, Wikipedia
- Set up Endpoints on a Classic Windows VM, Microsoft

Dr. Derek Colley is the lead technical consultant for Optimal Computing, a boutique data consultancy based in the UK NW helping clients troubleshoot, configure, plan and deploy their data platforms. He specializes in data integration and database performance optimization, and is a PhD candidate with Staffordshire University, looking into methods of integrating AL query selection algorithms with the cost-based query optimizer. In his spare time, he enjoys building robots, going outdoors, and spending time with his four children.
- MSSQLTips Awards: Trendsetter (25+ tips)


