Problem
When building a modern data platform in the Azure cloud, you are most likely going to take advantage of Azure Data Lake Storage Gen 2 as the storage medium for your data lake. If you are reading this article, you are likely interested in using Databricks as an ETL, analytics, and/or a data science tool on your platform. As such, it is imperative to know how to interact with your data lake through Databricks.
- Data Engineers might build ETL to cleanse, transform, and aggregate data into ‘higher’ zones in the data lake.
- Data Analysts might perform ad-hoc queries to gain instant insights.
- Data Scientists might use raw or cleansed data to build machine learning models.
The following article will explore the different ways to read existing data in your ADLS Gen 2 data lake and how to write transformed data back to it.
Solution
The below solution assumes that you have access to a Microsoft Azure account, with credits available for testing different services. Follow this link to create a free Azure trial account.
To use a free account to create the Azure Databricks cluster, before creating the cluster, go to your profile and change your subscription to pay-as-you-go. For more information, see Azure free account.
Also, before we dive into the tip, if you have not had exposure to Azure Databricks, I highly recommend reading this tip which covers the basics.
Create a Basic ADLS Gen 2 Data Lake and Load in Some Data
The first step in our process is to create the ADLS Gen 2 resource in the Azure Portal that will be our Data Lake for this walkthrough.
Navigate to the Azure Portal, and on the home screen click ‘Create a resource’.

Search for ‘Storage account’, and click on ‘Storage account – blob, file, table, queue’.

Click ‘Create’.
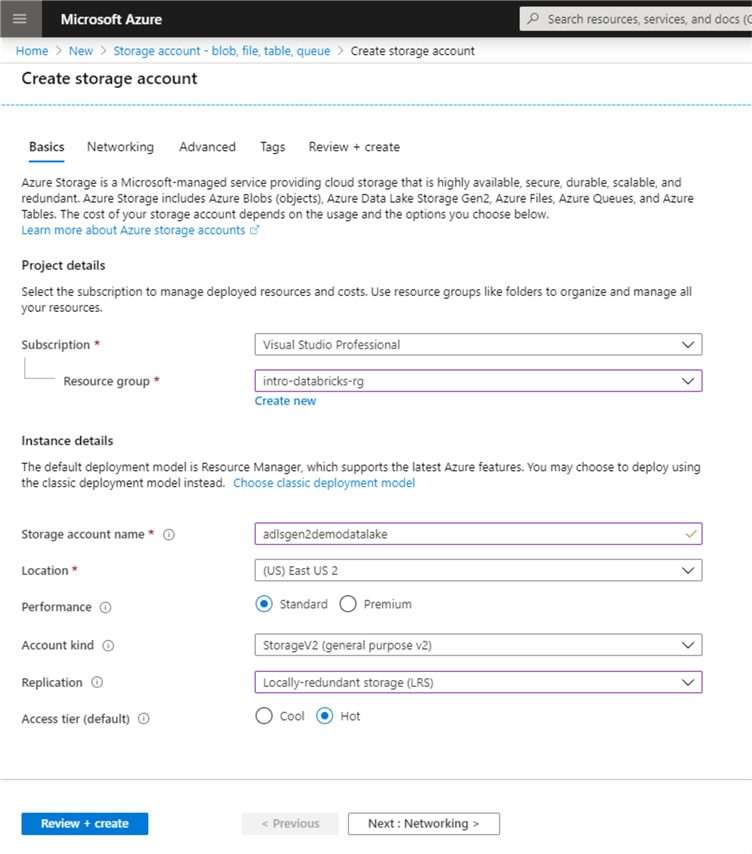
Make sure the proper subscription is selected – this should be the subscription where you have the free credits. Next select a resource group.
If you do not have an existing resource group to use – click ‘Create new’. A resource group is a logical container to group Azure resources together. Name it something such as ‘intro-databricks-rg’.
Next, pick a Storage account name. This must be a unique name globally so pick something like ‘adlsgen2demodatalake123’.
Pick a location near you or use whatever is default. Keep ‘Standard’ performance for now and select ‘StorageV2’ as the ‘Account kind’. For ‘Replication’, select ‘Locally-redundant storage’. Finally, keep the access tier as ‘Hot’.
Your page should look something like this:
Click ‘Next: Networking’, leave all the defaults here and click ‘Next: Advanced’.
Here is where we actually configure this storage account to be ADLS Gen 2. Under the Data Lake Storage Gen2 header, ‘Enable’ the Hierarchical namespace. This is the field that turns on data lake storage. Finally, click ‘Review and Create’.
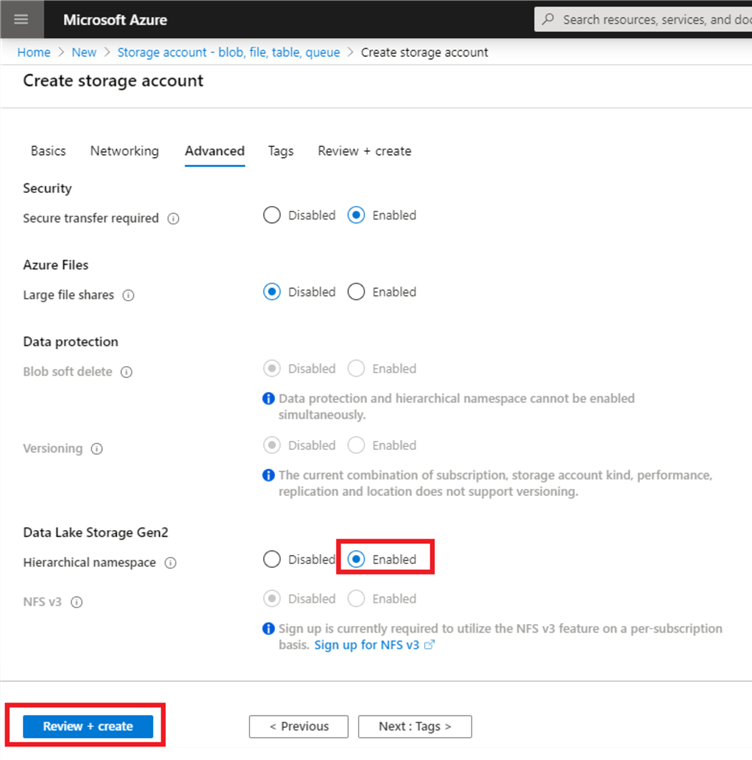
You should be taken to a screen that says ‘Validation passed’. Click ‘Create’ in the bottom left corner.
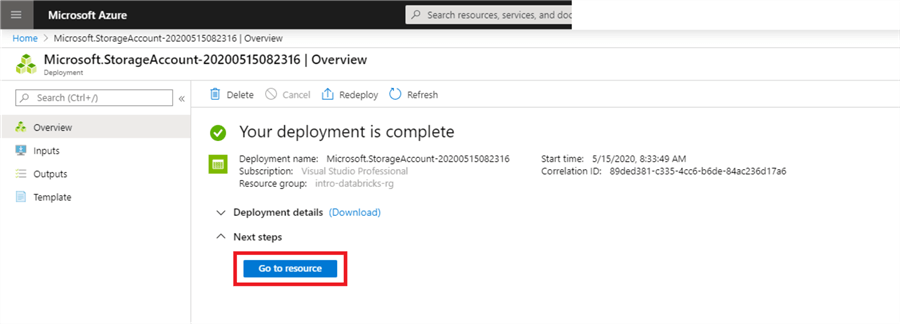
It should take less than a minute for the deployment to complete. Click ‘Go to resource’ to view the data lake.
Before we create a data lake structure, let’s get some data to upload to the data lake.
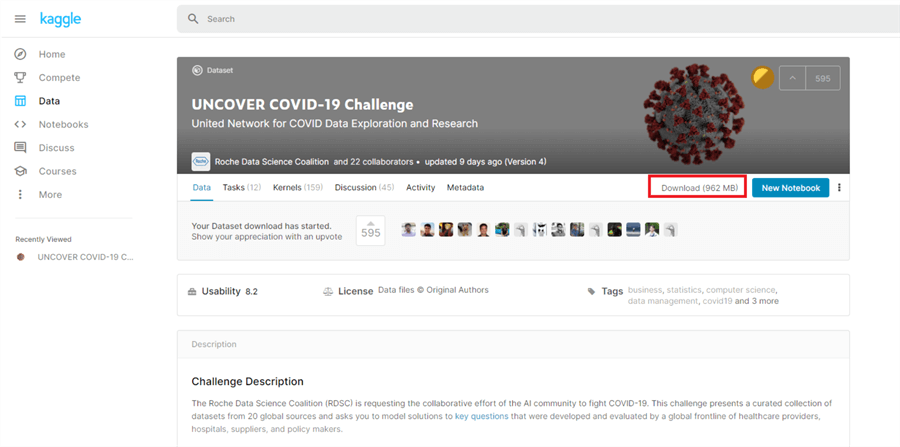
For this tutorial, we will stick with current events and use some COVID-19 data from Kaggle.
Kaggle is a data science community which hosts numerous data sets for people learning data science and data analytics. I highly recommend creating an account and using this website whenever you are in need of sample data.
In this example, we will be using the ‘Uncover COVID-19 Challenge’ data set. To get the necessary files, select the following link, create a Kaggle account, and click ‘Download’.
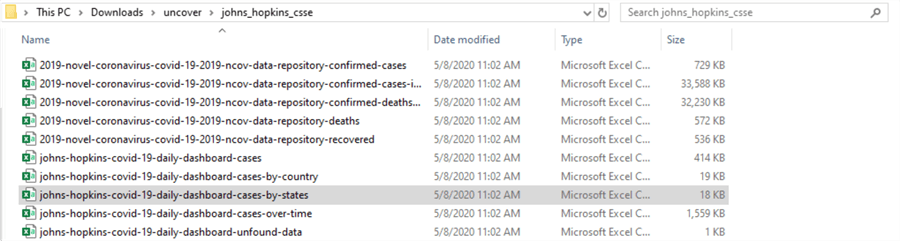
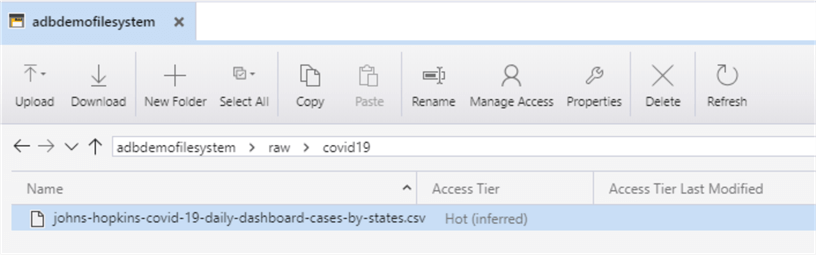
This will download a zip file with many folders and files in it. Once unzipped, navigate to the following folder and copy the csv ‘johns-hopkins-covid-19-daily-dashboard-cases-by-states’ to your desktop.
Once you have the data, navigate back to your data lake resource in Azure, and click ‘Storage Explorer (preview)’.

Right click on ‘CONTAINERS’ and click ‘Create file system’. This will be the root path for our data lake.

Name the file system something like ‘adbdemofilesystem’ and click ‘OK’.
Now, click on the file system you just created and click ‘New Folder’. This is how we will create our base data lake zones. Create two folders – one called ‘raw’ and one called ‘refined’.

Double click into the ‘raw’ folder, and create a new folder called ‘covid19’.
In order to upload data to the data lake, you will need to install Azure Data Lake explorer using the following link.
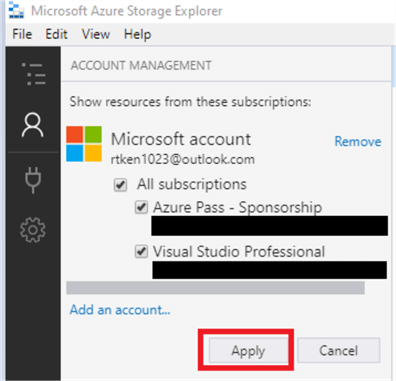
Once you install the program, click ‘Add an account’ in the top left-hand corner, log in with your Azure credentials, keep your subscriptions selected, and click ‘Apply’.
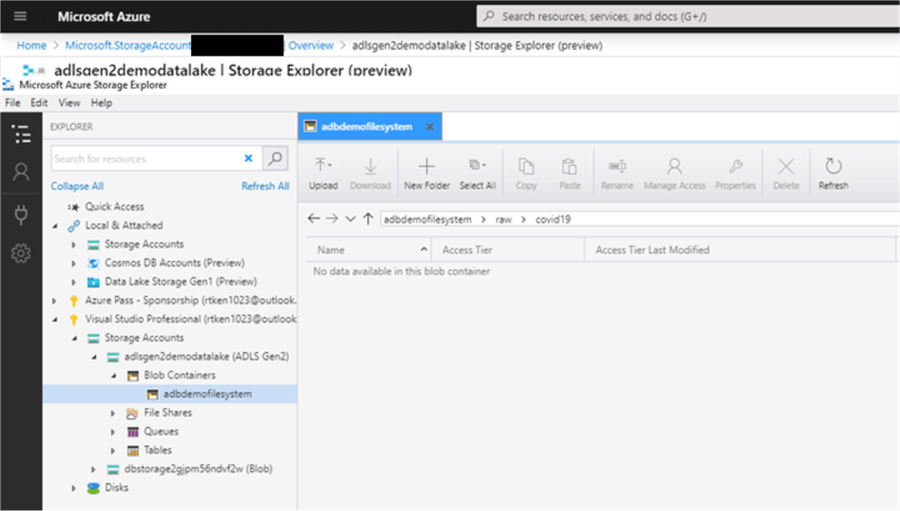
Navigate down the tree in the explorer panel on the left-hand side until you get to the file system you created, double click into it. Then navigate into the raw zone, then the covid19 folder.
Next click ‘Upload’ > ‘Upload files’, and click the ellipses:
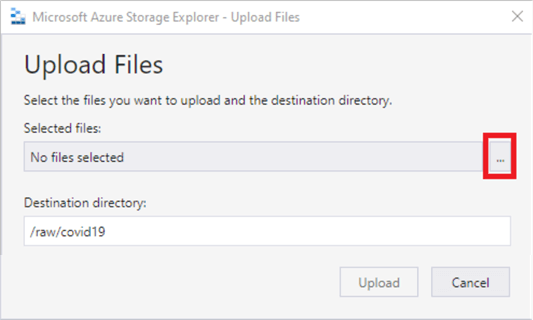
Navigate to the csv we downloaded earlier, select it, and click ‘Upload’. Once you hit refresh, you should see the data in this folder location.
Create a Databricks Workspace
The next step is to create a Databricks Workspace. You can think of the workspace like an application that you are installing within Azure, where you will access all of your Databricks assets.
On the Azure home screen, click ‘Create a Resource’.
In the ‘Search the Marketplace’ search bar, type ‘Databricks’ and you should see ‘Azure Databricks’ pop up as an option. Click that option.
Click ‘Create’ to begin creating your workspace.

Use the same resource group you created or selected earlier. Then, enter a workspace name. Remember to always stick to naming standards when creating Azure resources, but for now enter whatever you would like. You can keep the location as whatever comes default or switch it to a region closer to you. For the pricing tier, select ‘Trial’. Finally, select ‘Review and Create’. We can skip networking and tags for now which are for more advanced set-ups.
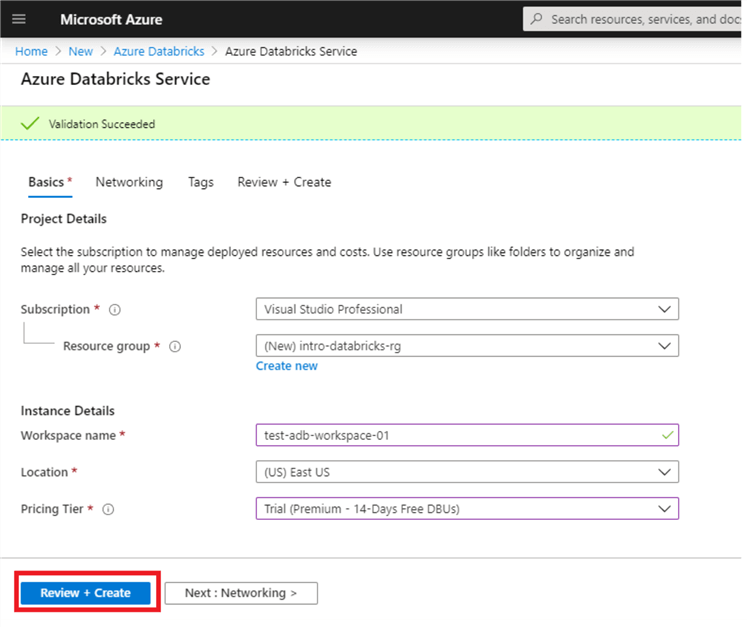
This should bring you to a validation page where you can click ‘create’ to deploy your workspace. This will bring you to a deployment page and the creation of the workspace should only take a couple minutes. When it succeeds, you should see the following:
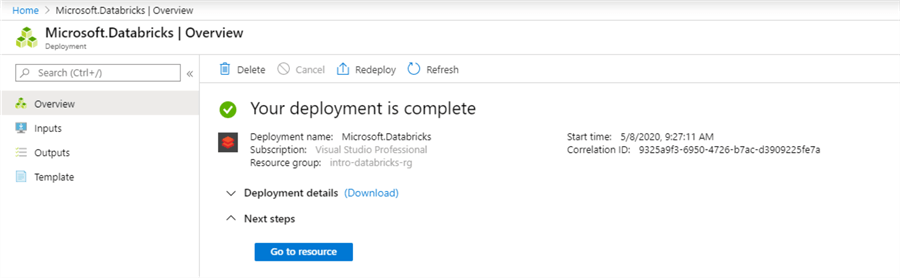
Once the deployment is complete, click ‘Go to resource’ and then click ‘Launch Workspace’ to get into the Databricks workspace.

Explore Options for Accessing Data Lake from Databricks
The following information is from the Databricks docs:
There are three ways of accessing Azure Data Lake Storage Gen2:
- Mount an Azure Data Lake Storage Gen2 filesystem to DBFS using a service principal and OAuth 2.0.
- Use a service principal directly.
- Use the Azure Data Lake Storage Gen2 storage account access key directly.
For this tip, we are going to use option number 3 since it does not require setting up Azure Active Directory. The following are a few key points about each option:
Mount an Azure Data Lake Storage Gen2 filesystem to DBFS using a service principal and OAuth 2.0:
- Mounting the data lake storage to an existing cluster is a one-time operation. From that point forward, the mount point can be accessed as if the file was in DBFS.
- DBFS is Databricks File System, which is blob storage that comes preconfigured with your Databricks workspace and can be accessed by a pre-defined mount point.

- All users in the Databricks workspace that the storage is mounted to will have access to that mount point, and thus the data lake. If you have granular security requirements in the data lake, this is likely not the option for you.
Use a service principal directly:
- Allows you to directly access the data lake without mounting. This is set in the spark session at the notebook level.
Use the Azure Data Lake Storage Gen2 storage account access key directly:
- This option is the most straightforward and requires you to run the command setting the data lake context at the start of every notebook session.
- You will see in the documentation that Databricks Secrets are used when setting all of these configurations. This is a best practice. Please read this tip to learn more about Databricks Secrets.
Now, let’s connect to the data lake! Start up your existing cluster so that it is ready when we are ready to run the code. If you do not have a cluster, create one.
To set the data lake context, create a new Python notebook and paste the following code into the first cell:
spark.conf.set(
  "fs.azure.account.key.<storage-account-name>.dfs.core.windows.net",
  ""
)
Replace ‘<storage-account-name>’ with your storage account name.
In between the double quotes on the third line, we will be pasting in an access key for the storage account that we grab from Azure. Again, the best practice is to use Databricks secrets here, in which case your connection code should look something like this:
spark.conf.set(
  "fs.azure.account.key.<storage-account-name>.dfs.core.windows.net",
  dbutils.secrets.get(scope="<scope-name>",key="<storage-account-access-key-name>")
)
Navigate to your storage account in the Azure Portal and click on ‘Access keys’ under ‘Settings’.
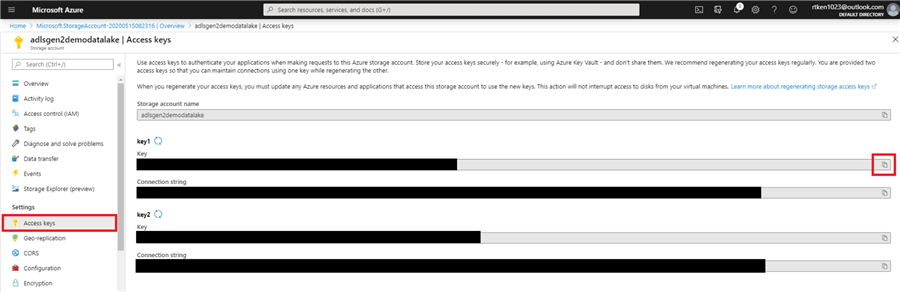
I have blanked out the keys and connection strings, as these provide full access to my Data Lake. So be careful not to share this information. Click the copy button, and paste the key1 Key in between the double quotes in your cell. Your code should now look like this:
#NOTE: The key I put below is not a real key.
spark.conf.set(
  "fs.azure.account.key.adlsgen2demodatalake.dfs.core.windows.net",
  "ASDFjkkldfjgljadsfAfdhjk/l34987dsl32l4kjl;djf="
)
Attach your notebook to the running cluster, and execute the cell. If it worked, you should just see the following:

For the duration of the active spark context for this attached notebook, you can now operate on the data lake. If your cluster is shut down, or if you detach the notebook from a cluster, you will have to re-run this cell in order to access the data.
To test out access, issue the following command in a new cell, filling in your relevant details, and you should see a list containing the file you updated. Dbutils is a great way to navigate and interact with any file system you have access to through Databricks. Read more here.
dbutils.fs.ls("abfss://<file-system-name>@<storage-account-name>.dfs.core.windows.net/<directory-name>")

Load Data into a Spark Dataframe from the Data Lake
Next, let’s bring the data into a dataframe. You can think about a dataframe like a table that you can perform typical operations on, such as selecting, filtering, joining, etc. However, a dataframe exists only in memory. One thing to note is that you cannot perform SQL commands directly on a dataframe. First, you must either create a temporary view using that dataframe, or create a table on top of the data that has been serialized in the data lake. We will review those options in the next section.
To bring data into a dataframe from the data lake, we will be issuing a spark.read command. You can issue this command on a single file in the data lake, or you can issue it on a path in the data lake. The second option is useful for when you have multiple files in a directory that have the same schema.
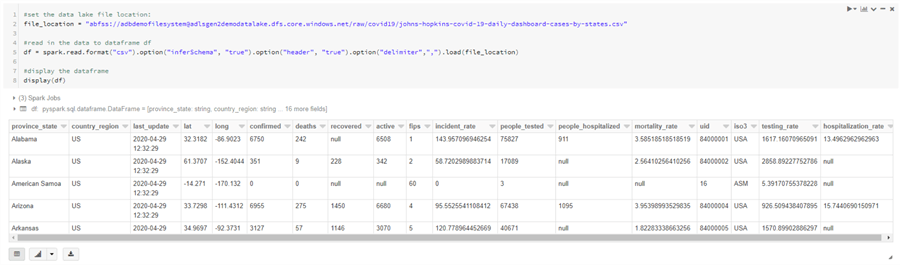
Create a new cell in your notebook, paste in the following code and update the file_location variable to point to your data lake location.
We can get the file location from the dbutils.fs.ls command we issued earlier – you should see the full path as the output – bolded here:
name=’johns-hopkins-covid-19-daily-dashboard-cases-by-states.csv’, size=17998)]
#set the data lake file location:
file_location = "abfss://adbdemofilesystem@adlsgen2demodatalake.dfs.core.windows.net/raw/covid19/johns-hopkins-covid-19-daily-dashboard-cases-by-states.csv"

#read in the data to dataframe df
df = spark.read.format("csv").option("inferSchema", "true").option("header", "true").option("delimiter",",").load(file_location)

#display the dataframe
display(df)
We have specified a few options – we set the ‘InferSchema’ option to true, so Spark will automatically determine the data types of each column. We also set the ‘header’ option to ‘true’, because we know our csv has a header record.
If everything went according to plan, you should see your data!
In a new cell, issue the printSchema() command to see what data types spark inferred:
df.printSchema()

Check out this cheat sheet to see some of the different dataframe operations you can use to view and transform your data.
Use SQL to Query Data in the Data Lake
In the previous section, we used PySpark to bring data from the data lake into a dataframe to view and operate on it. But, as I mentioned earlier, we cannot perform SQL queries on a Spark dataframe. Thus, we have two options as follows:
Option 1: Register the Dataframe as a temporary view
If you already have the data in a dataframe that you want to query using SQL, you can simply create a temporary view out of that dataframe. In a new cell, issue the following command:
df.createOrReplaceTempView("covid_tempview")
Now, using the %sql magic command, you can issue normal SQL statements against the data:

This option is great for writing some quick SQL queries, but what if we want to be able to come back in the future (after the cluster is restarted), or we want other people to also be able to write SQL queries against this data? We can create a Databricks table over the data so that it is more permanently accessible.
Option 2: Create a table on top of the data in the data lake
In Databricks, a table consists of metadata pointing to data in some location. That location could be the Databricks File System (Blob storage created by default when you create a Databricks workspace), or another file store, such as ADLS Gen 2. When we create a table, all we are doing is declaring metadata in the hive metastore, where all database and table metadata is stored. We are not actually creating any physical construct.
We can use SQL to create a permanent table on the location of this data in the data lake:
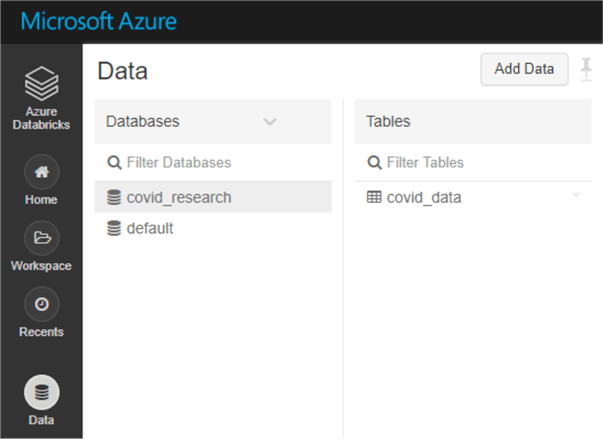
First, let’s create a new database called ‘covid_research’.
In a new cell, issue the following command:
%sql
CREATE DATABASE covid_research
Next, create the table pointing to the proper location in the data lake.
%sql
CREATE TABLE IF NOT EXISTS covid_research.covid_data
USING CSV
LOCATION 'abfss://adbdemofilesystem@adlsgen2demodatalake.dfs.core.windows.net/raw/covid19/johns-hopkins-covid-19-daily-dashboard-cases-by-states.csv'
Notice that we used the fully qualified name <database>.<tablename>, so that the table will go in the proper database. Once you issue this command, you should see the table appear in the data tab on the left-hand navigation pane.
Now, you can write normal SQL queries against this table as long as your cluster is running and you don’t have to ‘create’ the table again! Even after your cluster is restarted this table will persist.
Next, run a select statement against the table. Notice that Databricks didn’t realize there were column headers already there, so we need to fix that!
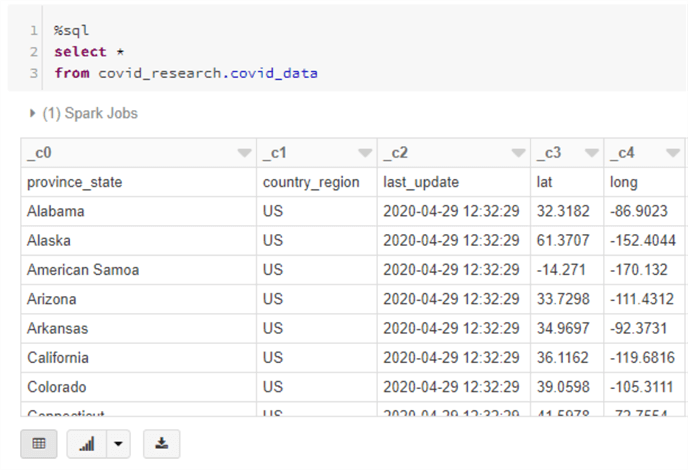
First, ‘drop’ the table just created, as it is invalid. When dropping the table, the underlying data in the data lake is not dropped at all. We are simply dropping the metadata that we declared in the metastore. Issue the following command to drop the table:
%sql
DROP TABLE covid_research.covid_data
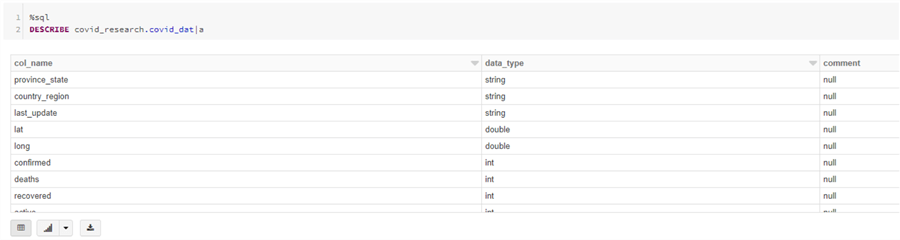
Let’s recreate the table using the metadata found earlier when we inferred the schema when bringing the data to a dataframe. In a new cell, issue the following command:
%sql
CREATE TABLE IF NOT EXISTS covid_research.covid_data
USING CSV
LOCATION 'abfss://adbdemofilesystem@adlsgen2demodatalake.dfs.core.windows.net/raw/covid19/johns-hopkins-covid-19-daily-dashboard-cases-by-states.csv'
OPTIONS (header "true", inferSchema "true")
If you re-run the select statement, you should now see the headers are appearing properly. In a new cell, issue the DESCRIBE command to see the schema that Spark inferred:
%sql
DESCRIBE covid_research.covid_data
There are many other options when creating a table – you can create them on file types other than csv or specify custom data types to name a few. Please read the documentation for all available options.
Write Transformed Data back to the Data Lake
Now that our raw data represented as a table, we might want to transform the data or create a new table that is a cleansed version of that raw data. There are a few different options for doing this.
Option 1: Using Python
First, let’s bring the data from the table we created into a new dataframe:
df_covid = spark.table('covid_research.covid_data')
display(df_covid)

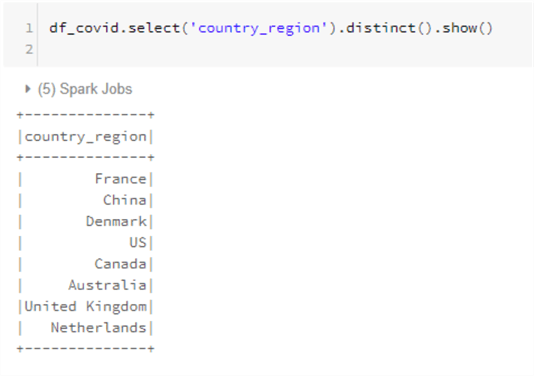
Notice that the country_region field has more values than ‘US’.
Let’s say we wanted to write out just the records related to the US into the ‘refined’ zone of the data lake so downstream analysts do not have to perform this filter every time they want to query for only US data.
First, filter the dataframe to only the US records.
from pyspark.sql.functions import col
df_covid = df_covid.filter(col("country_region") == "US")
Now, by re-running the select command, we can see that the Dataframe now only consists of US records.
df_covid.select('country_region').distinct().show()

Next, we can declare the path that we want to write the new data to and issue a write command to write the data to the new location:
#declare data lake path where we want to write the data
target_folder_path = 'abfss://adbdemofilesystem@adlsgen2demodatalake.dfs.core.windows.net/refined/us_covid/'

#write as parquet data
df_covid.write.format("parquet").save(target_folder_path)
Parquet is a columnar based data format, which is highly optimized for Spark performance. It is generally the recommended file type for Databricks usage.
Once you run this command, navigate back to storage explorer to check out the new data in your data lake:
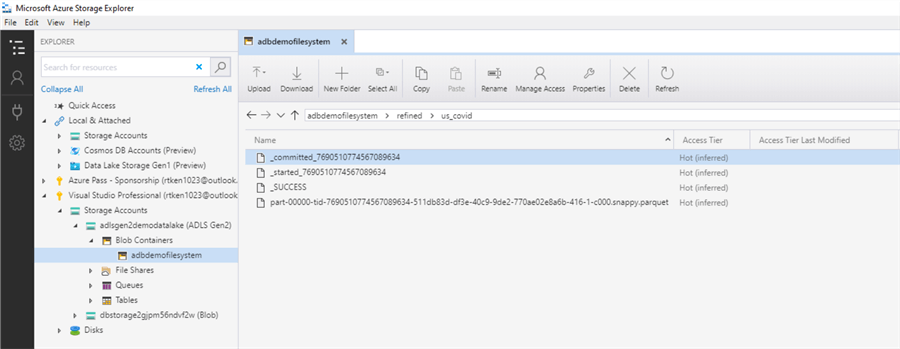
You will notice there are multiple files here. The files that start with an underscore are auto generated files, written by Databricks, to track the write process. The file ending in.snappy.parquet is the file containing the data you just wrote out. A few things to note:
- You cannot control the file names that Databricks assigns – these are handled in the background by Databricks.
- Snappy is a compression format that is used by default with parquet files in Databricks.
- If you have a large data set, Databricks might write out more than one output file. This is dependent on the number of partitions your dataframe is set to.
- To check the number of partitions, issue the following command:
print("Partitions: {0:,}".format(df_covid.rdd.getNumPartitions() ))
- To increase the number of partitions, issue the following command:
repartitioned_df_covid = df_covid.repartition(16)
- To decrease the number of partitions, issue the following command:
coalesced_df_covid = df_covid.coalesce(1)
To create a table on top of this data we just wrote out, we can follow the same process as outlined previously.
Using SQL
Another way to create a new and transformed table in another location of the data lake is to use a Create Table As Select (CTAS) statement.
This process will both write data into a new location, and create a new table that can be queried:
In a new cell, issue the following command:
%sql
CREATE TABLE IF NOT EXISTS  covid_research.covid_data_usa
USING PARQUET
LOCATION 'abfss://adbdemofilesystem@adlsgen2demodatalake.dfs.core.windows.net/refined/us_covid_sql/'
AS
SELECT *
FROM covid_research.covid_data
WHERE country_region = "US"
Note that we changed the path in the data lake to ‘us_covid_sql’ instead of ‘us_covid’. The reason for this is because the command will fail if there is data already at the location you want to write to. To avoid this, you need to either specify a new path or specify the ‘SaveMode’ option as ‘Overwrite’.
Feel free to try out some different transformations and create some new tables in the refined zone of your data lake!
Next Steps
- Try building out an ETL Databricks job that reads data from the raw zone of the Data Lake, transforms it, and inserts it into the refined zone as a new table.
- Try building out an ETL Databricks job that reads data from the refined zone of the Data Lake, aggregates it for business reporting purposes, and inserts it into the curated zone as a new table.
- Look into Delta Lake as the storage technology for your data lake.
- Consider how a Data lake and Databricks could be used by your organization.
- Read other Databricks MSSQLTips:

Ryan Kennedy is a Solutions Architect for Databricks, specializing in helping clients build modern data platforms in the cloud that drive business results. He has worked with clients across industries, most extensively healthcare and insurance, to architect and build data solutions spanning the data fabric – from ingestion processes, data lakes, and data warehouses, to advanced analytics, visualizations, and BI. Ryan is Microsoft certified in Big Data and Data Science technologies, and is always looking to further his technical expertise. When not working on an exciting data project, you can find Ryan spending time with his wife or training for a triathlon.
- MSSQLTips Awards: Rookie of the Year – 2020


Thanks for Sharing valuable information.
what if the storage account is in a different subscription or resource group than the azure databricks data lake?
Thank you so much,this is really good article to get started with databricks.It helped me.
Amazing article .. very detailed . Thank you so much
What is the code when I am using the Key directly to access my Storage account.
Dbutil command is not valid in Azure Databricks when I am using with Synapse.
Please advise.
Excellent!!
Wow!!! What an excellent article. Thanks Ryan.