Problem
When building a modern data platform in the Azure cloud, you are most likely going to take advantage of Azure Data Lake Storage Gen 2 as the storage medium for your data lake. Since the goal of the data lake is to centrally house all of an organization’s data, it will likely contain personal identifiable information (PII), personal health information (PHI), or confidential information that not all data users in the organization should be granted access to. Databricks offers many types data user personas who might interact with the data lake:
- Data Engineers might build ETL to cleanse, transform, and aggregate data into 'higher' zones in the data lake.
- Data Analysts might perform ad-hoc queries to gain instant insights.
- Data Scientists might use raw or cleansed data to build machine learning models.
Given that these different user personas might have different security clearance for accessing data, we need a way to secure the Data Lake through Databricks in the most effective manner possible.
Solution
Before we dive into the tip, if you have not had exposure to Azure Databricks, I highly recommend reading this tip which covers the basics.
Note that the following might not touch on all levels of security requirements for the Data Lake and Databricks within Azure – just the connection between the two. Ensure to consult your organization’s network security architect to make sure the data lake and Databricks is secured within the proper vnet, has access control set up, etc.
Also note that you will need Databricks Administrator permissions in order to implement any of these security techniques.
Accessing the Data Lake through Databricks
Before we consider setting up security within Databricks and the data lake, we need to determine an access method between the two.
The following information is from the Databricks docs:
There are three ways of accessing Azure Data Lake Storage Gen2:
- Mount an Azure Data Lake Storage Gen2 filesystem to DBFS using a service principal and OAuth 2.0.
- Use a service principal directly.
- Use the Azure Data Lake Storage Gen2 storage account access key directly.
Mount an Azure Data Lake Storage Gen2 filesystem to DBFS using a service principal and OAuth 2.0:
- Mounting the data lake storage to DBFS is a one-time operation. From that point forward, the mount point can be accessed as if the file was in DBFS.
- DBFS is Databricks File System, which is blob storage that comes preconfigured with your Databricks workspace and can be accessed by a pre-defined mount point.

- All users in the Databricks workspace that the storage is mounted to will have access to that mount point, and thus the data lake. If you have granular security requirements in the data lake, this is likely not the option for you.
Use a service principal directly:
- Allows you to directly access the data lake without mounting. This is set in the spark session at the notebook level. This also grants entire access to the data lake.
Use the Azure Data Lake Storage Gen2 storage account access key directly:
- This option is the most straightforward and requires you to run a command that sets the data lake context at the start of every notebook session.
- You will see in the documentation that Databricks Secrets are used when setting all of these configurations. This is a best practice. Please read this tip to learn more about Databricks Secrets.
Generally speaking, we will want to mount the Data Lake (option 1) only on dedicated ETL workspaces where there are no granular user level security requirements, or if it is ok for all Databricks users to access all data in the data lake. This is because the user takes on the role of the service principal that we used to mount the data lake when accessing that mount point. For workspaces with granular security requirements, the typical approach is to use the storage access key (option 3) directly using Databricks Secrets.
Determine the number of Databricks Workspaces required
The next decision to make is to determine the number of workspaces you want to set up. A Databricks Workspace is “an environment for accessing all of your Databricks assets. The workspace organizes objects (notebooks, libraries, and experiments) into folders, and provides access to data and computational resources such as clusters and jobs.” In other words, it is the application you can access through the Azure Portal in order to use Databricks.
One important note is that workspaces are free – it is the Spark clusters (compute) underneath that end up costing money. As a result, it will often make sense to have two workspaces – one for ETL jobs (Data Engineers), and one for analytics / data science users, who might have less privilege’s than an automated ETL job. There are several reasons to keep these workspaces separate:
- Security requirements differ – it usually makes sense to mount your data lake to the ETL cluster, so your ETL jobs automatically have the permissions they need without setting the context to connect at the beginning of every job. However, that also allows anyone else in the workspace access to the data lake, so caution should be taken.
- Modularization of CI / CD and maintenance – since the two workspaces have different functions, it makes sense to logically separate them.
- Cluster requirements will often be different between analytics users and ETL workspaces. You can have multiple clusters in a single workspace, but separating them eases maintenance.
Then of course, you should have different workspaces per environment – dev, test, stage, and prod.
There is a tradeoff here. More workspaces mean more Azure resource management, but it also allows for logical separation of security requirements. Thus, there is no one approach that is better – it is important to analyze your organization’s requirements and make a decision from there.
Table Access Control
Let’s assume we take the two-workspace approach: One for ETL (Data Engineers usually have full access to the data lake), and one for Analytics Users / Ad Hoc querying. You still have a decision to make: Do you enable Table Access Control, Azure Data Lake Storage Passthrough, or some combination of both, to secure what access they are given?
Table access control allows you to assign permissions on objects in the Hive Metastore to groups within Databricks. To be clear, this does not mean that you can set table access control on a SQL Server that you are accessing through Databricks. It is purely for Tables, (Delta or not), which you have created within Databricks. For example, let’s say you have created an ‘orders’ table on top of a set of Parquet files that is incrementally updated in the data lake. This table would appear in the ‘Data’ tab in the Databricks workspace.

However, let’s say there was only one group of users who should be able to see this table. You could create a security group within Databricks called ‘orders_users’, add all of the users to that group, and then grant SELECT permissions to that group. Then, only users in that group could see and access the table. To other users, the table doesn’t even exist. By default, when you enable TAC, only admins and the user who created objects automatically are given access rights to those objects. For all other users, you will need to explicitly grant permissions to either them individually, or to their respective groups (always go with groups if you can). There is also a limitation here: TAC only works with Python and SQL clusters – so if you are using Scala, this is not an option.
TAC will work best if you have a group of analysts who are only querying a set of tables, or perhaps a ‘lake house’, and you want to have a workspace for them to work in where you can manage their permissions separate from the data lake. These users would normally not require to access the data lake directly, so TAC is sufficient. It also works well when you have many tables defined on data that is outside of the data lake, since AD Passthrough only passes credentials through to the lake.
Note – TAC requires a Premium Databricks plan.
Implement Table Access Control
In order to enable Table Access Control in your Databricks Workspace, navigate to the workspace home screen and click your user icon in the top right-hand corner. The click on ‘Admin Console’

From here, click on the ‘Access Control’ Tab. You should see an option that says ‘Table Access Control: Disabled’ with a blue button next to it that says ‘Enable’. By default, this setting is disabled. Click ‘Enable’ and you are all set!

In order to create groups in your Databricks Workspace, navigate back to the workspace home screen and click your user icon in the top right-hand corner. Then click ‘Admin Console’.

Click on the ‘Groups’ tab on the top of the page, and click ‘Create Group’.

Enter the name of the group, and then click create. This will bring you into the group itself, where you can add members, grant entitlements, and link parent groups. Generally speaking, you will want your groups to be more generic and encompassing than a group to grant access to a single table. One strategy for this is creating Databricks Databases to group your tables together and then grant group permissions based on the database rather than individual tables. Also try to group your users into as few groups as possible. These tactics will result in less overhead for managing access control.
The last step to implement TAC is to actually assign permissions to the group. This can be done using data object privileges syntax, and is very similar to granting permissions in SQL Server. Below is an example of granting the SELECT permission to the order_users group to the orderDB Database.

There are many types of privileges you can grant, so it is a good idea to review the link above to get a feel for what can be done.
Azure Data Lake Storage Passthrough
Azure AD Passthrough allows the Active Directory credential that users logged into Databricks with to be passed through to the Data Lake, where you can also set access control. This is a great option if you are using Azure Active Directory for identity management, because you only have to set ACLs in one place – on the data lake. Then, you don’t need to worry about managing a separate set of permissions in Databricks as well. Also, with TAC control enabled, if a user has the data lake credential (Databricks secret / etc.), and they know where to look in the data lake, they can still technically get to the data there. Using ADLS Gen 2 ACLs and AD Passthrough prevents this ‘loophole’ of TAC.
You can set ACLS at any object level within the data lake. For example, say you had 3 major data lake zones, raw, refined, and curated. You can set different permissions for each of these zones, or you could even go into subdirectories of these zones, and define permissions there. You can also set permissions at the file system level, if you desire.

ACLS within ADLS Gen 2 can get quite robust – but there is one thing to look out for. These permissions will not inherit on files and sub-directories that are already created. That is, if you decide to add a new permission to the raw zone of your data lake, but there is already a lot of data in that directory, the permissions will only inherit to NEW data added after the permissions were set up. You will need to write a script to loop through the directories and ‘manually’ assign the permissions to all the files and folders below. Thus, it is critical to get your data access personas defined early, so you can avoid this extra step down the line.
One caveat with AD Passthrough: Let’s say you have a table ‘FinancialForecasts’ defined in Databricks on the curated zone of the data lake that only a small group of people should have access to. If I am an analytics user in the same workspace as the small group that DOES have access to this table, I will be able to ‘see’ the table metadata in the data tab within the Databricks workspace. But if I am not granted permissions to the area in the data lake that the underlying data for this table lives, if I try to select from the table, I will get a permission error. So, while I can see the metadata, I won’t be able to access the data.
Finally, you will need a Databricks premium plan to use this feature. Likely, if you are implementing this at an enterprise level, you will want a premium plan for other features anyway.
AD Passthrough is declared at the cluster level. Here is where you can enable AD Passthrough when creating a Databricks Cluster:
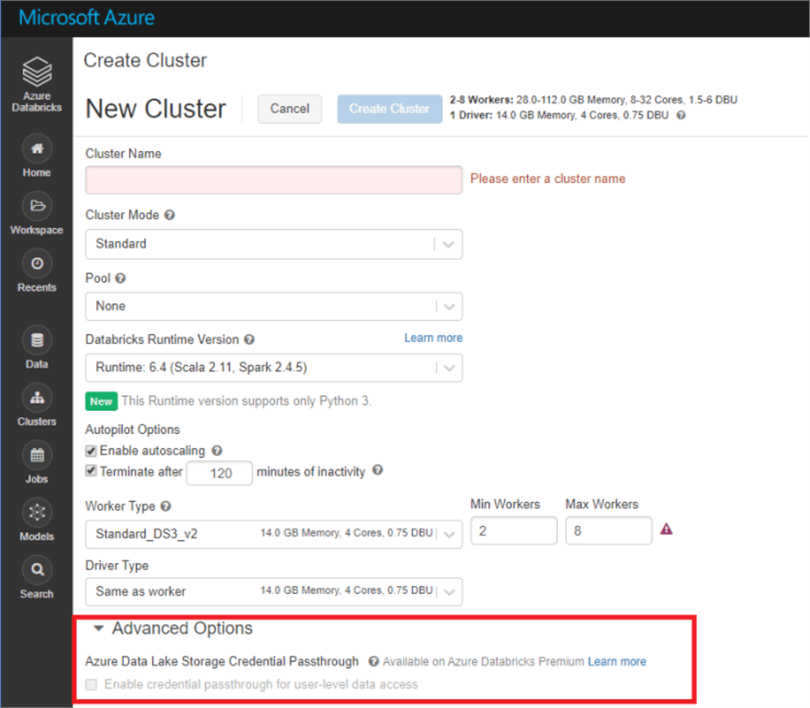
This link goes through what setting up access control in ADLS Gen 2, so that the permissions are set appropriately when the AD credential is passed through Databricks.
Sample Databricks Security Architecture
Based on all of the details just covered, here is an example of what your production environment might look like:

In the above example, we have two Databricks workspaces – one dedicated to ETL, and one dedicated to analytics. The ETL workspace has the data lake mounted, such that anyone who can access this workspace can access everything in the data lake. Since this workspace will mostly contain ETL jobs, which need access to all data, this is fine. The Analyst workspace will employ two types of security – AD Passthrough for Data scientist, who might need more access to raw data in the data lake, and Table Access Control for Data Analysts, who might only need to query tables that are defined within Databricks. Each of these personas would have their own cluster so their security can be separate. This allows us to provide minimal access to each user persona in a manageable way.
As with all technology problems, there are many ways to accomplish the same goal. So please take the above with a grain of salt, and think critically on the requirements for your data platform before making any major decisions!
Next Steps
- Brainstorm with your organization the best way to implement Databricks security on your Data Lake.
- Test out different methods above to see what works best for your organization.
- Read other Databricks MSSQLTips:

Ryan Kennedy is a Solutions Architect for Databricks, specializing in helping clients build modern data platforms in the cloud that drive business results. He has worked with clients across industries, most extensively healthcare and insurance, to architect and build data solutions spanning the data fabric – from ingestion processes, data lakes, and data warehouses, to advanced analytics, visualizations, and BI. Ryan is Microsoft certified in Big Data and Data Science technologies, and is always looking to further his technical expertise. When not working on an exciting data project, you can find Ryan spending time with his wife or training for a triathlon.
- MSSQLTips Awards: Rookie of the Year – 2020


I suggest you look into using ACL’s alongside cluster’s with credential pass-through. It’s a more secure and elegant approach to controlling ADLS security access for a wide variety of reasons. Using this approach, you simply mount your ADLS without credentials baked-in and auth is handled in at query time by passing the logged-in users credentials. It’s worth noting that this is ACL only, i.e., DO NOT setup the user with any RBAC.