Problem
With the rise and fall of numerous Azure Resources, one service that has gained quite a bit of recent hype as a promising Apache Spark-based analytics cloud big data offering is Databricks. With its record setting and blazing fast performance for processing big data workloads, coupled with its integration with Azure security and variety of other offerings, Databricks is sure to play a key role in the modern data and analytics platform for several reasons. For one, Azure Databricks offers quick setup and limits the stress from configuring and managing clusters, while seamlessly integrating into the Azure cloud platform. Additionally, it offers a collaborative workspace for data analysis, data science, AI and ML. While this all sounds great from a data engineering, data integration and data science perspective, as a novice to Azure Databricks, how can one simply start querying an Azure SQL Database using Azure Databricks?
Solution
Azure Databricks is an Apache Spark-based analytics platform optimized for the Microsoft Azure cloud services platform that integrates well with Azure databases and stores along with Active Directory and role-based access. It excels at big data batch and stream processing and can read data from multiple data sources to provide quick insights on big data workloads. In this article, I will discuss key steps to getting started with Azure Databricks and then Query an OLTP Azure SQL Database in an Azure Databricks notebook. This querying capability introduces the opportunity to leverage Databricks for Enterprise Cloud Data warehouse projects, specifically to stage, enrich and ultimately create facts and dimensions for star schema data models and to promote self-service BI.
Prerequisites
I have utilized the following three Azure Resources to complete this exercise:
1) Create an Azure SQL Database: For more detail related to creating an Azure SQL Database, check out Microsoft’s article, titled Quickstart: Create a single database in Azure SQL Database using the Azure portal, PowerShell, and Azure CLI. Additionally, we will need the Wide World Importers OLTP Database. Check out this tip for more detail: Download and Install SQL Server 2016 Sample Databases WideWorldImporters and WideWorldImportersDW.
2) Create an Azure Key Vault: For more detail related to creating an Azure Key Vault, check out Microsoft’s article titled Quickstart: Set and retrieve a secret from Azure Key Vault using the Azure portal.
3) Create an Azure Databricks Service: For purposes of setting up a Key Vault, we will need a Premium Databricks pricing tier. This article, titled Try Azure Databricks will help with setting up the Databricks Service.

Create a Secret Scope
Azure Databricks has Key Vault-backed and Databricks-backed secret scopes. These secret scopes allow users to store secrets, such as database connection strings, securely. If someone tries to output a secret to a notebook, it is replaced by [REDACTED], which helps prevent someone from viewing the secret or accidentally leaking it when displaying or sharing the notebook.
Now that I have an instance of Key Vault up and running, it is time to let Azure Databricks know how to connect to it.
The first step is to open a new web browser tab and navigate to https://#secrets/createScope (for example, https://westus.azuredatabricks.net#secrets/createScope).
Enter the name of the secret scope, such as key-vault-secrets.
Select Creator within the Manage Principal drop-down to specify only the creator (which is you) of the secret scope has the MANAGE permission.
MANAGE permission allows users to read and write to this secret scope, and, in the case of accounts on the Azure Databricks Premium Plan, to change permissions for the scope.
Your account must have the Azure Databricks Premium Plan for you to be able to select Creator. This is the recommended approach: grant MANAGE permission to the Creator when you create the secret scope, and then assign more granular access permissions after you have tested the scope.
Enter the DNS Name (for example, https://databricks-demo.vault.azure.net/) and Resource ID you copied earlier during the Key Vault creation step, for example: /subscriptions/xxxxxxxx-xxxx-xxxx-xxxx-xxxxxxxxxxxx/resourcegroups/azure-databricks/providers/Microsoft.KeyVault/vaults/Databricks-Demo. If this is a preconfigured environment, you do not need to complete this step.

Select Create.
After a moment, you will see a dialog verifying that the secret scope has been created.
Create a Databricks Cluster
Now that I have created all my Azure Resource, I will go ahead and launch the Databricks workspace by clicking Launch Workspace.
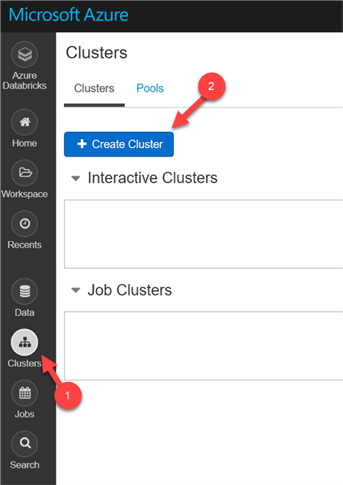
Once I am in the Workspace, I will click Clusters from the left-hand menu to create a cluster.
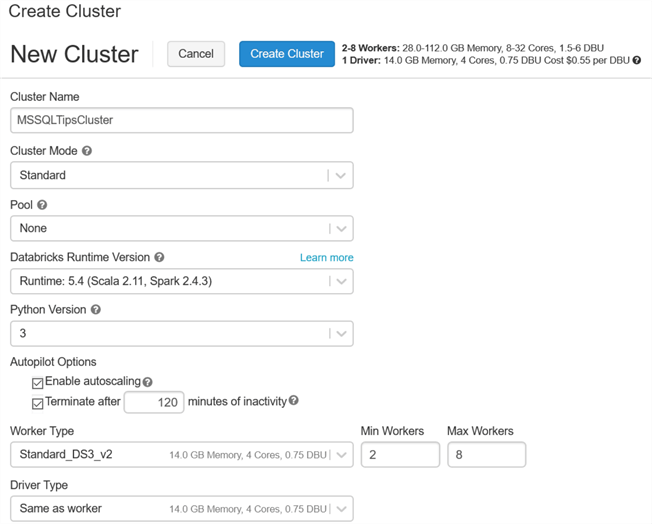
Next, I will configure my cluster as a Standard Mode, with the defaulted run-time version. I will leave the Min Workers to 2 and the Max to 8. Additionally, as a best practice, I will terminate the cluster after 120 minutes of inactivity. For more information on Creating Clusters along with the difference between Standard and High Concurrency Clusters, check out Create a Cluster.
Create a Databricks Notebook
Now that my cluster is created, I will create a notebook to connect to my SQL Database.

I will then enter a name for my notebook, select python as my language of choice and click Create.

Remember to attach the Cluster we created earlier to the Notebook. For more detail on managing notebooks, read Managing Notebooks.
Write Code to Query SQL Database
Now that I have my notebook up and running, I am ready to enter code to begin setting up the process to Query my SQL Database.
I will start by entering the following Scala code to configure my key vault secrets for my SQL Username and Password, which will be redacted going forward:
%scala
val jdbcUsername = dbutils.secrets.get(scope = "key-vault-secrets", key = "sql-username")
val jdbcPassword = dbutils.secrets.get(scope = "key-vault-secrets", key = "sql-password")

Class.forName("com.microsoft.sqlserver.jdbc.SQLServerDriver")
I will make use of this optional block of code to create an input widget to store the host name and database values to allow me access to those same values from cell that use a different language:
# Execute this cell to display the widgets on top of the page, then fill the information before continuing to the next cell.
dbutils.widgets.text("hostName", "", "Host Name")
dbutils.widgets.text("database", "", "Database Name")
Once executed, the widget will be displayed at the top of the notebook, as follows:
As we move on, I will enter the following code to configure the JDBC URL without passing in the username and password parameters:
%scala
val jdbcHostname = dbutils.widgets.get("hostName")
val jdbcPort = 1433
val jdbcDatabase = dbutils.widgets.get("database")

// Create the JDBC URL without passing in the user and password parameters.
val jdbcUrl = s"jdbc:sqlserver://${jdbcHostname}:${jdbcPort};database=${jdbcDatabase}"

// Create a Properties() object to hold the parameters.
import java.util.Properties
val connectionProperties = new Properties()

connectionProperties.put("user", s"${jdbcUsername}")
connectionProperties.put("password", s"${jdbcPassword}")
The following block of code will configure the SQL Server Driver:
%scala
val driverClass = "com.microsoft.sqlserver.jdbc.SQLServerDriver"
connectionProperties.setProperty("Driver", driverClass)
I am now ready to begin defining my connection properties with the following code, which defines three OLTP tables: Cities, Countries and StateProvinces:
%scala
val application_cities = spark.read.jdbc(jdbcUrl, "Application.Cities", connectionProperties)
val application_countries = spark.read.jdbc(jdbcUrl, "Application.Countries", connectionProperties)
val application_stateprovinces = spark.read.jdbc(jdbcUrl, "Application.StateProvinces", connectionProperties)
I will then create a TempView for my three tables to allow for easy querying:
%scala
application_cities.createOrReplaceTempView("Cities")
application_countries.createOrReplaceTempView("Countries")
application_stateprovinces.createOrReplaceTempView("StateProvinces")
Finally, I will run the following SQL Statement, which essentially joins my three tables, while selecting key fields from the tables to form a dataset that is enriched and prepared for my City dimension.
%sql
Select CityID,CityName,StateProvinceCode,SalesTerritory,CountryName,CountryType,Continent,Region,Subregion
FROM Cities c
INNER JOIN StateProvinces sp ON c.StateProvinceID = sp.StateProvinceID
INNER JOIN Countries co ON sp.CountryID = co.CountryID
LIMIT 10
As expected, the result displays the City related fields based on the SQL Query against my SQL Database that was run in the Databricks service.

Next Steps
- Similar to directly querying Azure SQL Database from Databricks, explore tutorials related to querying and Accessing Azure Data Lake Storage Gen2 with Azure Databricks for big data workloads that are stored in Azure Data Lake.
- Also explore Copying Azure SQL Database tables to Azure Data Lake Storage Gen2 using Azure Data Factory to move Azure SQL Database tables to Azure Data Lake and then query them from the Azure Databricks Service.

Ron C. L’Esteve is a Data and AI Leader and professional Author residing in Chicago, IL, USA. He is well-known for his impactful books and article publications on Azure Data & AI Architecture, Engineering, and Leadership. Ron holds a Master of Business Administration (M.B.A.) and Master of Science in Corporate Finance (M.S.F.) from Loyola University Chicago. Ron possesses deep technical skills and experience in designing, implementing, leading, and delivering modern Azure Data & AI projects for numerous clients around the world. He is a Motorola Certified Six Sigma Green Belt, a Microsoft Global Challenger, and also holds numerous additional Microsoft, Snowflake, and Databricks professional certifications in Big Data Engineering, Artificial Intelligence, Apache Spark and Data Platform Architecture.
- MSSQLTips Awards: Champion (100+ tips) – 2023 | Author of the Year – 2020-2021 | Rookie of the Year – 2019

