By: John Miner | Comments | Related: > Azure
Problem
You were asked by your manager to investigate the new functionality released with SQL Server 2016 this past June. How can you accomplish this task without installing the new software onto a development machine?
Solution
An Azure Virtual Machine is a great way to spin up a preconfigured environment for developing and testing Transact-SQL code.
Business Problem
Use Azure's Infrastructure As A Service (IAAS) offering to deploy a Windows 2012 Server R2 that is loaded with SQL Server 2016 RTM developer edition. The Contoso Retail BI sample database will be leveraged during the creation and validation of our sample code.
Azure Virtual Machine
This tip assumes you have an active Azure Subscription with money to spend and you are familiar with the Azure portal. Our first task is to create an Azure Virtual Machine using the Visual Studio Enterprise subscription that comes with MSDN. Each step listed below is part of the total solution.
From the dashboard, just select the Virtual Machines (VM) menu option which uses the Azure Resource Manager (ARM) deployment model. Do not select the Virtual Machines (classic) menu option which uses the older Azure Service Manager (ASM) deployment model. You should now be on the following input screen. Azure documentation uses the term blade(s) as nomenclature for screen(s).

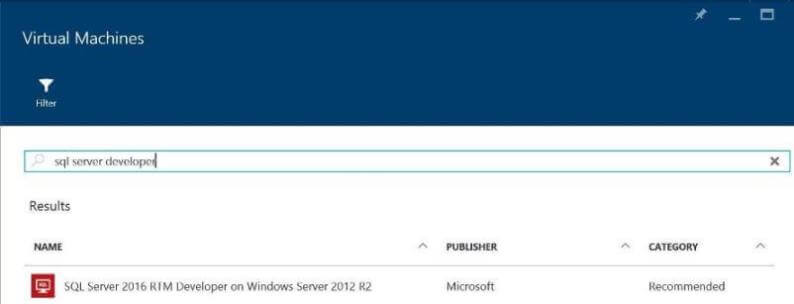
Click the add button at the top to advance to the Gallery screen. Type "sql server developer" in the search (filter) box. You should end up with the resulting image below. This is important since the developer edition is now free of charge. All other editions will incur a software rental cost. Click the virtual machine description to continue.
For some reason, the screen prompts you to confirm this is an ARM deployment model. However, there are some useful links on the screen such as Azure pricing details by product. Click the create button to continue.
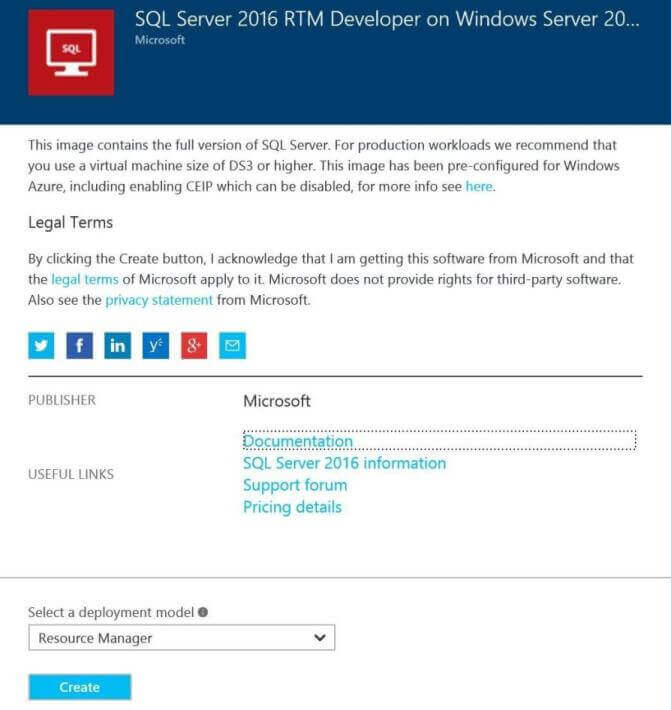
Deploy an Azure Virtual Machine
There are five easy steps (screens) that you need to fill in before you can create (deploy) the virtual machine (VM) image.
- Basics - Configure basic settings.
- Size - Choose virtual machine size.
- OS Settings - Configure optional features.
- SQL Settings - Configure SQL Server settings.
- Summary - Confirm your choices before deployment.
Basics - Configure Basic Settings in Azure
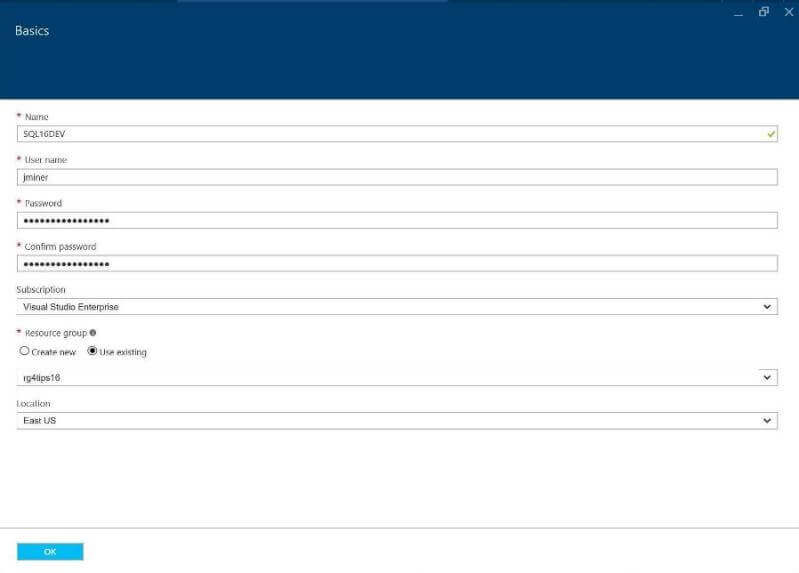
The first screen prompts you to enter the server name SQL16DEV, the administrator user name jminer, the user password, the subscription Visual Studio Enterprise, the resource group rg4tips16 and data center location East US.
In this example, I already had a resource group created and choose to use that existing group. I suggest that you come up with some type of prefix convention so that you know what an Azure object is by name. For instance, rg4 prefix represents a resource group for a particular purpose. Some screen entries need to be lower case. Therefore, everything except for the computer name is lower case. In fact, I could have made that lower case if I wanted.
Size - Choose the Azure Virtual Machine Size
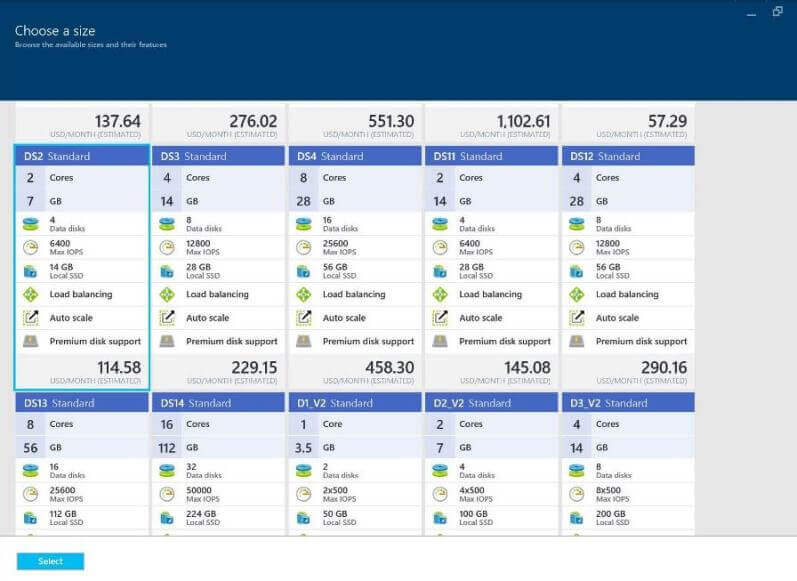
The second screen asks you to select a machine series and machine size. Currently, there are five different series at this time.
- A-series VM's can be deployed on a variety of hardware types and processors.
- D-series VM's are designed to run applications that demand higher compute power and temporary disk performance.
- G-series VM's offer the most memory and run on hosts that have Intel Xeon E5 V3 family processors.
- GS/DS – series VM’s follow their parent series with the hard disk being solid state drives.
There is an Azure Best Practice white paper that suggests to use a DS2 size for Standard Edition and DS3 size for Enterprise Edition.
For this test machine, I choose a DS2 size since I am not putting any real load on the system.
OS Settings - Configure Optional Features
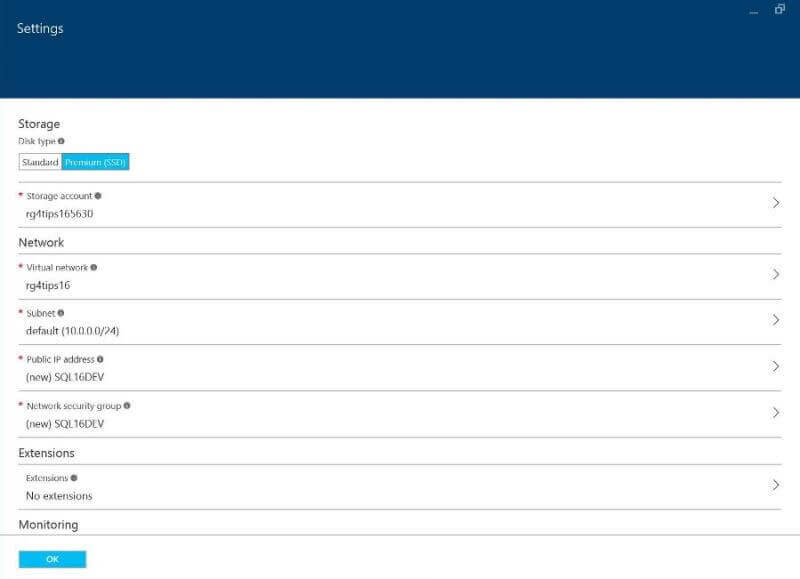
The third screen lets you to modify storage, networking, monitoring and availability. Since we choose a DS series image, the storage type is defaulted to Solid State Drive (SSD) which can not be changed. Networking is an advanced topic that I will not get into right now. However, if you wanted to deploy a Share Point Farm that had three different sub-nets for web, batch and database servers, this is where you can make such changes.
For this image, we will leave the defaults. Two
storage accounts are created by default. One for the virtual machine and one for
monitoring. Monitoring is enabled by default. We will not define a availability
group since we only have one SQL Server image. There is no redundancy in this deployment.
SQL Settings - Configure SQL Server Settings
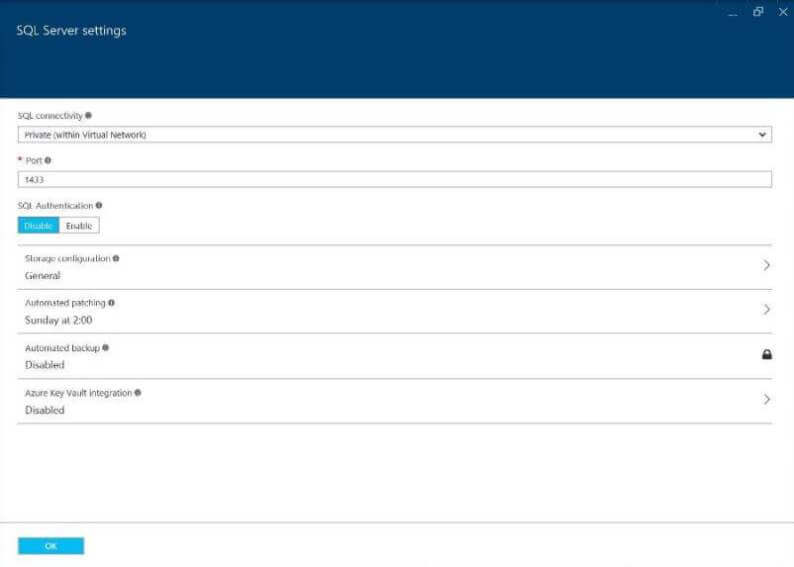
The fourth screen prompts you for SQL Server settings. Again, we will take all the defaults for this deployment.
There are three different connectivity options.
- Local - inside this virtual machine only.
- Private - inside the virtual network only.
- Public - accessible from the internet.
By default, SQL Server listens to tabular data stream (TDS) requests on port 1433. You can change this to a port of your choosing for added security. SQL Authentication is disabled by default. If you enable this setting, a user name and password must be supplied. This account will be added to the system administrator group for the database server. Under the storage configuration option, you can optimize the disk storage for either transactional processing (64 KB) or data warehousing (256 KB). This effects the allocation unit size of the formatted virtual disks.
The next three options are related to automated patching, automated backups and azure key vault integration. Automating patching of SQL Server is enabled by default for newer versions of the database engine. The next two options are permanently disabled for the developer edition. For automated backups, a storage account must be supplied to retain the backups for a given period. In short, the backup agent implements managed backup just like the on premise version does. Thus, the transactional work load determines when backups occur. Last but not least, all encryption features in SQL Server require keys and integration with Azure key vault can be used as an option for added security.
Summary - Confirm Your Choices Before Deployment
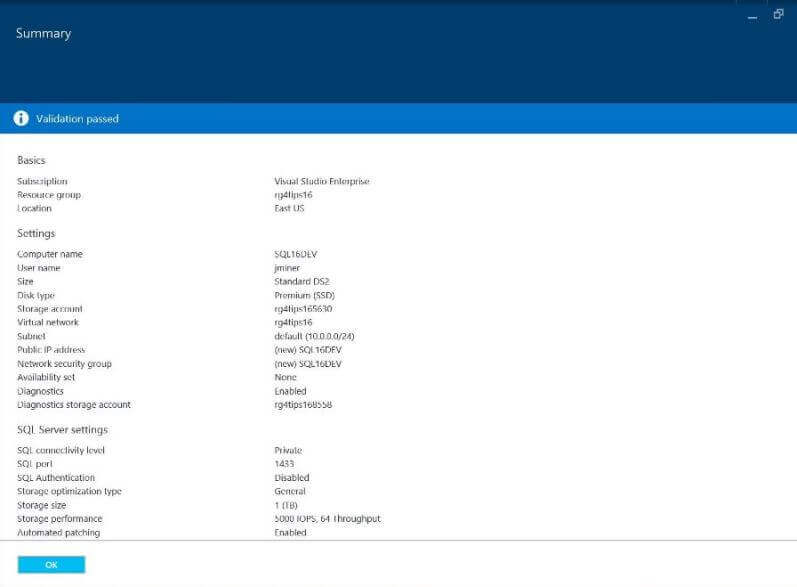
The fifth screen allows the user to review all of the options before actually
creating the image.
Remote Desktop Protocol
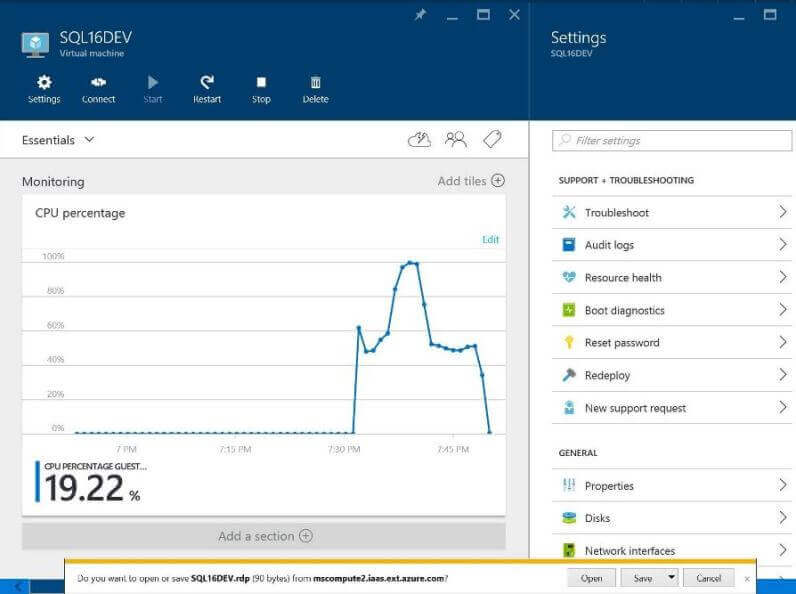
An Azure Virtual Machine is given a new IP every time it is started. Therefore,
I suggest you click on the connect button to download the latest RDP file. From
the monitoring blade, we can see the time it took to spin up and configure our machine.
Your time will vary depending upon how busy the data center is at the time of the
request.
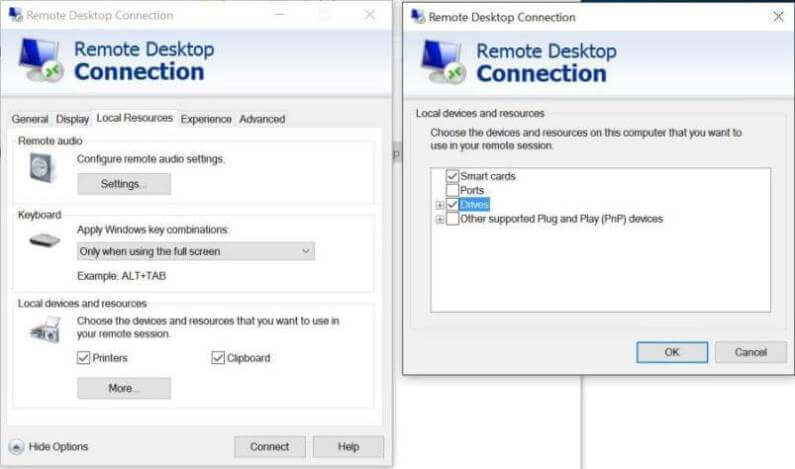
A little know fact is that the RDP session can expose the local computer resources
to the remote connection. We will want to modify the RDP file so that local resources
such as the disk drive are available. In our example, a database backup file will
be copied from the local to remote computer.
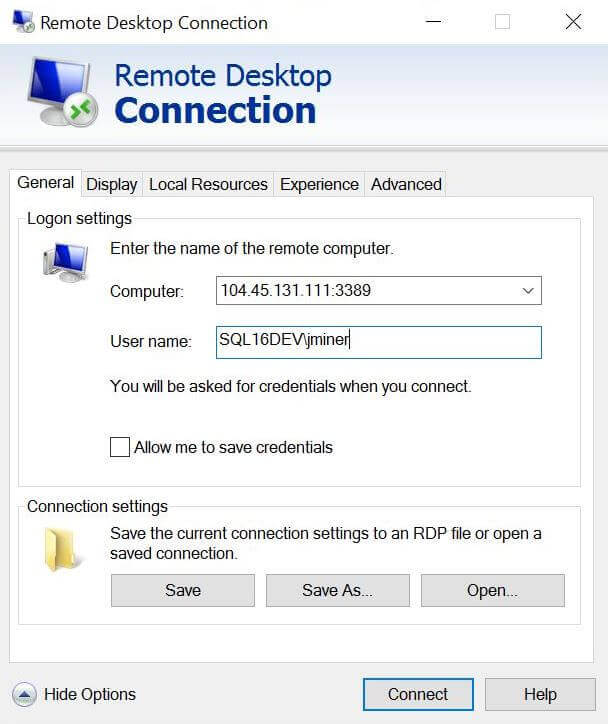
Since the remote computer is not part of a domain, we need to supply the local
machine and user name. Make sure you save the settings we modified.
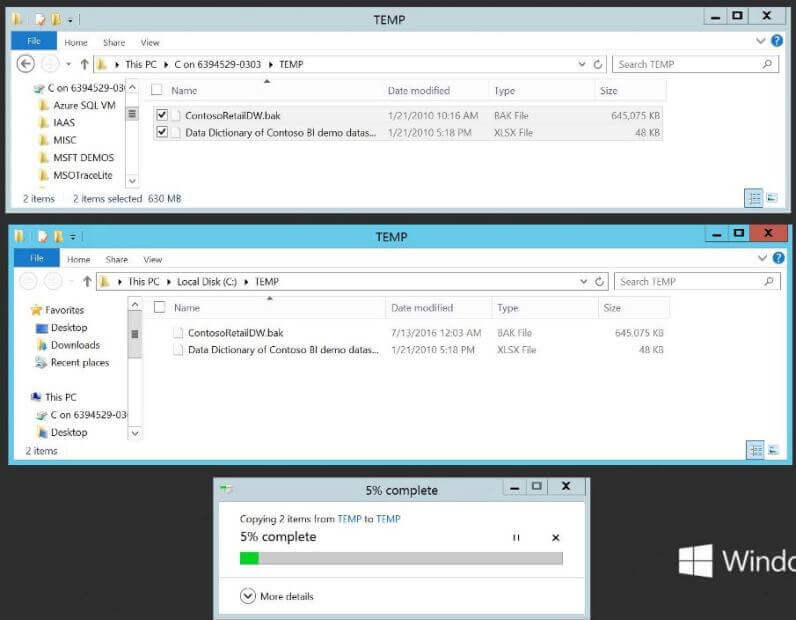
We need to copy over backup file from our local to remote machine since restoring
the Contoso sample database was a business requirement.
Contoso Retail Data Warehouse
I usually execute three T-SQL commands during a restore database task.
First, we want to validate that the backup is valid. This can be accomplished using the RESTORE VERIFYONLY command. Sometimes, backups will get corrupted when copying from the local to remote computers. If this happens, try copying the file using a network restartable program such as xcopy /z or robocopy.
Second, we want to list the contents of the backup file. This can be accomplished using the RESTORE FILELISTONLY command. Many times, the source file path(s) differs from the destination file path(s). In that situation, we want to use the MOVE clause.
Third, we want to use the following
RESTORE DATABASE command to bring the Contoso Retail DW database online with
the RECOVERY clause.
--
-- Restore Contoso Retail Db
--

-- Verify backup contents
RESTORE VERIFYONLY
    FROM DISK = 'C:\TEMP\ContosoRetailDW.BAK';
GO

-- List backup contents
RESTORE FILELISTONLY
    FROM DISK = 'C:\TEMP\ContosoRetailDW.BAK';
GO

-- Restore and move files
RESTORE DATABASE ContosoRetailDW
    FROM DISK = 'C:\TEMP\ContosoRetailDW.BAK'
    WITH MOVE 'ContosoRetailDW2.0' TO 'C:\MSSQL\DATA\ContosoRetailDW.mdf',
    MOVE 'ContosoRetailDW2.0_log' TO 'C:\MSSQL\DATA\ContosoRetailDW.ldf',
    RECOVERY
GO
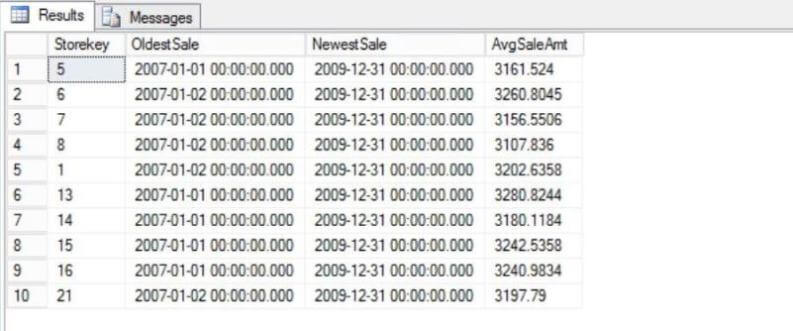
Our first sample query returns the oldest sale date, newest sale date and average
sales amount from the sales fact table grouped by store id.
--
--  Get first & last sale by store with average sale amount
--

SELECT TOP 10
    Storekey,
    MIN([DateKey]) as OldestSale,
    MAX([DateKey]) as NewestSale,
    AVG([SalesAmount]) as AvgSaleAmt
FROM
    [ContosoRetailDW].[dbo].[FactSales]
GROUP BY
    StoreKey
Output from executing T-SQL query is listed below.
Summary
In the past, projects that needed a test environment either had to procure hardware
and software or go thru red tape to get a new guest created on an virtualized environment.
Today, we saw that an Azure Virtual Machine is a great way to spin up a preconfigured
environment for developing and testing. This task can be accomplished in mere minutes.
Next Steps
- Check out these related resources:
About the author
 John Miner is a Data Architect at Insight Digital Innovation helping corporations solve their business needs with various data platform solutions.
This author pledges the content of this article is based on professional experience and not AI generated.
View all my tips


