Problem
Over the next few years, companies will be moving to the cloud for the speed in which services can be deployed, the ability to scale services when demand changes, and potential cost savings from eliminating data centers. However, there will still be some workloads that cannot be moved to the cloud. In those situations, we might have a hybrid situation in which development and testing can be done in the Azure cloud. Once a software release candidate is ready, the solution can be deployed to our on premise environment.
How can we easily move databases between our cloud development environment and our on premise production environment?
Solution
Microsoft has provided the database developer with PowerShell cmdlets to export and import Azure SQL databases to and from bacpac files. A bacpac file is basically a renamed zip file. This file has two purposes: contains instructions to duplicate the database schema and contains data files to reproduce the current state of the database.
Business Problem
Our boss has asked us to execute a couple of change orders this week.
First, we need to copy the PORTFOLIO database in the Azure development environment to our on premise production environment. The software development team has been working hard on this new application and it is ready for release.
Second, we need to re-initialize our development environment with the ADVENTURE WORKS database that is in production. The business team has a list of enhancements that need to be designed for the next version of our software.
These are common requests for an active development team. We will leverage Azure blob storage as a staging area for the bacpac files.
Azure Subscription
We must log in with a valid subscription owner before we can do any work. The Add-AzureRmAccount cmdlet will prompt you for credentials.

An account might have several subscriptions associated with it. Use the Get-AzureRmSubscription cmdlet to list the subscriptions associated with craftydba@outlook.com account. We want to make sure any new database deployments are on the Visual Studio Enterprise subscription since it has a higher spending limit. Use the Set-AzureRmContext cmdlet to choose the correct subscription.

The PowerShell script below logs into the portal, lists the subscriptions and selects the correct subscription. Of course, manual intervention is needed for the sign on and coding the correct subscription id ahead of time.
#
# Azure Subscriptions
#
# Prompts you for azure credentials
Add-AzureRmAccount
# List my subscriptions
Get-AzureRmSubscription
# Pick my VS Enterprise one
$SubscriptionId = '26efaaba-5054-4f31-b922-84ab9eff218e'
Set-AzureRmContext -SubscriptionId $SubscriptionId
Database Consistency
The export cmdlet is an asynchronous process that is executed in a queued fashion for each data center. Since each table has to be scripted out as well as the data dumped to files, the execution time is somewhat proportionate to the size of the database. In short, creating a bacpac file for a good size database might take several minutes. If changes are allowed to the database during this process, bacpac file might not be consistent with the database for a given point of time.
How can we guarantee a consistent database state?
The PowerShell script below uses the Get-AzureRmSqlDatabase cmdlet to list all the Azure SQL databases associated with the mssqltips16 server which is part of the rg4tips16 resource group.
#
# List databases
#
# List databases
$ListDbs = Get-AzureRmSqlDatabase -ResourceGroupName "rg4tips16" -ServerName "mssqltips16"
$ListDbs | Select-Object Edition, ServerName, DatabaseName, Location | FL
The image below shows the two databases associated with the server.

The easiest way to guarantee consistency is to create a database copy. Please see my prior article for full details. The PowerShell script below makes a copy of the development database using the New-AzureRmSqlDatabaseCopy cmdlet. Since no transactions are happening to the OUT-PORTFOLIO database, we now have a consistent database for a given point in time.
#
# Transactionally consistency
#
# Create database copy
New-AzureRmSqlDatabaseCopy -ResourceGroupName "rg4tips16" -ServerName "mssqltips16"
  -DatabaseName "PORTFOLIO" -CopyDatabaseName "OUT-PORTFOLIO"
The output below shows the new database.

The image below shows the three databases associated with the server.

While looking at PowerShell output might be interesting for some folk, I like to make sure the database is on-line using SQL Server Management Studio (SSMS). The image below shows the databases associated with the mssqltips16 server.

Export Database
Exporting the database to a bacpac file to blob storage requires several parameters: location of database server, credentials to database server, location of blob storage and credentials to blob storage. The paragraphs below will explain each required parameter and steps to export the database.
I wanted to go over the PSCredential object which is part of the PowerShell environment. You will see this object used in many scripts. However, it is not secure since the user name and password are readable text. Basically, we pass the user name and a secure string to the New-Object cmdlet to instantiate the object.
If security is a real concern, look at storing the password in a file using a standard encryption method such as AES that is not user specific. Please see this article by David Lee on how to do this. In the example below, I could have just passed plain text instead of using this object. But, I would have missed an opportunity to pass along some information.
We already know that the OUT-PORTFOLIO database is associated with the mssqltips16 server and rg4tips16 resource group. These are just string parameters to pass to the cmdlet. Just remember that a database copy will cost you some money over time. After you have completed the export, you can always remove this temporary database to save money.
I like referencing prior articles to re-enforce learning. I am going to leverage the cool storage that I created in my prior article on the azcopy utility. The URL to the blob storage with the resulting file name is one parameter that we need. The other parameter is the storage key that can be found in the Azure Portal.
Last but not least, we need to call the New-AzureRmSqlDatabaseExport cmdlet to submit our request to the queue.
#
# Submit export request
#
# Create a credential
$User = "jminer"
$Password = ConvertTo-SecureString -String 'MS#tips$2016' -AsPlainText -Force
$Credential = New-Object -TypeName System.Management.Automation.PSCredential `
  -ArgumentList $User, $Password
# Blob storage information
$StorageKey1 = "eubYDN9yIFNJYP4+cumXauateg/IIoHkzuDYYndlmmvkp2IiOa=="
$BacPacUri1 = "https://sa4coolback.blob.core.windows.net/sc4coolback/bacpacs/portfolio.bacpac"
# Create a request
$Request = New-AzureRmSqlDatabaseExport -ResourceGroupName "rg4tips16" -ServerName "mssqltips16" `
   -DatabaseName "OUT-PORTFOLIO" -StorageKeytype StorageAccessKey -StorageKey $StorageKey1 `
   -StorageUri $BacPacUri1 -AdministratorLogin $Credential.UserName `
   -AdministratorLoginPassword $Credential.Password
It is very important to capture the returned request object. Again, the export process is asynchronous and may take some time. We can call the Get-AzureRmSqlDatabaseImportExportStatus cmdlet to check the status of our request. It is prudent to let the export finish creating the bacpac file in our blob storage staging area before using it.
#
# Status of export request
#
Get-AzureRmSqlDatabaseImportExportStatus -OperationStatusLink $Request.OperationStatusLink
The output below shows the completion status of our request at zero percent.

We can also look at the activity log of associated with the OUT-PORTFOLIO database via the Azure Portal. We want to wait until the status has change to succeed.

Download Bacpac File
Right now, we have a copy of the PORTFOLIO database saved as a bacpac file in blob storage. We need to download this file to our on premise server and save it in the C:\TEMP directory for processing. PowerShell scripts can help us accomplish this task. Make sure you execute these scripts within the on premise server using a remote desktop connection (RDP).
It is not uncommon to have several Azure subscriptions. In our case, the cool blob storage is associated with our free Developer Program Benefit subscription. The PowerShell script below switches the PowerShell Integrated Development Environment (IDE) to the correct subscription.
#
# Change subscriptions
#
# Pick my developer subscription
$SubscriptionId = '7c41519a-7595-4443-805d-deff7fb2a8e8'
Set-AzureRmContext -SubscriptionId $SubscriptionId
The output below shows we are now using the correct subscription.

The script below draws from knowledge acquired in a previous article on storing large amounts of data in Azure. The Get-AzureRmStorageAccount cmdlet returns the blob storage context for sa4coolback. We can call the Get-AzureStorageBlob cmdlet and filter the results for our container and file.
#
# Show exported file
#
# Grab storage context
$StorageContext = Get-AzureRmStorageAccount -Name 'sa4coolback' -ResourceGroupName "rg4backups"
# Find out new file
$List = $StorageContext | Get-AzureStorageBlob -Container 'sc4coolback'
$List | Where-Object {$_.Name -like "bacpacs*"}
The output below shows the total size and last modification date of the bacpac file.

The script below uses the Get-AzureStorageBlobContent cmdlet to save the portfolio.bacpac file to the c:\temp directory.
#
# Download file from azure
#
# Grab storage context
$StorageContext = Get-AzureRmStorageAccount -Name 'sa4coolback' -ResourceGroupName "rg4backups"
# Download file
$StorageContext | Get-AzureStorageBlob -Container 'sc4coolback' -Blob "bacpacs/portfolio.bacpac" `
  | Get-AzureStorageBlobContent -Destination "c:\temp\"
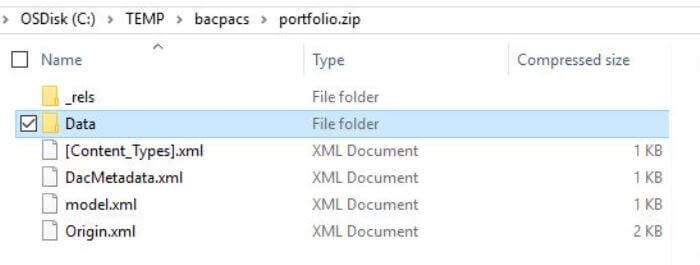
The image below shows our bacpac file in the correct directory. I even made a copy of the file and changed the extension to zip. This will allow us to open the file using windows explorer and examine the contents.

The image below shows the internal contents of the zip (bacpac) file. This file contains xml objects that can be used to reproduce the database schema and data files that can be used to reproduce the database state.
Import Data Tier Application
There are a few ways to import a bacpac file as a database. One way is to call the command line utility named sqlpackage.exe with the correct parameters to create a new database. Another way is to use the import data tier application wizard inside SQL Server Management Studio (SSMS). We are going to use the latter technique in this article. Make sure you are using the latest version of SSMS when importing so that there are no compatibility issues with file formats.
The image below shows our hypothetical on premise production server that has two databases. Of course we are using SQL Server 2016 as the database engine. Right click the database object in the object explorer. Choose import data tier application as our action.

The first dialog box prompts for the location of our bacpac file. We can either choose a local computer file or one stored remotely in the cloud. In our case, browse to and select the portfolio.bacpac file in the c:\temp directory.

The second dialog box prompts for details on the new database that will be created shortly. Supply the server and database names at this time. In our case, the server name is SQL16DEV, the administrator account is jminer and the database name is portfolio. If you choose, you can remap the file locations of the data and log files at this time.

The third dialog box prompts the user to confirm the information that was supplied for both the source and target. Choosing the finish button executes the import process.

You should see a final results dialog box that confirms the completion of the import process. Refreshing the database node in the object explorer will reveal the newly created portfolio database. Our first change order task was to move data from the cloud to on premise. This is now complete. The second change order task will reverse the process.
Export Data Tier Application
There are several ways to export a database to a bacpac file. One way is to call the command line utility named sqlpackage.exe with the correct parameters to create a bacpac file. Another way is to use the export data tier application wizard inside SQL Server Management Studio (SSMS). We are going to use the latter technique in this article. Make sure you are using the latest version of SSMS when exporting so that there are no compatibility issues with file formats.
The image below shows our hypothetical on premise production server that has three databases. To follow along with this example, you can download this sample database and install it in your environment. Right click the Adventure Works DW 2014 database object in the object explorer. Choose export data tier application as our action.

The first dialog box prompts for the target location of our bacpac file. We can either specify a local computer file or one stored remotely in the cloud. In our case, enter the advwrks2014.bacpac file in the c:\temp directory.

The second dialog box prompts the user to confirm the information that was supplied for both the source and target. Choosing the finish button executes the export process.

The image below shows the resulting bacpac file. I choose to move this file to a local sub-directory named c:\bacpacs. While this step is not necessary, the directory name now matches the purpose of the file contained within.

Upload the Bacpac File
At this point, we have the advwrks2014.bacpac file saved in the c:\bacpacs directory within our on premise production server. We need to upload this file to blob storage for processing. PowerShell scripts can help us accomplish this task. Make sure you execute these scripts within the on premise server using a remote desktop connection (RDP).
The PowerShell script below uses the Set-AzureStorageBlobContent cmdlet to save the bacpac file to the sc4coolback storage container. Use backward slashes to specify folders within the container when supplying the file name.
#
# Upload file to azure
#
# Grab storage context
$StorageContext = Get-AzureRmStorageAccount -Name 'sa4coolback' -ResourceGroupName "rg4backups"
# Upload file to azure
$src = 'c:\bacpacs\advwrks2014.bacpac'
$dst = 'bacpacs/advwrks2014.bacpac'
$StorageContext | Set-AzureStorageBlobContent -Container 'sc4coolback' -File $src -Blob $dst
The output below shows the total size and last modification date of the uploaded bacpac file.

Another way to look at the files in blob storage is to use the Azure Portal. Shown below are the two bacpac files in the staging area.

Import Database
Importing the bacpac file from blob storage to an Azure SQL database requires the same parameters as exporting: location of database server, credentials to database server, location of blob storage and credentials to blob storage. Refer to the paragraph above on Export Database for details. Some additional parameters that are necessary include the database edition, service objective, and maximum database size.
The script below switches our working subscription back to the Visual Studio Enterprise one.
#
# Change subscriptions
#
# Pick my developer subscription
$SubscriptionId = '26efaaba-5054-4f31-b922-84ab9eff218e'
Set-AzureRmContext -SubscriptionId $SubscriptionId
To get the process started, we need to call the New-AzureRmSqlDatabaseImport cmdlet to submit our request to the queue. The script below submits our import request to the queue. Please note we are creating a new Standard S0 database named AdventureWorksDW2014.
#
# Submit import request
#
# Create a credential
$User = "jminer"
$Pword = ConvertTo-SecureString -String 'MS#tips$2016' -AsPlainText -Force
$Credential = New-Object -TypeName System.Management.Automation.PSCredential `
  -ArgumentList $User, $Pword
# Blob storage information
$StorageKey1 = "eubYDN9yIFNJYP4+cumXauateg/IIoHkzuDYYndlmmvkp2IiOa=="
$BacPacUri1 = "https://sa4coolback.blob.core.windows.net/sc4coolback/bacpacs/advwrks2014.bacpac"

# Create a request
$Request = New-AzureRmSqlDatabaseImport -ResourceGroupName "rg4tips16" -ServerName "mssqltips16" `
   -DatabaseName "AdventureWorksDW2014" -StorageKeytype StorageAccessKey -StorageKey $StorageKey1 `
   -StorageUri $BacPacUri1 `
   -AdministratorLogin $Credential.UserName -AdministratorLoginPassword $Credential.Password `
   -Edition Standard -ServiceObjectiveName S0 -DatabaseMaxSizeBytes 500000000
Again, it is very important to capture the returned request object. To reiterate, the import process is asynchronous and may take some time. Just call the Get-AzureRmSqlDatabaseImportExportStatus cmdlet to check the status of our request. It is prudent to let the import finish creating the database before using it.
The image below shows the import process at seventy-eight percent.

The Impatient Developer
Many companies do not communicate well between teams. In our case, both the DBA and Application Developer have access to the Azure development subscription. Let’s assume the DBA has started work on the change order request. At the same time, the impatient developer wants to start work on a refreshed version of the database. The developer might login to the Azure Portal to list out the current databases.
The image below shows the new database exists and is on-line.

The developer has to add a field named PctQuotaChange to the FactSalesQuota table. That person uses SSMS to connect to the database and selects all rows from the table. An unexpected result is returned. There is no data in the table. Yet, this condition makes sense. The import process has created the database schema and is in the middle of loading each table with data. See image below for details.

Of course, the application developer calls the database administrator (DBA) on the phone to complain about the problem. The DBA tells the developer to go get another cup of coffee. He will give him a call when the process is complete.
The image below shows a fully loaded table since the import process is now complete.

The image below taken from SQL Server Management Studio (SSMS) shows our development environment with three databases. I will leave you with the task to delete the OUT-PORTFOLIO database since we have the point in time portfolio.bacpac file saved in blob storage.

Summary
Today, we had two change requests that needed to be executed. We used PowerShell scripts, Azure Blob Storage and SQL Server Management Studio (SSMS) Wizards to accomplish the tasks. First, we copied the PORTFOLIO database in the Azure development environment to our on premise production environment. Second, we need to re-initialize our Azure development environment with the ADVENTURE WORKS DW 2014 database that was in our on premise production environment.
In summary, it is very easy to move databases back and forth in a hybrid world. For more information on these tools and tasks, please look at the Azure documentation.
Next Steps
- How can we keep both an on premise and in cloud database in sync. The cloud database will be a read only copy.
- Transactional replication is one way to solve this problem.

John Miner is a Senior Data Architect at Insight Digital Innovation helping corporations solve their business needs with various data platform solutions.
He has over thirty years of data processing experience, and his architecture expertise encompasses all phases of the software project life cycle, including design, development, implementation, and maintenance of systems.
His credentials include undergraduate and graduate degrees in Computer Science from the University of Rhode Island. Also, he has earned certificates from Microsoft for Database Administration (MCDBA), System Administration (MCSA), Data Management & Analytics (MCSE), Data Science (MPP), Databricks Certified, and Fabric Certified.
John has been recognized with the Microsoft MVP award nine times for his outstanding contributions to the Data Platform community.
When he is not busy talking to local user groups or writing blog entries on new technology, he spends time with his wife and daughter enjoying outdoor activities. Some of John’s hobbies include wood working projects, crafting a good beer and playing a game of chess.
- MSSQLTips Awards: Author of the Year – 2019, 2022, 2023 | Champion (100+tips) – 2023

