Problem
If you have a need to remove a SQL Server Availability Group database from a secondary replica then you should read this article. I’ll explain the steps to remove the secondary database using both the SQL Server Management Studio (SSMS) and T-SQL code.
Solution
As you may know, a SQL Server Availability Group supports a set of read-write primary databases and one to eight sets of corresponding secondary databases. For our example, we have Availability Group configuration with three databases. We will make changes to remove one of the databases from the Availability Group. This could be for maintenance or just the need to refresh and re-synch the database if it is out of synch for some reason.
NOTE: MAKE SURE TO TEST IN LOWER LIFE CYCLE FIRST. DO NOT MAKE ANY CHANGES IN PRODUCTION WITHOUT PROPER TESTING.
Removing Secondary Database From AlwaysON Availability Group using SSMS
Step 1: Review and Validate
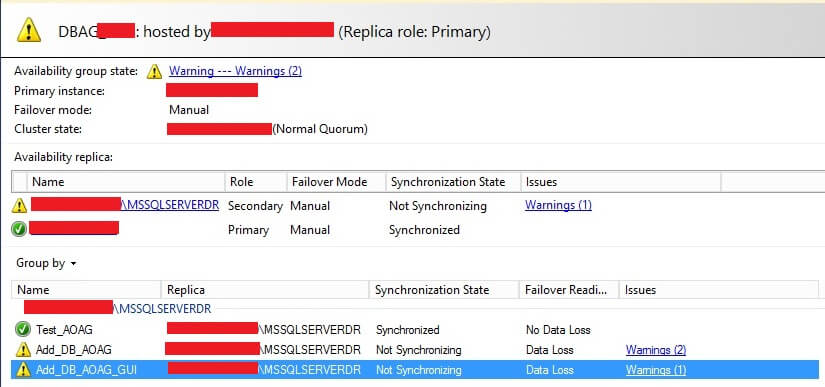
Our first step is to check and validate the existing AlwaysON Availability Group configuration by launching the dashboard report in SSMS. To do so in SSMS, on the primary server, right click on Availability Group name and choose “Show Dashboard” to display the AlwaysON dashboard report as shown below. Note: I masked some the data from my server, hence the red boxes.

We can see above that everything looks healthy and is in green state.
Step 2: Remove Secondary Database
Now we need to remove one of the secondary databases – “Add_DB_AOAG_GUI” from this configuration.
In SSMS, expand the folder “AlwaysOn High Availability” on the secondary replica where you want to remove the secondary database. Now expand folder “Availability Databases” under AOAG name. You can see all three availability databases are showing a green status. Right click on the identified database you want to remove from this configuration as shown in the below screenshot.

There are multiple options you will find here. Click on the “Remove Secondary Database…” option to proceed to the next step.
Step 3: Confirm Removal
Once you click on the “Remove Secondary Database…” option another window “Remove Secondary Database From Availability Group…” will appear. You can see the name of the identified secondary database that needs to be removed from the configuration.

Step 4: Removal Being Processed
Once you click on OK it will show you that it is processing for few seconds and then this window will disappear from the screen if removal is successful. The screen will not disappear if there is an issue during removal.
Step 5: Validate Removal of Secondary Replica
Now open the SSMS dashboard report again to validate the changes. We can see the status of secondary database “Add_DB_AOAG_GUI” is in red and the data synchronization status shows “Not Synchronizing”. This is because database Add_DB_AOAG_GUI has been removed from the secondary replica and is not receiving any data from the primary.

If you click on Warnings that are shown in the dashboard report you will get the below information.

Removing Secondary Database From AlwaysON Availability Group using T-SQL
Step 1: Review Status
This task can be done using a T-SQL statement as well. We can see we have removed one secondary database from the secondary replica in the above section using SSMS. Now we will remove another one of the secondary databases, “Add_DB_AOAG”. You can see the status of this database is showing green and synchronized in the above screenshots.
Step 2: Remove Secondary Database
Now launch a new query window and connect to the secondary replica from where you want to remove your secondary database from the Availability Group configuration.
 --Remove Secondary DB from AOAG
ALTER DATABASE Add_DB_AOAG SET HADR OFF;
GO

Once the command executes successfully you are done with the secondary database removal.
Step 3: Validate
Now we will check and validate if the secondary database has been removed from this AG. Launch the SSMS dashboard report for this Availability Group to check the details.
We can see database has been removed from the Availability Group configuration on the secondary replica. Now you can perform any activity like a restore that needs to be done on this secondary database.
Next Steps
- Stay tuned for additional tips related to how to remove a database from an Availability Group and other related tasks for Availability Groups.
- Go and check error logs, alerts on all replicas for any unusual events/logs.
- Explore more knowledge on SQL Server Database Administration Tips.
- Check out these other Availability Group tips.

Manvendra is a passionate database lover currently working as a Technical Architect at one of the top MNCs. He has extensive experience on all versions of SQL Server since 2000 and has built Big Data skills. He has lead projects on the following database features: Database Mirroring, Always ON, Replication, Log Shipping, Geo-Clustering and Performance Tuning and delivered many SQL Server projects on consolidation, upgrades, heterogeneous replication, HA / DR solutions, automation and major performance tuning projects. You can also follow Manvendra on his blog, Twitter, LinkedIn and Facebook.
- MSSQLTips Awards: Champion (100+ tips) – 2018 | Author Contender – 2015-2018, 2021-2022