Problem
We are planning on deploying a SQL Server 2016 failover clustered instance (FCI) for local high availability. From my understanding, a SQL Server FCI requires some form of shared storage subsystem. However, the servers that we purchased for our failover cluster nodes only have local storage. How can we install and configure a SQL Server 2016 FCI without shared storage?
Solution
To continue this series on Installing SQL Server 2016 Failover Clustered Instance on a Windows Server 2016 Failover Cluster Without Shared Storage, we will look at configuring the network adapters on the WSFC. In Part 1, you have learned how to create the WSFC and running the Failover Cluster Validation Wizard to include tests pertaining to Storage Spaces Direct (S2D). You’ve also configured the cluster quorum settings to use a file share witness. This tip will walk you through the configuration of the WSFC network adapters and S2D.
Renaming Cluster Network Resources
As a best practice, you should rename your cluster network resources prior to installing SQL Server 2016. There are two reasons for this. First, it makes it easy for administrators to identify what the network adapters are used for. Second, and one that is very relevant to the deployment of S2D, you want to configure a dedicated network adapter for the S2D traffic. S2D requires high bandwidth and low latency network connections between the WSFC nodes. The recommendation is to have remote-direct memory access (RDMA) capable network adapter on a 10 GbE or higher network switch. But in case you only have the standard network adapters that came with the servers, you have to properly configure the WSFC network adapters so that S2D traffic will not go thru the public network adapter. And while you may have renamed the network adapters using the Network Connections management console, you still have to rename them from the point-of-view of the WSFC. The default names of the cluster network resources will be Cluster Network n where n is the number assigned to the cluster network adapter.

To rename the cluster network resources:
- Within the Failover Cluster Manager console, select the Networks navigation option. This will display all of the cluster network resources added to the WSFC.

- Right-click one of the WSFC network adapters and select Properties. This will open up the Properties page for that specific cluster network resource.

- In the Properties page, type the appropriate name for the cluster network resource in the Name textbox. Click OK.

- Do this on all of the cluster network resources available on your WSFC.

NOTE: The WSFC will detect whether or not client applications can connect thru the specific cluster network resource. This is determined based on whether or not a network adapter has a default gateway and can be identified via network discovery. This is why it is important to get your network administrators involved in properly assigning the IP address, the subnet mask and the default gateway values of all the network adapters used on the WSFC nodes prior to creating the WSFC.
Another way of renaming the WSFC network adapters is by using the Get-ClusterNetwork PowerShell cmdlet as described in this previous tip. Be sure to rename the appropriate WSFC network adapters accordingly.
(Get-ClusterNetwork "Cluster Network 1").Name = "LAN"
Modifying Cluster Network Settings
By default, all of the WSFC network adapters will be configured for both internal cluster communication (heartbeat/private) and client applications. This is what it means when the checkbox for Allow clients to connect through this network is selected.


In most cases, only one WSFC network adapter is configured for client access while the rest should be configured for internal cluster communication.
To modify the cluster network settings for the other WSFC network adapters:
- Within the Failover Cluster Manager console, select the Networks navigation option. This will display all of the cluster network resources added to the WSFC.

- Right-click one of the WSFC network adapters that you want to use for internal cluster communication and select Properties . This will open up the Properties page for that specific cluster network resource.

- In the Properties page, uncheck the option for Allow clients to connect through this network. Click OK.

Do this on all the remaining WSFC network adapters that you want to use for internal cluster communication.

Another way of modifying the WSFC network adapters for internal cluster communications is by using the Get-ClusterNetwork PowerShell cmdlet. Be sure to apply the correct setting to the appropriate WSFC network adapter accordingly.
(Get-ClusterNetwork "Heartbeat").Role = 1
Configuring Dedicated Cluster Network Adapter for S2D Traffic
In the past, internal cluster communication traffic was all about monitoring and checking the health of all the members of the WSFC. This is very important to maintain the overall health and availability of the WSFC. In Windows Server 2008 R2, the Cluster Shared Volume (CSV) feature was introduced for use with the Hyper-V role. CSV allowed all of the nodes in the WSFC to have simultaneous read and write access to all of the available shared storage via the Server Message Block (SMB) protocol. This provided additional resiliency on accessing the shared storage: if a WSFC node loses its direct connection to the underlying CSV storage, the storage I/O will be redirected over the network to another WSFC node that can access the storage.
Today, internal cluster communication traffic not only includes WSFC monitoring and health checking but also CSV traffic. And since S2D leverages CSV and the SMB 3 protocol, it will use all of the available WSFC network adapters that you have configured as Cluster Only. By default, the WSFC automatically chooses the network adapters that appear to be the best for S2D traffic. You can check how this was automatically configured by reviewing the WSFC network adapter property called Metric. The WSFC network adapter with the lowest Metric value is automatically assigned for S2D traffic and internal cluster communication.
To view the Metric property of all the WSFC network adapters, use the Get-ClusterNetwork PowerShell cmdlet and sort by the Metric property.
Get-ClusterNetwork | Sort-Object Metric

Both the Heartbeat and Storage WSFC network adapters were assigned a Metric value lower than that of the LAN WSFC network adapter because you removed the option to Allow clients to connect through this network . Between the two, the Heartbeat WSFC network adapter is automatically configured with the lowest Metric value because it was the first network adapter that the WSFC identified when it first came online.
You can configure the Storage WSFC network adapter specifically for S2D traffic by setting the Metric property value to something lower than that of the Heartbeat WSFC network adapter. You can use the Get-ClusterNetwork PowerShell cmdlet to change Metric property. In this example, the Metric property value of 500 is assigned.
(Get-ClusterNetwork "Storage").Metric = 500

This doesn’t mean that only the Storage WSFC network adapter will be used for S2D traffic. It just means that it will be the preferred WSFC network adapter. If the Storage WSFC network adapter becomes unavailable due to a hardware or a switch failure, the WSFC will use the Heartbeat WSFC network adapter for the S2D traffic. In a worst-case scenario, the WSFC can end up redirecting S2D traffic on the LAN WSFC network, thereby, affecting client application traffic that may potentially cause timeouts due to network traffic saturation and possibly a failover.
Enabling Storage Spaces Direct (S2D)
After configuring the WSFC and the network adapters, it’s time to enable S2D. You can use the Enable-ClusterStorageSpacesDirect PowerShell cmdlet to accomplish this task.
Enable-ClusterStorageSpacesDirect

Running this PowerShell cmdlet does three things:
- Creates one large storage pool that has a name like “S2D on <WSFC name>” using all of the disks available on all of the WSFC nodes
- Configures caching for S2D if there are available SSD or NVMe drives
- Creates 2 default tiers – one is called “Capacity” and the other called “Performance”- if there are available SSD or NVMe drives. S2D will automatically configure each tier with different types of redundancy.
Because the servers used in this environment only had rotating disks and no SSDs nor NVMe drives, running the Enable-ClusterStorageSpacesDirect reported several warnings about no available disks for S2D caching.

You can verify this by using the Get-StorageTier PowerShell cmdlet. The command below displays the following information:
- FriendlyName: Either Capacity or Performance. Since no SSDs nor NVMe drives, Capacity was configured
- MediaType: Either HDD (rotating disks), SSD (solid state drive) or SCM (storage-class memory such as NVMe)
- NumberOfDataCopies: 2 for two-way mirror (similar to distributed, software-defined RAID-5 or RAID-6)
- ResiliencySettingName: Either Simple, Mirror, or Parity.
Get-StorageTier | Select FriendlyName, MediaType, NumberOfDataCopies, ResiliencySettingName

Once the process completes, you can verify the storage pool created using the Failover Cluster Manager and select the Pools navigation option under Storage.
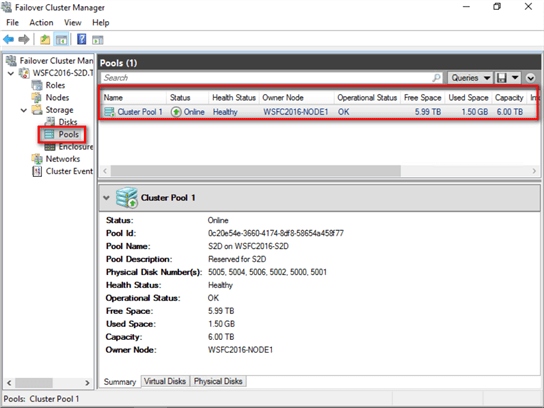
You can view additional information about the disks by clicking on the Physical Disks tab.

Create Disk Volumes from Storage Pool
Creating disk volumes from the storage pool is like creating logical partitions from a single physical partition. For this example, you will create two disk volumes - one for the SQL Server data files and one for the SQL Server log files.
You can create disk volumes from the S2D storage pool from using the Failover Cluster Manager console and follow the instructions outlined in the Creating volumes in Storage Spaces Direct documentation.

However, if you choose to do so, be aware that you do not have the option to choose the NTFS file system. When you launch the New Volume Wizard, you only have the resilient file system (ReFS) as the file system option available in the drop-down list as it is the preferred file system for S2D.

If you want to configure your disk volumes using the NTFS file system, you can use the New-Volume PowerShell cmdlet. An example command is shown below.
New-Volume -StoragePoolFriendlyName "S2D on <WSFC name>" -FriendlyName SQLDATA
-FileSystem CSVFS_NTFS -AllocationUnitSize 65536 -Size 2048GB -ProvisioningType Fixed
-ResiliencySettingName Mirror
The following parameters are used with the New-Volume PowerShell cmdlet to create the new disk volume:
- StoragePoolFriendlyName: The name of the storage pool where the disk volume will be coming from
- FriendlyName: The volume label
- FileSystem: Either NTFS, ReFS or their CSV versions. Since this is for S2D and specifically for SQL Server, use CSVFS_NTFS. SQL Server 2014 and higher is supported to run on top of ReFS. At the moment, SQL Server 2016 is the only documented version supported to run on top of S2D.
- AllocationUnitSize: The volume allocation unit size. This follows the SQL Server best practice of using 64K
- Size: The size of the disk volume
- ProvisioningType: Either Fixed or Thin. This also follows the SQL Server storage best practice of fix-provisioning storage for database files
- ResiliencySettingName: The storage layout configured for the disk volume. Either Simple, Mirror or Parity

Repeat the process to create a 500 GB disk volume for the SQL Server log files.
Once the disk volumes have been created, you can verify them using the Failover Cluster Manager and select the Disks navigation option under Storage.

Since the disk volumes are managed by CSV, they will be added as mount points to the C:\ClusterStorage folder on all of the WSFC nodes. Volume1 is the SQLDATA disk volume with 2 TB capacity and Volume2 is the SQLLOG disk volume with 500 GB capacity.

Rename the Disk Volumes
As a best practice, you should rename the disk volumes prior to installing SQL Server 2016. This makes it easy to identify what the disks are used for – data, log, backups, etc. – during the installation and later on when troubleshooting availability issues. You can do this by simply renaming the mount points on the C:\ClusterStorage folder.
Alternatively, you can use the Rename-Item PowerShell cmdlet to rename the volume mount points.
Rename-Item C:\ClusterStorage\Volume1 C:\ClusterStorage\SQLData

This will be reflected in the disk volume from within the Failover Cluster Manager.

In this tip, you have configured the WSFC network adapters, S2D and created disk volumes. In the next tip, you will proceed to install SQL Server 2016 on top of this WSFC, leveraging S2D as the shared storage subsystem for the database files.
Next Steps
- Review the previous tips on Step-by-step Installation of SQL Server 2016 on a Windows Server 2016 Failover Cluster – Part 1 , Part 2 , Part 3 and Part 4.
- Read more on the following topics:

Edwin M. Sarmiento is the Managing Director of 15C, a consulting and training company that specializes on designing, implementing and supporting SQL Server infrastructures. He is a Microsoft SQL Server MVP and Microsoft Certified Master from Ottawa, Canada specializing in high availability, disaster recovery and system infrastructures running on the Microsoft server technology stack ranging from Active Directory to SharePoint and anything in between. He is very passionate about technology but has interests in music, professional and organizational development, and leadership and management matters when not working with databases. Edwin lives up to his primary mission statement: “To help people and organizations grow and develop their full potential.”
- MSSQLTips Awards: Champion Award (100+ tips) – 2017 | Author of the Year Contender – 2020, 2017