By: Dinesh Asanka | Comments (4) | Related: More > Import and Export
Problem
In data warehousing, it's essential to keep historical data for analysis. Data changes over time, so what is the best way to keep a historical record of data changes?
Solution
In case of OLAP or data warehousing, it's essential to keep track of data changes for historical analysis. For example, let's assume a customer moved from one location to another, it is important to keep these historical changes. If not, all the transactions done by the particular customer will fall under the new location which will be incorrect in analysis. Instead, previous transactions should be tagged under the previous location and new transactions should be tagged to the new location.
Before going through the details of implementation, let's look at the physical implementation of tables and storing historical data based on a book from Ralph Kimball.
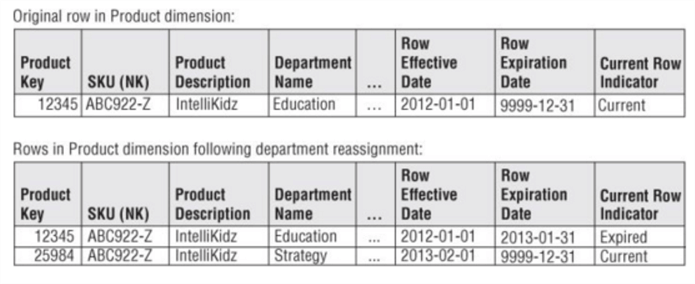
In the example below, for Product Key 12345, the Department Name has changed from Education to Strategy on 2013-02-01. In the case of historical data maintenance, a new row is added with all the other attributes and modified attributes. Three additional columns are introduced as housekeeping columns to find out the latest record and the effective date range for each record. When the current record expires, the Current Row Indicator is set to expired and the row expiration date is set to the current date. This is called a Type 2 Slowly Changing Dimension (SCD) in the data warehouse world.
Environment Setup
Let’s setup an environment to show an example.
First, we will create an empty database.
CREATE DATABASE HistoryDW
GO
Next, let's create the source table or the OLTP table named Customer which has the business key CustomerID.
CREATE TABLE [dbo].[Customer](
   [CustomerID] [nvarchar](15) NOT NULL,
   [MaritalStatus] [nchar](1) NULL,
   [Gender] [nvarchar](1) NULL,
   [YearlyIncome] [money] NULL,
   [TotalChildren] [tinyint] NULL,
   [NumberChildrenAtHome] [tinyint] NULL,
   [Education] [nvarchar](40) NULL,
   [Occupation] [nvarchar](100) NULL,
   [HouseOwnerFlag] [nchar](1) NULL,
   [NumberCarsOwned] [tinyint] NULL,
   [CommuteDistance] [nvarchar](15) NULL,
CONSTRAINT [PK_Customer_CustomerID] PRIMARY KEY CLUSTERED
(
   [CustomerID] ASC
)
) ON [PRIMARY]
GO
Let’s insert a few records as well.
INSERT INTO [dbo].[Customer]
           ([CustomerID]
           ,[MaritalStatus]
           ,[Gender]
           ,[YearlyIncome]
           ,[TotalChildren]
           ,[NumberChildrenAtHome]
           ,[Education]
           ,[Occupation]
           ,[HouseOwnerFlag]
           ,[NumberCarsOwned]
           ,[CommuteDistance])
     VALUES
           ('C00001','M','M',25000,2,2,'Graduate','Senior Engineer','Y',0,'10.5 KM')

INSERT INTO [dbo].[Customer]
           ([CustomerID]
           ,[MaritalStatus]
           ,[Gender]
           ,[YearlyIncome]
           ,[TotalChildren]
           ,[NumberChildrenAtHome]
           ,[Education]
           ,[Occupation]
           ,[HouseOwnerFlag]
           ,[NumberCarsOwned]
           ,[CommuteDistance])
     VALUES
           ('C00002','F','M',20000,3,1,'MBA','Manager','N',1,'20.5 KM')
Then the dimension table called DimCustomer is created. At end of this script, you will notice that there are three additional columns introduced as housekeeping columns as described before.
USE HistoryDW
GO

CREATE TABLE [dbo].[DimCustomer](
   [CustomerKey] [int] IDENTITY(1,1) NOT NULL,
   [GeographyKey] [int] NULL,
   [CustomerAlternateKey] [nvarchar](15) NOT NULL,
   [MaritalStatus] [nchar](1) NULL,
   [Gender] [nvarchar](1) NULL,
   [YearlyIncome] [money] NULL,
   [TotalChildren] [tinyint] NULL,
   [NumberChildrenAtHome] [tinyint] NULL,
   [Education] [nvarchar](40) NULL,
   [Occupation] [nvarchar](100) NULL,
   [HouseOwnerFlag] [nchar](1) NULL,
   [NumberCarsOwned] [tinyint] NULL,
   [CommuteDistance] [nvarchar](15) NULL,
   [isActive] [varchar] (15) NULL,
   [RecordValidStartDate] [date] NULL,
   [RecordValidEndDate] [date] NULL
CONSTRAINT [PK_DimCustomer_CustomerKey] PRIMARY KEY CLUSTERED
(
   [CustomerKey] ASC
)
) ON [PRIMARY]
GO
Another major difference in the DimCustomer table is the introduction of the surrogate key (CustomerKey). In cases like data warehousing, there are many reasons to include an additional surrogate key. One reason to add a surrogate key is to handle historical data which is the focus of discussion.
Handling Historical Data Changes
There are couple of approaches to achieve the historical aspect of data in data warehousing.
T-SQL Approach
The first approach is to use the T-SQL MERGE statement to implement type 2 SCDs. This is explained in detail in this tip. The advantage of this method is the user has the option of controlling the process. However, implementing this approach is a little bit of a hassle and could take some time to think through the process.
SQL Server Integration Services Approach
In SQL Server Integration Service (SSIS), there is a separate control flow task called Slowly Changing Dimensions in the SSIS tool box. To utilize this, first create a SSIS project using the SQL Server Data Tool. After creating a SSIS project, add a Data Flow Control and add an OLE DB source to the data flow connecting the Customer table which is the OLTP table.
Then drag and drop the Slowly Changing Dimension control from the tool box to the Data Flow.
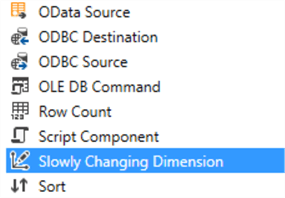
Connect the source to the newly added slowly changing dimension control. Then configure the Slowly Changing Dimension by double clicking on it. You will be taken through a wizard which makes it much easier to configure the type 2 slowly changing dimension.
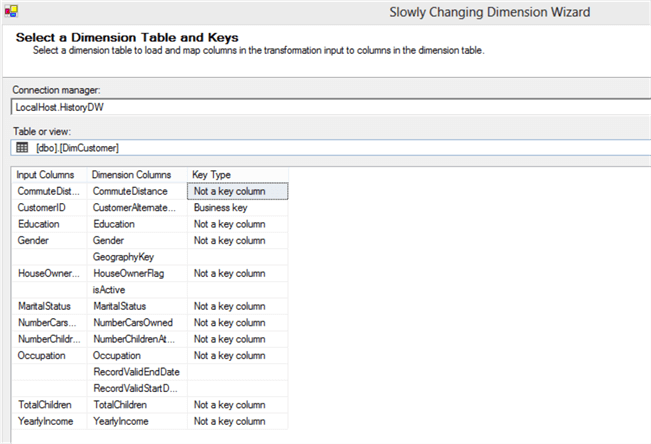
First, you need to configure the business key. This key will be used to identify the entity uniquely. In this customer example, it will be CustomerID. As shown in the below figure, CustomerID is selected as the business key.
Next is to define what type of attributes you have. There are three types of attributes as shown in the below figure.
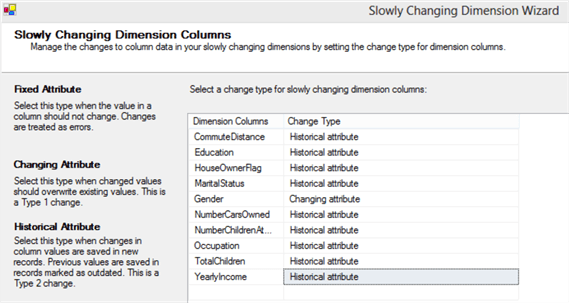
They are Fixed Attribute, Changing Attribute and Historical Attribute.
Fixed Attributes are the ones that won’t change. Gender and name are possible candidates for Fixed Attributes in the customer example. In cases where there are modifications to fixed attributes either it will fail or it will be ignored depending how it is configured.
In case of Changing Attributes, it will simply overwrite the existing value, which is a type 1 SCD.
In the following example, all of the other columns are considered historical attributes except for Gender which is considered a Type 1 SCD.
Next is to configure how historical attributes should change. There are two options, you can set a column to Current or Expired values.
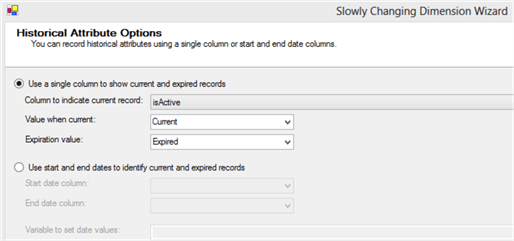
There is also another option to configure date columns instead of the above configuration as shown below.
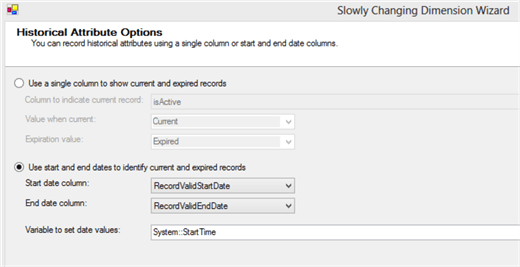
It is essential to note that you can’t configure both options together. If you want both options, you will need to use the MERGE option.
After configuring, you will see the following in your SSIS package.
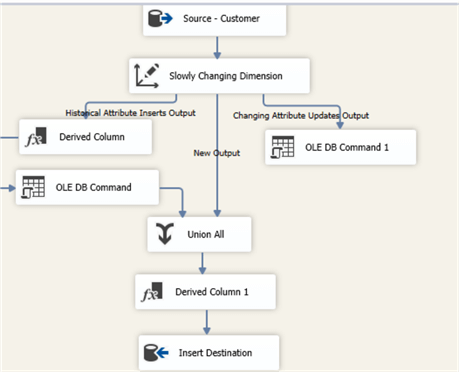
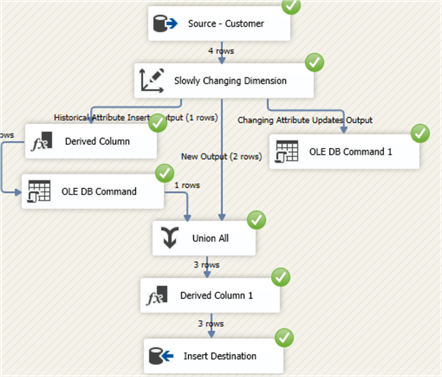
After running this SSIS package and modifying records in the source table, the following execution can be seen in the SSIS package. In this it can be observed that there are two new records and one modified record. All together there will be three records.
If we analyzed data, you can see that there are two records for CustomerID C00001 (CustomerKey 1 and 5) and one of them is expired based on the Valid Start and End dates.

CustomerID C00001 with CustomerKey 1 will be tagged to older records in fact tables while the new records are tagged to the CustomerKey 5. By this mechanism, a historical aspect of data is achieved.
Next Steps
- Evaluate what option is better between using MERGE or SSIS. You have to look at all aspects such as configuration, manageability, troubleshooting, performance, etc. Depending on the situation one option may have an edge over the other.
About the author
 Dinesh Asanka is a 10 time Data Platform MVP and frequent speaker at local and international conferences with more than 12 years of database experience.
This author pledges the content of this article is based on professional experience and not AI generated.
View all my tips


