Problem
Power BI offers a data entry option which allows users to enter data directly and this data can then be used on reports and visuals. How can we create and use this type of data in SQL Server Reporting Services?
Solution
As you may know, Power BI and SQL Server Reporting Service (SSRS) are different platforms and offer different types of solutions to developers and end users. If you ask “which one should we use”, the answer is often “it depends on your requirements”. Also, some Power BI or SSRS features are very useful and you may be wondering when this feature will be added to the other report development tool.
In this tip, we will cover the Enter Data feature in Power BI and also show how you can now do this in SQL Server Reporting Services.
Enter Data Option in Power BI
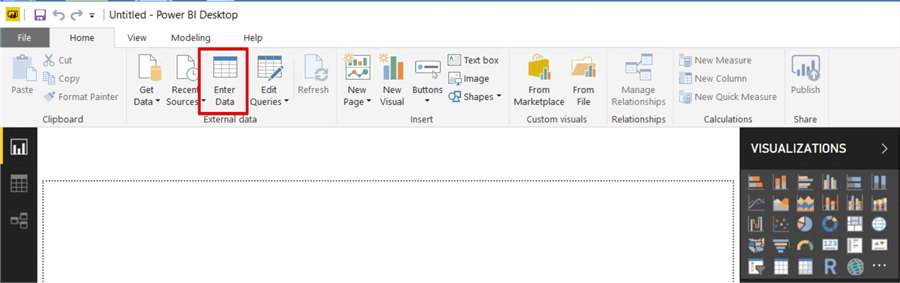
Launch Power BI and click the Enter Data option in the Home tab as shown below.
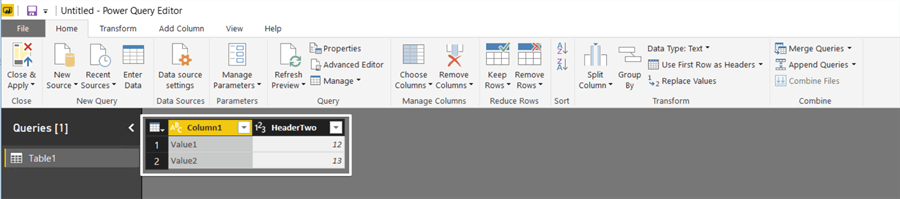
A create table pop-up screen will appear. In this screen we can enter the rows and can add new columns.

If we double click the Column header we can change the column name. When we click the Load button, Power BI automatically creates a table for us.
This table can now be used in your reports just like any other table.
Now we will look at how we can do something like this in SSRS.
Enter and Edit Data Option in Report Builder
The SQL Server Reporting Service Team Blog made a new announcement which is the Enter Data feature is now available in SQL Server 2016 Report Builder. This feature allows us to enter data directly to Reporting Services. This feature is very similar to Power BI’s.
First we need to install the newer version of Report Builder and if you are using the previous version of Report Builder, you have to uninstall and install the new version. Now we will complete the steps for the SSRS enter data demonstration.
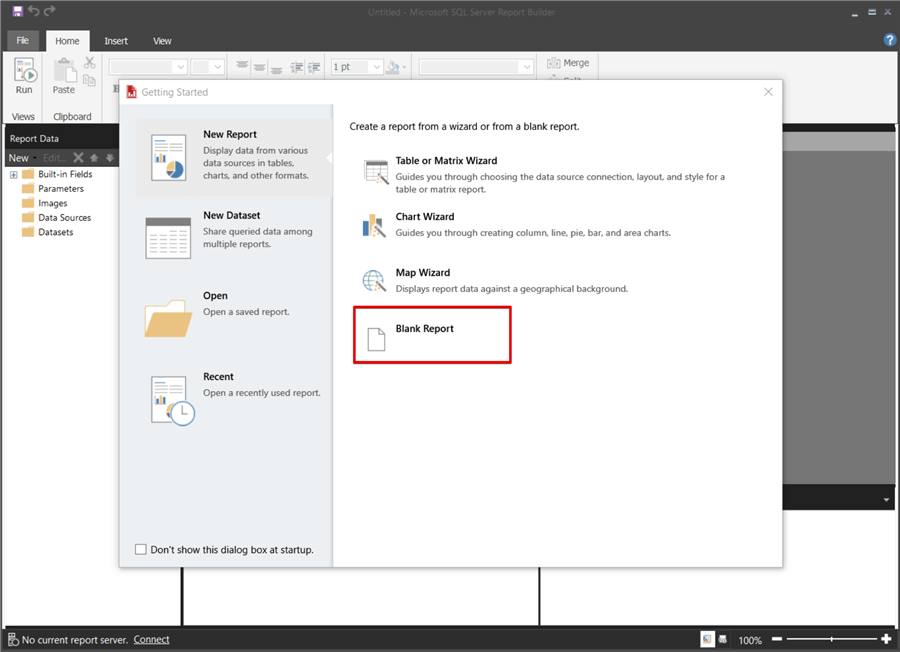
Launch Report Builder and click Blank Report.
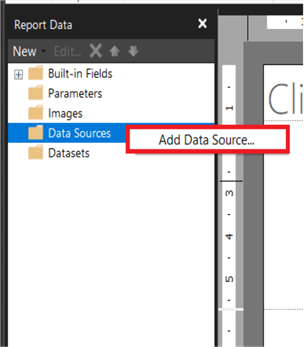
Right click Data Sources in the Report Data menu and click Add Data Source.
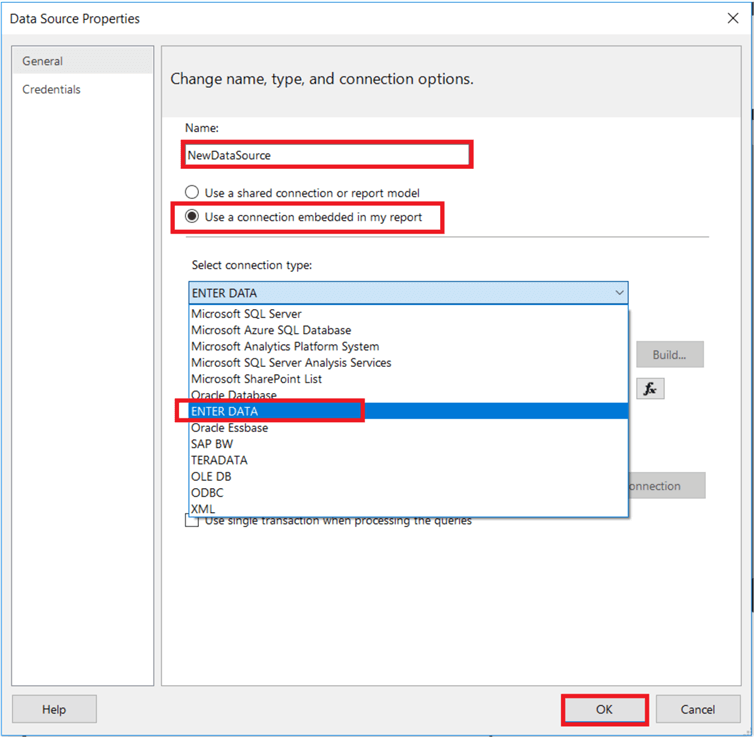
Add a name to the data source.
Chose “Use a connection embedded in my report” and select ENTER DATA. Then click the OK button.
Right click Datasets which is in the Report Menu and click Add Dataset.
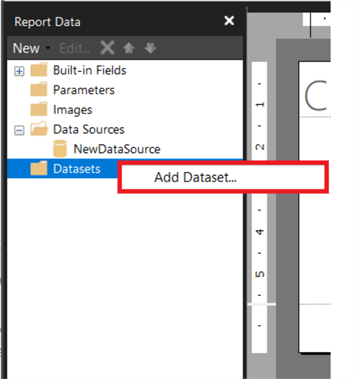
Add a name to the dataset.
Chose “Use a dataset embedded in my report” and select the Data source created in the previous step.

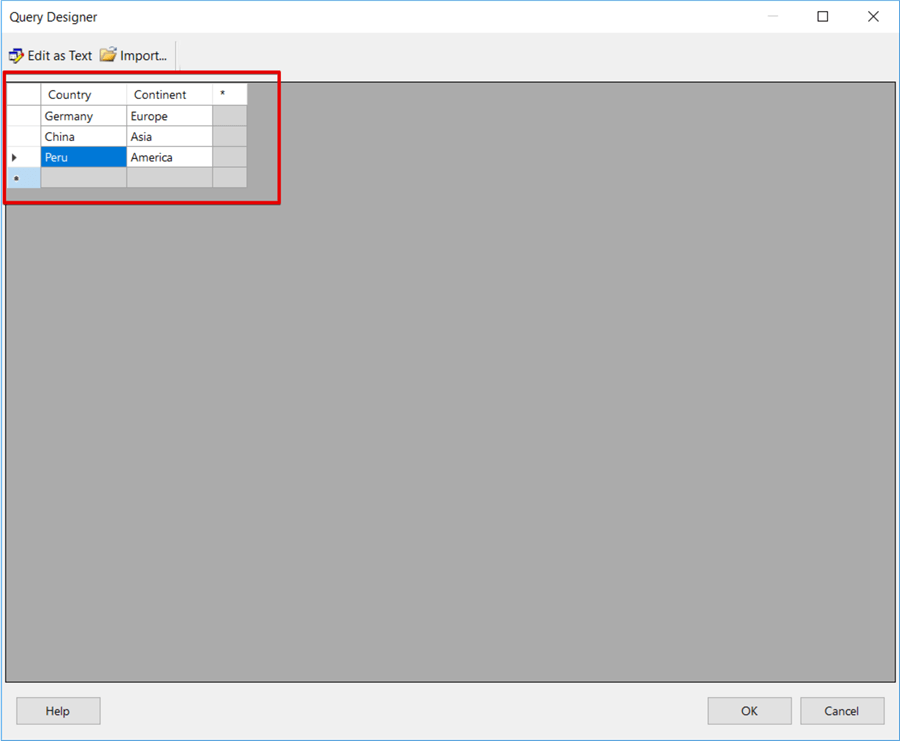
Click Query Designer and a pop-up screen appears which allows us to enter data manually. This screen is very similar to the Power BI screen. In this screen we will enter some constant data. We can change the column caption by double clicking the column header or when we right click in the columns, we can change the column caption and data type.
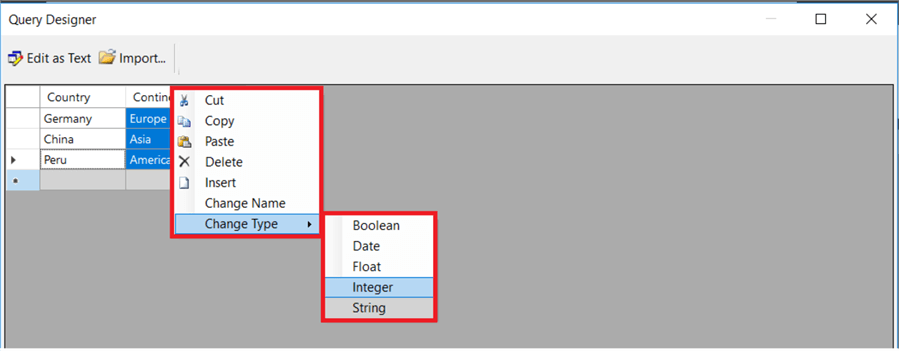
By default, all columns are created using the string data type. We can easily change the data type in the context menu.
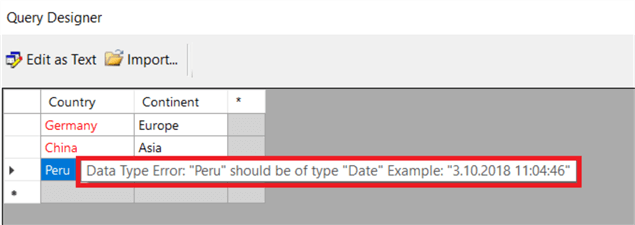
At this point, I want to add a note about data type conversion. If you make an incorrect data conversion, you will see the below error in the Query Designer screen.
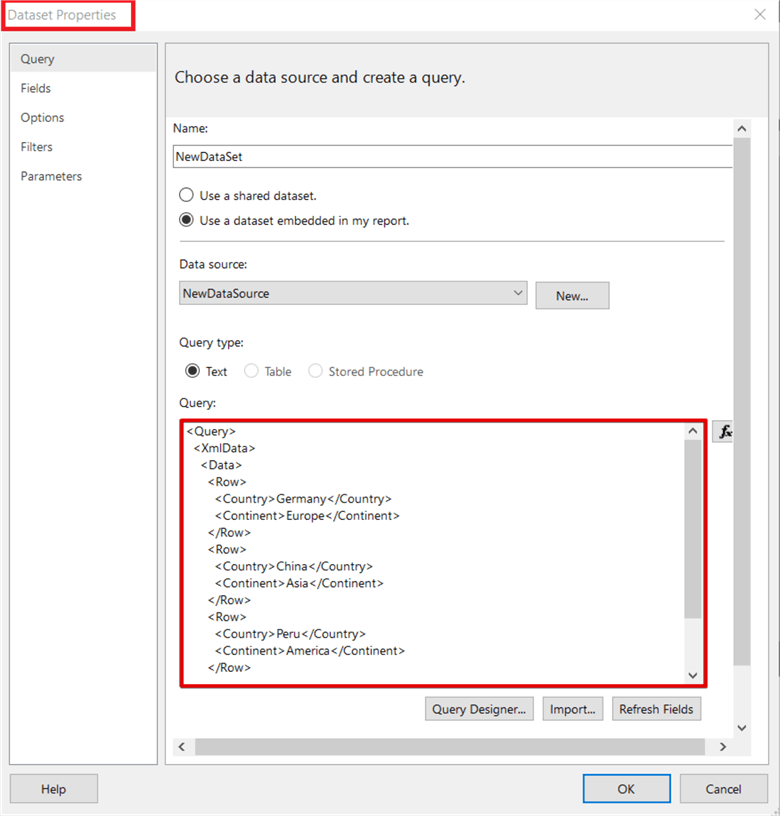
When we save the report in Report Builder, it creates a report file which has a file extension of RDL. In addition, Report Builder creates an XML type data source and adds this XML data source to the RDL (Report Definition Language) file. This XML data can be seen in the Dataset Properties below.
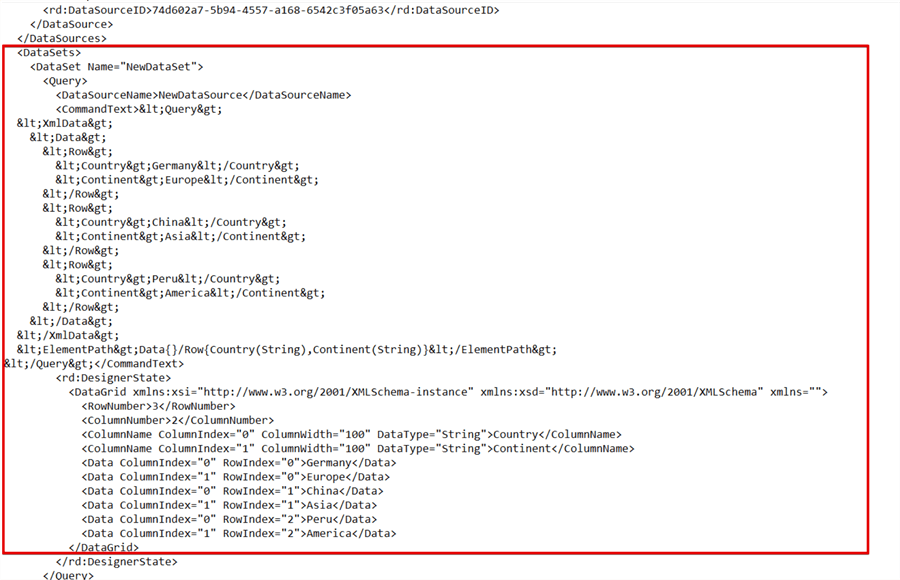
When we open the RDL file in Notepad, we can see the XML data source code.
If we want to edit data, we can click Query Designer and we can edit the data.

After all these steps, we will create a very basic report which will use this embedded data and then we will publish it to SQL Server Reporting Service.
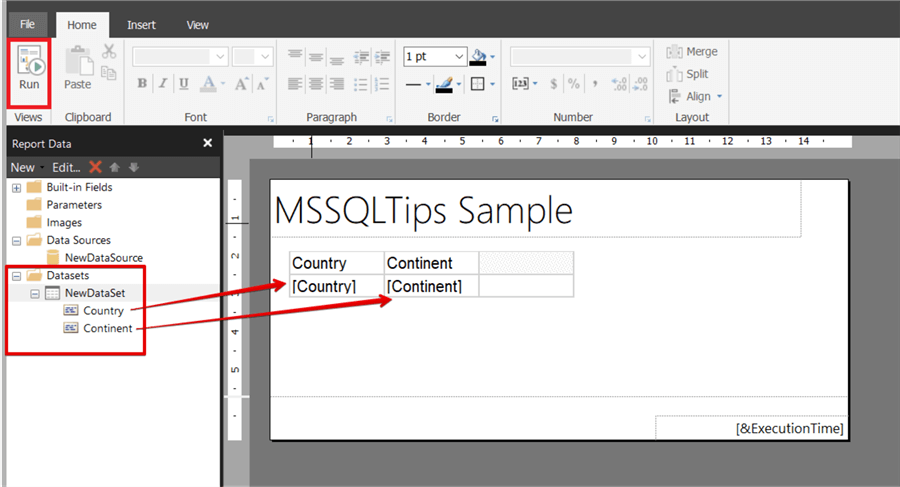
Click Insert tab and select Insert Table in the design pane.

Drag and drop the data set columns to table and run the report.

Deploy Report to SQL Server Reporting Services
After we have finished our report design, we have to edit our RsReportServer.config file because this new data extension is not enabled in our current SSRS installation. You can find this file in these paths.
Native Installation of SSRS:
- SQL Server 2016: “C:\Program Files\Microsoft SQL Server\MSRS13.MSSQLSERVER\Reporting Services\ReportServer”
- SSRS 2017: “C:\Program Files\Microsoft SQL Server Reporting Services\RSServer\ReportServer”
- SharePoint mode SSRS: “C:\Program Files\Common Files\Microsoft Shared\Web Server Extensions\15\WebServices\Reporting”
This configuration file includes SSRS parameters and settings. For this reason, before we edit this file we should make a copy of this file.
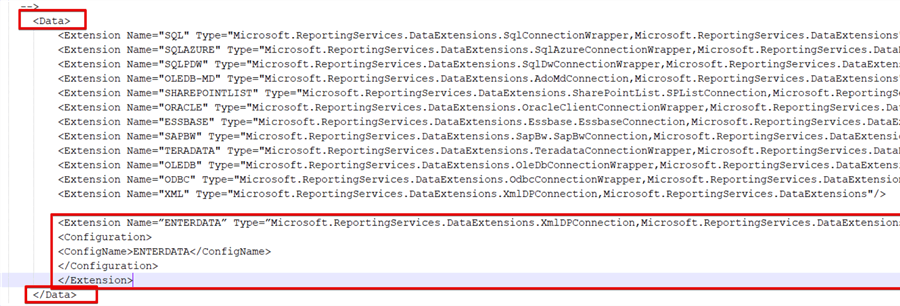
Open the RsReportServer.config file with Notepad and then add the below extension settings to the configuration file.
 <Extension Name="ENTERDATA" Type="Microsoft.ReportingServices.DataExtensions.XmlDPConnection,Microsoft.ReportingServices.DataExtensions">
<Configuration>
<ConfigName>ENTERDATA</ConfigName>
</Configuration>
 </Extension>
The configuration file looks like the below image.
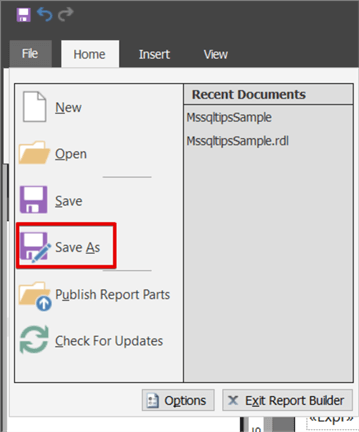
Save the RsReportServer.config file. After all these steps are finished, we will deploy the report to SSRS.
Click the Home menu and select the Save As option.
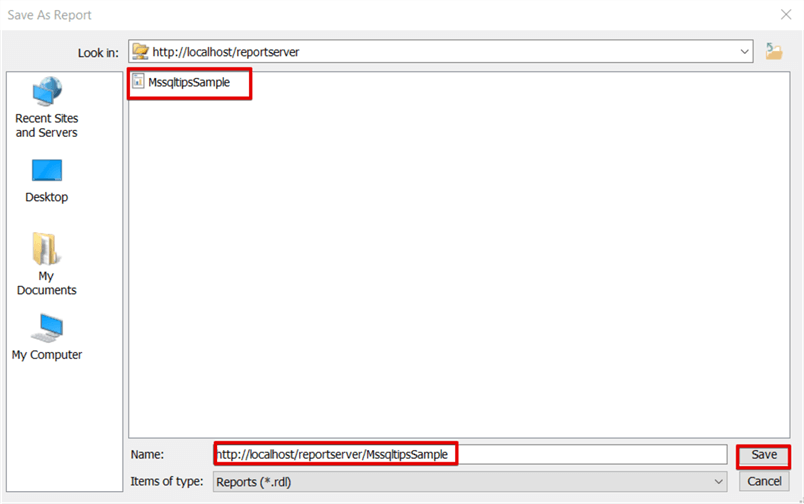
We will select Recent Sites and Servers and set the report server web URL in the Name field. Then click Save.
When we connect to the SSRS web URL we can find our report.
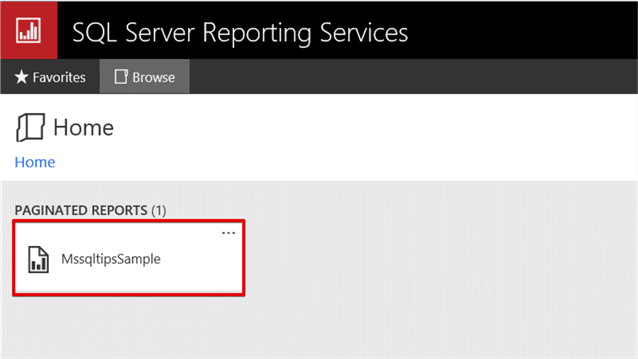
We can easily run this report and it will look like the below image.

Next Steps
- Follow the steps in this tip and create your own demonstration.
- Discover more details about RsReportServer.config
- More tips about SQL Server Reporting Services

Esat Erkec is a SQL Server professional who began his career 10+ years ago as a Software Developer. He is now a Microsoft SQL Server Certified Solutions Expert. Most of his career has been focused on SQL Server Database Administration and Development. His current interests are in Database Administration and Business Intelligence.