Problem
Your development, QA and production database environments are out of synchronization. Your present solution relies on a mix of scripts and manual actions to periodically restore production downstream. You need to improve things – there's significant schema drift, the amounts of data available for testing are unrealistic and there's live customer data in your development platforms. Where do you start?
Solution
This tip shows how automating downstream propagation from production – for example, for creating QA and development databases – can be made easy. We'll demonstrate how to do it by using T-SQL, SqlPackage.exe and SQL Agent, using Azure DB as our production environment and a local copy of the database as our downstream (QA/development) environment (however this tip can be adapted to many configurations of on-premises/VM/cloud arrangements). We'll also show how data can be anonymized using a simple T-SQL script and the new Data Discovery and Classification feature of SSMS 17.5 + and how we can integrate this into our end-to-end process for a fully-automatic, scheduled downstream deployment.
Exporting the Source Database
First, we must export the source database (schema and data) so we can import it later. To do this, we're going to use SqlPackage.exe, an executable bundled with SQL Server that allows us to import and export data as DACPACs or BACPACs on the command line. We'll first create a copy of our source database (production) then export to a .BACPAC (schema and data). Why do we need to create a copy? Well, the export process takes the data as-is at the time of reading, which means we run the risk of exporting a transactionally-inconsistent version of the database. As any DBA knows, transactional inconsistency is A Bad Thing. Consistency is the C in ACID. Without it, we could be left with a corrupt and unrecoverable database. There's two ways to do this – first, we could put our source database into READ_ONLY mode. Great idea but impractical for organizations where this database is critical for operations and uptime is essential. Our second option is to create a copy, which ensures transactional consistency and allows concurrent database activity on the original database.
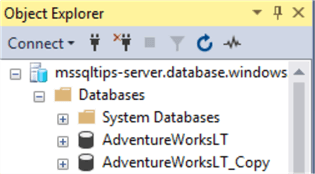
In Azure, this is very easy to do programmatically. We first check for the existence of a copy database and drop it if it exists. We then use CREATE DATABASE AS COPY OF to create the copy. Note you must be in the master database context.
DROP DATABASE IF EXISTS [AdventureWorksLT_Copy];
CREATE DATABASE [AdventureWorksLT_Copy] AS COPY OF [AdventureWorksLT];
That's it. Check out the screenshots below. Of course, for non-Azure databases it's slightly harder – we might want to clone the database instead, or use backup/restore, but the principle is the same. We'll do the DROP and CREATE inside a SQL Agent job, so a) the whole process can be scheduled on-demand and b) we can be notified of completion. This is slightly tricky since the Agent job will live on our target (QA/development) on-premise server, as Azure doesn't have SQL Agent, and this means we'll need to be creative to execute this against the Azure database. We can do this using a sqlcmd call inside a CmdExec step type:
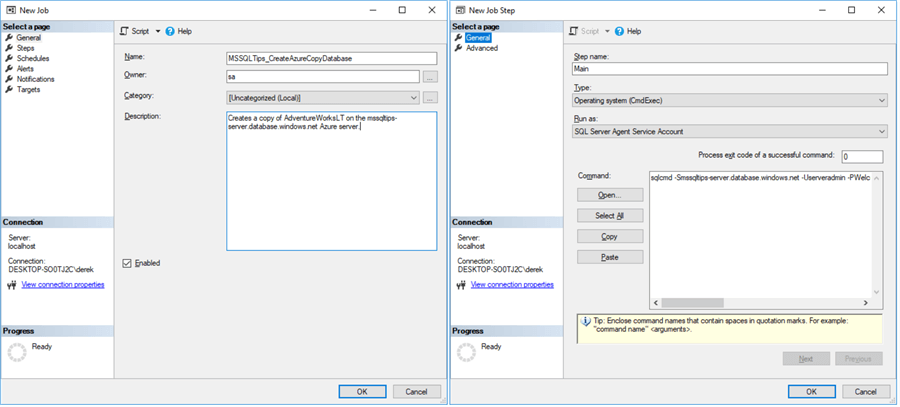
sqlcmd -Smssqltips-server.database.windows.net -Userveradmin -Pxxxx -q"DROP DATABASE IF EXISTS [AdventureWorksLT_Copy]; CREATE DATABASE [AdventureWorksLT_Copy] AS COPY OF [AdventureWorksLT];"
After we run the job, we can see that the database has been created. It takes a few minutes to complete:
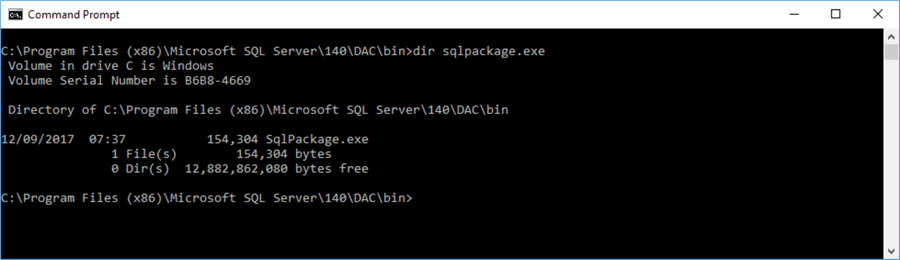
Now we'll use SqlPackage.exe to export the BACPAC file from the Azure copy to our development server. We'll do this via our SQL Agent job as Step 2, which calls the executable using CmdExec. This executable can be tricky to find, but it’s normally in the Program Files (x86)\Microsoft SQL Server\1xx\DAC\Bin folder of your SQL Server installation:
Here’s the full command string. We’ll go over each element below.
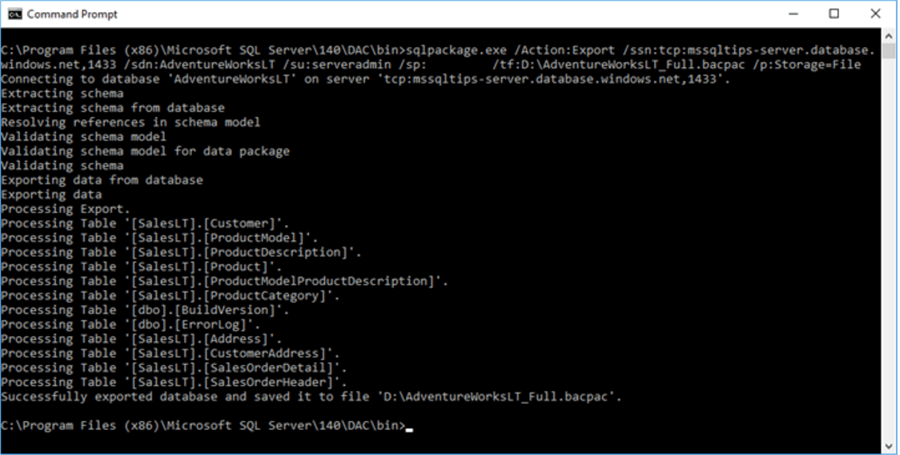
Sqlpackage.exe /Action:Export /ssn:tcp:mssqltips-server.database.windows.net,1433 /sdn:AdventureWorksLT_Copy /su:serveradmin /sp:xxxx /tf:D:\AdventureWorksLT_Full.bacpac /p:Storage=File
- Sqlpackage.exe – Calls the package
- /Action:Export – Export the database
- /ssn:tcp: – Source server name and protocol
- /sdn: – Source database name
- /su: – Source user
- /sp: – Source password
- /tf: – Target file, full path
- /p: – Properties – here, we specify we want the output stored as a file
This only takes a few minutes to run and the output is sent to the console window.
Again, this is something we can put into our Agent job. Let’s run this as a CmdExec call – here’s the syntax for our job step:
"C:\Program Files (x86)\Microsoft SQL Server\140\DAC\bin\sqlpackage.exe" /Action:Export /ssn:tcp:mssqltips-server.database.windows.net,1433 /sdn:AdventureWorksLT /su:serveradmin /sp:xxxx /tf:D:\AdventureWorksLT_Full.bacpac /p:Storage=File
Now we'll need to clear the decks for our destination database. Let's assume we want to overwrite the existing database – in which case, the easiest way forward is to force it offline, drop the database and recreate it. Don't forget, if you have any custom objects in use in development, script them out first – this includes roles, role memberships and users. We can add these as a post-deployment script in the Agent job after we've imported the database – for demonstration, we'll do this below. But first, add a step to drop the target database:
IF EXISTS ( SELECT name FROM sys.databases WHERE name = 'AdventureWorksLT' )
BEGIN
   ALTER DATABASE AdventureWorksLT SET OFFLINE WITH ROLLBACK IMMEDIATE;
   DROP DATABASE AdventureWorksLT;
END
Importing the Source Database
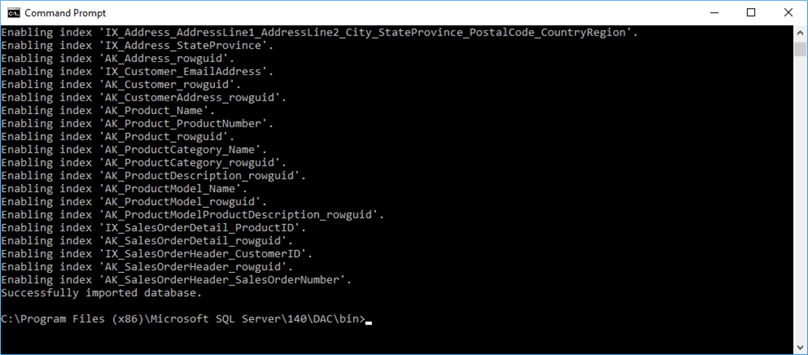
Now we'll import the source database from our .BACPAC to replace the database we just dropped. We do this again using SqlPackage.exe with slightly different syntax – here’s the command, which you can also use as-is in the job step:
"C:\Program Files (x86)\Microsoft SQL Server\140\DAC\bin\sqlpackage.exe" /Action:Import /sf:"D:\AdventureWorksLT_Full.bacpac" /tsn:"<my local hostname>" /tdn:AdventureWorksLT
Now, let's add our post-deployment script as another job step. For demonstration purposes, we add a new user, a new role, and assign the role to the user, but you can repurpose this to suit your needs.
-- POST-DEPLOYMENT SCRIPT
IF NOT EXISTS ( SELECT name FROM sys.server_principals WHERE name = 'Developer' )
   CREATE LOGIN [Developer] WITH PASSWORD = 'Welcome123!!!'
GO
USE AdventureWorksLT
GO
CREATE USER [Developer] FROM LOGIN [Developer]
EXEC sp_addrolemember @rolename = 'db_owner', @membername = 'Developer'
GO
-- ... and so on.
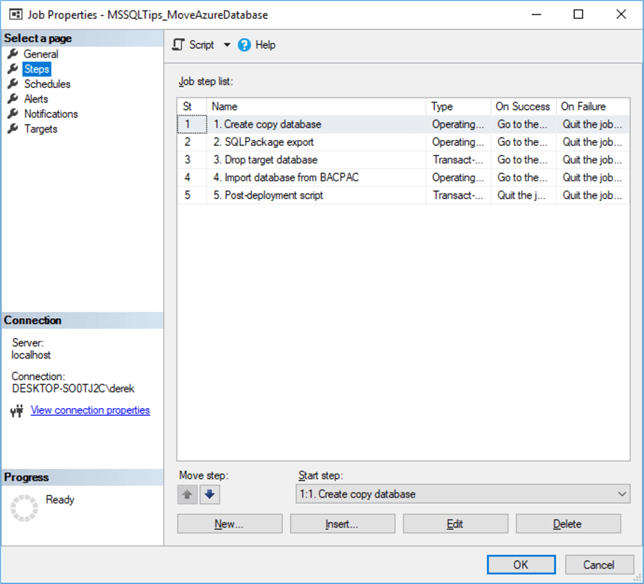
Don’t forget to add your script to the Agent job. This script should contain everything you want changed on the downstream copy of your database, except for anonymization – we’ll cover that next. So, consider local users, database roles, extra tables, etc. When you’re done, save the SQL Agent job. It should look something like the below. Try it out – it should be idempotent, i.e. you’re able to run it over and again without any manual pre-configuration, and the outcomes won’t change.
Classifying the Data
Before we begin, to identify what data requires anonymization we must first classify the data. We only need to do this once, but it's important, so sensitive data is kept confidential and your organisation is compliant to your relevant local legislation. Versions of SSMS 17.5 upwards provide great new tooling to do this for you, assessing column names to automatically identify which data is sensitive. This column metadata is stored as extended properties, and we can get to these easily using T-SQL – more on this later. For now, let's go step-by-step through the classification process.
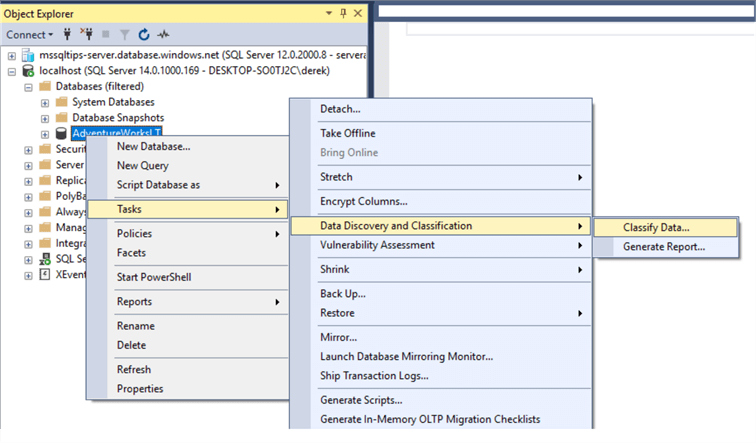
We’ll be using the database copy we just imported from Azure, since Data Classification and Discovery is not (at the time of writing) supported in Azure DB.
First, open SSMS and connect to your database in Object Explorer. You can see in the screenshot that we’re connected to my localhost, database AdventureWorksLT. I’m running SSMS 18 (preview 4), but any version of SSMS from 17.5 will work fine. You must have SQL Server 2008 or above as the database engine. Now right-click on the database, go to Tasks, and choose Data Discovery and Classification, then Classify Data.
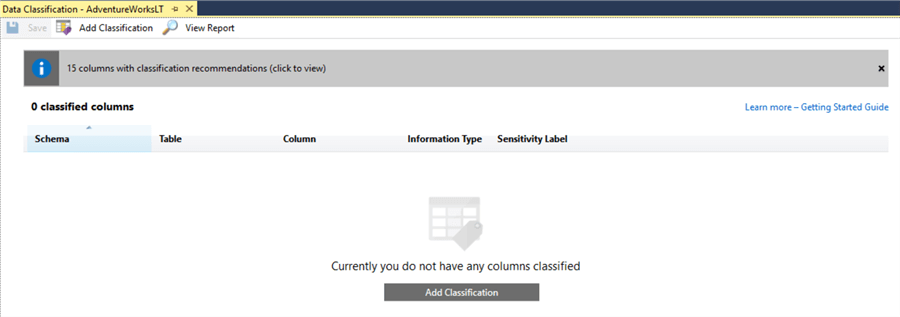
In the subsequent window, we’re able to view the automatic classification recommendations from the database engine, and also establish our own, manually. For example, if we have a customer record and it contains sensitive data that we don’t want any users of our new development database seeing, we might classify the columns as sensitive using this tool. Here’s the initial screen:
First let’s look at the classification recommendations. Click the top bar.
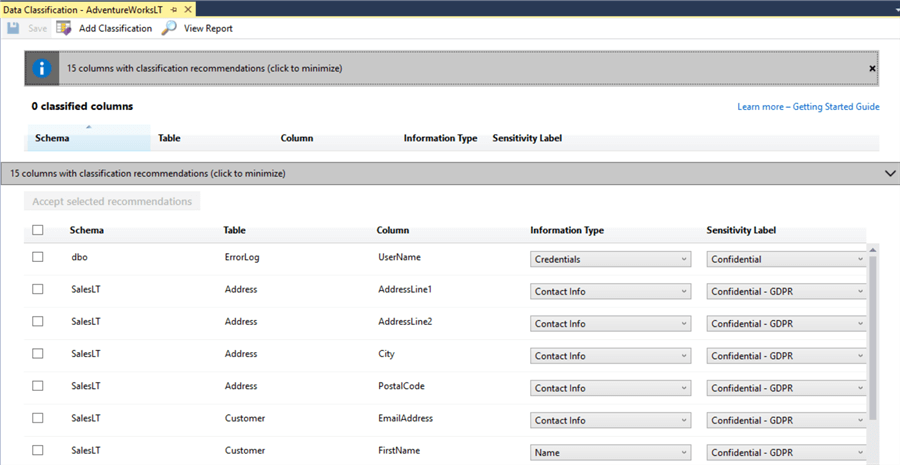
Okay, these recommendations look sensible. It’s classified the customer address as Confidential – GDPR (European legislation governing data protection) which means we probably don’t want all the developer users of the database to be able to see it. However, there’s a false positive here too, the ‘UserName’ column of the ErrorLog – that’s probably less important. We can manually alter the classifications using the drop-downs to the right of the screen.
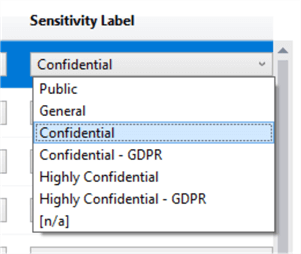
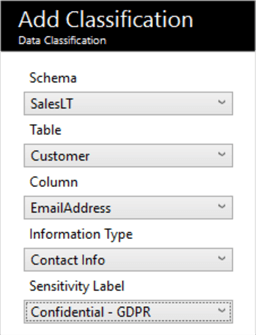
We get 7 classifications out of the box, and we can use these to classify the data accordingly. We can add a manual classification – collapse the pane, and click the ‘Add Classification’ button. We can also classify the information type. Here, I’ve overridden the AdventureWorksLT.SalesLT.Customer.EmailAddress column recommendation to be Contact Info / Confidential – GDPR.
The good news is that we only need to do this once. All this information is stored as extended properties – you can check this by checking the extended properties of individual columns. Extended properties are just key-value pairs:

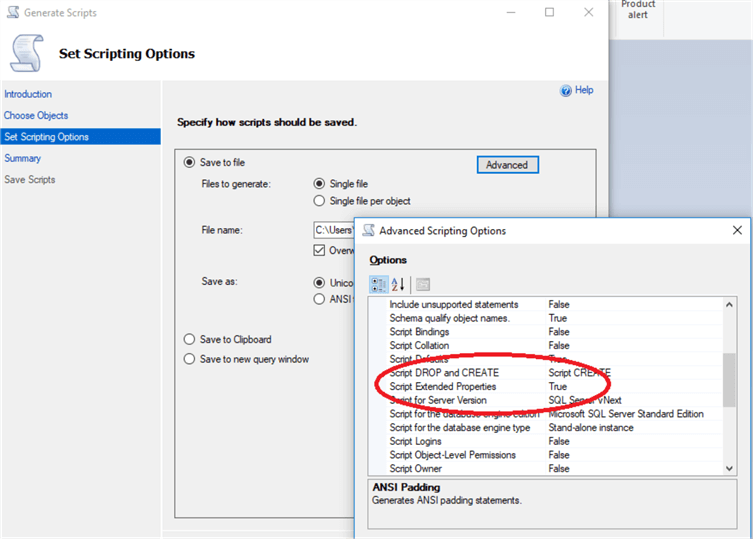
Thus, once we’re done, we can script out the extended properties of the database and add it to our post-deployment script. One way of doing this is to use the right-click (on the database) > Tasks > Generate Scripts dialog box and use the Generate Scripts wizard. Choose objects to script, select tables, go to the next screen, click Advanced and ensure that Script Extended Properties is set to True.
Happily for us, all your extended properties will appear at the very end of your generated script – so no need to pick them out from hundreds of tables, simply remove everything above the first extended property definition and add your extended properties to your post-deployment script. Here are the 4 we just added for the email address:
EXEC sys.sp_addextendedproperty @name=N'sys_information_type_id', @value=N'5C503E21-22C6-81FA-620B-F369B8EC38D1' , @level0type=N'SCHEMA',@level0name=N'SalesLT', @level1type=N'TABLE',@level1name=N'Customer', @level2type=N'COLUMN',@level2name=N'EmailAddress'
GO
EXEC sys.sp_addextendedproperty @name=N'sys_information_type_name', @value=N'Contact Info' , @level0type=N'SCHEMA',@level0name=N'SalesLT', @level1type=N'TABLE',@level1name=N'Customer', @level2type=N'COLUMN',@level2name=N'EmailAddress'
GO
EXEC sys.sp_addextendedproperty @name=N'sys_sensitivity_label_id', @value=N'989ADC05-3F3F-0588-A635-F475B994915B' , @level0type=N'SCHEMA',@level0name=N'SalesLT', @level1type=N'TABLE',@level1name=N'Customer', @level2type=N'COLUMN',@level2name=N'EmailAddress'
GO
EXEC sys.sp_addextendedproperty @name=N'sys_sensitivity_label_name', @value=N'Confidential - GDPR' , @level0type=N'SCHEMA',@level0name=N'SalesLT', @level1type=N'TABLE',@level1name=N'Customer', @level2type=N'COLUMN',@level2name=N'EmailAddress'
GO
Anonymizing the Target Database
Our final step is to anonymize the data. Now we have our classifications, we have a couple of choices – we can either remove the data that is sensitive, or otherwise obfuscate it.
Removing the data can cause other problems. For example, NULLifying the data won’t work if the column is a key or has a NOT NULL definition. Replacing the column data with a short value is fine but may drastically reduce the size of the data held and therefore the utility of the database as a production-like test bed, and may alter execution plans too. The same argument applies to removing entire rows.
Your actions here are entirely up to you – there are many third-party tools for data anonymization. However, below is a simple start to a template for anonymizing columns based on their extended property classifications. It deals with only a few data types and classifications, so feel free to extend this template as needed to suit your environment – a recent implementation I did for a client ran to 8 stored procedures and thousands of lines, including user-defined data types and custom rules based on foreign key relationships, so this can be as simple or as complex as you require!
Per table, per column, it analyses the extended properties and executes a rule to UPDATE the values in the column if the classification is of a certain type. The values it UPDATES with are determined by the datatype of the column. We add this to the job step – we could either add it as a stored procedure to the source database and simply call it (good practice) or add it as a separate step.
USE AdventureWorksLT
GO
IF NOT EXISTS ( SELECT name FROM tempdb.sys.tables WHERE name LIKE ('%#anonymousList%') )
   CREATE TABLE #anonymousList (
      [schema] VARCHAR(255), [object] VARCHAR(255), [column] VARCHAR(255), [type] VARCHAR(255),
      [precision] SMALLINT, [scale] SMALLINT, [max_length] SMALLINT, [statement] NVARCHAR(MAX) )
GO
-- I need to anonymise my Confidential - GDPR category
DECLARE @CategoryToAnonymise VARCHAR(255) = 'Confidential - GDPR'
TRUNCATE TABLE #anonymousList
INSERT INTO #anonymousList
SELECT s.[name] [schema], o.[name] [object], c.[name] [column],
   y.[name] [type], y.precision, y.scale, y.max_length,
   'UPDATE [' + s.[name] + '].[' + o.[name] + '] SET [' + c.[name] + '] ' + '= ' +
   CASE WHEN y.[name] LIKE ('datetime%')
      THEN '1970-01-01 00:00:00'
      WHEN y.[name] = 'bit'
      THEN CAST(ABS(CHECKSUM(NEWID())) % 2 AS char(1))
      WHEN y.[name] LIKE ('%char%')
      THEN '''' + LEFT(CAST(NEWID() AS VARCHAR(255)), FLOOR((y.max_length / 2.0)) + 1) + ''''
-- and so on.  The remainder are left as an exercise for the reader.
   END [statement]
   FROM sys.extended_properties e
   INNER JOIN sys.columns c ON e.major_id = c.object_id AND e.minor_id = c.column_id
   INNER JOIN sys.objects o ON e.major_id = o.object_id
   INNER JOIN sys.schemas s ON o.schema_id = s.schema_id
   INNER JOIN sys.types y ON c.user_type_id = y.user_type_id
   WHERE e.[value] = @CategoryToAnonymise
-- Now iterate over each statement and execute it.
DECLARE cur_ForEachStatement CURSOR LOCAL FAST_FORWARD FOR
SELECT [statement]
FROM #anonymousList a
DECLARE @thisStatement NVARCHAR(MAX)
OPEN    cur_ForEachStatement
FETCH NEXT  FROM cur_ForEachStatement INTO @thisStatement
WHILE @@FETCH_STATUS = 0
BEGIN
   -- Add logging here, perhaps - record the statement to some log table
   -- INSERT INTO LoggingTable
   -- SELECT GETDATE(), @thisStatement
   BEGIN TRY
      EXEC sp_executesql @thisStatement
END TRY
   BEGIN CATCH
      PRINT ERROR_MESSAGE()
      -- INSERT INTO @LoggingTable
      -- SELECT GETDATE(), ERROR_MESSAGE()
END CATCH
FETCH NEXT FROM cur_ForEachStatement INTO @thisStatement
END
CLOSE cur_ForEachStatement
DEALLOCATE cur_ForEachStatement
Next Steps
- Check out these additional resources:
- Jeffrey Yao – SQL Server Database Schema Synchronization vis SqlPackage.exe and PowerShell
- Vitor Montalvao – Learn How to Migrate a SQL Server database to SQL Azure server
- Jayendra Viswanathan – Working with SQL Extended Properties
- Microsoft Corporation – SQL Data Discovery and Classification

Dr. Derek Colley is the lead technical consultant for Optimal Computing, a boutique data consultancy based in the UK NW helping clients troubleshoot, configure, plan and deploy their data platforms. He specializes in data integration and database performance optimization, and is a PhD candidate with Staffordshire University, looking into methods of integrating AL query selection algorithms with the cost-based query optimizer. In his spare time, he enjoys building robots, going outdoors, and spending time with his four children.
- MSSQLTips Awards: Trendsetter (25+ tips)


