Problem
R and Python are the two prominent programming languages for a variety of purposes, especially for exploratory data analysis, manipulating data and other data processing needs. R and Python codebase is typically contained in complex script files which gets data from a variety of sources and applies complex data processing logic on the data as well as data structure. In a scenario where there is a need to source this data that is processed by such scripts, there would be a requirement to export this data and store it in some external file formats or databases. This approach needs more resources, creates dependencies and makes the approach non-scalable.
The need is to source the output data directly from these scripts, without any intermediate dependency to stage the data. In this tip we will learn how to source the output directly from R and Python scripts in Power BI Desktop, for reporting, visualization and analytics.
Solution
Power BI Desktop supports direct sourcing of data from R and Python Scripts by executing the script in the respective R and Python environment.
Importing data using R script
Step 1 – In order to get started with this tip, all you need is Power BI Desktop, and access to an installation of R and Python. In case, you do not have Power BI installed, go ahead and download it from here. We intend to import data first from R Script in Power BI Desktop. To do this, open Power BI Desktop application and make sure the R home directory is correctly set in the options dialog box before you run the R script. To go to the options dialogue box, click File > Options and Settings > Options > R scripting. If this option is not set correctly, Power BI Desktop won’t be able to execute R Scripts.

Step 2 – Click Get Data button on the main ribbon to select the data source options.

Step 3 – We want to import data using R Script. So, choose the Other menu item and R script on the sub-menu. Hit the Connect button.

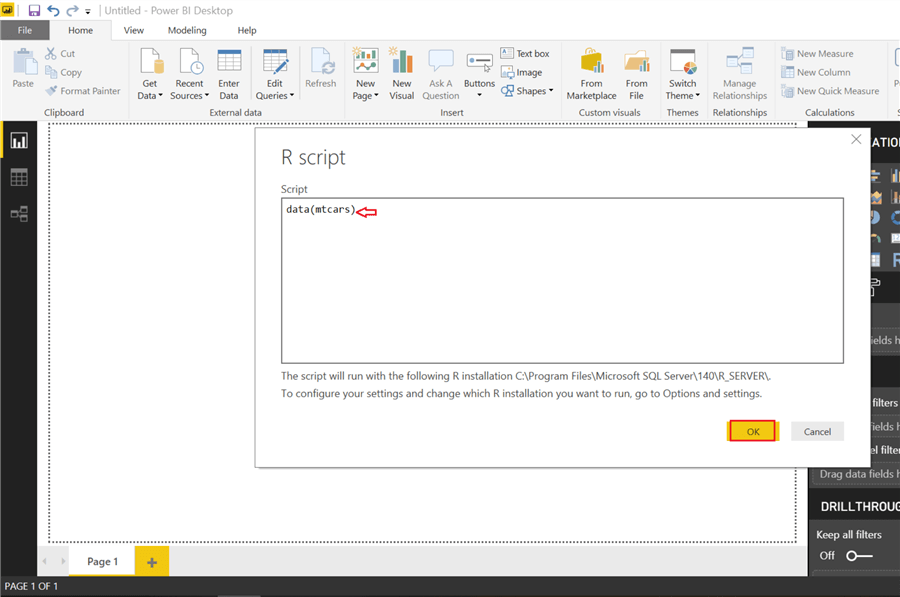
Step 4 – We want to import some sample data using R Script. In practical scenarios, one would want to re-use R Scripts that may contain complex data import and processing logic. In the absence of the option to import data directly from R script, one would be required to stage this data into some other data repository supported by Power BI Desktop, which may not be an efficient solution at times. So, to simulate the import of data directly using R Script, type the below code in the R script text box. mtcars is a built-in dataset in R and can be loaded using the data function as mentioned below. Type this line of code and click OK.
data(mtcars)
Step 5 – This will bring us to a Navigator Dialogue screen that allows us to select tables that we would like to load. Check mtcars box and click on Load. Preview of the data to be loaded can be seen on the right side of the screen.

Step 6 – Once the data is loaded, you can see it over on the far right in the FIELDS List. You can just drag and drop the fields on the Power BI Desktop reports view tab to use the data in the report.

Step 7 – You can click on Data view in the navigation pane on the left side of the interface to see data that has been loaded using R script.

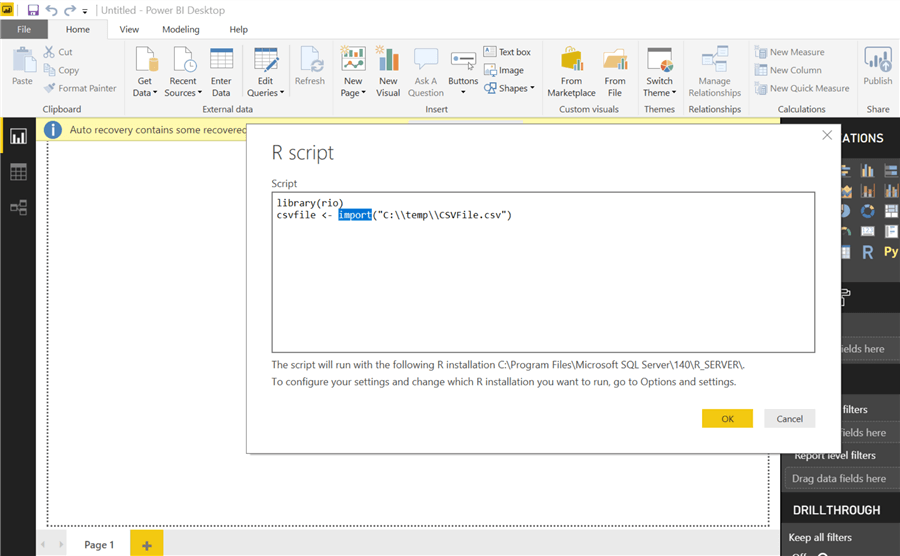
Step 8 – In a few cases, there might be a requirement to import data from external data sources or different file formats into R, rather than using built-in datasets. Let’s say we intend to import CSV file here. You can either create any sample CSV file or feel free to download it from here. Choose Get Data button and go to R script (after clicking Other on sub menu) and click Connect. Consider referring to this tip to understand the installation and usage of the Rio package in R to import and export data from a variety of sources. Type the below code and click OK.
library(rio)
csvfile <- import("C:\\temp\\CSVFile.csv")
Select csvfile and click on Load in the figure below. Data imported from the csv file can previewed on the right side of the Navigator screen.

Note – One can use complex R scripts that contain references to many libraries and applies complex data processing logic. In case the script execution fails, one may encounter an error. Below is an example where I have intentionally given an incorrect function name to the R script "datas(mtcars)". When you execute the script, you would find the error description as shown below. Power BI Desktop does not provide an environment to debug the script. The only option is to debug this script in the respective R or Python environment using an editor of choice. The expectation here is that tested scripts should be used to import data, as Power BI Desktop will provide limited error information or any debugging options.

Importing data using Python script
Step 9 – Starting in August 2018, one of the most powerful additions in Power BI Desktop is its integration with the Python language. And once this integration is enabled, we can use Python scripts directly in Power BI Desktop and also to do analysis and create visualizations.
In order to work with Python, we need to enable Python support in the preview settings in the Options dialog box. To go to the options dialog box, click File > Options and Settings > Options > Preview features and ensure Python Support option is checked.

Additionally, we need to validate if the correct Python installation has been done on our system. Verify by opening the options dialog box and confirm if the Python home directory is correctly set in the options dialog box.

Step 10 – Now, let’s move on and work with Python script. Follow steps 2 and 3, but choose Python script instead of R script.

Step 11 – Add the below code in the Script section and click OK.
import pandas as pd
import numpy as np
from sklearn.datasets import load_iris
iris = load_iris()
irisdata = pd.DataFrame(data= np.c_[iris['data'], iris['target']], columns= iris['feature_names'] + ['target'])
irisdata
Let’s understand how this code works. The first two lines of code imports the pandas and numpy library. Iris is another commonly used dataset. In the next line of code, we are importing the iris dataset from a package called scikit-learn, which contains this dataset. We are then loading the iris dataset in an object by using the load_iris function. Once the dataset is loaded, we are creating a data frame using this object, so that the import wizard recognizes it and loads it.
Now that we understand the script, add this script and click the OK button as shown below.

Step 12 – Now select irisdata in the Navigator dialogue and click Load.

Step 13 – Once the data is loaded, it can be seen under the fields section on the far-right corner in the Power BI Desktop interface.

Step 14 – Try clicking on the Data view on the left pane to see data loaded using Python script.

Also, by running the above same code in Query Editor, we can perform a plethora of tasks such as data modeling, data analytics, munging and cleansing.
Summary
We have walked through the process of importing data using R and Python scripts directly in Power BI Desktop. This tip was to give you an idea of how simple and independent it becomes to import data using R and Python in Power BI Desktop.
Next Steps
- This tip has used simple scripts for the purpose of simplicity and to keep the focus on the import process. Consider importing data from complex R and Python scripts to exploit maximum benefit from these scripts.
- Check out all of the Power BI tips.

Gauri Mahajan is a SQL Server Professional with 6+ years of experience of working with global multinational consulting and technology organizations. She is very passionate about SQL Server Reporting Services, R, Python, Power BI, Database engine, etc. She has years of experience in technical documentation and enjoys writing. She has deep experience in designing data and analytics solutions and ensuring its stability, reliability, and performance. She is also certified in SQL Server and has passed the 70-463: Implementing Data Warehouses with Microsoft SQL Server exam.
- MSSQLTips Awards: Author of the Year Contender – 2019


Thank you so much for this tip
But how can one use this to review academic research work