By: Maria Zakourdaev | Comments (5) | Related: > Amazon AWS RDS
Problem
More companies are aiming to move away from managing their own servers and moving towards a cloud platform. Going serverless offers a lot of benefits like lower administrative overhead and server costs. In the serverless architecture, developers work with event driven functions which are being managed by cloud services. Such architecture is highly scalable and boosts developer productivity.
We know how convenient it is to run SQL Server as a database cloud service, whether it is Azure Database or AWS RDS database (unfortunately, Google SQL Cloud Service has only MySQL and Postgresql flavors). If your company's datacenter is on the AWS cloud and you are using AWS RDS database as a data serving layer, sometimes you may need to move your data around and automate the data transformation flows. You may need to dump table data to S3 storage, AWS Simple Storage Service (in functionality, AWS S3 is similar to Azure Blob Storage), for further analysis/querying with AWS Athena (equivalent to Azure Data Lake Analytics) or move it to a different RDS database, SQL Server or any other database technology. RDS SQL Server database is limited in terms of server-side features. There is no support of Integration Services and you have no BULK operation permissions. You have some workarounds to build a Linked Server (using RDS IP and sp_addlinkedserver), but during RDS upgrades or maintenance, the IP might change and your data flows will fail. There is where the AWS Glue service comes into play.
Solution
If we are restricted to only use AWS cloud services and do not want to set up any infrastructure, we can use the AWS Glue service or the Lambda function. Invoking Lambda function is best for small datasets, but for bigger datasets AWS Glue service is more suitable.
The AWS Glue service is an ETL service that utilizes a fully managed Apache Spark environment. Glue ETL that can clean, enrich your data and load it to common database engines inside AWS cloud (EC2 instances or Relational Database Service) or put the file to S3 storage in a great variety of formats, including PARQUET.
AWS Glue builds a metadata repository for all its configured sources called Glue Data Catalog and uses Python/Scala code to define data transformations. The Glue Data Catalog contains various metadata for your data assets and even can track data changes.
How Glue ETL flow works
During this tutorial we will perform 3 steps that are required to build an ETL flow inside the Glue service.
- Create a Crawler over both data source and target to populate the Glue Data Catalog.
- Add a Job that will extract, transform and load our data. During this step we will take a look at the Python script the Job that we will be using to extract, transform and load our data.
- Add a Trigger that will automate our Job execution.
Populating AWS Glue Data Catalog
The first step would be creating the Crawler that will scan our data sources to add tables to the Glue Data Catalog. We will go to Tables and will use the wizard to add the Crawler:

On the next screen we will enter a crawler name and (optionally) we can also enable the security configuration at-rest encryption to be able to send logs to CloudWatch for log management. You can find more information here. In addition, on this page you can catalog your data using classifiers, you can find more information here and define table grouping behavior for S3 data - whether the crawler should create the same dictionary/schema for your files or different schemas.

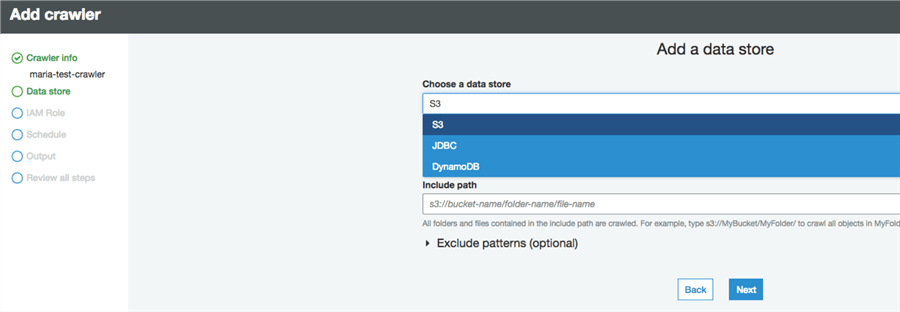
On the next screen we will choose which data store we will be using. For SQL Server RDS Database we will add a JDBC connection. The SQL Server format for a JDBC connection string is as follows:
jdbc:sqlserver://host:port;databaseName=db_name
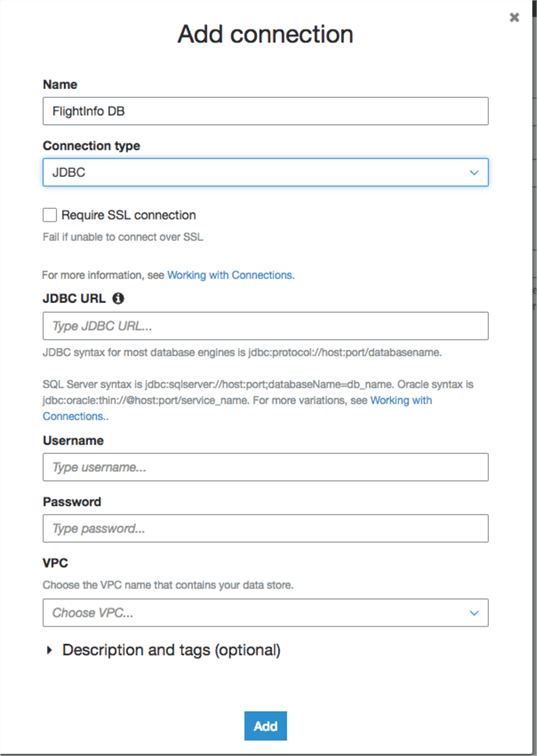
You will need to choose the VPC (Virtual Private Cloud), subnet and security group for where your database is located. By default, you can create connections in the same AWS account and in the same AWS Region as the one where your AWS Glue resources are located. However, this post explains how to set up networking routes and interfaces to be able to use databases in a different region.
After configuring a connection, chose an IAM role that contains all required permissions. Here is a link with instructions on how to create an IAM role. In short, the role needs to have access to all sources, targets and scripts that you are planning to use in your AWS Glue ETL flows.

As a last step you will need to define a frequency for the crawler execution. It can run on demand or use a specific schedule.

In this window, we configure the crawler output and database name in the Glue Data Catalog. I planned to call it FlightInfoDB as a source database, but it converts all upper-case letters to lower case. After hitting Next and Finish at the summary page we will see our crawler and its status.

Clicking on the Log link next to the Crawler name takes you to the CloudWatch page with crawler execution status. Note the weird WARN message "Unable to read index for table…"- it didn't impact anything, the Crawler finished successfully. If anyone can shed light on this it would be much appreciated. I couldn't find any reason for this, it's impact or how to fix it.

If we go to the Databases > Tables Tab, we can see two tables that the crawler discovered and added to the Data Catalog.
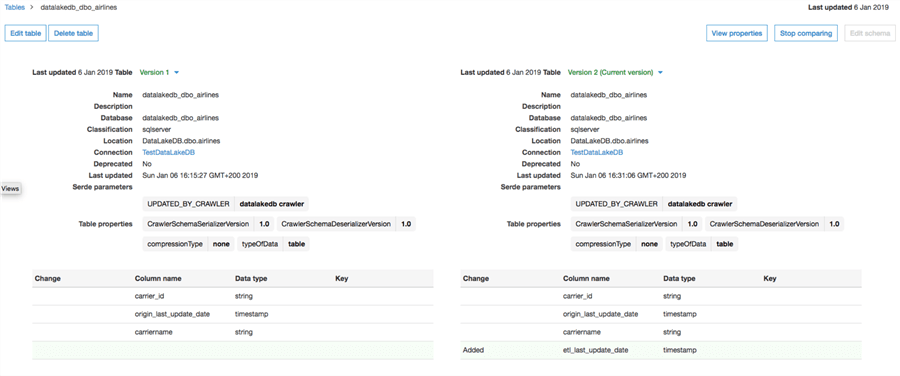
We will choose one of the tables and we can see the table metadata the way the Glue service imported it and even compare the versions of the schema. See below, I have added a new column to the table between Crawler executions, the new column is highlighted in green:
Add a Glue Job
The next step is in the Jobs tab, here we will be creating the Job that will move our data.
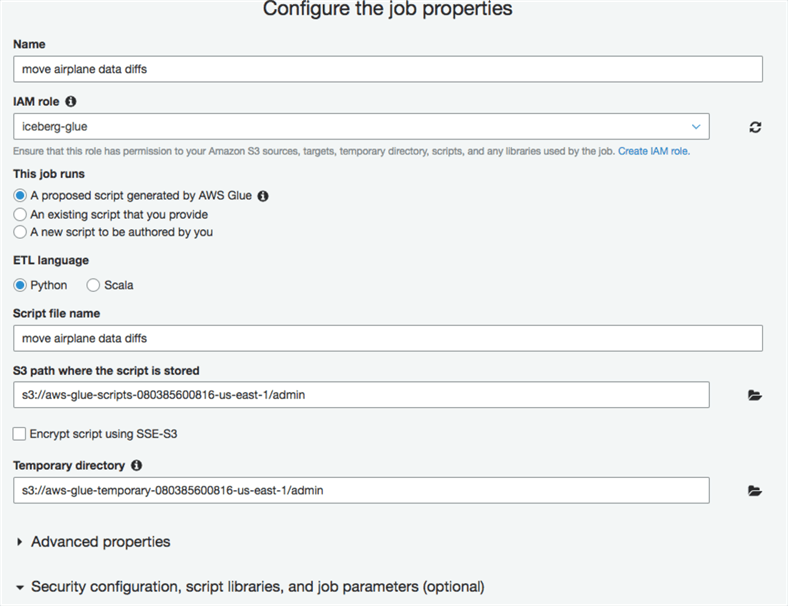
If you want to track processed data and move only new tuples, make sure to enable job bookmark. You can use this feature with relational database sources only if you have a primary key. Note that job bookmarking will identify only new rows and will not move updated rows. For S3 input sources, a job bookmark will check the files last modified time. Bookmarks are maintained per job. If you drop the job, the bookmark will be deleted and new jobs will start processing all data. When you want to manually run a job, you will be prompted whether you want to keep the Job Bookmark enabled or Disable it and process all data.

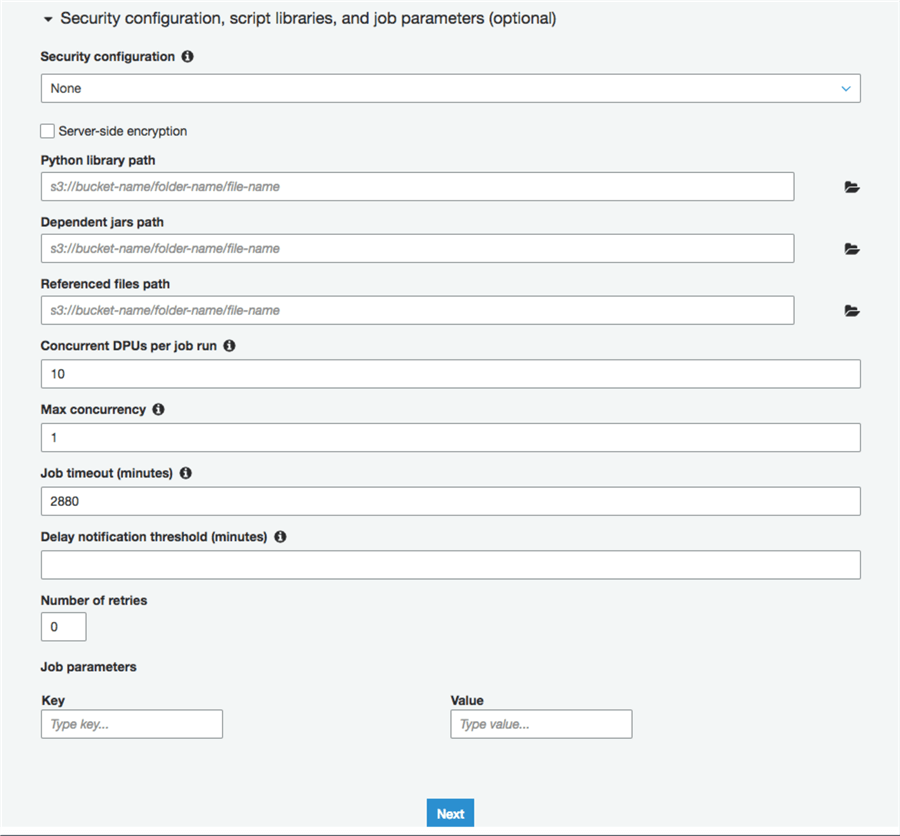
Note that you can impact how fast the job will run by assigning concurrent DPUs per job run, setting how many concurrent threads of this job you want to execute, job timeout and many other settings.
As a next step, select the ETL source table and target table from AWS Glue Data Catalog.

In this example I will be using RDS SQL Server table as a source and RDS MySQL table as a target. This shows the column mapping.

After you hit "save job and edit script" you will be taken to the Python auto generated script.
I have edited a script and have performed the following changes:
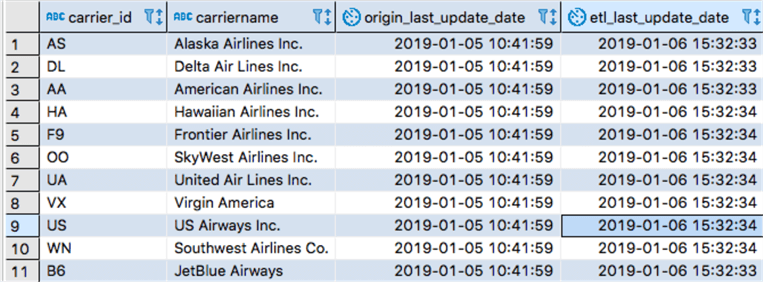
- Renamed column carrier to carrier_id in the target table
- Renamed last_update_date to origin_last_update_date in the target table
- Added a new column etl_last_update_date to the target table
- Created a map function to generate a timestamp value for the etc_last_updated_date for each tuple
I didn't use the columns mapping wizard which you saw above, all changes were done in the script and columns were renamed/added in the target table.
This is how we build a dynamic frame for the source data:
airlines_tbl = glueContext.create_dynamic_frame.from_catalog(database = "flightinfodb", table_name = "flightinfodb_dbo_airlines", transformation_ctx = "airlines_tbl")
Renaming the column:
airlines_tbl = airlines_tbl.rename_field('carrier', 'carrier_id')
Adding a new column and populating it with the timestamp value:
def AddTimestamp(rec):
  rec["etl_last_update_date"] = datetime.datetime.fromtimestamp(time.time()).strftime('%Y-%m-%d %H:%M:%S')
  return rec
Applying the map function to the DataFrame:
mapped_airlines = Map.apply(frame = airlines_tbl, f = AddTimestamp)
The rest of the logic I haven't changed.
Here is my edited Python script that will run inside the job:
import sys
import time
import datetime
from awsglue.transforms import *
from awsglue.utils import getResolvedOptions
from pyspark.context import SparkContext
from awsglue.context import GlueContext
from awsglue.job import Job

## @params: [JOB_NAME]
args = getResolvedOptions(sys.argv, ['JOB_NAME'])

sc = SparkContext()
glueContext = GlueContext(sc)
spark = glueContext.spark_session
job = Job(glueContext)
job.init(args['JOB_NAME'], args)

airlines_tbl = glueContext.create_dynamic_frame.from_catalog(database = "flightinfodb", table_name = "flightinfodb_dbo_airlines", transformation_ctx = "airlines_tbl")

airlines_tbl = airlines_tbl.rename_field('carrier', 'carrier_id')

airlines_tbl = airlines_tbl.rename_field('last_update_date', 'origin_last_update_date')

def AddTimestamp(rec):
  rec["etl_last_update_date"] = datetime.datetime.fromtimestamp(time.time()).strftime('%Y-%m-%d %H:%M:%S')
  return rec

mapped_airlines =  Map.apply(frame = airlines_tbl, f = AddTimestamp)

applymapping1 = ApplyMapping.apply(frame = mapped_airlines, mappings = [("carrier_id", "string", "carrier_id", "string"), ("carriername", "string", "carriername", "string"), ("origin_last_update_date", "timestamp", "origin_last_update_date", "timestamp"),("etl_last_update_date", "string", "etl_last_update_date", "timestamp")], transformation_ctx = "applymapping1")

selectfields2 = SelectFields.apply(frame = applymapping1, paths = ["carrier_id", "carriername", "origin_last_update_date","etl_last_update_date"], transformation_ctx = "selectfields2")

resolvechoice3 = ResolveChoice.apply(frame = selectfields2, choice = "MATCH_CATALOG", database = "datalakedb", table_name = "datalakedb_dbo_airlines", transformation_ctx = "resolvechoice3")

resolvechoice4 = ResolveChoice.apply(frame = resolvechoice3, choice = "make_cols", transformation_ctx = "resolvechoice4")

datasink5 = glueContext.write_dynamic_frame.from_catalog(frame = resolvechoice4, database = "datalakedb", table_name = "datalakedb_dbo_airlines", transformation_ctx = "datasink5")

job.commit()
Here is a link with more script samples if you want to write more complicated logic and PySpark transformation commands referenced with the examples.
Add a Glue Trigger
After you have finished with the job script, you can create a trigger and add your job to the trigger. You can choose either a cron based schedule or based on other job success/failure/timeout event. There is an option to start the job based on AWS Lambda function as well.
Don't forget to check the Enable trigger on creation checkbox.
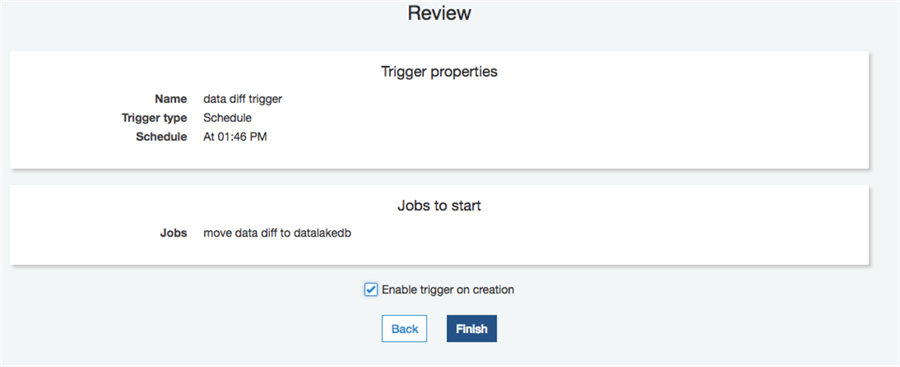
In the Jobs tab you can find the job status, execution log and run history, you can run the job and change the script:

AWS Glue ETL flow result
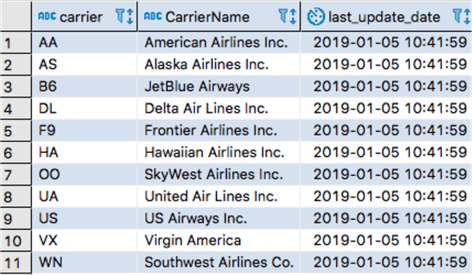
Here is how my source table looks:
And this is how my destination table looks after the AWS Glue ETL finished moving the data:
Next Steps
- Here is some additional reading:
- Set up a VPC to access RDS data stores - https://docs.aws.amazon.com/glue/latest/dg/setup-vpc-for-glue-access.html
- What is Amazon Glue - https://docs.aws.amazon.com/glue/latest/dg/what-is-glue.html
- Amazon Glue pricing - https://aws.amazon.com/glue/pricing/
About the author
 Maria Zakourdaev has been working with SQL Server for more than 20 years. She is also managing other database technologies such as MySQL, PostgreSQL, Redis, RedShift, CouchBase and ElasticSearch.
This author pledges the content of this article is based on professional experience and not AI generated.
View all my tips


