Problem
Many organizations need to extract data from AWS RDS SQL Server databases, transform the data, and then load it into a data warehouse or make it available for downstream systems. While SQL Server Integration Service (SSIS) can be the natural choice for an ETL platform for on-premises SQL Servers, is there any such option for Amazon RDS SQL Servers?
Solution
SQL Server Integration Services is a platform for creating extract, transform, and load workflows. It enables users to connect to various data sources, copy the data, cleanse it, process it, and load it to a destination system. SSIS supports a variety of data sources, including RDBMS, flat files, XML files, etc. It also boasts a comprehensive list of transformation operations. Like other state-of-the-art ETL tools, SSIS allows developers to create ETL dataflows without writing much code.
Amazon Web Service has recently announced support for SSIS with RDS SQL Server. This is great news for data architects, engineers, and analysts because many on-premise SSIS packages can now be ported to the cloud.
In this article, we will learn how to integrate SSIS with AWS RDS SQL Server 2017 instance
Prerequisites
Using SSIS with an RDS database has a few prerequisites, these include:
- Integration between RDS and S3
- CLR Integration enabled in the RDS Parameter Group
- Windows authentication enabled for the RDS SQL Server instance
- SSIS enabled in the RDS Option Group
An RDS SQL Server Parameter Group contains SQL Server configuration parameters. Option Groups are used to specify optional features that can be enabled.
All these steps can be done either when creating the database instance later. In this article, we will create a new RDS SQL Server instance, restore a copy of the Adventureworks database there, and use SSIS to export data from it to S3.
Create an RDS Database Instance
To set up an AWS RDS SQL Server instance, select “Create Database” from the AWS RDS console, and then select the “Standard create” option:

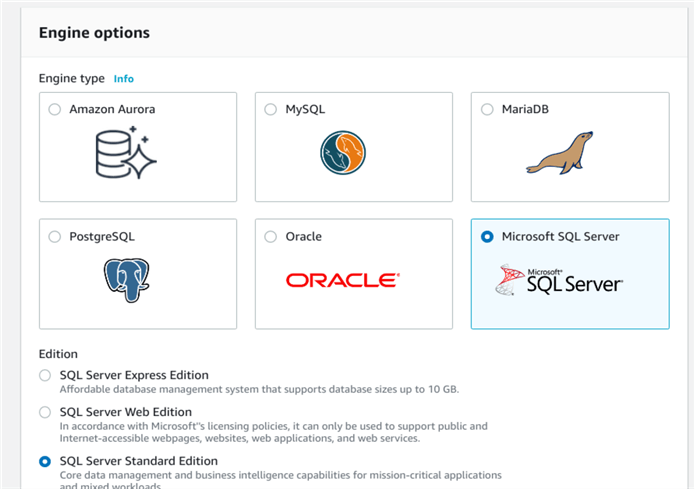
Select the Microsoft SQL Server as the database engine, and select SQL Server standard edition. Although not shown here, select version 2017:
In the next step, make sure you are enabling the Microsoft SQL Server Windows Authentication option on the configuration page:
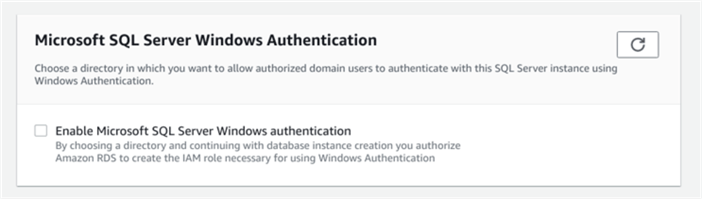
You can then search for the Windows Active Directory and add it to the configuration. For this article, we are assuming you already have a working AD. If not, refer to this page from AWS documentation.
Keep other configuration options to their default values.
After you click on the “Create Database” button, RDS will create an RDS SQL Server instance with the default options and parameters.
Setting up S3 Integration
The next step is to enable S3 integration for the RDS instance. For this, follow the steps described here.
Setting up a Custom Option Group
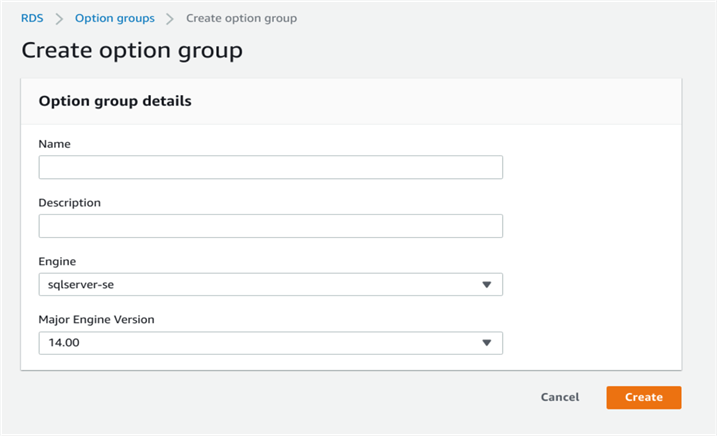
We will now configure an RDS Option Group for enabling SSIS. To do so, click the link “Option groups” from the navigation menu of the RDS console. Then click on the “Create group” button. This will open a dialog box where you can fill in the required details. For our use case, we selected the engine as “sqlserver-se” and the major engine version as “14.00”, which is SQL Server 2017. Click “Create” to create the Option Group.
Once the Option Group is created, click on its link in the RDS Option Groups console to open its properties. We will need to add two options to this group. Click the “Add option” button and select SSIS from the drop-down menu. Also, make sure the option is added immediately:
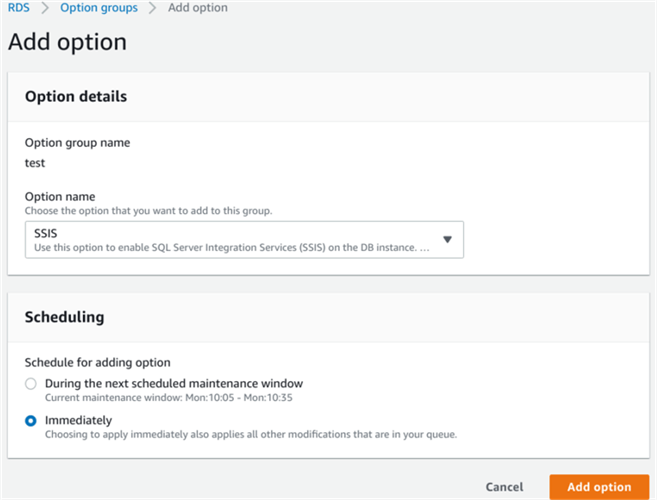
After adding the option, repeat the process to add the “SQLSERVER_BACKUP_RESTORE” option. We will need this option to restore a copy of the AdventureWorks database. The method of enabling SQL Server native backup and restore feature in Amazon RDS and restoring a database backup is described here.
Setting up the parameter group
Next, you will create a parameter group to enable CLR integration. Just like creating the Option Group, you can navigate to the RDS Parameter Groups console and click the “Create parameter group”:

After creating the group, click on the newly created group and select “Edit Parameters”. Then search for the parameter “clr” and change its value to 1:

Click “Save changes” to make the changes permanent.
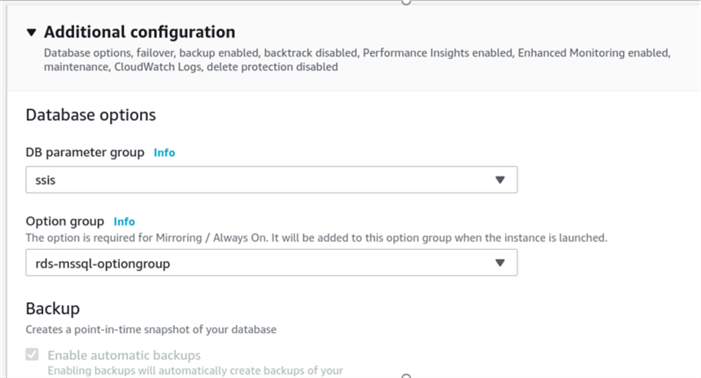
We will now attach the newly-created Option Group and the Parameter Group to the database instance. To do this, click on the instance name from the RDS console. Once the instance properties come up, click the “Modify” button.
In the “Additional configuration” section, select the Option Group and the Parameter Group that created. Click “Continue” and then select the checkbox to apply the changes immediately in the next screen:
Restoring the AdventureWorks Database
You can find a link for a copy of the AdventureWorks database here. Once you download the backup file, upload it to the S3 folder the RDS instance is configured to access. Next, connect to the database instance from the SQL Server Management Studio as the RDS master user. You can run a query like the one shown below to restore the database (replace the S3 location and backup file name):
exec msdb.dbo.rds_restore_database
@restore_db_name='adventureworks',
@s3_arn_to_restore_from='arn:aws:s3:::mybucket/backup1.bak';
Setting up SSIS permissions for the Windows authenticated user
SSIS modules can only be run as a Windows authenticated user. This is the reason why the RDS SQL Server needs to integrate with an Active Directory and have Windows authentication enabled. Assuming you have already set up an Active Directory and created a Windows domain user there for SSIS, Run the query block below to create a login from the Windows user and grant that user memberships of the ssis_admin and ssis_logreader roles:
USE [SSISDB]
GO
CREATE USER [mydomain\user_name] FOR LOGIN [mydomain\user_name]
ALTER ROLE [ssis_admin] ADD MEMBER [mydomain\user_name]
ALTER ROLE [ssis_logreader] ADD MEMBER [mydomain\user_name]
GO
Next, run the commands below to set up the SSI execution permissions for the user:
USE [msdb]
GO
CREATE USER [mydomain\user_name] FOR LOGIN [mydomain\user_name]
GRANT EXEC ON msdb.dbo.rds_msbi_task TO [mydomain\user_name] with grant option
GRANT SELECT ON msdb.dbo.rds_fn_task_status TO [mydomain\user_name] with grant option
GRANT EXEC ON msdb.dbo.rds_task_status TO [mydomain\user_name] with grant option
GRANT EXEC ON msdb.dbo.rds_cancel_task TO [mydomain\user_name] with grant option
GRANT EXEC ON msdb.dbo.rds_download_from_s3 TO [mydomain\user_name] with grant option
GRANT EXEC ON msdb.dbo.rds_upload_to_s3 TO [mydomain\user_name] with grant option
GRANT EXEC ON msdb.dbo.rds_delete_from_filesystem TO [mydomain\user_name] with grant option
GRANT EXEC ON msdb.dbo.rds_gather_file_details TO [mydomain\user_name] with grant option
GRANT EXEC ON msdb.dbo.sp_add_proxy TO [mydomain\user_name] with grant option
GRANT EXEC ON msdb.dbo.sp_update_proxy TO [mydomain\user_name] with grant option
GRANT EXEC ON msdb.dbo.sp_grant_login_to_proxy TO [mydomain\user_name] with grant option
GRANT EXEC ON msdb.dbo.sp_revoke_login_from_proxy TO [mydomain\user_name] with grant option
GRANT EXEC ON msdb.dbo.sp_delete_proxy TO [mydomain\user_name] with grant option
GRANT EXEC ON msdb.dbo.sp_enum_login_for_proxy to [mydomain\user_name] with grant option
GRANT EXEC ON msdb.dbo.sp_enum_proxy_for_subsystem TO [mydomain\user_name]  with grant option
GRANT EXEC ON msdb.dbo.rds_sqlagent_proxy TO [mydomain\user_name] WITH GRANT OPTION
ALTER ROLE [SQLAgentUserRole] ADD MEMBER [mydomain\user_name]
GO

USE [master]
GO
GRANT ALTER ANY CREDENTIAL TO [mydomain\user_name]
GO
Creating an SSIS Package
We will now create an SSIS package to export a table from the AdventureWorks database to a CSV file. Since the SSIS package will run inside the RDS environment, we have to use a predefined path in the RDS server to upload the SSIS artifacts and download the output files. For RDS, this path is the D:\S3\ directory.
To develop an SSIS package, you will need to have Visual Studio with SQL Server Data Tools installed. For this exercise, we will use Visual Studio 2019 with SSDT 2019.
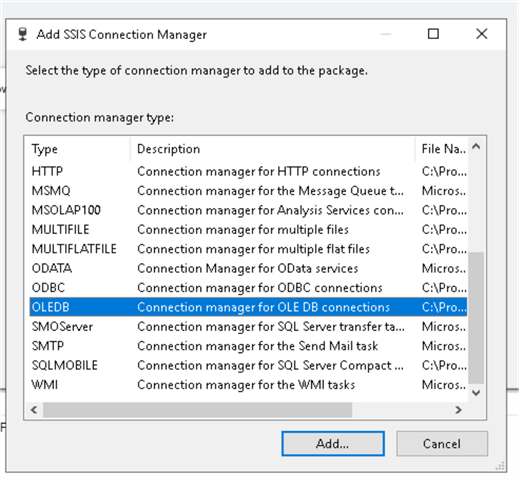
Open Visual Studio and create an SQL Server Integration Services project. The first step is to define the connection parameters for the job. Right-click on the connections icon in the solution tab and click “New Connection Manager” to bring up the window below:
Select the OLEDB connection manager and fill in the relevant details:
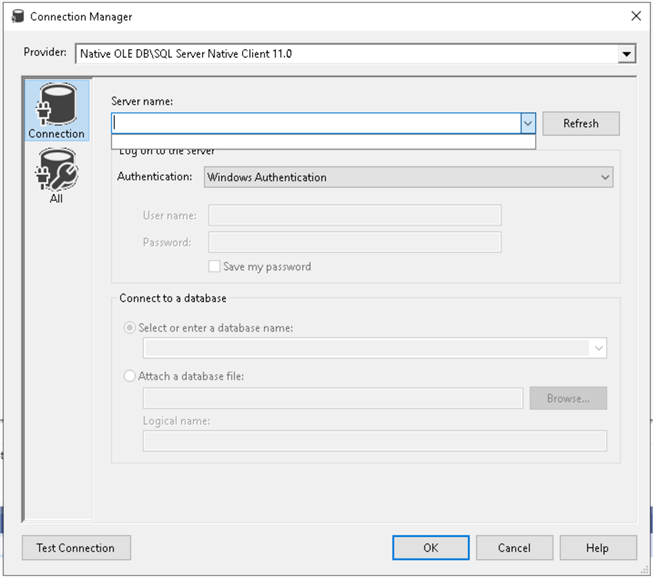
AWS recommends using a SQL Server user for remote connections. For local connections, you can use either a Windows authenticated user or a SQL Server user. For our use case, we will use a SQL Server user for the connection. Please note that a Windows authenticated user is mandatory for deploying the package. Click “OK” once you provided the details to create the connection manager and tested the connection.
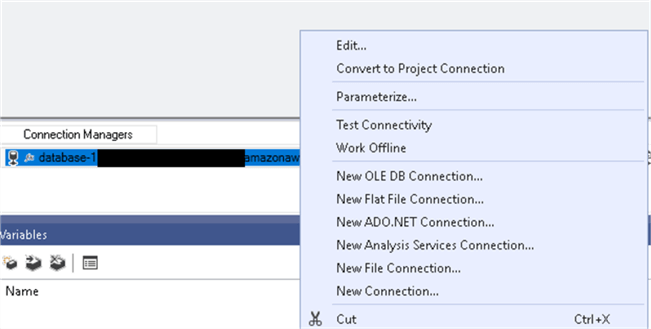
We will now parameterize the connection manager password since SSIS is very particular about sensitive data. Right-click on the connection manager just created, and click the “Parameterize…” option from the pop-up menu:
Select “Password” from the drop-down list, select “Use existing parameter”, and then select OK. This ensures the parameter value will have to be entered manually or provided through the SQL Server agent job when running the package.
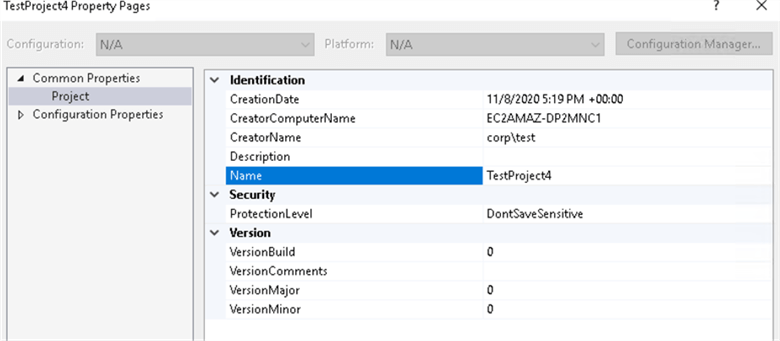
Right-click on the project in the Solution Explorer and ensure that Protection Level is set to “DontSaveSensitive”. This is to ensure the password is not stored as part of the package file.
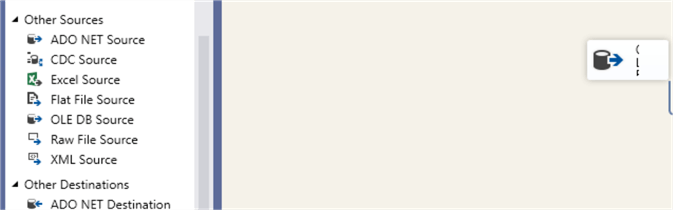
The next step is to add the data source. Click the Data flow tab and drag the OLEDB Source component into the design palette.
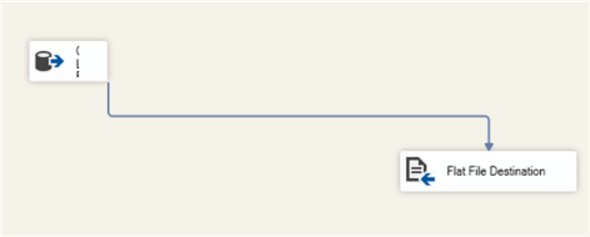
Right-click on the OLEDB source and click “Edit”. Add the connection manager previously created as the OLEDB data source. Also, select the table you want to export. Next, drag the “Flat File Destination” to the design palette, and connect the OLEDB Source component to the Flat File Destination component.
Right-click edit on the Flat File Destination component and set the path to D:\S3 folder. In the image below, we want the export file to be in CSV format and not have a header row:

Next, select the “Build” menu in Visual Studio, and click the “Build Solution” option: as shown below.

A successful build will create a “.ispac” file. This file can be used to deploy the SSIS package you created. Note the location of the .ispac file created from the logs in the build console.

Deploying the SSIS Package
To deploy the package, you need to upload the .ispac file to the S3 location you created when configuring S3 integration for the RDS instance.

Once you upload the file, note down the ARN (Amazon Resource Name) of the file:

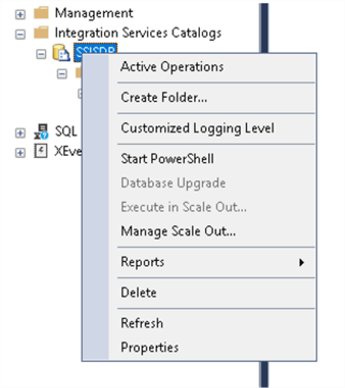
As a next step, connect to the database engine from SSMS using the Windows user’s credentials. Once connected, right-click on the Integration Service Catalog and create a folder to deploy the artifacts.
Next, open a new query tab in SSMS and run the query below to download the .ispac file from S3 to the SSIS Catalog. Replace the names of the S3 location and the file name:
exec msdb.dbo.rds_download_from_s3
@s3_arn_of_file='arn:aws:s3:::adv-bucket-adventure/TestProject4.ispac',
[@rds_file_path='D:\S3\TestProject4.ispac'],
[@overwrite_file=1];
Note down the ID returned in the query result. You can use it to monitor the status of the download process. To see the status, you can run a query like this:
SELECT * FROM msdb.dbo.rds_fn_task_status(NULL,<id>);
Once the file is downloaded (the status should be “SUCCESSFUL”, and the progress should be 100%), you can deploy the package using the query below. Change the folder name and the file path to reflect your use case. The project name should be the Visual Studio project name.
exec msdb.dbo.rds_msbi_task
@task_type='SSIS_DEPLOY_PROJECT',
@folder_name='test',
@project_name='TestProject4',
@file_path='D:\S3\TestProject4.ispac;
Once again, the result will show an ID for the task. You can use this ID to monitor the status of the RDS task:
SELECT * FROM msdb.dbo.rds_fn_task_status(NULL,<id>);
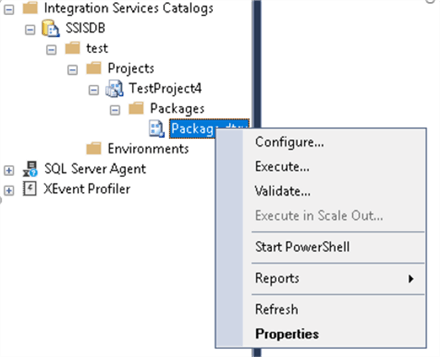
Once the deployment is successful, expand the folder you created in the SSISDB catalog to see the .ispac file.
From here, you can run it by right-clicking and selecting “Execute” from the pop-up menu:
Since the password was parameterized, the package execution process will prompt for it:

Enter the password, and you can see the package execution status in the next screen:

And that’s it. You have now installed SSIS with an AWS RDS SQL Server instance, created an SSIS package, and successfully deployed it.
Next Steps
Usually, SSIS packages are scheduled to run at specific times as part of automated workflows. The next logical step is to learn how to create such schedules. For this, you can learn about:
- Setting up SQL Server proxy and SQL Server agent
- Configuring parameter values and required permissions
- Creating SQL Server agent jobs in RDS

Sadequl Hussain lives in Sydney, Australia and holds a Bachelor’s degree in Electrical Engineering. His more than 15 years’ experience in IT has seen him in various roles including training, technical writing, web application development and database administration. Sadequl has been working with SQL Server since version 6.5 and his life as a DBA has seen him managing mission critical database systems for various large companies. He is also an Oracle DBA and an avid Linux administrator. Over the years Sadequl has achieved various certifications including those from Microsoft, CompTIA and ITIL. He is currently having fun preparing for other ones from Amazon and the Open Group. He regularly contributes to various SQL Server and Linux online publications. Apart from spending time with his wife and daughter, he loves his part-time career as a photographer and film-maker and also loves to travel.
- MSSQLTips Awards: Trendsetter (25+ tips) – 2017


Hi,
I am planning to integrate SSIS to Aws Rds. .I have couple of doubts.
1.Is SSIS can be integrated in the local machine too?
2.I am planning to take SQL server Standard edition from Aws Rds. What version of Visual studio should I download like Visual Studio Community or Visual Studio Professional or Visual Studio Enterprise.