Problem
Notebooks are new functionality available in Azure Data Studio, that allows you to create and share documents that may contain text, code, images and query results. These documents are helpful to be able to share database insights and create runbooks that you can share easily.
Originally implemented as an open source project for data science projects, Azure Data Studio (ADS) has implemented it to use with SQL Server databases as well.
In this tip we will show you how it works and how to get started on it.
Solution
Notebooks are part of an open source initiative called Project Jupyter and were implemented for sharing data science insights containing code and text with rich format.
The text is formatted using MD Language (MarkDown, the same used in GitHub to create the readme files), so if you are already familiar with .md files, you will find it easy to create readme or manuals for your repositories within Azure Data Studio.
In case you don’t know what Azure Data Studio is, this tool is a fork from the cross platform tool Visual Studio Code, created specifically to work with SQL Server and Azure Databases, it is a fully customizable tool aimed for database development. You can take a look of the latest version here.
In this tip we will show you how to configure ADS and create a simple notebook.
Configure Azure Data Studio
Notebook support has been natively implemented since the March 2019 release of Azure Data Studio. So the only thing you need to do is to download and install the latest version here.
Note: At the time of writing this article, I worked with the insiders build that contains the March release. This build contains features to be released, so some things could change in the future.
Once you have installed the latest release, open ADS and access the Command Palette (in Windows: Ctrl + Shift + P) or in View > Command Palette as follows:

Once the command palette is displayed, type “New Notebook”, and then select the option:

When you open the notebook interface for the first time, it will ask you to install the Python Kernel (we will discuss what a kernel is later), you can install it if you want to use data science notebooks too, or click cancel.

Once we are able to see the notebook screen, then we are ready to work, we will discuss each option in the next section.
Notebook Overview
The default notebook window looks like this:

Let’s take a look on each component:
- Kernel: The language you write the code and the engine that will execute it, for our case, T-SQL.
- Attach To: The connection under we want to work, the default is Localhost.
- + Code: Add a code snippet.
- + Text: Add a text snippet in MD language (can be formatted text, images, links, etc.).
- Save: Saves the notebook as a .ipynb file, which is the file to share.
- Trusted: Since .ipynb files can be shared, you should mark as a trusted document after you have reviewed it and check that there is no malicious code in it.
We are now ready to work on our example.
Creating a SQL Notebook
We will create a notebook using an old tip Determine SQL Server Network Protocol Information using T-SQL and DMVs, so we create a new Notebook and save it as MSSQLTips.ipynb:

We proceed to add a text snippet using the +text option (or Ctrl+Shift+T), and we add the Problem – Solution part using the MD format:
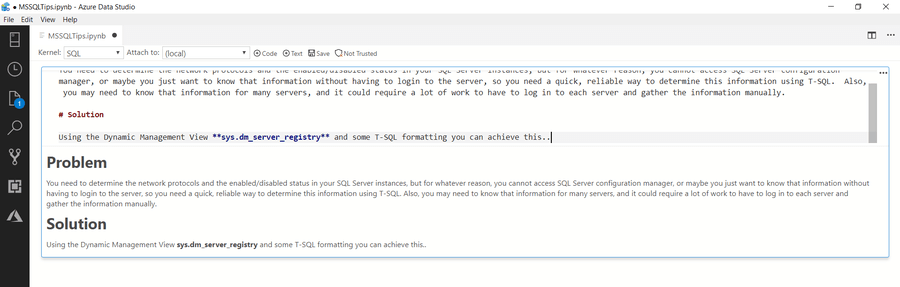
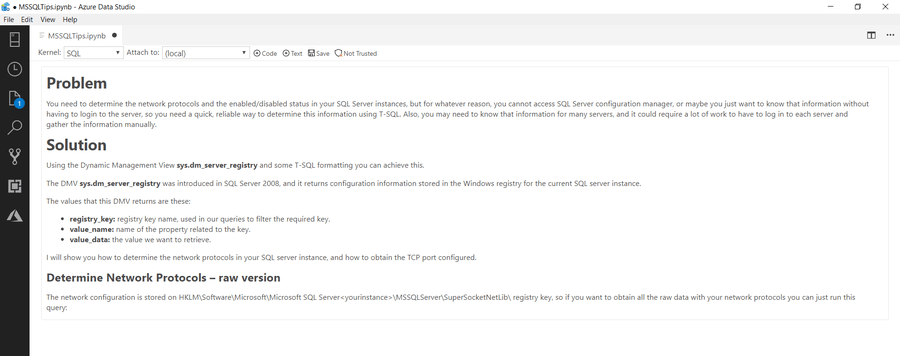
You can see that there is also an integrated preview as you are typing, so you can check the final result as you are typing. We proceed to complete the remaining text and once you are happy with the text, just click on an empty area and the final result should look like this:
If you want to edit any text snippet, just double click on it.
To add a code snippet, select the + Code option (or Ctrl+Shift+C), we added the code section as follows:

You can see a Run Cell button on the left, with this feature you can also include the query results in the notebook:

If you want to remove the results from the document, just click on the elipse icon (i.e. …) located in the upper right corner of the code snippet and select the Clear output option.
After some more text and code is added, your notebook should look like this:

At this point, you can save the notebook, using Ctrl + S or by using the File > Save Option.
Note that after saving the notebook, the document has changed to not trusted, to change an external document to trusted, just click on the trust button, be careful with code that can contain external sources.
You can learn more about trusted documents on this link (from python documentation).

We have created a notebook successfully, now let’s see some edit options.
To access the edit options on each section, just click on elipse icon (i.e. …) on the top right corner:

You can:
- Delete current Text/Code section
- Insert Text/Code before or after the current section
- For code sections, we can select to clear query results from notebook
Additional Azure Data Studio Functionality
Some other inherited options from Azure Data Studio are also available for you in the notebook as well.
For example, if you are familiar with T-SQL code snippets (in this tip I explain how they work), you can use them in notebooks as well as if you are working on a normal query window:

For adding links and images, you use the same conventions with the MarkDown language:

Next Steps
- Check out my previous tip on how to create custom snippets in Azure Data Studio.
- An excellent Markdown language reference can be found here.
- Note that on newer releases of Azure Data Studio, some features can change or new features can be added.
- You can download the latest Azure Data Studio release here.

Eduardo Pivaral is an MCSA, SQL Server Database Administrator and Developer with over 15 years of experience working in large environments.
- MSSQLTips Awards: Trendsetter (25+ tips) – 2020 | Author of the Year Contender – 2019 | Rookie of the Year – 2018