Problem
Virtual machines (VM) are one of several resources that Azure offers and gives you total control to install and configure anything you need to perform your work. But how easy is to create and manage an Azure VM? Is there anything else that I should know before creating an Azure VM?
Solution
In this article we are going to look at the options to deploy Azure VMs, with the necessary notes and tips to help you with your daily administration tasks.
Deployment
A virtual machine is virtualization of a physical computer and just like any server in a datacenter, virtual machines needs some elements to do their job:
- Resource group
- The VM itself
- Disks
- Virtual network (shared with other VMs and services)
- Network interface (NIC) to communicate on the network
- Network Security Groups (NSG) to secure the network traffic
- Public IP address (optional)
- Azure DNS (optional)
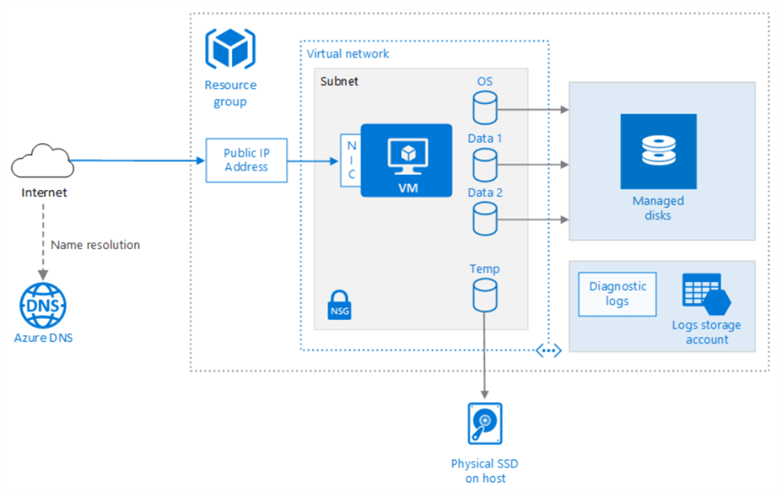
Azure will create all of these resources if necessary and it will use the VM name to generate a resource group name (a resource group is a logical container that holds related Azure resources). All these resources are manageable items in Azure.
Location
Azure has datacenters around the world and they are grouped into geographic regions ('West US', 'North Europe', 'Southeast Asia', etc.) to provide redundancy and availability. Have the following 3 things in mind when choosing the location for your virtual machine:
- Place your VMs in a region close as possible to your users to improve performance and to meet any legal, compliance, or tax requirements.
- Each region has different hardware available and some configurations are not available in all regions, so this can limit your available options.
- There are price differences between locations, but if you choose to place your VM in a cheaper region it may impact negatively the performance if the region is far from your users (see point 1).
Sizing
The best way to determine the appropriate VM size is to consider the type of workload your VM needs to run. Based on the workload, you’re able to choose from a subset of available VM sizes offered by Azure. Workload options are classified as follows on Azure (Source – https://docs.microsoft.com/en-us/azure/virtual-machines/windows/sizes):
| Option | Description |
|---|---|
| General purpose | These VMs are designed to have a balanced CPU-to-memory ratio. Ideal for testing and development, small to medium databases, and low to medium traffic web servers. |
| Compute optimized | These VMs are designed to have a high CPU-to-memory ratio. Suitable for medium traffic web servers, network appliances, batch processes, and application servers. |
| Memory optimized | These VMs are designed to have a high memory-to-CPU ratio. Great for relational database servers, medium to large caches, and in-memory analytics. |
| Storage optimized | These VMs are designed to have high disk throughput and IO. Ideal for VMs running databases. |
| GPU | GPU VMs are specialized virtual machines targeted for heavy graphics rendering and video editing. These VMs are ideal options for model training and inferencing with deep learning. |
| High performance computes | High performance compute is the fastest and most powerful CPU virtual machines with optional high-throughput network interfaces. |
Azure allows you to upgrade or downgrade the VM size after creation (in case of changes in your workload or if you just misconfigured it at the beginning) to a new size allowed by the current Azure region hardware configuration.
Note that changing a running VM size will automatically reboot the machine to complete the request so be very careful when resizing a production VM since it will cause a temporary outage.
Tip: If you stop and deallocate the VM, you can then select any size available in your region since this removes your VM from the cluster it was running on.
Costs
Azure offers three payment options for virtual machines and you can learn more about these options here. Following is a table from the previous link:
| Option | Description |
|---|---|
| Pay as you go | Pay for compute capacity by the second, with no long-term commitment or upfront payments. Increase or decrease compute capacity on demand. Start or stop at any time and only pay for what you use. |
| Reserved Virtual Machine Instances | An Azure Reserved Virtual Machine Instance is an advanced purchase of a Virtual Machine for one or three years in a specified region. The commitment is made up front, and in return, you get up to 72 percent price savings compared to pay-as-you-go pricing. Reserved Virtual Machine Instances are flexible and can easily be exchanged or returned. |
| Spot Pricing | Purchase unused compute capacity at deep discounts – up to 90 percent compared to pay as you go prices. If your workload can tolerate interruptions, and its execution time is flexible, then using spot VMs can significantly reduce the cost of running your workload in Azure. Run your workloads on Virtual Machines or Virtual Machine Scale Sets. |
For each single Azure VM you will have two separate costs (compute and storage costs).
Compute costs – If you are using the Pay-as-you-go option the costs of compute will be billed per usage meaning that you won't be charged for compute capacity if you stop and deallocate the VM since this releases the hardware. The hourly price takes in consideration the VM size and the Operation System you have selected for the VM (there is no charge for Linux, but there are charges for the Windows operating system).
Tip: You might be able to save money by reusing existing licenses for Windows with the Azure Hybrid benefit.
Storage costs – Since the storage is charged separately from the VM usage, if the VM is stopped/deallocated you still will be charged for the storage used by the disks.
Operating System
There are several versions of Windows and Linux images offered in Azure that you can use to install into your VM.
You can also find for more sophisticated install images in the Azure Marketplace that not only includes the OS, but also well-known software installed for specific scenarios. Alternatively, you can also create your own disk image with what you need, upload it to Azure storage, and use it to create an Azure VM.
Note: Azure only supports 64-bit operating systems.
Name the VM
The VM name is used as the computer name, which is configured as part of the operating system. You can specify a name of up to 15 characters on a Windows VM and 64 characters on a Linux VM. Don't forget that if Azure creates a resource to work with the VM, it will use the VM name to generate the related resource name. So, it's always good to provide a consistent name to your virtual machine.
Tip: Add the environment, location, type and role of the VM in the virtual machine name to help quickly identify it.
Network
Every virtual machine is deployed into a virtual network and it has at least one network interface (NIC) that enables the VM to communicate with the virtual network.
Note: The number of NICs available for a VM depends on the VM size you have chosen.
If you need to communicate with the VM from another network then a public IP address is needed. By default, the public IP address is dynamic, i.e., it will be lost when VM is shut down and it will have a new and different IP address when it comes back online. If you want to keep the same Public IP address for a VM then you need to configure it to be static.
On top of that, you can Create a fully qualified domain name in the Azure portal and have an DNS that points to the FQDN.
To secure your Azure virtual network you can allow and deny network traffic to your VMs by using the Network security group (NSG) that acts as a software firewall.
Disks
Azure virtual machines have at least two virtual hard disks (VHDs):
- The first disk is where the Operating System is installed and is a VHD that's stored in Azure Storage.
- The second disk is used as temporary storage and is stored on a physical drive on the host machine. Use this disk only for temporary data, such as page or swap files since the contents may be deleted during reboots and other VM lifecycle events.
If you need to install software in the VM, then it's recommended to add additional disks to store install those applications and respective data. The maximum number of additional disks per VM is determined by the VM size (typically two per CPU). Do not forget that you pay for the storage you are consuming.
Note: If for some reason you really need to install applications on the OS disk, then you can resize the OS disk using PowerShell if you see that there's not enough free space.
Check here for a complete view of the storage offer in Azure where you can learn for example that Premium Storage is the best choice for disk I/O performance.
Next Steps
- Learn more about the Azure VM series and Managed disks.
- After create your VMs in Azure with what you learnt from this article check for the options of Azure Resiliency and learn how to implement high availability, disaster recovery and backups in Azure.

Vitor Montalvão is a SQL Server engineer with 20 years of experience in SQL Server, specializing in performance & tuning, data modelling, migration and security. Vitor also has a website with some useful information about SQL Server: https://f1-sqlserver.wixsite.com/f1-sqlserver.
- MSSQLTips Awards: Author of the Year Contender – 2017


