Problem
Power Apps is a great tool for enhancing a SharePoint form or making cross-platform mobile apps. In this tip we will see how to take it a step further and call a SQL Server stored procedure from a Power App.
Solution
Calling a SQL Server stored procedure from Power Apps is not possible directly. The Power Apps SQL connector allows you to read or write data to an SQL Server database table, but not use any of the programmability functions of SQL Server. We must use a workflow built with Power Automate, which will associate the call to the stored procedure with an event in the Power App and also allow you to pass parameters to the stored procedure.
Solution Components
The solution consists of three main components:
- The stored procedure. As an example, we will use a stored procedure for creating a login and a user. The example can be refitted to production scenarios for self-service user creation.
- Power Automate flow that is activated by an event in the Power App.
- The Power App which will serve as the starting point for a user to automatically create their SQL login and SQL user.
Stored Procedure
We will use the following example code for creating a login and a user. The procedure requires three parameters: login, password and target database:
CREATE PROCEDURE dbo.CreateLoginAndUser(
        @login VARCHAR(100),
        @password VARCHAR(20),
        @db VARCHAR(100))
AS
DECLARE @sql NVARCHAR(MAX)
SET @sql = 'USE ' + @db + ';' +
           'CREATE LOGIN ' + @login +
               ' WITH PASSWORD = ''' + @password + '''; ' +
           'CREATE USER pa_usr_' + @login + ' from login ' + @login + ';'
EXEC (@sql)
GO
Error handling can be tricky in case the flow fails at executing the stored procedure. So, note your parameter constraints because we must implement data validation for the login and password in the Power App.
Power Automate
Now let us turn to the core business of building the bridge between the Power App and SQL Server. Go to flow.microsoft.com. Click on New flow and choose Instant cloud flow.


On the next screen, give your flow a name and choose the PowerApps trigger from the list of triggers. Click Create once done.
In the flow building canvas, click on New Step. Type “stored procedure” in the Choose an operation search bar. This way you will filter the relevant actions only. Pick the SQL Server Execute Stored Procedure action. Note this is a premium action: a per-app or a per-user license will be required to run this in a production scenario. Also note since we are creating a login and a user, the stored procedure must be executed by a properly elevated user.

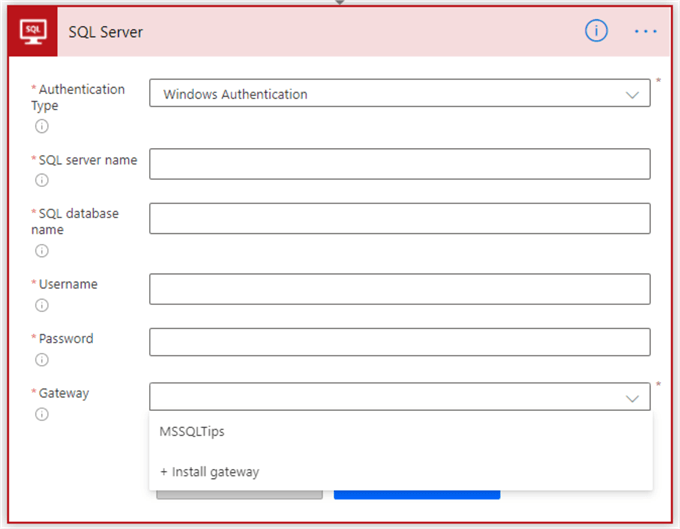
Now you will notice that the action requires three inputs: server name, database name and procedure name. However, we must establish a connection to the server first. Assuming your server is in Azure, but behind a private endpoint, denied public access or on-premises, you will need a data gateway setup. In either case, click on the three dots on the top right corner of the action card and click + Add new connection. In my case I am using my localdb for this example so you will have to pick the appropriate login type and configure the connection accordingly. If you don’t have a gateway, you must install one prior to configuring the connection.
After a successful configuration, the flow action will pick up the required parameters required for executing the stored procedure:

Starting with login, click on the empty field and click Ask in PowerApps from the pop up that will appear. Repeat for the other two parameters. This action will in turn create three parameters that we will be able to submit to the stored procedure via the flow from the app. You may have to click See more in the PowerApps heading in the pop up to get to the Ask in PowerApps choice.

This action concludes the setup of the flow. You can save it and go to Power Apps.
Power Apps
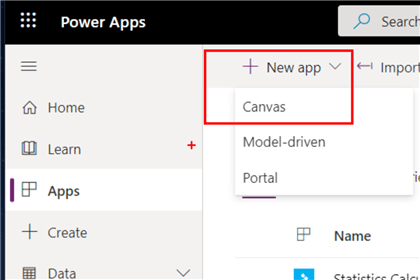
Go to powerapps.com. Click on Apps to the left, then New app > Canvas. You can skip this if you already have an existing app or a customized SharePoint form. The following steps, however, are valid for every Power App.
On the next screen, pick a suitable blank app template, either phone or tablet layout. Once you have the blank canvas visible, add the following elements to it and configure their properties accordingly:
- Element – Text Input
- Property – HintText
- Configuration – input login
- Property – OnChange
- Configuration – see below code
If(
    Len(LoginInput.Text) > 100,
    Set(
        IsError,
        true
    ),
    Set(
        IsError,
        false
    )
);
- Property – HintText
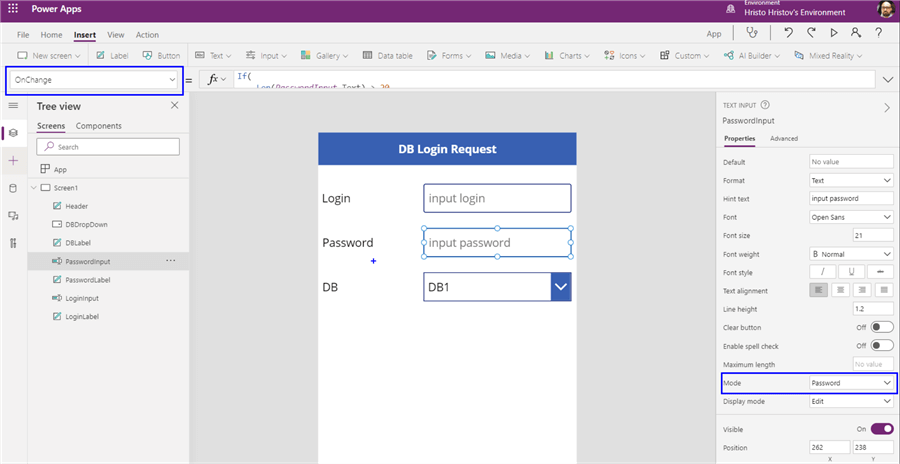
- Element – Text Input
- Property – HintText
- Configuration – input password
- Property – Mode
- Configuration – Password
- Property – OnChange
- Configuration – see below code
If(
    Len(PasswordInput.Text) > 20,
    Set(
        IsError,
        true
    ),
    Set(
        IsError,
        false
    )
);
- Property – HintText
- Element – Drop down
- Property – Items
- Configuration – List of values of database names. Unfortunately, it must be hardcoded because the SQL connector works only on the table level so we cannot use it to produce a live list of databases on a server.
- Property – Items
By using the OnChange property and the IsError variable, we can ensure the user inputs for login and password meet the criteria set by the parameters of the stored procedure.
Additionally, you can add three label elements to give a description for the inputs. The configuration should look like this:
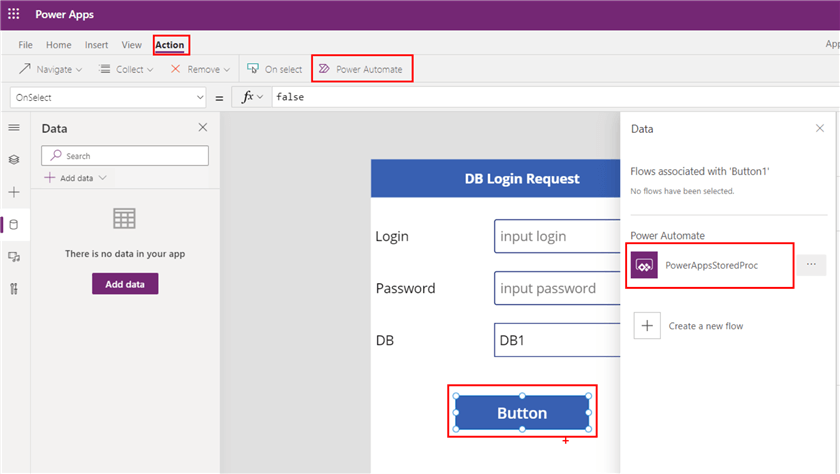
Next, add a Button element. Then go the Action tab and click Power Automate. A list of flows that have the Power Apps trigger will appear. Your flow and the Power App you are making must be in the same environment. Cross-environment flow and Power App association is not supported:
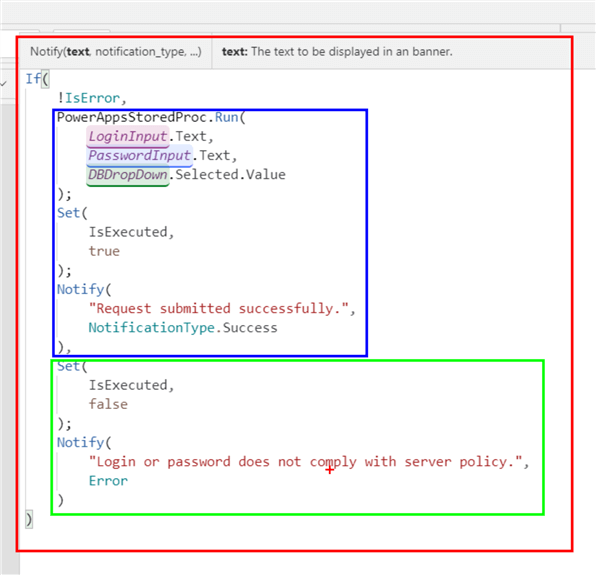
As soon as you click on the workflow’s name, the button’s OnSelect property will be populated. Now we must pass the values for the expected parameters of the stored procedure. These are login, password, and database name. We must also ensure all inputs comply with the parameter requirements. If not, we raise an error notification. In the following screenshot you can examine the formula for doing so:

In a real-life scenario, you can make separate error or notification messages for the login and password with more verbose feedback or add a text box in the app explaining what values are expected. This concludes the core configuration. You can test your Power App, but let us look into making the whole thing a bit better.
Make the process better
Add a success message
We could additionally add a Notify formula with a success message right after calling the flow:

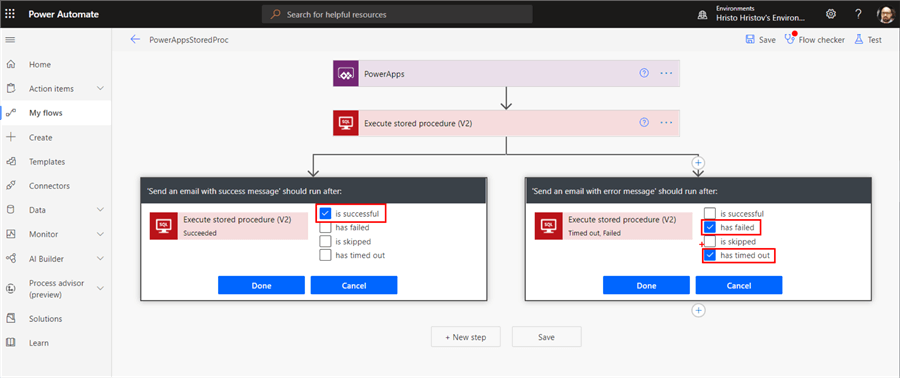
However, such a configuration may result in a success message even when the flow run results in an error. So, you can make the success message more generic, e.g. “Request submitted.” Then implement the success/error notification on the flow level. You can add two Send an email actions in a parallel branch. Configure one to run only after the stored procedure has been executed successfully, and the other the other way round:
The only consideration here is your organization DLP (data loss prevention) policies. Some are stricter and prevent any SQL action to exist together with a Send an email action in one flow.
Disable the Create button
To prevent the user from calling the stored procedure more than once, you may choose to disable the create button immediately after the flow has been triggered. This configuration coupled with a generic request submitted message may prove beneficial to user experience. The button will stay disabled for the current session only though:
Now you must add the following formula to the Create button’s DisplayMode property:
If(
    !IsExecuted,
    DisplayMode.Edit,
    Disabled
)
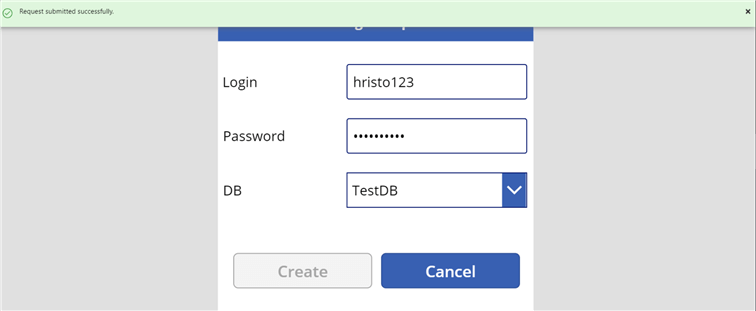
Overall, this configuration will result in the following visual experience, where a banner appears on the top of the screen and the Create button becomes grayed out and unclickable after being clicked:
Add a Cancel button
Additionally, you can implement a Cancel button. If this were a more complex app, the Cancel button can prompt the user to go back to a previous screen. Here we will just make sure that the input fields are reset and can be easily filled in anew. Pass the Reset formula to the OnSelect property of the Cancel button:

At this point you should be done and well ready to integrate a stored procedure execution into a Power App.
Next Steps
- Manage an on-premises data gateway in Power Apps
- Start a flow in a canvas app
- Power Apps concurrent function
- Learn more about SQL Server Stored Procedures
- Check out all of the Power Apps tips

Hristo Hristov is a seasoned data professional with 10+ years of experience spanning the intersection of data engineering and smart manufacturing solutions. Since 2017, he has specialized in implementing advanced analytics solutions for bridging the IT/OT gap.
A technical writer with over 80 published articles on data and AI technologies, Python development, and cloud solutions. Passionate about transforming complex data into business value through innovative applications of Azure Data Platform, Python, IoT solutions, databases, and other cloud technologies.
Currently applying Industry 4.0 best practices, focusing on IoT connectivity, and implementing data and AI systems in manufacturing. Hristo holds a degree in Data Science and several Microsoft certifications covering SQL Server, Power BI, and related technologies.
- MSSQLTips Awards
- Achiever Award (75+ tips) – 2026
- Rookie of the Year – 2021
- Author Contender – 2022/2023/2024/2025

This is now possible https://learn.microsoft.com/en-us/power-apps/maker/canvas-apps/connections/connection-azure-sqldatabase
Hi Chad,
if pushing the button does not work, then try checking the Power App component’s OnSelect property once you click it. The error from the flow should be visible there by hovering over the formula (which will be underlined in red). What does the error say?
Sadly, this does not work. I push the button and nothing happens. It looked like a fantastic idea. Can you provide any suggestions?