Problem
In a previous tip we have outlined the many scenarios where Microsoft Power Apps can be useful (business apps, mobile apps, low-code app development, custom apps, etc.) and save you lots of time and effort in development. Today we dive deeper into a specific scenario, which is creating a checklist app. This is a common in many industries. Paper checklists still exist, sometimes Excel is used, but processes can benefit from digitalization and automation via Power Apps development. Having the data at hand will provide a fertile ground for further insights into your process too.
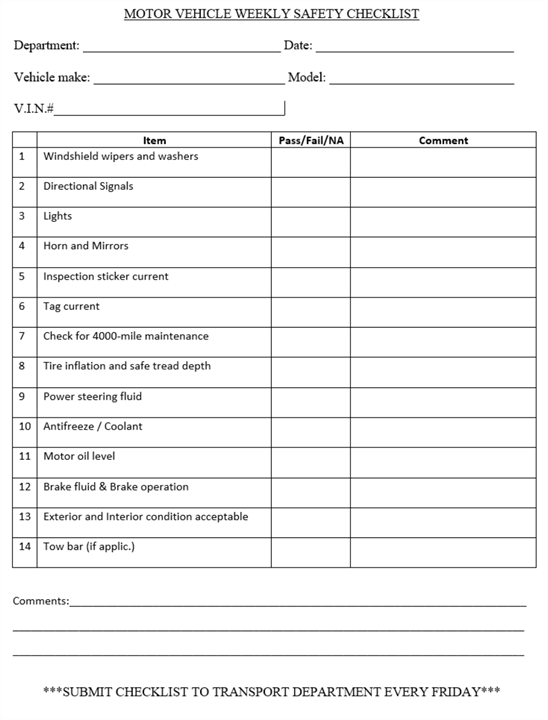
Let us consider the following simple checklist that an employee must fill in every week for their company car and build a Power App to support this:
Solution
Let us start by creating a simple data model to accommodate the data the app will generate. In a production scenario chances are there will be a database already containing vehicles’ data and to which departments they are assigned. We will try to emulate this as closely as possible, which will also be an added benefit in the app – users will not have to fill in these data manually. If the company had a particularly large vehicle pool, search and filtering in the app can be implemented as shown in the tip Querying SQL Data from Power Apps.
Data model
Let us create the SQL Server database first either on-premises or in the cloud (Azure, AWS, Google Cloud):
CREATE DATABASE VehicleInspections
Then a table for the departments:
CREATE TABLE Departments (
    DepartmentID INT IDENTITY(1,1) PRIMARY KEY,
    DepartmentName VARCHAR(255) NOT NULL
)
INSERT INTO Departments
VALUES ('HR'),
('IT'),
('Marketing')
Next, a table for the vehicles the company has and the business data:
CREATE TABLE Vehicles (
    VehicleID int IDENTITY(1,1) PRIMARY KEY,
    Make varchar(255) NOT NULL,
    Model varchar(255) NOT NULL,
    VIN char(17) NOT NULL
)
INSERT INTO Vehicles
VALUES ('Toyota', 'Prius', '1N6AD0EV6DN7140861'),
('Toyota', 'Prius', '3GCPKSE3XBG242896'),
('Toyota', 'Prius', '3D7KA28C14G232811'),
('Kia', 'Forte', '3C8FY4BB41T695286'),
('Kia', 'Forte', '1HSHBAANXRH607025'),
('Kia', 'Forte', '1MEFM59S3YG629821'),
('Chrysler', '300', '1N4AL3AP3EN363028'),
('Chrysler', '300', '1HGCM66574A102663'),
('Chrysler', '300', '4TAPM62N9XZ454425')
Next, a table that maps each vehicle to a department.
CREATE TABLE DepartmentVehicles (
    ID INT IDENTITY(1,1),
    DepartmentID INT FOREIGN KEY REFERENCES Departments(DepartmentID)NOT NULL,
    VehicleID INT FOREIGN KEY REFERENCES Vehicles(VehicleID)NOT NULL
)
INSERT INTO DepartmentVehicles
VALUES (1,1),
(1,2),
(1,3),
(2,4),
(2,5),
(2,6),
(3,7),
(3,8),
(3,9)
The following table is modeled after the checklist itself:
CREATE TABLE Inspections (
  InspectionID INT IDENTITY(1,1) PRIMARY KEY,
  DepartmentID INT FOREIGN KEY REFERENCES Departments(DepartmentID) NOT NULL,
  VehicleID INT FOREIGN KEY REFERENCES Vehicles(VehicleID) NOT NULL,
  Wipers BIT,
  DirSignals BIT,
  Lights BIT,
  HornAndMirros BIT,
  TagCurrent BIT,
  FourKMilesMaintenance BIT,
  Tires BIT,
  PowerSteering BIT,
  Coolant BIT,
  MotorOil BIT,
  Brakes BIT,
  ExtAndInt BIT,
  TowBar BIT,
  UserName VARCHAR(250)NOT NULL,
  InspectionTimeStampDATETIMENOT NULL
)
For the comments, it is wise to have a separate table rather than creating a varchar column for each check and another one for the overall comment. This poses a particular challenge because we cannot easily reference the last inspection id. Precisely, we could but if multiple users are using the app at the same time, we may end up saving the comments under another user’s inspection. Therefore, we will make a sort of a surrogate id based on the VIN and the inspection date:
CREATE TABLE Comments (
  CommentID INT IDENTITY(1,1) PRIMARY KEY,
  InspectionID INT --FOREIGN KEY REFERENCES Inspections(InspectionID) NOT NULL --keep the foreign key constraint as an alternative but then you must reference the Inspection ID when you save each comment.
  CommentSurrogateID CHAR(26) NOT NULL,
  Comment VARCHAR(1000) NOT NULL
)
With these tables the data model should be covered.
Setting up the app
You can create a blank app by going to the power apps portal, clicking on New app, and choosing Canvas. Depending on the use-case, the app must be in either phone or tablet layout. With a checklist, there may be lots of columns so if a phone layout is required, probably the content will have to be split among different screens that group certain checks. For this demo, I will make a tablet layout app.
The first order of business is to add the relevant tables to the app. Do that by going to the data tab, click Add data and choose the SQL Server Connector.

When you select it, you will get a list of your connections, so choose the one to VehicelInspections:

Then choose all tables as they each one of them will be needed in the app and click connect at the bottom of the pop-up screen:

This concludes the basic setup of the app.
Screen 1: Overview
The main screen of the app should provide an overview of the inspections the current user has made. Add a gallery control and pass the Inspections table to the Items property of the Gallery. Then select the imaginary top row of the gallery to be able to edit the gallery template. Inside add five text labels. Rename the labels accordingly and provide the following configuration to their Text property:
InspectionLabel:
ThisItem.InspectionID
DepartmentLabel:
LookUp(
    Departments,
    DepartmentID = ThisItem.DepartmentID
).DepartmentName
With this formula we reference the department name based on the foreign key for Department ID.
VehicleLabel:
LookUp(
    Vehicles,
    VehicleID = ThisItem.VehicleID
).Make & " " & LookUp(
    Vehicles,
    VehicleID = ThisItem.VehicleID
).Model
UserLabel:
With this formula we reference the vehicle make and model based on the foreign key for Vehicle ID.
ThisItem.UserName
TimestampLabel:
ThisItem.InspectionTimeStamp
Here is how it should all look, prior to having any data in the gallery:

Additionally, you can add some visual flavor, for example by adding two labels with thick background and placing them as a header and a footer on the screen. As soon as there is any data in Inspections table, the gallery will be populated.
Screen 2: Checklist
Next, create a new blank screen:

You should rename all objects properly so call this screen InspectionScreen. You may prefer to skip adding “-Screen” or “-Label” to the object names, but I think it is a good practice for bigger apps where you can easily avoid confusion between a variable called inspection and the screen with the same name, for example.
To ensure users can get to this screen, add a suitable icon, and configure its OnSelect property like so:

The Fade argument is the type of effect during screen transition. There are a couple of other options to choose from depending on your preference or the business needs.
For the user it would be the most convenient if they can select their department first and then have a choice of pre-filtered vehicles that are assigned to their department. So, add two combo box controls, set their SelectMultiple property to false and set their Items property like so:
DepartmentsList:
Departments
VehiclesList:
Filter (
    Vehicles,
    VehicleID in Filter(
        DepartmentVehicles,
        DepartmentID = DepartmentsList.Selected.DepartmentID
    ).VehicleID
).VIN
The latter configuration will ensure only the relevant vehicles for the selected department are served as a choice for the user. For this latter combo box, you may also consider setting the IsSearchable property to trueif lots of values are to be expected. To check this configuration, we can add a label informing the user of the current selection:

At this point you will also notice the triangle signaling a delegation warning and possible data loss. This notification is due to the nested Filter formula. Please check our tip on how to query SQL data from Power Apps on how to reconcile the required configuration with Power Apps’ delegation requirements.
Next, we can proceed to adding the actual checks. First add one Toggle input control and one Label. Then group them together by selecting both, right-clicking and then clicking Group. Now copy the group thirteen times for each check and rename accordingly:

Next add an arrow icon to the header so we have the option to move to the next screen. This is identical to the configuration for the InspectionScreen:

You can consider hiding the button unless all necessary information is provided:

Screen 3: Comments screen
In the comments screen, we want to provide two major functionalities:
- Comment for a specific check. That means between zero and thirteen comments possible, emulating the Comment column from the paper form, and
- General comment for the whole inspection.
Prior to this we must configure helper variables and collections. Let us do that on the OnVisible property of the Comments screen:
Concurrent( /*concurrent executes formulas in parallel to improve performance*/
    UpdateContext(
        {
            vehicleId: LookUp(
                Vehicles,
                VIN = VehiclesList.Selected.VIN
            ).VehicleID /*get the selected vehicle ID from the database*/
        }
    ),
    UpdateContext(
        {
            currentVechicleVinAndDate: VehiclesList.Selected.VIN & "-" & Text(
                Now(),
                "yyyymmdd") /* This variable holds the surrogate id, which is constrained to 26 characters (17 for the VIN, one dash and 8 for the date). A different date format will require adjusting the constraint. */
            )
        }
    )
);
ClearCollect( /* here we initiate an empty collection where we will add the comments for each inspection check (wipers, signals, etc.) */
    CommentsCollection,
    {
        commentID: "",
        commentText: ""
    }
)
Note the ClearCollect collect formula: collections cannot be instantiated schema-less, you must provide at least one column and value pair, essentially adding one item to the new collection. We will filter this blank item out later.
For the first comment type, you can add a dropdown control. Configure the Items property by passing an array containing the different checks:

Next to it add a text input box and configure it for multiline text content. You can modify the HintText property to provide some guidance to the user. Then add a button for saving every single comment (Save comment) and add the following code to the button’s OnSelect property:
Collect(
    CommentsCollection, /* the collection we instantiated as soon as this screen loads*/
    {
        commentID: currentVechicleVinAndDate,
        commentText: CheckPicker.Selected.Value & ": " & CheckCommentText.Text
    }
);
Notify( /* some feedback */
    "Comment added successfully",
    Success
);
Concurrent( /*we can use the concurrent formula again to reset the inputs to their default state*/
    Reset(CheckPicker),
    Reset(CheckCommentText)
)
This configuration ensures that upon clicking the button, the comment will be recorded in the CommentsCollection collection and be available for saving to the database in the next step. You can easily test out the current configuration by going to File > Collections and examine a preview of the collection:

As an extra step, it is recommended to enable the Save comment button only if there is some text in the input control. Pass this formula to the DisplayMode property:
If(
    !IsBlank(CheckCommentText), /* the name of the input control for check comments*/
    Edit,
    Disabled
)
Next, to configure the option to add a single comment for the whole inspection, add another text input box, with a HintText set accordingly. Also add a button for saving all data (Save inspection):

Now the most interesting and critical part of the application: saving it all to SQL. Here is the formula, I have added numbers to explain different parts of it easily:
/*1*/
Notify(
    "Saving inspection...",
    NotificationType.Information
);
/*2*/
Patch(
    Inspections,
    Defaults(Inspections),
    {
        DepartmentID: DepartmentsList.Selected.DepartmentID,
        VehicleID: vehicleId,
        Wipers: WipersToggle.Value,
        DirSignals: SignalsToggle.Value,
        Lights: LightsToggle.Value,
        HornAndMirros: HornToggle.Value,
        TagCurrent: TagToggle.Value,
        FourKMilesMaintenance: '4kToggle'.Value,
        Tires: TireToggle.Value,
        PowerSteering: PowerStToggle.Value,
        Coolant: CoolantToggle.Value,
        MotorOil: OilToggle.Value,
        Brakes: BrakesToggle.Value,
        ExtAndInt: ExteriorToggle.Value,
        TowBar: TowBarToggle.Value,
        UserName: User().FullName,
        InspectionTimeStamp: Now()
    }
);
/*3*/
ForAll(
    Filter(
        CommentsCollection,
        !IsBlank(commentID)
    ),
    Patch(
        Comments,
        Defaults(Comments),
        {
            CommentSurrogateID: ThisRecord.commentID,
            Comment: ThisRecord.commentText
        }
    )
);
/*4*/
Patch(
    Comments,
    Defaults(Comments),
    {
        CommentSurrogateID: currentVechicleVinAndDate,
        Comment: InspectionCommentText.Text
    }
);
/*5*/
Reset(InspectionCommentText);
Clear(CommentsCollection);
Notify(
    "Inspection saved successfully.",
    NotificationType.Success
);
Navigate(
    SuccessScreen,
    ScreenTransition.Cover
)
In the first part (1), it is a good idea to give some feedback to the user by using the Notify formula. Immediately after, in (2), we use the Patch function to save the input data to the Inspections table in SQL Server. The value created by the Toggle control will be automatically parsed into BIT data type in SQL. In (3) we use the ForAll formula for looping over all records in the CommentsCollection which holds individual comments for each check. We Patch each of these comments to the Comments table in SQL Server. Notice the use of ThisRecord – that is a special formula designed to reference the current item in the loop (in this case). Next, in (4), we save individually the single inspection comment. Alternatively, we can add it to the CommentsCollection and save it with the ForAll. Finally, in (5) we reset the input control, clear the comments collection, put out a success message and navigate to a success confirmation screen. This last configuration largely depends on the specific requirement. Some variations could be, for example:
- create many inspections in one session: then you should ensure all inputs are reset every time you save to the data source and jump to the home screen,
- attach images to an inspection: then a separate screen will be needed for the camera control,
- option to edit a previous inspection, either for a user or for an admin: then a more complex menu will be needed allowing navigation between the different screens,
- option to check before submitting: will require a screen showing a summary of all inputs and allowing the user to navigate back to previous screens.
For the Success screen, the easiest way to add it is to click New Screen and choose Success Screen. That is a preconfigured screen type. Then rename it and refer to it in the formula:

Check the data
Finally, we can add some inspections and see the data. Here is a query to get all inspections and their comments:
SELECT v.Make +' '+ v.Model Car
      ,[DepartmentID]
      ,i.[VehicleID]
      ,[Wipers]
      ,[DirSignals]
      ,[Lights]
      ,[HornAndMirros]
      ,[TagCurrent]
      ,[FourKMilesMaintenance]
      ,[Tires]
      ,[PowerSteering]
      ,[Coolant]
      ,[MotorOil]
      ,[Brakes]
      ,[ExtAndInt]
      ,[TowBar]
      ,[UserName]
      ,[InspectionTimeStamp]
      ,CASE
       WHEN LEFT(c.Comment, CHARINDEX(':', c.Comment)) = '' THEN 'general comment'
       ELSE LEFT(c.Comment, CHARINDEX(':', c.Comment)) END [Comment type]
      ,RIGHT(c.Comment, LEN(c.Comment)- CHARINDEX(':', c.Comment)) [Comment text]
  FROM [VehicleInspections].[dbo].[Inspections] i
  JOIN Vehicles v ON v.VehicleID = i.VehicleID
  JOIN Comments c ON (LEFT(c.[CommentSurrogateID],17) = v.VIN AND CONVERT(DATE,i.InspectionTimeStamp, 112) = CONVERT(DATE, RIGHT(c.[CommentSurrogateID],8), 112))
And here are the results:

For the inspection of the Kia we see one general comment, while the one for the Toyota we see two checks did not pass, the comments for them accordingly and a general comment.
Considerations
While this tip is a simple example of how to create a checklist app, it should give you a good overview of the process. Starting with the data model, through the internal application configuration and all the way to the interface we have created an app that is ready to use. A checklist can contain as many as hundreds of individual checks of various data types (not only yes/no but short text values) as well as complex dependencies. Power Apps can also help you implement these scenarios.
Next Steps
- Collect, Clear, and ClearCollect functions in Power Apps
- ThisRecord in Power Apps
- Upload files from Power Apps to SQL Server

Hristo Hristov is a seasoned data professional with 10+ years of experience spanning the intersection of data engineering and smart manufacturing solutions. Since 2017, he has specialized in implementing advanced analytics solutions for bridging the IT/OT gap.
A technical writer with over 80 published articles on data and AI technologies, Python development, and cloud solutions. Passionate about transforming complex data into business value through innovative applications of Azure Data Platform, Python, IoT solutions, databases, and other cloud technologies.
Currently applying Industry 4.0 best practices, focusing on IoT connectivity, and implementing data and AI systems in manufacturing. Hristo holds a degree in Data Science and several Microsoft certifications covering SQL Server, Power BI, and related technologies.
- MSSQLTips Awards
- Achiever Award (75+ tips) – 2026
- Rookie of the Year – 2021
- Author Contender – 2022/2023/2024/2025