Problem
Power Apps is a powerful citizen developer tool. It offers its own formula language with formulas allowing to read and write to data sources. In a previous tip we showed how to use the Patch function to persist data in SQL Server. But what if you wanted to take all complexity away from your app and put it on the shoulders of SQL Server?
Solution
We will combine Power Apps and Power Automate to enable writing to a SQL database without using the Patch formula.
Environment setup
There are three things you need in case you want to follow along with this tip in your environment. A database instance in Azure, and a suitable premium Power Apps and Power Automate license. Unfortunately, this setup does not work with SQL on-prem as connections over a gateway are not supported by the Power Automate action I use. However, there has been a request raised for that and I encourage you to vote on it so it gets in Microsoft’s list of things to add: click here to vote.
Database
I am using a database instance in Azure. I will create a new database called Inventory. In it, I will put a table with the following schema:
CREATE TABLE Products (
    ProductName VARCHAR(255),
    ProductWeight FLOAT,
    Category VARCHAR(255),
  LaunchDate DATE
With this setup I will be able to illustrate how to create a new record in the table by running a query instead of using the Patch function.
Canvas app
I will use the canvas app from the previous tip of this mini-series. I will just create a new screen and add the relevant input fields, such as Name, Weight, a Category dropdown, and a Launch Date date picker. Of course, two buttons for Save and Cancel:

Power automate flow
The final part of the setup is Power Automate flow. Begin by going to flow.microsoft.com. From My Flow, click New Flow and choose Instant cloud flow:

Then select Power Apps as your trigger. This will take to the flow authoring canvas. Click on the plus icon and find the action "Execute an SQL query":

Also please keep in mind this is a premium connector. In a production scenario all app users must have a per-app or per-user premium license to be able to use this connector. When you add this action click on the three dots and configure a connection to your Azure SQL instance depending on your authentication type and connection parameters:

For example, I use SQL Server Authentication, so I must know my SQL server name, database name, username and password. Caution: this setup is not supported via an on-prem data gateway, as mentioned. This means that if you want to execute a SQL query on a SQL Server on-prem or on Azure SQL that is behind a private endpoint, you will not be able to until Microsoft updates the connector.
Next, in the query field press Ask in PowerApps. We do this four times as we have four incoming variables:

The result should look like this. Make sure to enclose the string values in single quotes and separate all parameters by a comma. The numerical value and data/time value will be parsed automatically by SQL Server:

Once this is done you can save the flow and go to the power apps studio.
Put it all together
Next, we must add the flow to the canvas app. Go to the Action tab and select Power Automate. In the pane to the right, you will see a list of the available flows with the Power Apps trigger. Note, for a flow to appear in this list it must be in the same environment as the app and must be shared with the user editing the canvas app.
It is handy to select the Save button and pick the OnSelect property prior to clicking the flow you need. In this way it will directly populate the property value.

The flow requires four arguments: name, weight, category and date. We supply those by calling the relevant values of the inputs we have:

Additionally, or depending on the table schema, you may wish to ensure all fields are populated. Here is an example formula how to do this. If only some fields are mandatory, then just include those. If only one field is mandatory, wrap the "not is blank" checks in an Or instead of the And.
If(
    And(
        !IsBlank(ProductName.Text),
        !IsBlank(ProductWeight.Text),
        !IsBlank(CategoriesMenu.Selected.Value),
        !IsBlank(LaunchDate_1.SelectedDate)
    ),
    Edit,
    Disabled
)
Here is how this looks:

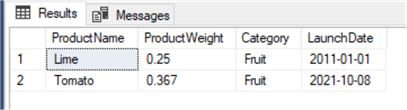
Running this with some test values will write to SQL successfully:
Enhancements
It is a good practice to provide as much useful feedback to the user as possible. In this case, they would be interested if their record made it to the database. To configure this, go back to your flow. After the execute SQL query action add the respond to power apps action. Add a single text output called statusCode. As its value pass the status generated from the body of the request of the previous action. This value though we need to provide manually as an expression. It is not available directly:

Finally click on the three dots of the Respond action and configure it to run only if the previous action has failed:

This is a prerequisite for the whole configuration; the execute query action has a different output if it succeeds.
Finally, go back to your app. As you have added an output to the flow, you must remove it and add it again to the OnSelect of the Save button so it refreshes. Wrap the call to the flow in a variable assignment with Set or UpdateContext. Then add a suitable check:

As you can see the feedback variable is a representation of the response action. As a property we have the statuscode output we created inside the action. With this configuration users would get a success message if everything went fine or an error message if nothing was recorded.
That’s it, you can rely on SQL server from this point on!
Next Steps
- Read more about the SQL Server Connector.
- Check out the Power Apps tips on MSSQLTips.com

Hristo Hristov is a seasoned data professional with 10+ years of experience spanning the intersection of data engineering and smart manufacturing solutions. Since 2017, he has specialized in implementing advanced analytics solutions for bridging the IT/OT gap.
A technical writer with over 80 published articles on data and AI technologies, Python development, and cloud solutions. Passionate about transforming complex data into business value through innovative applications of Azure Data Platform, Python, IoT solutions, databases, and other cloud technologies.
Currently applying Industry 4.0 best practices, focusing on IoT connectivity, and implementing data and AI systems in manufacturing. Hristo holds a degree in Data Science and several Microsoft certifications covering SQL Server, Power BI, and related technologies.
- MSSQLTips Awards
- Achiever Award (75+ tips) – 2026
- Rookie of the Year – 2021
- Author Contender – 2022/2023/2024/2025

To everyone who read this article: as I said in my previous comment, I was investigating how to get the execute query action potentially work with an Azure on-prem data gateway and SQL connection in logic apps, instead of using MS Power Automate directly with the gateway. Unfortunately, as of December 2021, it appears this is completely unsupported. This is the error I got when making the SQL connection in Logic Apps:
“Gateway ExecutePassThroughNativeQueryAsync – this operation (Execute Native Sql) is currently not supported using an on-prem gateway connection\r\nclientRequestId: cc0e262d-b1d0-458b-b120-2e77effa73a2”.
I would encourage anyone interested in the “Execute SQL query” action either via Power Automate or Logic Apps to vote for the idea: https://powerusers.microsoft.com/t5/Power-Automate-Ideas/Support-quot-Execute-a-SQL-query-quot-action-through-an-on/idi-p/69514#M4819
Hi JB, thanks for your comment and great addition. I am researching how to make “execute query” work with an on-prem database. I hope to publish another tip on that soon.
Thank you for this great article!
Good news for on-prem databases… it’s only the “Execute a SQL query” action which is not supported for on prem.
All other actions like “Insert row”, “Delete row” etc. are working. Just make sure your table has a primary key as the “Delete row” action needs it.
Maybe you can add this info to the intro section…