Problem
Databricks, a big data tool in the Azure cloud, is a fast analytics platform, built on the top of the Apache Spark distributed platform. Databricks is usually used to explore and process massive amounts of data. Data Engineers can use Databricks to pull data from multiple data management systems that store operational data and merge it into a company data lake for data analysis and reporting. In many cases you would want to create an incremental data flow to pull only new data. In this tip, I will show you how to use Azure Data factory to build an incremental pipeline.
Solution
One tool that can help you to build an incremental data pipeline is Azure Data Factory. Data Factory is an ETL/ELT tool that is used to perform data movement activities between different data storage engines. It took me some time to figure out how to move only new data for each pipeline execution, since there is no such out of the box functionality, so I will share what I learned.
Step 1 – Setup destination database and table in Databricks
The main tool used to manipulate data in Databricks is a Databricks Notebook which is a web-based interface that contains runnable code and Python runtime as a backend. If you are not comfortable with Python, we can use the built-in command (magic) %sql and write commands in the SQL language. See my tip Data Exploration with Python and SQL Server using Jupyter Notebooks which explains the use of SQL magic in more detail.
Azure Data Factory supports automatic table creation, in the case where the table does not exist, only for a small list of database systems and unfortunately Databricks Data Lake is not one of them: Copy Activity in Azure Data Factory supports creating a destination table automatically. So, we will need to create a destination table in Databricks database as follows.
%sql
create table yellow_trips(
   tripid int,
   verdorid int,
   pickup_datetime timestamp,
   dropoff_dateime timestamp,
   passenger_count int,
   trip_distance int);
My table is ever growing, and the data never changes. I will use the table’s primary key to pull new data and all I need is to append data to the destination table. If your data rows can change over time, then you can use last update date to pull changed data and update date data in your destination table.
insert into yellow_trips
select 100,100,'2020-01-01T00:47:41','2020-01-01T00:04:16',4,10;
Here is what I currently have in the destination table. Each time the data pipeline runs, it will check the last tripid that I have in the destination table and will move fresh data. I didn’t have to add this initial row, my query inside the Data Factory could also check if the table is empty and start from tripid = 1.

Step 2 – Create Azure Data Factory pipeline
In Azure Data Factory, I will create two datasets, one for my source data in Azure SQL Database and a second to Azure Databricks Delta Lake. If you want more details on how to create datasets, here is a good post by Cathrine Wilhelmsen – Datasets in Azure Data Factory.
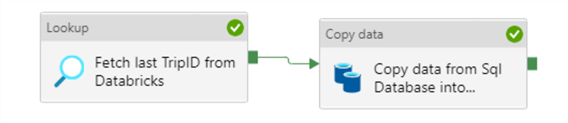
We will use 2 types of activities, the Lookup activity to pull the last ID of the data from the Azure Databricks table and Copy data activity to copy the data, using the Lookup Activity result set as a filter for the source data.
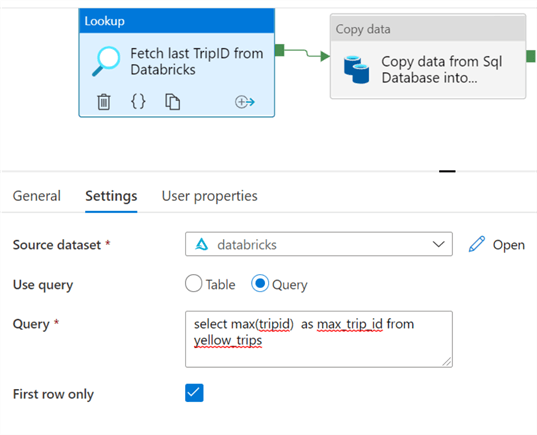
In the Lookup activity, in the Settings tab, I will use Query as a data source to pull the max tripid and will call it max_trip_id:
In the Copy data activity, in the Source tab, I will also use a Query as a data source as follows:

Here is a query that I use for the data copy activity source, this is the correct way to use the output of the Lookup activity:
@{activity('activity_name').output.firstRow.max_trip_id}
Here is the query:
select tripid,vendorid
from yellow_trips
where tripid >= cast('@{activity('Fetch last TripID from Databricks').output.firstRow.max_trip_id}' as int)
Another configuration that we need to get familiar with is located in the Settings tab, “Enable staging”. We cannot copy data into Databricks directly, we need to use some container on Blob Storage.

That’s about it. Our pipeline is ready, we can now validate it by pressing the “Validate” button and save it to Data Factory by pressing the “Publish” button. In order to run the pipeline you can either use the “Debug” button or add a Trigger by pressing the “Add trigger” button. There is a great tip Create Schedule Trigger in Azure Data Factory ADF on how to create Azure Data Factory triggers.
Next Steps
As an enhancement, let me know if you find a way to push the data into Databricks using Azure Data Factory that will create a destination table automatically in case it does not already exist. Just leave a comment below.
- More tips of Azure Data Factory
- More tips on Databricks
- Learn how we can also use Jupyter Notebooks in Azure Data Studio

Maria Zakourdaev is a Data Platform Microsoft MVP and a technology expert with more than 20 years of experience, a community leader with a profound knowledge of Microsoft products and services, while also being able to bring together diverse platforms, products, and solutions to solve real-world problems.
Maria has a hands-on experience managing various data management technologies in Azure, AWS and Google public cloud platforms, including SQL Server, Azure CosmosDB, AWS DynamoDB, MemSQL, MySQL, Postgresql, Snowflake, Redis, Amazon Redshift, Couchbase and Elasticsearch, Spark, Databricks, Big Query.
Maria is an organiser of the annual conference “Data TLV” ( ex “SQL Saturday Israel”), a free training event for any data professionals: http://datatlv.com.
- MSSQLTips Awards: Trendsetter (25+ tips) – 2022 | Author Contender – 2022 | Rookie Contender – 2018


What happens when the source data changes by a row that is not the maximum row?
Row
1
2
3
4 <——- Changed
5
6
7
Insightful piece, thank you, Maria. As to how to check if a table (file) exists and create it if not, I would consider the Azure Databricks DBFS API. There is a List and Create method that could be invoked from ADF.
https://docs.microsoft.com/en-us/azure/databricks/dev-tools/api/latest/dbfs#–list