Problem
A SQL UPDATE query is used to alter, add, or remove data within some or all tuples in existing rows of a table. In the typical format, we usually update one tuple at a time in a table. We can also update multiple tuples at a time when we make use of the WHERE clause. Alternatively, we can update all the tuples in a column with a simple UPDATE statement. However, in the later scenario, all the rows will have the same value in that column. Now, what if you want to update all the tuples in one or more columns of a table with unique corresponding values in another table. Our simple UPDATE TABLE NAME SET COLUMN NAMES statement will not work in this scenario. Okay, actually it will, but it would be a long tedious script when you are working with a few hundred or a few thousand rows of data.
Solution
In this tutorial, we will explore three options that will update all the tuples in one or more columns with unique values that are stored in a separate table. In the first option, we will use the JOIN as a form of a SELECT statement and in the second option we will use the MERGE statement and finally, we will use a nested SELECT statement. Remember, you will need to make sure that the columns you are updating are of the same or compatible datatypes as the source columns. Example, you cannot put a VARCHAR value in an INT field.
Use a Test System
Always use a test server and a test database for testing and learning. In my sample, I am using a test database named “AdventureWorks2014”.
Getting a Test Database
For simplicity’s sake and for keeping with a standard test database, we will be working with the AdventureWorks2014 database. If you already have this sample database installed, don’t worry, we will not be changing any of the tables or data. We will, however, create a couple of new tables along with a new schema to work with. Afterwards, we will simply dump both tables as well as the schema. (If you so choose.)
If you do not have the AdventureWorks2014 database installed already, you can get a backup (BAK) version for free. Once it’s downloaded, simply follow the basic steps to restore from a “.BAK” file.
Building our Test Tables
In the following query, we will create a schema named “Test” and two tables, “Test.Person” and “Test.PersonAddress”. We will also create a primary – foreign key constraint to link the two tables. Finally, we will populate the tables with data from the existing Person.Person and Person.Address tables provided in the Adventurworks2014 database. This would allow us to work with and manipulate the data without disturbing any tables that pre-exist in the database. Here is the syntax we can run in SQL Server Management Studio (SSMS):
USE AdventureWorks2014
GO

CREATE SCHEMA Test AUTHORIZATION dbo
GO

CREATE TABLE Test.Person(
     BusinessEntityID INT NOT NULL
   , FirstName NVARCHAR(50)
   , LastName NVARCHAR(50)
   , City NVARCHAR(30)
   , PostalCode NVARCHAR(15)

GO

ALTER TABLE Test.Person ADD CONSTRAINT PK_Person_BusinessEntityID PRIMARY KEY CLUSTERED(BusinessEntityID
GO

INSERT INTO Test.Person
SELECT
     p.BusinessEntityID
   , p.FirstName
   , p.LastName
   , a.AddressID AS City
   , a.AddressID AS PostalCode
FROM Person.Person AS p
INNER JOIN Person.Address AS a ON p.BusinessEntityID = a.AddressID
GO

CREATE TABLE Test.PersonAddress(
     BusinessEntityID INT
   , AddressID INT
   , City NVARCHAR(30)
   , PostalCode NVARCHAR(15)

GO

ALTER TABLE Test.PersonAddress ADD CONSTRAINT FK_PersonAddress_AddressID FOREIGN KEY(AddressID)
REFERENCES Test.Person(BusinessEntityID
GO

INSERT INTO Test.PersonAddress
SELECT
     p.BusinessEntityID
   , a.AddressID
   , a.City
   , a.PostalCode
FROM Person.Person AS p
INNER JOIN Person.Address AS a ON p.BusinessEntityID = a.AddressID
ORDER BY BusinessEntityID
GO
Results:

Defining the issue
In our test environment, we want to update all the rows in the “City” and “PostalCode” columns in the “Test.Person” table with the correct and corresponding data from the “Test.PersonAddress” table. Since each tuple in each row is unique, we could use the standard form “update – set” method, but that would take too long since it will have to be done one row at a time. As luck would have it, we can accomplish this task with either the “JOIN” (technically known as the “INNER JOIN”), the “MERGE” or the “SELECT” commands as shown in the examples below.
Update using the INNER JOIN Syntax
Using this method, we will update the values in the “City” and “PostalCode” columns of the customers table with the data held in the “City” and “PostalCode” columns of the “Test.PersonAddress” table. We will use the “BusinessEntityID” and “AddressID” columns as reference link between the two tables to keep our data organized.
USE AdventureWorks2014
GO

UPDATE Test.Person
SET Test.Person.city = Addr.city, Test.Person.PostalCode = Addr.PostalCode
FROM Test.Person AS pers
INNER JOIN Test.PersonAddress AS addr ON pers.BusinessEntityID = addr.AddressID
GO
Explaining how the INNER JOIN option works
The INNER JOIN clause links two or more tables by a relationship between two columns, one on each table. Both columns will have related (corresponding) data and compatible datatypes and often those columns will have a primary / foreign key relationship, although the keys are not necessary. In our sample tables, the common link is the “BusinessEntityID” column and the “AddressID” column.
With the SET keyword, we specified which columns in the target table we want updated and set them to equal the values found in the source table, matching the columns by aliases. Finally, we linked the source and target tables via an INNER JOIN by using the matching BusinessEntityID and AddressID columns respectively from each table.
We could take it a step further by adding a WHERE clause to filter out any columns from the referenced or updated tables. This will allow for updating only certain rows while leaving the other rows untouched. For example, if you only wanted to update the tuples in the Test.Person table that have a certain PostalCode or only in certain cities this would be specified in the WHERE condition.
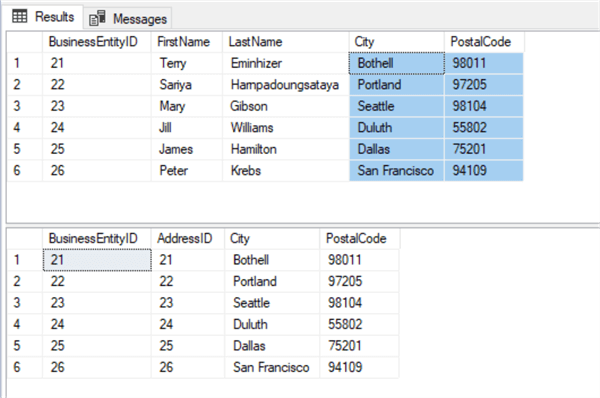
Note: Instead of doing a simple SELECT statement to view the results, I’m adding an OFFSET / FETCH option to return a different set of data. The reason being that the first ten rows in the AdventureWorks2014 database will have the same city and postal code even though they have different “AddressID’s”. So, I am returning rows 21 through 26 for the sake of clarity in the result set.
![]() Generally, the OFFSET-FETCH can only be applied to an ordered set. A simple SELECT statement will not return an ordered set and consequently, we will need to add an ORDER BY clause. In the sample script below, I am applying the ORDER BY clause to the “BusinessEntityID” and “AddressID” columns (respectively) on each table.
Generally, the OFFSET-FETCH can only be applied to an ordered set. A simple SELECT statement will not return an ordered set and consequently, we will need to add an ORDER BY clause. In the sample script below, I am applying the ORDER BY clause to the “BusinessEntityID” and “AddressID” columns (respectively) on each table.
Below is the SELECT query that I used to return this set of data. Feel free to alter the code to suit your needs.
USE AdventureWorks2014
GO

SELECT *
FROM Test.Person
ORDER BY BusinessEntityID
OFFSET 20 ROWS
FETCH NEXT 6 ROWS ONLY
GO

SELECT *
FROM Test.PersonAddress
ORDER BY AddressID
OFFSET 20 ROWS
FETCH NEXT 6 ROWS ONLY
GO
Results:
Update using the MERGE statement
The MERGE statement is used to manipulate (INSERT, UPDATE, DELETE) a target table by referencing a source table for the matched and unmatched rows. The MERGE statement can be very useful for synchronizing the target table with data from any source table that has the correct corresponding data and datatypes.
USE AdventureWorks2014
GO

MERGE Test.Person AS Per
USING (SELECT * FROM Test.PersonAddress) AS Addr
ON Addr.AddressID=Per.BusinessEntityID
WHEN MATCHED THEN
UPDATE SET
  Per.PostalCode =Addr.PostalCode ,
  Per.city = Addr.city
GO
Explaining how the MERGE option works
We listed the Test.Person table just after the MERGE statement making it the target table. The USING statement declares our source table where we want to pull the new data from. Notice that we chose to select all (SELECT *), but we could have just as easily specified which columns to select by using (SELECT PostalCode, city) instead of the select all. In a production environment, the later would be the preferred method. For this test sample, we went with the simpler method of simply selecting all. Remember, just because you select all from a table, doesn’t mean you have to use all of the columns in your results. The ON statement sets the common denominator of the two tables using the BusinessEntityID and AddressID columns in each table respectively. Finally, when those match up, we update the target table with the corresponding values pulled from the source table by using the aliases assigned earlier in the script.
As in the previous example, “Update using the INNER JOIN method”, we are going to use the “OFFSET-FETCH” clause to return only rows 21 through 26 for readability’s sake.
USE AdventureWorks2014
GO

SELECT *
FROM Test.Person
ORDER BY BusinessEntityID
OFFSET 20 ROWS
FETCH NEXT 6 ROWS ONLY
GO

SELECT *
FROM Test.PersonAddress
ORDER BY AddressID
OFFSET 20 ROWS
FETCH NEXT 6 ROWS ONLY
GO
Results:
Update using the SELECT Subquery Statement
A subquery is a query that is nested inside another query. This allows for multiple SELECT statements within one script to run in the order they are listed. It also allows for fine tuning exactly what you want the select statements to do and how they should behave.
USE AdventureWorks2014
GO

UPDATE Test.Person
SET Person.PostalCode =(SELECT PersonAddress.PostalCode
                         FROM Test.PersonAddress
                         WHERE PersonAddress.AddressID = Person.BusinessEntityID
GO

UPDATE Test.Person
SET Person.city =(SELECT PersonAddress.city
                   FROM Test.PersonAddress
                   WHERE PersonAddress.AddressID = Person.BusinessEntityID
GO
Explaining how the SELECT subquery statement works
This one is a relatively easy script to follow. One thing you will notice that is different in this sample as opposed to the previous two, is this one is actually two different scripts that are independent of each other. Each one updating the values of a single column. Unfortunately, SQL does not allow more than one SET condition per query. The UPDATE statement lists the target table, the SET statement specifies the column on that target table and the SELECT statement lists the source table and column. In this scenario, we use a WHERE clause to link the two tables via a common column.
Again, we are going to use the “OFFSET-FETCH” clause to return only rows 21 through 26 for readability’s sake.
USE AdventureWorks2014
GO

SELECT *
FROM Test.Person
ORDER BY BusinessEntityID
OFFSET 20 ROWS
FETCH NEXT 6 ROWS ONLY
GO

SELECT *
FROM Test.PersonAddress
ORDER BY AddressID
OFFSET 20 ROWS
FETCH NEXT 6 ROWS ONLY
GO
Results:
Performance Results Compared
Option 1 – INNER JOIN
A look at the over-all execution plan for the JOIN option. This returns a simple, almost straight forward flow with the exception of the offset “Table Scan” with a cost of 5%.

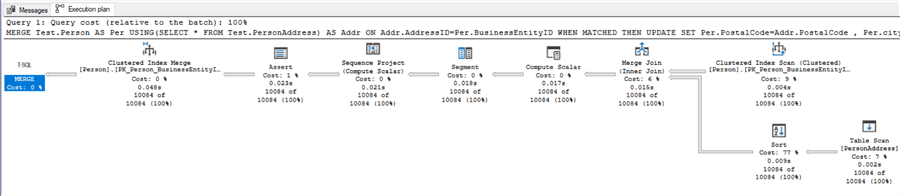
Option 2 – MERGE
Option 3 – SELECT (Sub-Query)
Notice that this returns in two parts. Query 1 displays the query plan for the first SELECT statement, and Query 2 for the second SELECT statement.

A quick look at the performance cost just on the “Clustered Index Scan” for each of these methods after updating the City and PostalCode columns. We can see that the cost is 6% for the JOIN option, 9% for the MERGE option and 2% for each step in the SELECT option. The combined cost of the two steps within the SELECT option, totaling 4%, is the lowest clustered index scan of the three options while the MERGE options 9% being the highest resource hog in that respect.
Cleanup (Optional)
Now for the cleanup process if you choose to do so. You are certainly welcome to keep these new tables and the corresponding schema for future testing. Should you decide to remove them, the following block of code will remove the tables and schema from your AdventureWorks2014 database.
USE AdventureWorks2014;
GO
DROP TABLE Test.PersonAddress;
DROP TABLE Test.Person;
DROP SCHEMA Test;
![]() The two “DROP TABLE” commands must be run in the order listed in the code block above. This is due to the Primary-Foreign key constraint between the two tables. Also, you cannot drop the schema while there are one or more objects using/referencing that schema. In this scenario, the two tables are Test.Person and Test.PersonAddress.
The two “DROP TABLE” commands must be run in the order listed in the code block above. This is due to the Primary-Foreign key constraint between the two tables. Also, you cannot drop the schema while there are one or more objects using/referencing that schema. In this scenario, the two tables are Test.Person and Test.PersonAddress.
Summary
While any of these three options listed above are excellent ways of updating multiple rows at a time with distinct data, you the user, will find yourself leaning more toward one than another. So, go with what is comfortable for you. However, you also may want to consider the performance cost of the option you choose from this SQL tutorial. On this simple example, the performance cost is minimal regardless of which option you select. On a larger database, it could be a resource hog.
Generally, like with many aspects of SQL, it’s a best practice to pick one method and stick with it across the board – not just for yourself, but for all co-workers as well. The company as a whole, should implement the same usage/style practices to keep some degree of order on how things are accomplished.
Next Steps
- SQL Server MERGE statement usage and examples
- SQL Update Statement with Join in SQL Server
- SQL Server Subquery
- How to Restore from a SQL Server Backup
- SQL Server Stored Procedures
- SQL Server Cursor Examples

Aubrey Love is a self-taught DBA with more than six years of experience designing, creating, and monitoring SQL Server databases as a DBA/Business Intelligence Specialist. Certificates include MCSA, A+, Linux+, and Google Map Tools with 40+ years in the computer industry. Aubrey first started working on PC’s when they were introduced to the public in the late 70’s.
- MSSQLTips Awards: Author of the Year – 2022 | Trendsetter (25+ tips) – 2023

Hi, you can try this solution with one Select:
UPDATE Test.Person
SET
city = Adr.city
,PostalCode = Adr.PostalCode
FROM (SELECT PostalCode, city FROM Test.PersonAddress) as Adr
WHERE Adr.AddressID = Test.Person.BusinessEntityID