Problem
Power BI reports are usually meant to be viewed within the Power BI Service (Powerbi.com). Recently, it has become easier to view Power BI reports within SharePoint Online and Microsoft Teams. However, there are cases where end users might not be able to view these reports within these platforms maybe due to permissions or licence issues within an organisation and so would require alternative ways to view the reports, or maybe the end users just need these reports to be emailed in PDF or Word formats on a set schedule for some reason. Although there is already a way to send full reports in PDF or PPTX formats on a set schedule using Power BI subscriptions, there currently are some limitations in that you might not be able to subscribe external users that are not in your organisations Active Directory due to organisational policies (this can be overcome by enabling email subscriptions and sharing content with external users in the Power BI Admin area), and there is currently no way to filter specific page(s) to export other than exporting full report pages using the subscriptions option.
The good news is that there is a workaround for this, which can be achieved using Power Automate. There have been loads of articles and videos done on various tasks we can use to automate with Power Automate and this is another unique one in that it helps to solve some of the limitations of the Power BI service as mentioned above.
Solution
Before we take a deep dive on how to schedule an export and emailing of Power BI reports pages using Power Automate let us first look at some things to remember and implement in the Power BI report you are to export and email.
- Power BI reports are not pixel perfect by default, and any export format (pdf or pptx) may not contain all records in a table as you would find in Paginated reports.
- Due to the point above, you may need to ensure the visuals on each page of your reports have values that can be seen without scrolling sideways or up and down.
- If you need to send each page to a different user you may need to design each page in a custom way, like each page representing certain information or each page representing store, offices, regions, countries, departments, etc.
- Ensure that you have at least one workspace in your Power BI tenant backed by a reserved capacity (a premium capacity which can be any of the A1/EM1 – A6/P3 SKUs).
- Any Office 365 subscription with access to the standard connectors in Power Automate.
So, with the five points mentioned above in mind, let us now demonstrate how to achieve this task.
Demo to Export and Email Reports
For this demo, I have used the sample dataset as seen below just for the purpose of this article. Your dataset might be different, but the principles and logic remain the same as would be demonstrated in this article.
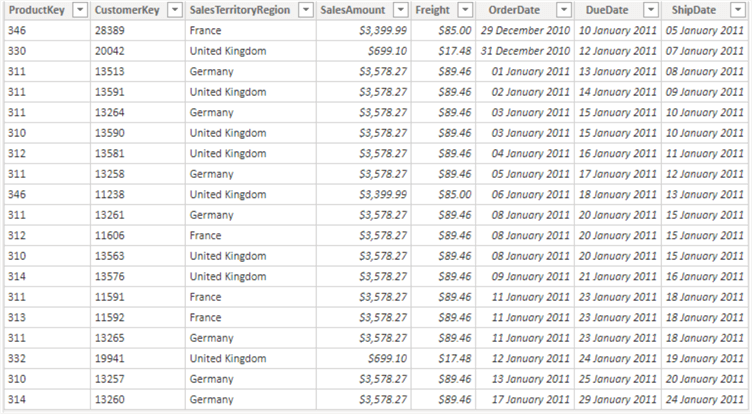
I have created a Power BI report with three pages for each Sales Territory Region. For this demo, we are assuming we need to automate the export and sending of the three pages to different offices (i.e., United Kingdom office, France office, and Germany office) via email in PDF format. This would be based on a schedule, for instance, the reports are expected every Monday morning. This might be the end of each month in your case or end of each day, just ensure the data meets the three points mentioned earlier.
Let’s now break down the whole process into easily understandable steps to achieve this task.
- Publish your report to a dedicated (premium capacity workspace)
- Sign-in to Power Automate and create the scheduled cloud flow
- Configure the recurrence flow step
- Create the Export to File for Power BI Reports operation
- Create the Send an Email to outlook operation
- Test and verify the complete Flow
STEP 1: Publish your report to a dedicated (premium capacity workspace)
Once the report development is completed, you would need to publish the report to a Premium capacity workspace in Power BI service (or at least one workspace in the Power BI tenant should have a reserved capacity). Also, it is important to note that you might not be able to complete all steps mentioned above for the flow to be set up unless you have at least a “Member” access permission or above in your chosen workspace, having a “Contributor” access might not be enough.
STEP 2: Sign-in to Power Automate and create the scheduled cloud flow
You can login to Power Automate using flow.microsoft.com. After successful login, you would need to do the following.
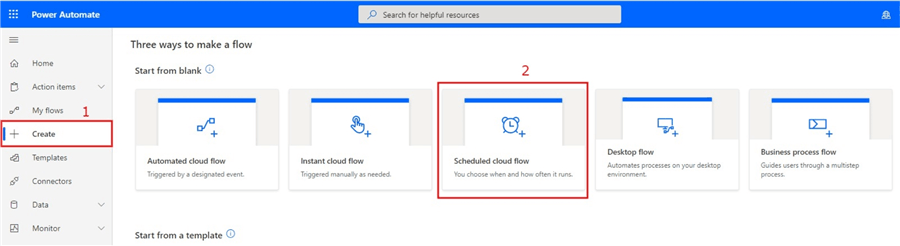
Click on the “Create” tab on the left blade as seen in the diagram below.
Next, select “Scheduled cloud flow” to create the flow from scratch.
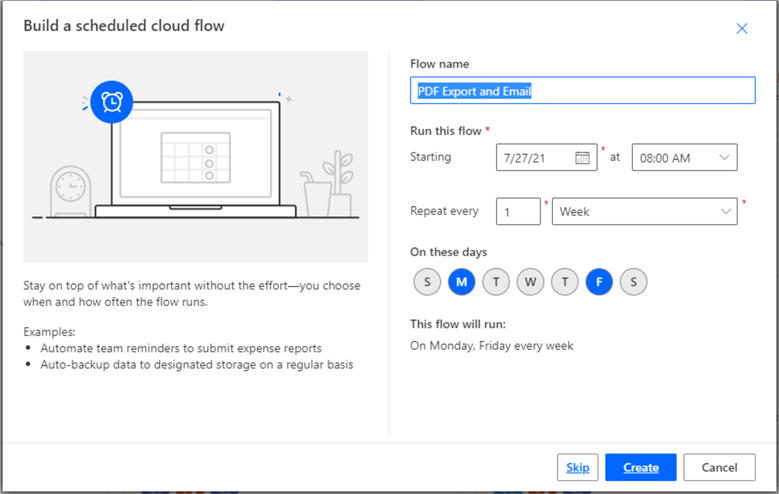
Then on the new window that opens, you need to give your flow a name, I have named this demo flow “PDF Export and Email“.
Next, on the “Run this Flow” section chose a Starting date and the time it should be running the flow as well as the frequency of running.
On the “On these days” section just choose the days of the week you need it to run.
Then click “Create” as seen in the diagram below.
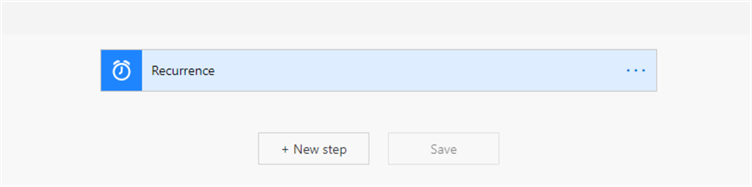
Once created, the Scheduled cloud flow first step should look like the diagram below.
STEP 3: Configure the recurrence flow step
Next, we need to configure the recurrence flow step by following the following steps.
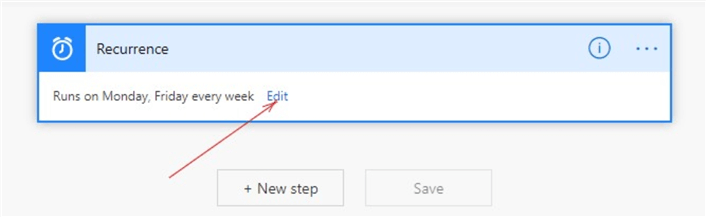
First, click on the recurrence step, and then click on ” Edit ” as seen in the diagram below.
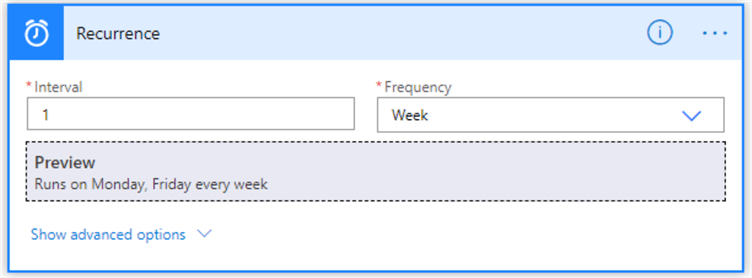
Then, click on the dropdown on the “Show advanced options” as seen in the diagram below.
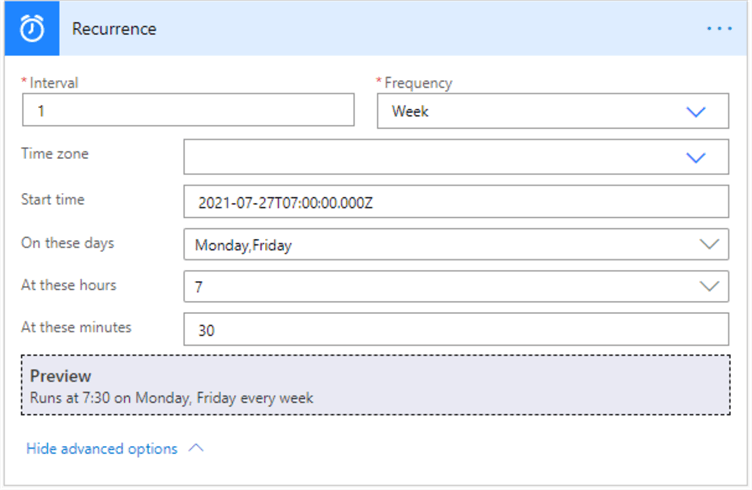
Next, enter a value in “At these hours” and “At these minutes” to set a specific time for your flow to run. I have entered 7:30am in mine as seen in the diagram below.
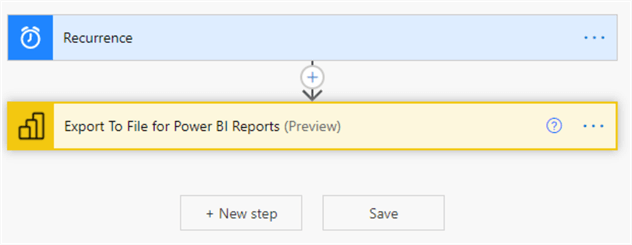
STEP 4: Create the Export to File for Power BI Reports operation
To start creating the next step we need to click on “Next Step” at the bottom of the “Recurrence” step we configured in step 3. The step is opened as seen in the diagram below.

Next, we need to do the following to create this step of the flow.
On the search bar for “Search connectors and actions” we search for Power BI and select Export to File for Power BI Reports as seen in the diagram below.

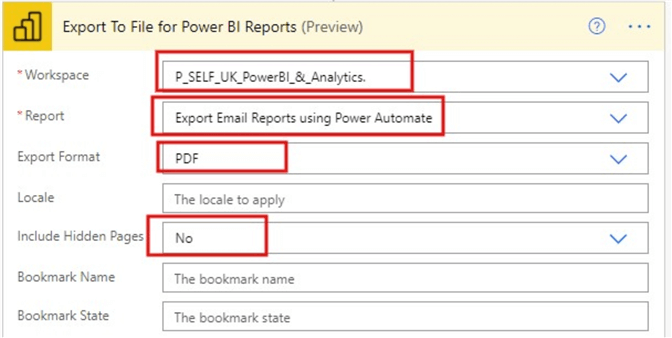
Next, enter the name of the premium capacity workspace in Power BI service that you have published the reports to in step 1 above in the “Workspace” section or click on the dropdown to choose among the lists. Do the same for the “Report” section. For the “Export format” we are choosing “PDF” for this demo. You can also try out the other formats. On the “Include Hidden Pages” section you can choose to either include hidden pages in your export or hide them, I have entered “No” to exclude hidden pages in my export in this demo. See the diagram below.
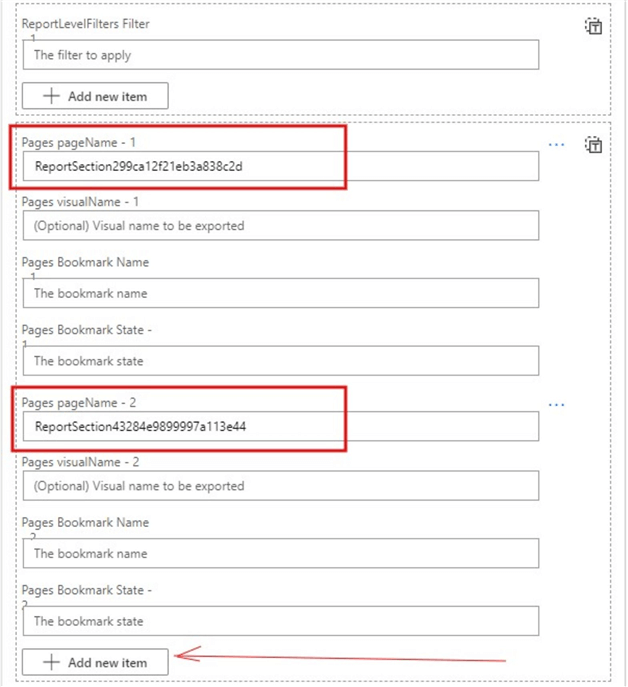
After this, we need to complete the sections where we can indicate specific pages we need to export. If we do not include specific pages, by default all pages of the report would be exported and emailed. But we can specify specific pages to be exported as follows.
First, we need to go to Power BI service, and open the report we need to export. On the page you need exported you need to copy the last part of the URL as seen in the diagram below.

Then, paste this copied URL part on the “Pages pageName – 1” section as seen in the diagram below. This should only export the “United Kingdom” report page alone.

To add other pages of the report like the “Germany” report page to this export already containing that of United Kingdom, we need to copy the last part of the URL in the “Germany” report in Power BI service as we did for United Kingdom above, then click on “Add new item” and paste the copied URL part into the “Pages pageName – 2” section as seen in the diagram below.
That would be all for this step of the flow for now. I will write another article that demonstrates how to export and email reports which have Role Level Security.
STEP 5: Create the Send an Email to outlook operation
After the step 4 above, click “Next step” as seen in the diagram below.
Next, on the search bar for “Search connections and actions” enter “Outlook” and search for “Send an email v2” as seen in the diagram below.

Once the flow window opens, complete the To, Subject, and Body fields for your email as seen in the diagram below. You can enter as many emails as required separated by semicolons. In the demo example I have only used one email address. You can also give any name for the subject as well as enter any custom message for the body of the email as you require.
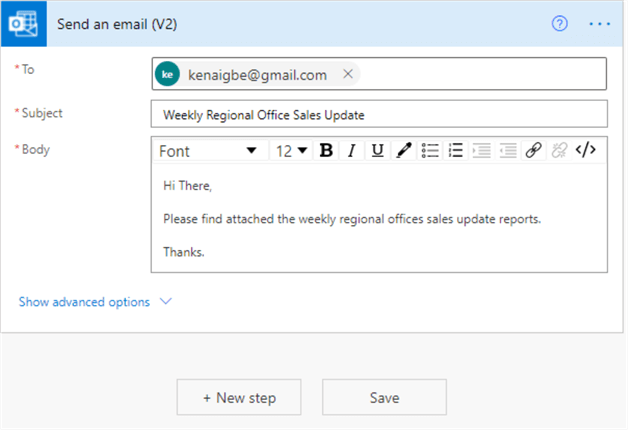
Next, you need to select “Show advanced options” as seen in the diagram above. In “Attachments Name – 1“, enter a name for your attachment and add a file extension to the file name (for example, .PDF) that matches your desired Export Format. See diagram below for example of this.
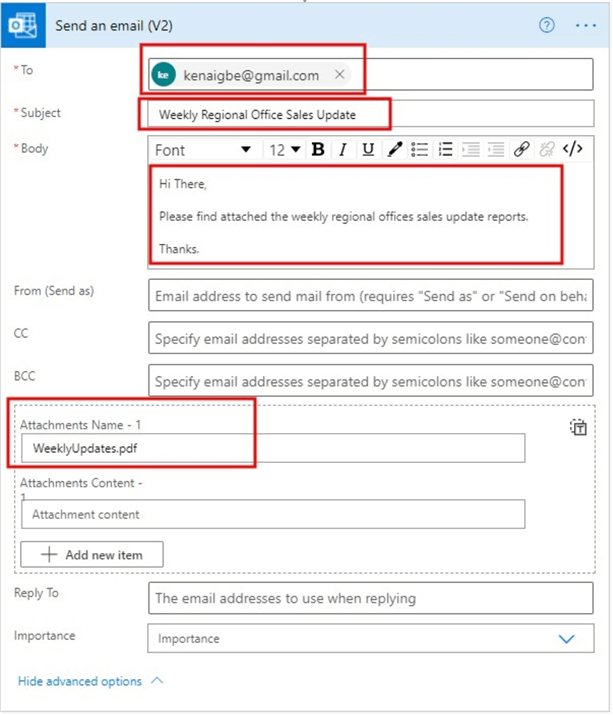
Next, click within “Attachment Content”, select “File Content” from among the dynamic content to attach your exported Power BI report. Follow the steps in the diagram below to do this. Once you click on the “File Content” it then gets attached into the “Attachment Content” section, and that should be all done.

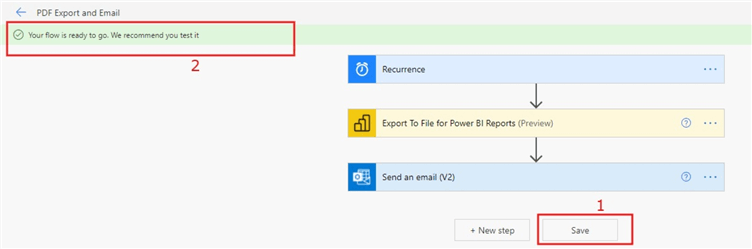
Next, you save the flow by clicking on “Save” at the bottom of the flow step.
STEP 6: Test and verify the complete Flow
At this step you need to test the flow after saving. Power Automate will create and evaluate the flow, and let you know if there are any errors.
If there are errors, select “Edit flow” to fix them. Otherwise, select the Back arrow to view the flow details and run the flow. When you run the flow, Power Automate exports your Power BI report in the format you specified (PDF in this case) and sends it as an email attachment as scheduled.
If your flow is error free, after saving you should see a message on a green background as seen in the diagram below. The message should also advice you to test your flow.
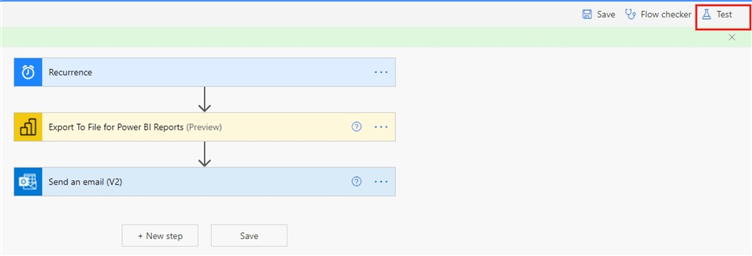
To test your flow, follow the steps below as also shown in the diagrams below.
Click on “Test“
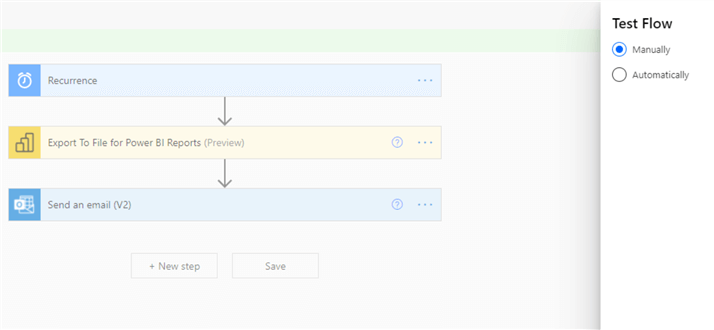
Next, select “Manually” and click on Test at the bottom.
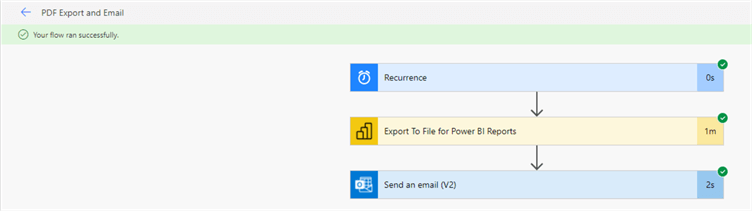
Next, click on “Run Flow” and “Done”. Once you click on “Done” the flow starts running and when completed you should see something like the diagram below.
When you check your email box (or the email box of the users you have sent this to) you should be able to see the PDF attachment with the pages of the report you have configured. As explained earlier, if you need all the pages of the report to be sent in one PDF file then don’t include any page URL extensions at all and it should send all pages by default. See the diagram below for the attachment sent to my inbox.
Summary
In summary, we have successfully demonstrated how to export and email a PDF format of pages of a Power BI report to users both within and outside of an organisation (does not require Active Directory accounts). It is important to note that this solution can be applied in many other business cases like an alternative solution for Row Level Security by sending pages of a report to specific teams, offices, regions, or departments depending on business requirements. Sometimes you may just need to add additional flow steps to achieve this or in other cases if you have too many categories (e.g., more than ten Offices, Regions, or Teams) you might need to be a little creative by creating separate flows to meet your needs.
Next Steps
- See this Microsoft documentation for more information here.
- Get information on how to activate sharing of content with external users here.
- Try this tip out with your own data as business requires.

Kenneth A. Omorodion is a Microsoft Certified Solutions Associate (MCSA) with 12+ years of enterprise application experience in Power BI, DAX, Microsoft Fabric, Business Intelligence, data warehousing, SSRS, T-SQL, and Azure. Beyond his technical skills, Kenneth has expertise working with stakeholders’ and business leaders to help them better understand key insights. He has a great track record of successfully delivering full life cycle Business Intelligence and data solutions to organizations with measurable business impact.
- MSSQLTips Awards
- Achiever Award (75+ Tips) – 2025
- Author of the Year-2021
- Author Contender-2022/2023/2024


Great work Aigbe Kenneth Omorodion for putting this all together.
Is there any way where we can send a report to shared folder instead of email?
Thank you for this tutorial, it has been a great help and I only have the problem that the pdf that it exports is blank
Is there any solution for this?
Hi Andrea,
Although i cannot take a holistic view of why this could be happenning, but my first thought would be for you to reachout to you IT team as it seems the error is relating to Adobe Acrobat. If this is not the issue, try do a reverse engineering on your work to figure out if you might have missed something during the development process. Remember, the fact that it sent a pdf as attachment doesnt mean it is done right.
Hi
Thank you for your article, it was very useful. I receive the email with the attached pdf but I get the following message:
Adobe Acrobat Reader could not open “Weekly Report.pdf because it is either not a supported file type of because the file has been damaged (for example, it was sent as an email attachment and wasn’t correctly decoded.
I just wondered if you could help.
Hi,
I have set up the flow and it works perfectly when I test on my own username in “Identities Username – 1” using (xxxx@mail.com), which is the username Im using for RLS on the dataset. However, I have 200 individual users so how is it possible to add groups instead of individuals in the identities-section?
Best regards, Mikkel
Hi Michelle,
I think you might be looking at two different things here. The link you included in your message is for a seperate feature called export to excel, it has nothing to do with Power Automate. However, if your business requirement is to Export data in Power BI to Excel in a defined location, yes you can use Power Automate to automate the process. See this youtube video by Curbal to help with that okay: https://www.youtube.com/watch?v=rGhddH0Fpk0
Let me know if you require further help.
Cheers!
Thank you very much for your response. I saw that there are three export options: PDF, PowerPoint, and JPEG. However, this article at https://learn.microsoft.com/en-us/power-platform-release-plan/2021wave2/power-bi/export-excel-improvements-table-matrix-visuals mentions that an Excel option was added in 2021. Could you please confirm that this Automate procedure allows for Export to Excel?
Hello Michelle,
This solution requires a dedicated capacity (premium capacity) to work. As of this time, i am not sure of any workaround for this to work with PPU.
Alternative you could try is to make use of the 48 daily refreshes limit on a PPU to schedule refreshes for your report in Power BI service. If i find a workaround for this soon i will write a new blog on it too.
Thanks.
Great writeup. I used this as a guide to schedule and export reports in Power Automate. The configuration was successful but when I ran the test, I received the error message “Report requested for export is not on dedicated capacity.” I have a PPU license. Can a PPU license be used or it has to be a per capacity license? If no, is there a way around it? My organization is small and purchasing a premium capacity license would not be cost-effective because many of the features might not be used. Thank you.
Hey,
Is this solution taking care of RLS apply with the email?
Hi Thomas,
Try the following approach to see if it helps:
First option is to create additional steps for each region offices like United Kingdom and Germany in addition to this completed one.
Second option is to create each flow steps separately.
Third option is to export each page to an email address or directly to SharePoint, then create additional Power Automate flows to send the files from SharePoint or email attachment to the RLS roles email addresses.
Let me know which one helps or easier to implement.
Thanks
Great write up, im trying to email multiple bookmarks of the same page in the same email. SO 6 pdfs in one email all with a different bookmark. I’ve tried to do this several different ways, by copying the power export connection 6 times in the flow and chnaging the bookmark name. That part seems to work but when I attach all of the pdf, they are all of the the most recent bookmark used. Have you tired doing this with multiple bookmarks for the same page?
Thanks,