Problem
In a recent monthly update, Microsoft updated and added a new Power BI Navigation feature / experience. Why would a dashboard developer want to use this new feature and how does it work?
Solution
Power BI includes a set of rich visuals that can be displayed on a single page or on multiple pages or tabs. As with any dashboard, report designers in Power BI long for a smooth and flowing interactive experience when viewing a dashboard. Prior to the latest updates from Microsoft, dashboard consumers were able to easily navigate between tabs within the Power BI service by clicking on the tab list from the left-hand menu. However, to create an interactive experience based on different filter selections within a single tab or an interactive experience to move from tab to tab on the design grid itself was possible but required a significant investment in setting up a consistent and expansive set of buttons and bookmarks. This process also included using an overlapping button group with different background and font colors to give the “impression” that a button was pushed even though in reality it was simply a different button object on top of the existing button object.
Be sure to download the latest version of Power BI desktop in order to follow along with the examples of setting up the next navigation features. Additionally, we will be using the WideWorldImportersDW database as a basis for our data sources; this database can be downloaded from GitHub. If you need a refresher on bringing data into Power BI please see: Querying SQL Server Data with Power BI Desktop.
Before we get started on the new navigation features, the below screen print shows the old methods of creating buttons of different colors in order to initiate a button scheme. Notice how one set of buttons has a light blue background while the other is white. Each of the buttons would have to be set as visual or hidden based on the required data to be shown.

Let us not dwell on the old method, but start in on showing how much easier the new method is when setting up a dashboard flow chart. The first step in the process to use the new navigation feature is to decide the type of navigation desired. The report designer is able to create either page navigation buttons or bookmark navigation buttons. For the first example we will start with page navigation buttons. To initiate a page navigation method, first go to the insert tab on the ribbon as shown in the below illustration. Next click on bookmarks, then Navigator, and finally Page navigator.

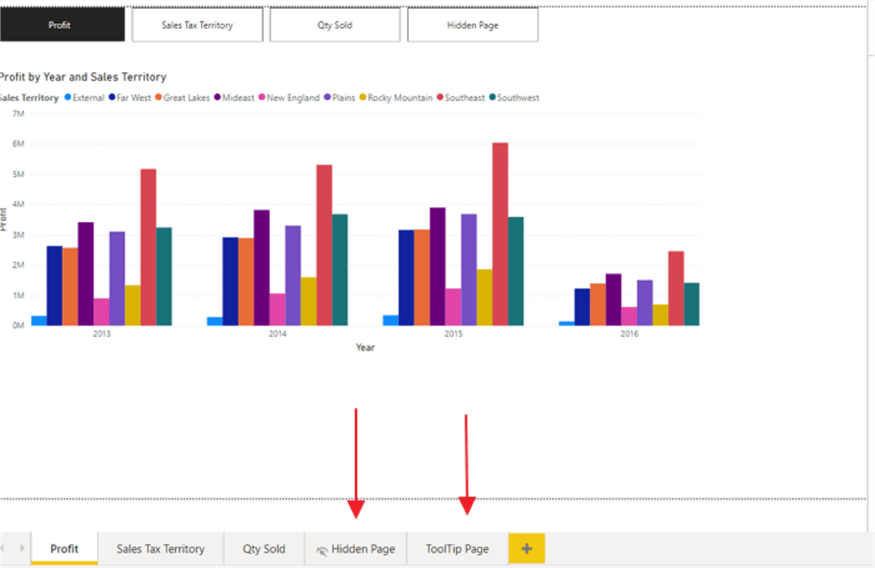
Now on the design grid a set of navigation buttons, one per page, is added automatically.

Hidden report tabs are added by default, but tooltip designated pages are NOT added by default, as revealed in the below screen print.
However, by clicking on the navigation buttons object, and going to Format navigator option, you can show or hide specific tabs including hidden tabs and tooltips tabs.

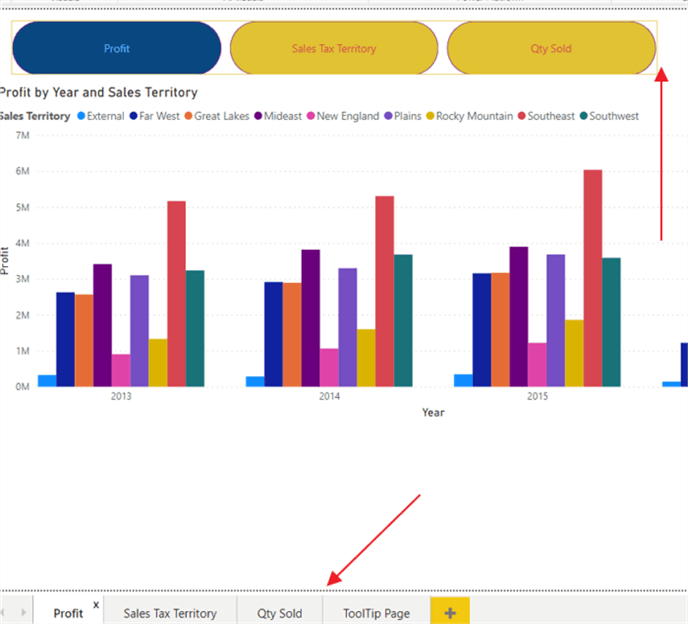
Next, the formatting of the newly added buttons can be adjusted; to make changes to the button style, shape, text and fill color, select the navigation object and then within in the Format navigator pane, these options can be adjusted. In the below examples, the shape is changed to pill, a purple border is added, and the font and fill colors are adjusted.


Notice how each button has been updated to the matching style except for the “default” pressed button.

In order to change the style of the selected button, the Apply settings option must be changed to “selected”. The other two states that can be managed are hover and pressed.

Up to this point, we have been working solely on the 1st tab in the dashboard; however, the new page navigation object only appears on that first page/tab. In order to see the same navigation object on other tabs, you will need to copy the object to those tabs. It would be best to have your navigation bar “done” from a styling and size standpoint before copying, so any changes will only need to be made to the original navigation set. As shown below, upon copying the bar to the second tab, the “selected” tab button automatically changes.

Upon deleting a tab, the related button automatically is removed from the navigation bar without any intervention.
Now that we covered page navigations, we can move on to bookmark level navigation buttons. However, before we can use this feature, appropriate bookmarks and bookmark groups need to be created. Each bookmark freezes the current state of the dashboard as it relates to any filters or slicers currently enabled and set. This state also includes and contextual filter that have been enabled by clicking on an item in a visual.
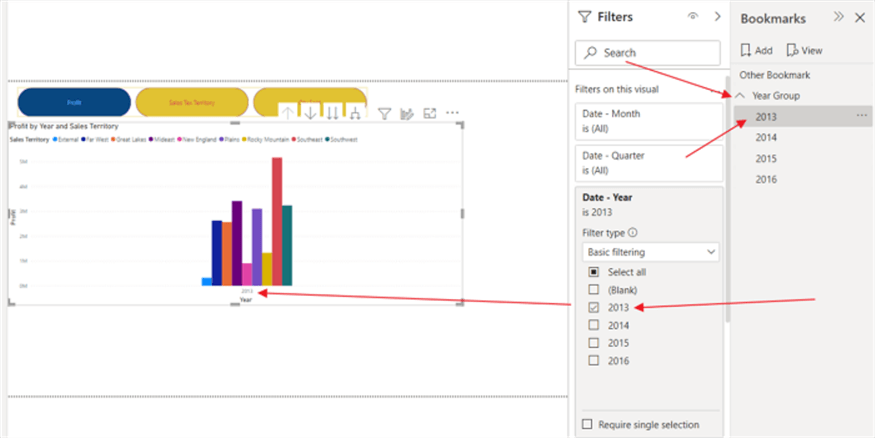
Thus, as shown below, a bookmark is created for each year individually; another state we will discuss is one with all years shown, but a bookmark will not be created for that situation. As such, a total of 4 bookmarks are created. Next these bookmarks are accumulated into a bookmark group as illustrated below.
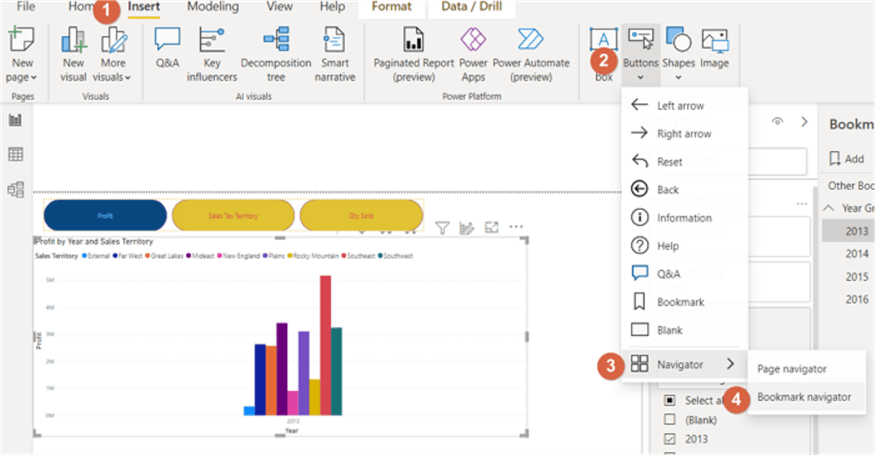
Now that the bookmarks are created, we can create a new navigation bar from these bookmarks. The process is a similar process to page navigations. First, open the Insert tab, then select Buttons and Navigator and finally Bookmark navigator.
We now have a button for each bookmark even the extra one I added called Other Bookmark.

Fortunately, bookmarks can be included or excluded on the navigation bar by bookmark group; thus, when creating the bookmarks, it is important to accumulate them into groups.

Selecting the Year Group bookmark group, the navigation bar now displays just the year bookmarks. Note the name of the bookmarks designate the names of the buttons. Similarly, the name of the tabs on the page navigation bar designates the names of the buttons for the page navigator.

In addition to the prior formatting and styling options mentioned in the page navigator, both navigator methods (page and bookmark) provided the ability to set up the buttons in a horizontal row, a vertical column, or in a grid format. As illustrated in the subsequent example, a grid of 2 x 2 buttons is setup for the year bookmarks.

When dealing with bookmark navigator buttons an additional feature is available which relates to the state when no buttons are picked, or a button is “unselected”. In order to use this feature an additional bookmark must be created which would be the “default state” when no buttons are selected. This feature allows all the buttons to be “not pushed”. In the below example, all years are shown on the visual, and thus a bookmark is created for this situation.

Now when a bookmark button is selected the appropriate year is shown.

However, when no buttons are pressed / selected, all years are shown because the default deselected bookmark is used.

In this tip, we showed how the new navigator button features can greatly reduce the development time needed to create custom navigation paths within a dashboard. This feature can be instituted at the page or the bookmark level and offers the opportunity to quickly create a set of buttons to navigate to specific pages or specific dashboard page states as defined by a bookmark.
Next Steps

I have a passion for crafting Business Intelligence Solutions for my user groups. My experience includes almost 15 years of SQL Server involvement with the last 12 years focused specifically on Business Intelligence, SharePoint, OLAP, SSRS, and Decision Support solutions. Currently, I am a Business Intelligence Architect in the healthcare industry, and I also teach database and analytics classes for Kennesaw State University, Southern New Hampshire University, and Reinhardt University. My education includes an MBA and an undergraduate in Accounting (yes I am a reformed accountant!), both from Kennesaw State University. I enjoy every day by trying to grow my faith and spend precious time with my family. I have been happily married to my wife of over 20 years, and we have two teenagers one who we home school with the help of a University Model School, Cornerstone Prep in Acworth, GA (cornerstoneprep.org). Our other child is a Construction Management major at KSU’s Southern Poly / Marietta campus. We are a soccer and Cross Country (XC) family who play, coach, and referee soccer or run for fun most every day. For several years, our family has volunteered (and played with the dogs and cats) at Etowah Valley Humane Society in Cartersville, GA.
- MSSQLTips Awards: Champion (100+tips) – 2016 | Author of the Year – 2015 | Author Contender – 2014, 2016-2021


Thank you for your Article, it helped me.