Problem
Configuring incremental refresh is much more straightforward if the data sources used have tables with Date/Time columns as date columns. But sometimes, your data source tables might have integer surrogate keys in the format “yyyymmdd” instead of Date/Time values in the Date columns that you are to use for defining the incremental refresh parameters.
The recommendation is to configure the RangeStart and RangeEnd parameters in Power Query with Power BI Desktop, a column of date/time data types must be used. This article looks at how to configure incremental refresh in such situations where we have tables that don’t have a date/time data type column, but have integer surrogate keys in the date column.
Solution
One thing to keep minding in this Power Query solution for Power BI is that we cannot just simply convert the integer surrogate keys to a date/time data type column as this would result in a non-folding query expression which is not supported in incremental refresh configurations.
The best solution is outlined in the steps below:
- Create the RangeStart parameter
- Create the RangeEnd parameter
- Create a function to convert date/time values in the above parameters to match integer surrogate keys of the data source tables
- Edit the query formula to call the function with the RangeStart and RangeEnd parameters
- Define the incremental refresh policy
- Save and publish the model to Power BI service and refresh the dataset in the Power BI service
In this tutorial, I have used the FactInternetSales table from the AdventureWorksDW which have surrogate keys as data columns included as seen in the diagram below.

STEP 1: Create the RangeStart parameter
To create the RangeStart parameter you need to be inside Power Query environment. Then on the Home tab click on “Manage Parameters“, then “New” as seen in the diagram below. Enter “RangeStart” as the Name of the parameter. You can leave the “Description” empty if you want. On the “Type” select “Date/Time“. On “Suggested Values” select or leave it on “Any Value“. On “Current Value” enter a start date/time value. See diagram below.

STEP 2: Create the RangeEnd parameter
The RangeEnd parameter is created in similar way to the RangeStart parameter, the only differences are in the “Name” which should obviously be “RangeEnd”. The other difference is in the “Current Value” on which you should enter an end date/time value as seen in the diagram below.

STEP 3: Create a function to convert date/time values in the above parameters to match integer surrogate keys of the data source tables
While still inside the Power Query Editor, you need to click on “New Source”, then select “Blank Query” as seen in the diagram below.

On the new query that results, change the name from “Query 1” to an appropriate name for the function you are about to create. In this example I have named it “DateKeyToDateTime” as seen in the diagram below.

Next, while click on the new function, enter the following M Query code on the formula bar as seen below to create the function.

You can copy and re-use the M Query above in the code below.
= (x as datetime) => Date.Year(x) * 10000 + Date.Month(x) * 100 + Date.Day(x)
The function created is as seen below. Also, you can test it in the view below.

STEP 4: In a new Query Step, edit the query formula to call the function with the RangeStart and RangeEnd parameters
On this step, you need to click on the table with the surrogate keys columns where you need to configure the parameters on. In this case I am using the FactInternetSales table. And you would need to go to the right-hand side and on the “Applied Steps” section, click on the last step as seen in the diagram below.

Then right click on the last step and select “Insert Step After” as seen on the diagram below.

The above action should include a new “Custom 1” step to the Applied Steps and on the formula bar you should be able to see the name of the last step before this inserted Custom step as seen in the diagram below.

Next, you need to edit the above formula bar as seen below.

You can copy and re-use the M Query above in the code below. In your case you only need to ensure the “Reordered Columns” is replaced with your last Applied Step as mentioned earlier.
= Table.SelectRows(#"Reordered Columns",
             each [OrderDateKey] > DateKeyToDateTime(RangeStart)
                  and [OrderDateKey] <= DateKeyToDateTime(RangeEnd))
Once the above step is done, the rows on the dataset would have been filtered according to the dates on the RangeStart and RangeEnd parameters.
STEP 5: Define the incremental refresh policy
After the configuration of both RangeStart and RangeEnd parameters on the integer surrogate keys date column, you then need to define the incremental refresh policy in Power BI desktop, and later apply the policy defined in Power BI service after publishing and refreshing the dataset.
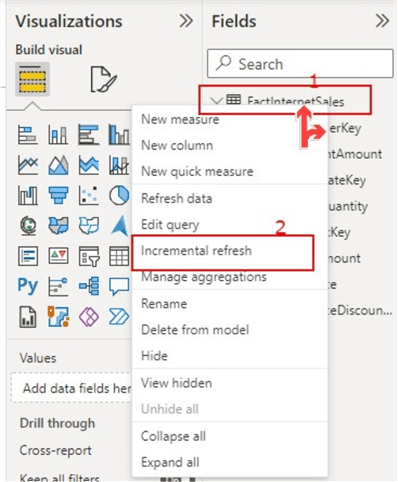
To do this, first you need to “Close and Apply” the queries to your Power BI model, then right-click on the table you have configured the parameters on (in this case it is the FactInternetSales table) and then click on “Incremental Refresh“. See the diagram below.
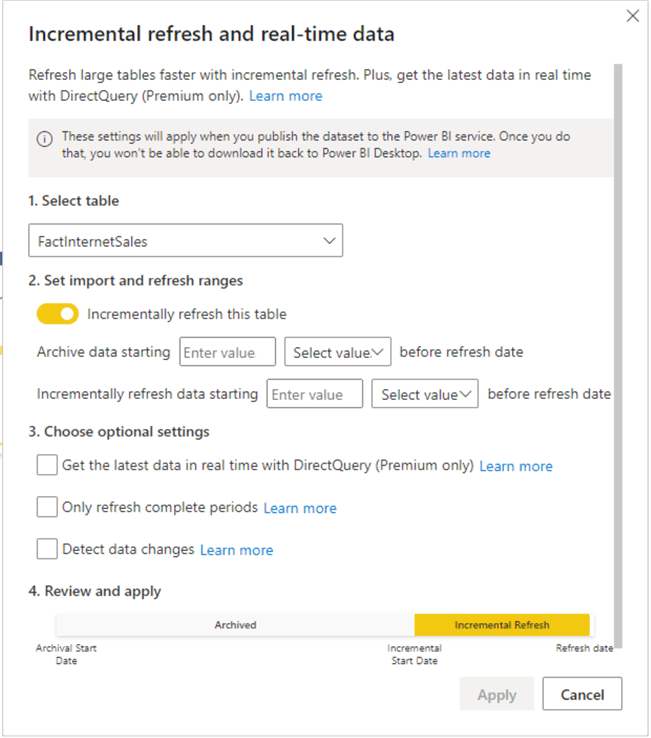
On clicking on “Incremental Refresh” as seen in the diagram above, the “Incremental refresh and real-time data” window is opened as seen in the diagram below. By default, the “Select table” recognises the table you have right clicked on earlier.

Next, to specify the required settings you would need to toggle the button under “Set import and refresh ranges” as seen in the diagram below.
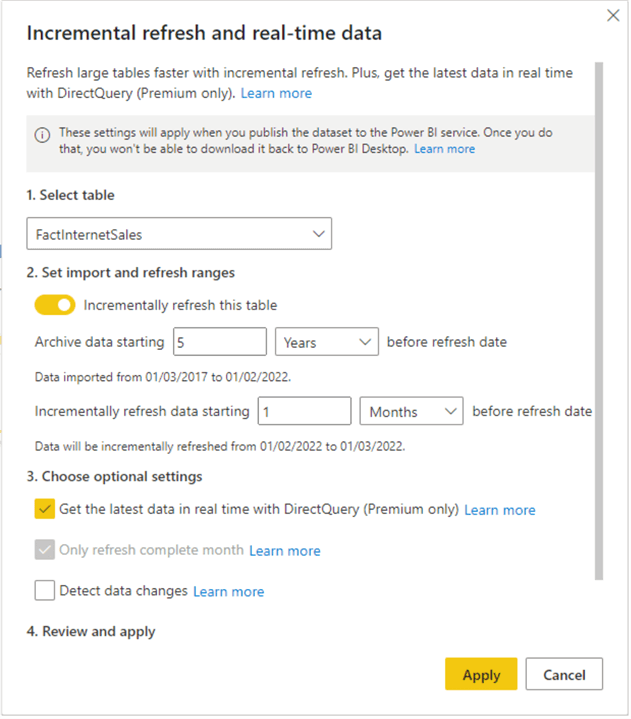
In the “Archive data starting” section, you would need to specify the period of historical store of data you would want to include in the dataset. In the “before refresh date” section just select if your historical store of data is in Days, Months, Quarters, or Years of historical data. In the example shown below, I have used “Five Years” meaning data will be imported historically as far back as five years.
In the “Incremental refresh data starting” section, you would need to specify the refresh period. This will refresh data incrementally using the date ranges specified here. The “before refresh date” part is where you can choose Days, Months, Quarters, or Years of incremental refresh start period. In the example shown below, I have used “One month” meaning data will be incrementally refreshed one month before refresh date.
There are some optional settings you can choose too including “Get the latest data in real time with DirectQuery (Premium only)”, “Only refresh complete periods”, and “Detect data changes”.
If you wish to include the latest data changes that occurred at the last refresh of the data source, then activate the “Get the latest data in real time with DirectQuery (Premium only)” option.
If you wish to refresh only whole days, then select the “Only refresh complete periods” option. Do note however that the option is automatically activated when you activate the “Get the latest data in real time with DirectQuery (Premium only)” option.
If you wish to refresh only the days when data has changed, then select the “Detect data changes” option. Do note that there are some considerations to understand when using this option. You can read more on this here.
STEP 6: Save and publish the model to Power BI service and refresh the dataset in the Power BI service
Once the incremental refresh policy is defined, you then need to apply it, save the model, and publish to Power BI service before refreshing the dataset in Power BI service to either manually or on schedule to apply the defined policy.
Next Steps
- Read more on detect data changes here.
- Read more on Only refresh complete periods here
- Read more on Get the latest data in real time with DirectQuery (Premium only) here.
- Read more about how to create and manage Power Query Functions in this Microsoft documentation.
- Read this other tip on how to configure incremental refresh for SQL sources.
- Try this tip out in your own data as business requires.

Kenneth A. Omorodion is a Microsoft Certified Solutions Associate (MCSA) with 12+ years of enterprise application experience in Power BI, DAX, Microsoft Fabric, Business Intelligence, data warehousing, SSRS, T-SQL, and Azure. Beyond his technical skills, Kenneth has expertise working with stakeholders’ and business leaders to help them better understand key insights. He has a great track record of successfully delivering full life cycle Business Intelligence and data solutions to organizations with measurable business impact.
- MSSQLTips Awards
- Achiever Award (75+ Tips) – 2025
- Author of the Year-2021
- Author Contender-2022/2023/2024


