Problem
Moving forward with the PowerShell series, I would like to shift the attention to types of loops: for, foreach and while loops. The main reason being that you will have the need to execute a particular piece of code iteratively, and you will definitely need to know how to do it in Microsoft PowerShell, so let’s get to it.
Solution
In this tutorial, we will learn how to declare, and use the different types of structures that allow us to execute code in a repeated fashion, in PowerShell scripts, along with several examples to have a clear understanding of the logic.
Initial considerations
- A very basic knowledge of coding in any other programming language will be assumed.
- No interaction with SQL Server will be covered in this article, that will be covered in a separate article.
Important note: I will be presenting all the examples using Windows PowerShell, but that shouldn’t be a showstopper for you to follow along in any other OS of your choosing.
For Loops in General
Formally speaking, a for loop is a language construct (for simplicity, think of a construct as a basic building block) that you can use to create a block of code that will execute repeatedly or a specific number of time, based on a condition.
Ideally such iterations should be finite so that you can end up with a specific final result, otherwise you will enter an endless loop that will prevent you from reaching a desired state.
PowerShell For Loop
The syntax in PowerShell is very similar to the one used in many other programming languages, so it will be very familiar to you. There will be a couple of things that can be done differently in PowerShell, but if you have followed along so far, it should be no surprise that PowerShell has beefed up versions of what you regularly find in other languages.
Here’s a high level approach of how you can think of it:
for (*initialization*; *evaluating condition*; *repeat*){
    *code to execute if evaluating condition is true*
}
- *initialization*: in this section you should specify the creation and value assignation of an integer variable. Although in PowerShell, you can specify multiple variables and craft more complex structures, depending on the problem that you are attempting to tackle of course.
- *evaluating condition*: this section contains an evaluating condition, or set of them, to instruct PowerShell if the code inside the block should be executed or not. The code will continue to execute after every iteration until the condition evaluates to false.
- *repeat*: in this section you should specify some sort of counter modification for the variable(s) specified in the initialization block. Ideally this value should either be an increment or decrement, although it will depend a lot on the problem you are trying to solve and what suits you best. Therefore, to keep it simple at the very beginning, start with increments and then as you master the language, then you should be able to hardcore things here.
Let’s go through the following examples to get a better grasp on this structure:

You’ll see two “different” for statements, well they are the same; I’ve just formatted the bottom one a bit different so that you can see that your for statement can be in one line and it will run just fine. Aside from that, you will see that the variable $i is initialized with a value of 1, and the iteration will take place as long as the variable $i is less or equal to 5, incrementing its value by 1 after every iteration.
That would be the “classic” approach that you mostly see in other programming languages, but if you’ve followed the series along, you already know by now that with PowerShell you can do things a little bit different, so let’s take a look at some examples to see some variations.
Working with Multiple Variables
You can work with multiple variables in the definition of your for loop statement.

So in PowerShell you are not bound to just working with one variable and call it a day, which opens the door for more possibilities to find clever solutions for specific problems. Now for this to happen, you must separate each variable initialization with a coma and wrap each within parenthesis, otherwise it won’t work; for the increment or decrement of the variables, you can skip the parenthesis if you are using ++ or —.
Let’s throw in an additional variable to see if we are able to pull it off:

Interestingly enough it is possible, and I’m curious if there is a defined limit. Now, if you take a closer look at the end of the definition of the for loop, you’ll see that the variable $k is wrapped in parenthesis, which you must if you aren’t using either ++ or —.
Like I mentioned before, the possibilities that something like this offers is truly amazing.
You can have a “ghost” for loop definition by writing your code in a particular way. Let me show you what I mean by “ghost definition”. Yes, “ghost” is something that I’m coming up with right now… because why not?

As you can see, the for loop definition is completely empty! In this particular example, the definition of the variable was done outside the for loop and within the loop code is the logic to force it to stop at some point. Yes, as we previously saw with the switch statement, you can throw the keyword “break” to get out of the loop.
Although this is just PowerShell allowing us to have one more cool way to do stuff, it is not meant to address every single case. If you don’t properly write the code to reach a stopping point, it will run forever until you either hit Ctrl+C, or kill the process running the script, or shutdown the server where the script is running, or blow up the machine where the script is hosted (ok, this last one was just me exaggerating, but you get the point).
One More Test
Before wrapping up the for loop, let me leave you one more example of how you can define and use the for loop, for the sake of science of course:
Using carriage returns instead of semicolons to separate each section of the definition.
Weird? Check! Possible? Absolutely!

PowerShell Foreach Loop
The foreach loop is an iteration structure mainly used to traverse all the items within a bag/collection of items. In practice, such collection of items are mostly arrays (classic or multidimensional) and hash tables.
Everything that you achieve with a foreach loop can be perfectly done with a for loop. However, the foreach version, if properly written, can be easier to the eye of the developer going through the code (either for troubleshooting or just to learn it).
The way you define a foreach loop is a bit different that the for loop:
foreach(*item* in *Item Collection*){*Code to be executed*}
Let’s take a look at an example to see it in action:

Now let’s take a look at its equivalent using the for loop so that you can clearly see the difference between them:

As you can see, in terms of lines of code both are basically the same, but with the for loop version there are a few nuances that you might experience:
- You either need to know the length of the array or use the Length property of the array so that the loop has a stopping point. As opposed with the foreach loop, this is automatically taken care of by PowerShell and you never specify such thing.
- To access any particular array element, you must seek it using it’s nth position within the array. As opposed to the foreach variant, you simply access the item that will be passed to the variable you declared in the definition, and that’s it.
Likewise, as with the for loops, you can write the foreach statements in one line without any issue.
Of course, every problem will have its way to be approached, but it’s a good thing to know these details beforehand so that you can make your life easier while attempting to tackle that particular problem.
At this stage, I don’t want to throw any fancier/complex examples because it would require the use of stuff that I haven’t covered yet in the series, so I don’t want to confuse the reader following along. As the series moves on forward, I will definitely be presenting more complex examples that resonate with the topics being presented at that point in time.
While Loops in PowerShell
The while loop provides you one more way, in addition to the couple of ways I already covered, to make a block of code iterative. If you ask me, the while is a bit easier to write (in terms of defining it) than the other ones, and you can basically achieve the exact same thing with it, if you adapt your code appropriately.
Here’s how you define a basic while loop:
while(*condition*){*Code to be executed*}
Let’s take a look at some examples to see it in action.
A normal while loop to achieve the same end result as the examples demonstrated for the for loops:

One-liner example:

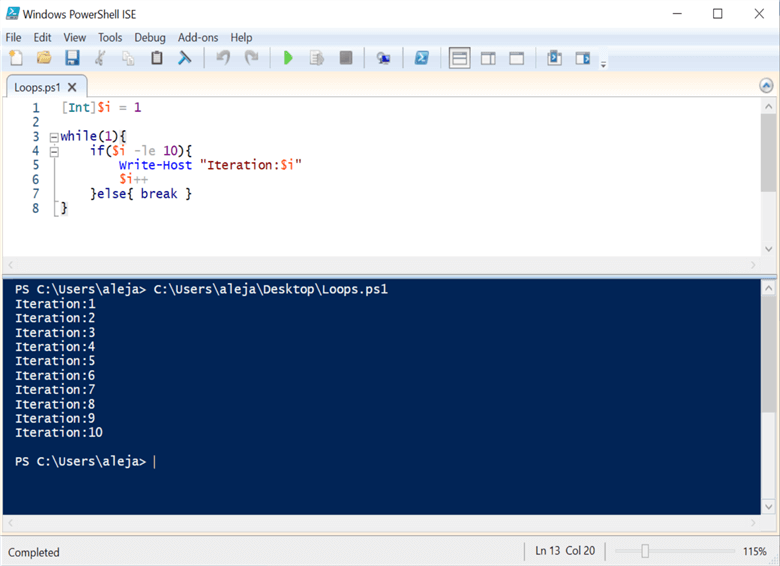
Writing a while loop that loops infinitely in its condition statement, but force it’s stopping point inside the code using a break:
Or you could also mix the two approaches, where you have a specific condition defined, but you also have a different condition within your code block that hits a break point if the condition is met.
PowerShell Do-While Loop and Do-Until Loop
As a bonus content, I’ll briefly show you these two additional iterative constructs, for your own toolbox.
Do-While Loop
In many other languages, the do-while approach is rather common and it basically guarantees that the block of code defined will be executed at least once.
Here’s how it’s defined:
do{*code to be executed*} while(*condition*)
Let’s see an example:

As you can see, the condition in the while is clearly false, but the block of code is executed at least once.
Do-Until
This one is very similar to the Do-While form, but with the slight difference that it will continue to iterate as long as the evaluating condition is false, basically it is the “negation” of the Do-While so to speak.
Here’s how it’s defined:
do{*code to be executed*} until(*condition*)
Let’s see an example:

For this example, I’ve just swapped the word “while” with “until” to see what the script does. As you can see, I had to hit Ctrl+C to stop the execution of this script because it was going to run forever, because the condition was always going to be false.
Let’s negate the condition to see if it stops:

See, it behaved just as we expected! With this, I’m wrapping up the basic iterative code structures that will definitely be of great help when we reach a point in the series where we are able to craft scripts that work with data coming from a SQL Server database.
Next Steps
- In case you missed it, check out the previous article PowerShell for the SQL Server DBA – If/else and Switch statements.
- Make sure to choose the right structure for the right problem, not just choosing one over the other because it looks cooler.
- Regardless of the structure you decide to use, always aim for a good readability of your code so that it is easier to comprehend for you and for anybody that has to take a look at it.
- Always test your code to avoid any unwanted surprises, like infinite loops or weird results due to bad written conditions and/or stopping points.
- In the next article we will be taking a look at functions, so stay tuned!

Alejandro Cobar is an MCP, SQL Server DBA and Developer with 10+ years of experience working in a variety of environments.
- MSSQLTips Awards: Author of the Year – 2020 | Rising Star (50+ tips) – 2021 | Author Contender – 2019, 2021