Problem
In a previous tip on Setup and Implement SQL Server 2016 Always On Distributed Availability Groups, we have seen how to configure a Distributed Availability Group as a disaster recovery strategy for SQL Server 2016 and higher instances. We want to leverage Distributed Availability Groups to migrate our databases to a different Active Directory domain. How do we go about it?
Solution
To continue this series on Configuring Distributed Availability Groups Between Failover Clusters on Different Active Directory Domains, we will look at finally configuring the Distributed AG in preparation for the database migration.
- In Part 1, you learned how to create the certificates for use with authentication.
- In Part 2 we walked through leveraging those certificates to configure authentication between the primary AG (TDPRDAGPROD01) and the secondary AG (TDPRDAGPROD11).
- In this tip, Part 3, we get into creating and configuring the Distributed AG. This will also walk you through the process of preparing for a production cutover as part of the database migration process.
For reference, a review of the high-level steps is shown below. This tip will continue on Step #7.
- Create the primary AG (TDPRDAGPROD01) with a corresponding listener name (TDPRDAGLN075)
- Create the secondary AG (TDPRDAGPROD11) with a corresponding listener name (TDPRDAGLN077)
- Configure certificates on the primary AG (TDPRDAGPROD01)
- Create a database master key on the primary replica of the primary AG (TDPRDAGPROD01)
- Create the certificate that will be used to authenticate while connecting to the primary replica of the primary AG (TDPRDAGPROD01)
- Modify the endpoint on the primary replica of the primary AG (TDPRDAGPROD01) and add the certificate for authentication
- Export the certificate generated on the primary replica of the primary AG (TDPRDAGPROD01) to a file and copy it to the replicas of the secondary AG (TDPRDAGPROD11)
- Repeat Steps (a) to (d) on the secondary replica of the primary AG (TDPRDAGPROD01)
- Configure certificates on the secondary AG (TDPRDAGPROD11)
- Create a database master key on the primary replica of the secondary AG (TDPRDAGPROD11)
- Create the certificate that will be used to authenticate while connecting to the primary replica of the secondary AG (TDPRDAGPROD11)
- Modify the endpoint on the primary replica of the secondary AG (TDPRDAGPROD11) and add the certificate for authentication
- Export the certificate generated on the primary replica of the secondary AG (TDPRDAGPROD11) to a file and copy it to the replicas of the primary AG (TDPRDAGPROD01)
- Repeat Steps (a) to (d) on the secondary replica of the secondary AG (TDPRDAGPROD11)
- Configure authentication on the primary AG (TDPRDAGPROD01) for use by the replicas of the secondary (TDPRDAGPROD11)
- Create a login on the primary replica of the primary AG (TDPRDAGPROD01)
- Create a user for the login
- Associate the certificates created on the replicas of the secondary AG (TDPRDAGPROD11) with the user
- Grant the CONNECT ON ENDPOINT permission on the login
- Repeat Steps (a) to (d) on the secondary replica of the primary AG (TDPRDAGPROD01)
- Configure authentication on the secondary AG (TDPRDAGPROD11) for use by the replicas of the primary (TDPRDAGPROD01)
- Create a login on the primary replica of the secondary AG (TDPRDAGPROD11)
- Create a user for the login
- Associate the certificates created on the replicas of the primary AG (TDPRDAGPROD01) with the user
- Grant the CONNECT ON ENDPOINT permission on the login
- Repeat Steps (a) to (d) on the secondary replica of the secondary AG (TDPRDAGPROD11)
- Create the Distributed AG (DistAG_DC1_DC2) on the primary AG (TDPRDAGPROD01)
- Join the secondary AG (TDPRDAGPROD11) to the Distributed AG
Step #7: Create the Distributed AG (DistAG_DC1_DC2) on the primary AG (TDPRDAGPROD01)
Creating a Distributed AG across different Active Directory domains is exactly the same as described in this tip. The biggest challenge is really the authentication between the primary AG and the secondary AG. That’s what all the ground work in Part 1 and Part 2 was for. Use the T-SQL script below to create the Distributed AG on the primary AG (TDPRDAGPROD01). And because this is in preparation for a migration, AVAILABILITY_MODE is set to ASYNCHRONOUS_COMMIT and FAILOVER_MODE is set to MANUAL. Besides, there is no concept of automatic failover between AGs in a Distributed AG.
NOTE: Since the secondary AG (TDPRDAGPROD11) has already been created to validate that it works, make sure to delete the dummy database used for testing prior to creating the Distributed AG. Also, validate name resolution of the LISTENER_URL parameters from the primary AG (TDPRDAGPROD01) to the secondary AG (TDPRDAGPROD11) and vice versa. The usual network connectivity guidelines still apply.
--Use the primary AG's listener name to guarantee connection to the primary replica
:CONNECT TDPRDAGLN075.TESTDOMAIN.COM -U sqladmin -P $ecUr3PAssw0rd
CREATE AVAILABILITY GROUP [DistAG_DC1_DC2]
WITH (DISTRIBUTED)
AVAILABILITY GROUP ON
'TDPRDAGPROD01' WITH
(
   LISTENER_URL = 'TCP://TDPRDAGLN075.TESTDOMAIN.COM:5022',
   AVAILABILITY_MODE = ASYNCHRONOUS_COMMIT,
   FAILOVER_MODE = MANUAL,
   SEEDING_MODE = AUTOMATIC
),
'TDPRDAGPROD11' WITH
(
   LISTENER_URL = 'TCP://TDPRDAGLN077.15C-INC.COM:5022',
   AVAILABILITY_MODE = ASYNCHRONOUS_COMMIT,
   FAILOVER_MODE = MANUAL,
   SEEDING_MODE = AUTOMATIC
);
GO
Pay attention to the LISTENER_URL parameter values. Notice that they use different fully qualified domain names (FQDN). This is indicative of AGs in different Active Directory domain.
Step #8: Join the secondary AG (TDPRDAGPROD11) to the Distributed AG
Once the Distributed AG has been created on the primary AG, you can now proceed to join the secondary AG (TDPRDAGPROD11). Use the T-SQL script below to join the secondary AG (TDPRDAGPROD11) to the Distributed AG (DistAG_DC1_DC2).
--Use the secondary AG's listener name to guarantee connection to the primary replica
:CONNECT TDPRDAGLN077.15C-INC.COM -U sqladmin -P $ecUr3PAssw0rd
ALTER AVAILABILITY GROUP [DistAG_DC1_DC2]
JOIN
AVAILABILITY GROUP ON
'TDPRDAGPROD01' WITH
(
   LISTENER_URL = 'TCP://TDPRDAGLN075.TESTDOMAIN.COM:5022',
   AVAILABILITY_MODE = ASYNCHRONOUS_COMMIT,
   FAILOVER_MODE = MANUAL,
   SEEDING_MODE = AUTOMATIC
),
'TDPRDAGPROD11' WITH
(
   LISTENER_URL = 'TCP://TDPRDAGLN077.15C-INC.COM:5022',
   AVAILABILITY_MODE = ASYNCHRONOUS_COMMIT,
   FAILOVER_MODE = MANUAL,
   SEEDING_MODE = AUTOMATIC
);
GO
Same as the previous step, the LISTENER_URL parameter values tell you that the AGs are on different Active Directory domains.
NOTE: If the authentication between the primary AG and the secondary AG is not done properly, you will see an error message on the primary AG similar to the one below.
Database Mirroring login attempt failed with error: 'Connection handshake failed. An OS call failed: (8009030c) 0x8009030c(The logon attempt failed). State 67.'. . [CLIENT: 127.25.1.77]'
The CLIENT referred to in the error message is the secondary AG’s listener IP address. This is because the secondary AG could not authenticate with the primary AG during the initial connection. There are several reasons for authentication failures – incompatible encryption algorithm, endpoint permissions, missing logins, expired passwords, etc. But since the error only appeared when the Distributed AG was configured, the authentication failures are caused by the configuration of the Distributed AG. Refer to this blog post on How the Client-Server Model Can Help Make SQL Server Always On Availability Group Replica Configuration A Lot Easier to understand what the secondary AG needs to connect to and authenticate with the primary AG.
Rather than troubleshoot the issue, simply delete the Distributed AG on both the primary and secondary AG, and rollback all of the changes. Keep in mind that your primary AG is a live, production environment. Any additional issue could potentially cause an outage. That is why it is very important to prepare a rollback plan should issues like this occur.
You can use the Availability Group dashboard to review the health of the individual AGs. And since this is a Distributed AG, any database added to the primary AG will automatically be replicated to the secondary AG, assuming that automatic seeding was configured.
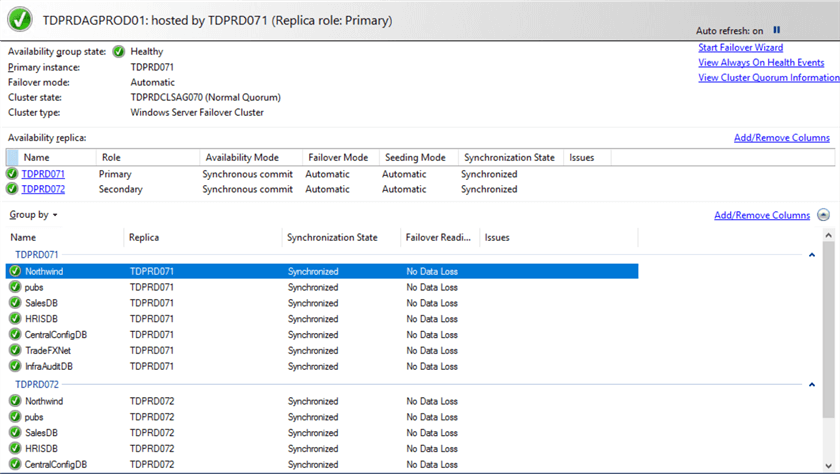
Status of primary AG (TDPRDAGPROD01)
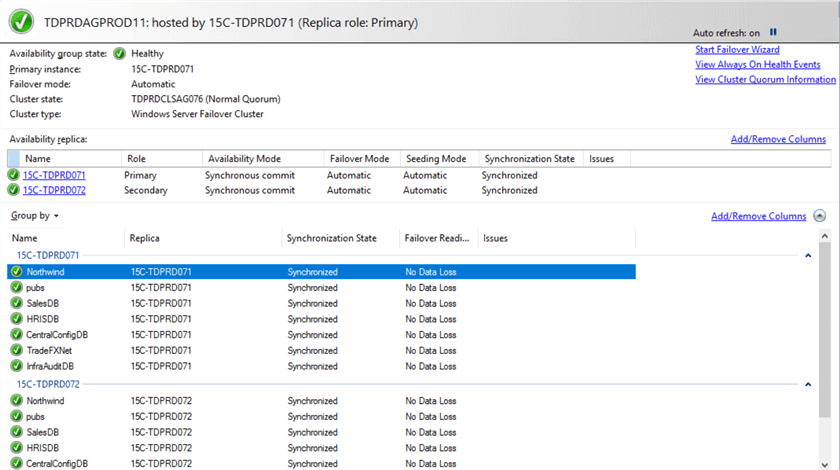
Status of secondary AG (TDPRDAGPROD11)
Production Cutover to the New Environment to Finalize Database Migration
Perform the steps below when you’re ready to cutover to the new environment. Here's a high-level overview of the steps for manually failing over the Distributed AG to the new environment for database migration.
- Modify the availability mode of the Distributed AG (DistAG_DC1_DC2) in the primary AG (TDPRDAGPROD01)
- Modify the availability mode of the Distributed AG (DistAG_DC1_DC2) in the secondary AG (TDPRDAGPROD11)
- Set the Distributed AG role on the primary AG (TDPRDAGPROD01) to SECONDARY
- Failover the Distributed AG to the secondary AG (TDPRDAGPROD11)
Step #1: Modify the availability mode of the Distributed AG (DistAG_DC1_DC2) in the primary AG (TDPRDAGPROD01)
Use the T-SQL query below to modify the availability mode of the Distributed AG in the primary AG. Since the primary and secondary AGs are configured in ASYNCHRONOUS COMMIT availability mode, you need to switch both of them to SYNCHRONOUS COMMIT. This prepares the databases for failover with minimal data loss.
--Use the primary AG's listener name to guarantee connection to the primary replica
:CONNECT TDPRDAGLN075.TESTDOMAIN.COM -U sqladmin -P $ecUr3PAssw0rd
--Modify availability mode of the primary and secondary AGs in a Distributed Availability Group
--Run this on the primary replica of the primary AG
USE master
GO
ALTER AVAILABILITY GROUP [DistAG_DC1_DC2]
  MODIFY
  AVAILABILITY GROUP ON
'TDPRDAGPROD01' WITH
(
   AVAILABILITY_MODE = SYNCHRONOUS_COMMIT
),
'TDPRDAGPROD11' WITH
(
   AVAILABILITY_MODE = SYNCHRONOUS_COMMIT
);
Step #2: Modify the availability mode of the Distributed AG (DistAG_DC1_DC2) in the secondary AG (TDPRDAGPROD11)
Use the T-SQL query below to modify the availability mode of the Distributed AG in the secondary AG. Since the primary and secondary AGs are in ASYNCHRONOUS COMMIT availability mode, you need to switch both of them to SYNCHRONOUS COMMIT.
--Use the secondary AG's listener name to guarantee connection to the primary replica
:CONNECT TDPRDAGLN077.15C-INC.COM -U sqladmin -P $ecUr3PAssw0rd
--Modify availability mode of the primary and secondary AGs in a Distributed Availability Group
--Run this on the primary replica of the secondary AG
USE master
GO
ALTER AVAILABILITY GROUP [DistAG_DC1_DC2]
 MODIFY
 AVAILABILITY GROUP ON
'TDPRDAGPROD01' WITH
(
   AVAILABILITY_MODE = SYNCHRONOUS_COMMIT
),
'TDPRDAGPROD11' WITH
(
   AVAILABILITY_MODE = SYNCHRONOUS_COMMIT
);
Don't be surprised if the T-SQL query above is exactly the same as the one in Step #1 – you're basically running the exact same query on two different AGs, one on the primary and another on the secondary.
Step #3: Set the Distributed AG role on the primary AG (TDPRDAGPROD01) to SECONDARY
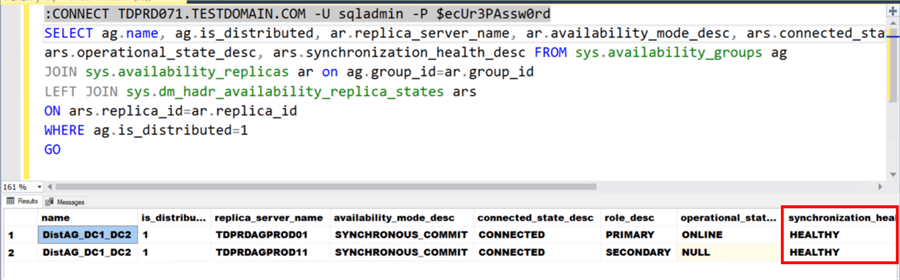
Before proceeding with Step #3, verify that both the primary and secondary AGs are in SYNCHRONOUS COMMIT and synchronization_health_desc value of HEALTHY. Use the T-SQL queries below to verify.
--Use the primary AG's listener name to guarantee connection to the primary replica
:CONNECT TDPRDAGLN075.TESTDOMAIN.COM -U sqladmin -P $ecUr3PAssw0rd
SELECT ag.name, ag.is_distributed, ar.replica_server_name, ar.availability_mode_desc, ars.connected_state_desc, ars.role_desc,
ars.operational_state_desc, ars.synchronization_health_desc FROM sys.availability_groups ag
JOIN sys.availability_replicas ar on ag.group_id=ar.group_id
LEFT JOIN sys.dm_hadr_availability_replica_states ars
ON ars.replica_id=ar.replica_id
WHERE ag.is_distributed=1
GO
Below is the result of running the queries on the primary replica of the primary AG (TDPRDAGPROD01). Note the synchronization_health_desc column values of the Distributed AG. Make sure this is HEALTHY before proceeding with the manual failover to minimize data loss.
Use the T-SQL query below to set the Distributed AG role on the primary replica of the primary AG (TDPRDAGPROD01) to SECONDARY.
--Use the primary AG's listener name to guarantee connection to the primary replica
:CONNECT TDPRDAGLN075.TESTDOMAIN.COM -U sqladmin -P $ecUr3PAssw0rd
--Modify role of the primary AG in a Distributed Availability Group
--Run this on the primary replica of the primary AG
USE master
GO
ALTER AVAILABILITY GROUP [DistAG_DC1_DC2] SET (ROLE = SECONDARY);
This takes the Distributed AG offline, terminating client applications connected to the primary AG (TDPRDAGPROD01). This also starts the countdown for your scheduled downtime during the production cutover.
Step #4: Failover the Distributed AG to the secondary AG (TDPRDAGPROD11)
Use the T-SQL query below to manually failover the Distributed AG to the secondary AG (TDPRDAGPROD11). Run the query on the primary replica of the secondary AG.
--Use the secondary AG's listener name to guarantee connection to the primary replica
:CONNECT TDPRDAGLN077.15C-INC.COM -U sqladmin -P $ecUr3PAssw0rd
--Failover the Distributed Availability Group to the secondary AG
--Run this on the primary replica of the secondary AG
USE master
GO
ALTER AVAILABILITY GROUP [DistAG_DC1_DC2] FORCE_FAILOVER_ALLOW_DATA_LOSS;
GO
This brings the Distributed AG online on the old secondary Availability Group (TDPRDAGPROD11), making it the new primary AG. You have just completed the process of migration of the databases to the new environment. Client applications can now connect to the new primary AG thru its listener name.
NOTE: Don't be alarmed with the use of FORCE_FAILOVER_ALLOW_DATA_LOSS argument in the ALTER AVAILABILITY GROUP command – it is the only supported argument for failing over a Distributed AG. This is not something you would use for regular Availability Groups unless in a DR situation. Make sure you make note of this in your project plan.
Since the Distributed AG is still configured, the AG on the old environment (TDPRDAGPROD01) is still receiving transaction log records from the new environment. To completely disconnect the AG on the old environment (TDPRDAGPROD01) from the new environment, you need to remove the Distributed AG.
Removing the Distributed Availability Group After Database Migration
Once you’ve stabilized the new environment, you can proceed to remove the Distributed AG. Unlike when creating the Distributed AG, this needs to be done on the old environment – the new secondary AG (TDPRDAGPROD01). Use the T-SQL query below to remove the Distributed AG on the old environment. Run the query on the primary replica of the new secondary AG.
--Use the new secondary AG's listener name to guarantee connection to the primary replica
:CONNECT TDPRDAGLN075.TESTDOMAIN.COM -U sqladmin -P $ecUr3PAssw0rd
--Remove the Distributed Availability Group from the new secondary AG (TDPRDAGPROD01)
--Run this on the primary replica of the new secondary AG
USE master
GO
DROP AVAILABILITY GROUP [DistAG_DC1_DC2];
GO
After removing the Distributed AG from the old environment, you need to remove it on the new primary AG (TDPRDAGPROD11). Use the T-SQL query below to remove the Distributed AG on the new environment. Run the query on the primary replica of the new primary AG.
--Use the new primary AG's listener name to guarantee connection to the primary replica
:CONNECT TDPRDAGLN077.15C-INC.COM -U sqladmin -P $ecUr3PAssw0rd
--Remove the Distributed Availability Group from the new primary AG (TDPRDAGPROD11)
--Run this on the primary replica of the new primary AG
USE master
GO
DROP AVAILABILITY GROUP [DistAG_DC1_DC2];
GO
At this point, the old environment is no longer connected to the new environment and the data replication is no longer happening. However, the remnants of the migration process – certificates, endpoint authentications, and SQL Server logins – still exist. Depending on your security and compliance requirements, you can decide to keep them or clean them up.
Summary
This is a very complex process, one that requires careful attention to detail and proper planning. Most of the work done is to allow authentication between two different Active Directory domains. And since this involves working with a production environment, you need to have a proper project plan – complete with implementation and rollback plans – to mitigate the risks. You do not want your production environment to be offline for much longer than your recovery time objective.
Next Steps
- Review the previous tips on SQL Server Availability Group
- SQL Server AlwaysOn Availability Groups – Part 1 configuration
- SQL Server AlwaysOn Availability Groups – Part 2 Availability Groups Setup
- Setup and Implement SQL Server 2016 Always On Distributed Availability Groups
- Implement a SQL Server 2016 Availability Group without Active Directory Part 1
- Implement a SQL Server 2016 Availability Group without Active Directory Part 2
- Manual Failover of SQL Server Always On Distributed Availability Group for Disaster Recovery Testing
- Read about the following topics from the Microsoft Documentation

Edwin M. Sarmiento is the Managing Director of 15C, a consulting and training company that specializes on designing, implementing and supporting SQL Server infrastructures. He is a Microsoft SQL Server MVP and Microsoft Certified Master from Ottawa, Canada specializing in high availability, disaster recovery and system infrastructures running on the Microsoft server technology stack ranging from Active Directory to SharePoint and anything in between. He is very passionate about technology but has interests in music, professional and organizational development, and leadership and management matters when not working with databases. Edwin lives up to his primary mission statement: “To help people and organizations grow and develop their full potential.”
- MSSQLTips Awards: Champion Award (100+ tips) – 2017 | Author of the Year Contender – 2020, 2017