Problem
One of our clients has an IBM DB2 for iSeries (“IBM DB2 for i”) database. Connecting using a traditional DB2 ODBC driver does not work for this type of database platform. I need to move some data from the iSeries to a staging database on SQL Server using SSIS, how can I connect?
Solution
In this tip we will provide the steps to install a data source driver and to configure an ODBC connection to the IBM DB2 for i (iSeries). We will also show an example SSIS (SQL Server Integration Services) package that exports data from the iSeries to a SQL Server database.
Driver Installation
In order to connect to the iSeries from SQL Server you have to make sure that an ODBC driver is installed on the server. You can also install it on your development PC if you need to perform ad-hoc data queries or data extracts.
After downloading IBM i Access, start the installation by double-clicking on the cwblaunch.exe file in the driver installation folder:</p

Select setup language:

Accept the terms in the license agreement on the next screen.
Select destination folder for the installation on the screen after that.
Select the primary language:
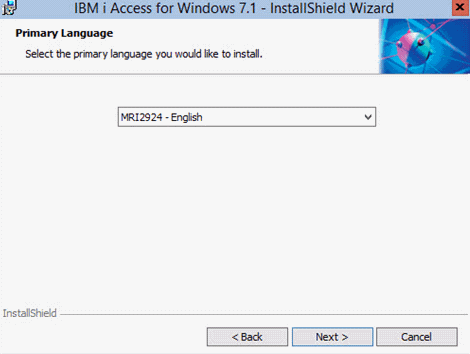
Choose the custom setup type on the screen below:

Click the “Next” button on the following screen:

Select the Data Access Providers and clear the selection for the “System i Navigator” and the “Data Transfer Base Support”:
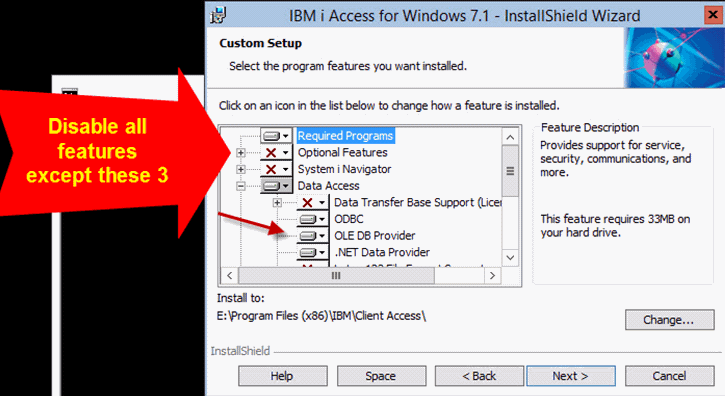
Complete the installation by using the default settings on the remaining screens.
Important! Make sure you understand the licensing requirements for the IBM i Access for Windows. For example, ODBC and other data source providers are free, but the “Data Transfer Base Support” requires a separate license. To copy data we only need the ODBC driver, the “Data Transfer Base Support” is not required.
ODBC Data Source
Open the ODBC Data Source Administrator and click “Add” under the “System DSN” tab:

Select “iSeries Access ODBC Driver” and click “Finish”.
Now we will configure the ODBC connection’s settings for the iSeries database.
Specify the data source name under the “General” tab and enter the host name of your iSeries as “System”:
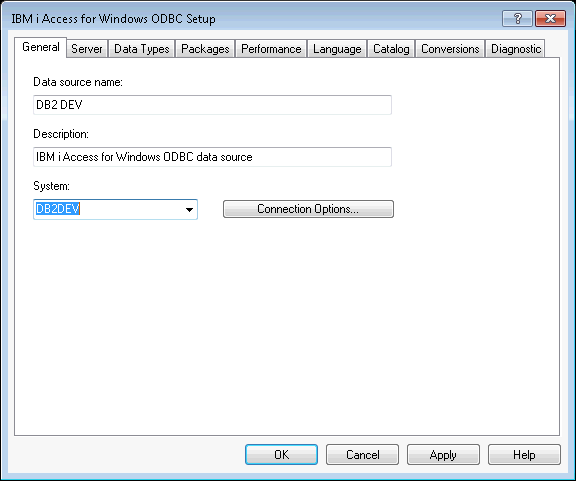
Specify the Default Schema or Library under “Server” tab and enable “Override default database” option:

Note, that settings may vary depending on your environment. You may need to contact your iSeries administrator for the correct settings. One of the examples (but using the older driver) could be found here.
Enter the package library name under the “Packages” tab:

Click “OK” button to save the new ODBC data source.
Data Export with SSIS Package
We will create the new SSIS project in Visual Studio 2012. You can also create the new project using “SQL Server Business Intelligence Development Studio” or use one of your existing projects.
In Visual Studio’s Solution Explorer create the new project’s Connection Managers (for both – SQL Server and iSeries):

Select “Connection manager for ODBC connections” to create the new connection to the iSeries database:

Select the “DB2 DEV” ODBC connection that was created earlier and enter the password under the “Login information”:

Review the new data connection and click “OK” to save it:

To create the SQL Server Connection Manager select the “Connection manager for OLE DB connections”. Enter the server name, credentials (if SQL Server Authentication is used) and a staging database name (the database that will hold the exported data):

Click “OK” twice to save the SQL Server Connection Manager.
Now we have two Project Connection Managers:

Alternatively you can create package level connections. Read more about SSIS connection managers here.
Create the new package under SSIS Packages.
Open the package and drag the “Data Flow Task” from the toolbox to the “Control Flow” area:

Double click the “Data Flow Task” and drag “ODBC Source” and “OLE DB Destination” from the SSIS Toolbox:

Double click and configure the “ODBC Source”. Select a table/view name, click “Columns” on the left and click “OK”:

Drag the Data Flow arrow from the “ODBC Source” to the “OLE DB Destination”. Double click the destination container and configure the properties.
Create the new table by clicking the “New” button or use existing table by selecting the table name from the drop down list. Click “Mappings” on the left to complete the columns mappings and click “OK” to complete the destination configuration:

Read more tips about SSIS Data Flow Transformations here.
Now the package is ready for execution. Run the package and verify the results:

Next Steps
- Read more tips about SSIS Development.
- Find out more about other database platforms here.
- See if you can be useful for your company even if you don’t support other database systems by bringing data to a SQL Server staging database and building reports.

Svetlana has been working in IT for more than 17 years. Most of her career has focused on Database Administration (both SQL Server and Oracle) and Database Development. Databases are Svetlana’s passion, but she also has fun helping co-workers and friends in troubleshooting non-database related issues. Svetlana tries to explore and learn as many SQL Server features as possible. Her favorite SQL Server features are Policy Based Management, SSIS, SSRS and Master Data Services. One of Svetlana’s areas of expertize is cross systems / database integration. Svetlana is currently a hands-on Database Team Lead in Calgary, Canada where she promotes SQL Server.
Svetlana likes to share her knowledge with others and enjoys learning herself. Her hobby is photography, but now she spends her free time away from Database Administration with her little girl who proudly wears her MSSQLTips shirt. Svetlana blogs at http://databaserefresh.com and posts her pictures to https://plus.google.com/u/0/111115767149899859037/posts. Her Twitter account is @magasvs.
- MSSQLTips Awards: Rising Star (50+ tips) – 2018 | Author of the Year Contender – 2015-2017