By: Ahmad Yaseen | Comments (5) | Related: > Partitioning
Problem
SQL Server Database Administrators prefer using the TRUNCATE TABLE statement over DELETE statement because it is faster, minimally logged and consumes less server resources. The downside of the TRUNCATE TABLE statement is that it deletes all the table rows since there is no WHERE clause that can be added to the statement to specify the delete criteria. So, how could we get the benefits of the TRUNCATE TABLE statement without deleting all the rows in the table?
Solution
SQL Server 2016 introduces a nice modification to the TRUNCATE TABLE statement that allows you to truncate a specific partition or set of partitions from your table while still get the advantages of the TRUNCATE TABLE statement without clearing all of the tableís data. This new filter mechanism on the TRUNCATE TABLE statement is achieved by using the WITH PARTITIONS() option specifying the partition or sets of partitions.
Letís go through a simple demo to show us how it works. We will start by adding four new filegroups and four data files to our existing MSSQLTipsDemo database with the below script:
USE [master]
GO
ALTER DATABASE [MSSQLTipsDemo] ADD FILEGROUP [Q1]
GO
ALTER DATABASE [MSSQLTipsDemo] ADD FILEGROUP [Q2]
GO
ALTER DATABASE [MSSQLTipsDemo] ADD FILEGROUP [Q3]
GO
ALTER DATABASE [MSSQLTipsDemo] ADD FILEGROUP [Q4]
GO

USE [master]
GO
ALTER DATABASE [MSSQLTipsDemo] ADD FILE ( NAME = N'Q1_2016', FILENAME = N'D:\Data\Q1_2016.ndf' , SIZE = 4096KB , FILEGROWTH = 1024KB ) TO FILEGROUP [Q1]
GO
ALTER DATABASE [MSSQLTipsDemo] ADD FILE ( NAME = N'Q2_2016', FILENAME = N'D:\Data\Q2_2016.ndf' , SIZE = 4096KB , FILEGROWTH = 1024KB ) TO FILEGROUP [Q2]
GO
ALTER DATABASE [MSSQLTipsDemo] ADD FILE ( NAME = N'Q3_2016', FILENAME = N'D:\Data\Q3_2016.ndf' , SIZE = 4096KB , FILEGROWTH = 1024KB ) TO FILEGROUP [Q3]
GO
ALTER DATABASE [MSSQLTipsDemo] ADD FILE ( NAME = N'Q4_2016', FILENAME = N'D:\Data\Q4_2016.ndf' , SIZE = 4096KB , FILEGROWTH = 1024KB ) TO FILEGROUP [Q4]
GO
Once the database filegroups and files are ready, we will create the partitioning function to partition the data depending on the four quarters of the year as shown below:
USE [MSSQLTipsDemo]
GO
CREATE PARTITION FUNCTION PartitionByQuarter(INT) AS
  RANGE RIGHT FOR VALUES
  (20161,20162,20163,20164)
GO
The next step is to create the partitioning scheme that specifies the filegroup assigned for each partition value mentioned in the partitioning function:
USE [MSSQLTipsDemo]
GO
CREATE PARTITION SCHEME PartitionByQuarterScheme AS
  PARTITION PartitionByQuarter  TO
  (
   [Q1],
   [Q2],
   [Q3],
   [Q4],
   [PRIMARY] )
GO
We are ready now to create the new PartitionDemo2016 table that is partitioned using the previously created partitioning function and scheme based on the QuarterNum computed columnís value:
USE [MSSQLTipsDemo]
GO
CREATE TABLE [dbo].[PartitionDemo2016](
 [ID] [int] NULL,
 [ActionGUID] [nvarchar](50) NULL,
 [TS] [datetime] NULL,
 [QuarterNum]  AS (datepart(year,[TS])*(10)+datepart(quarter,[TS])) PERSISTED
) ON [PartitionByQuarterScheme] ([QuarterNum])

GO
Letís fill the PartitionDemo2016 table with a few records to see what will happen:
USE [MSSQLTipsDemo]
GO
INSERT [dbo].[PartitionDemo2016] ([ID], [ActionGUID], [TS])
VALUES (1, N'asgdhfjflflgl', CAST(N'2016-01-15T00:00:00.000' AS DateTime))
GO
INSERT [dbo].[PartitionDemo2016] ([ID], [ActionGUID], [TS])
VALUES (2, N'djfjhgsfgdgd', CAST(N'2016-05-10T00:00:00.000' AS DateTime))
GO
INSERT [dbo].[PartitionDemo2016] ([ID], [ActionGUID], [TS])
VALUES (3, N'fvkifvjfvjfhy', CAST(N'2016-07-18T00:00:00.000' AS DateTime))
GO
INSERT [dbo].[PartitionDemo2016] ([ID], [ActionGUID], [TS])
VALUES (4, N'mvfhufvhfgtdh', CAST(N'2016-10-30T00:00:00.000' AS DateTime))
GO
Once the data is successfully inserted, we will retrieve the PartitionDemo2016 tableís data to check the QuarterNum computed columnís value as follows:
USE MSSQLTipsDemo
GO
SELECT  [ID]
      ,[ActionGUID]
      ,[TS]
      ,[QuarterNum]
  FROM [MSSQLTipsDemo].[dbo].[PartitionDemo2016]

What should have occurred in the background is that the first record will be inserted into the first filegroup as it meets the first partition condition, and the second record will be inserted into the second filegroup as it meets the second partition condition and so on.
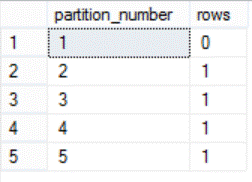
To make sure that occurred the right way, we will query the sys.partitions system table for the PartitionDemo2016 table to retrieve the number of records in each partition in the query below:
SELECT partition_number, rows
FROM sys.partitions
WHERE OBJECT_NAME(OBJECT_ID)='PartitionDemo2016';
GO
The result is as follows:

The result should not be a surprise as each record is inserted into its appropriate partition, and the first partition is empty based on how the partition function was created.
Now we will test the new addition to the TRINCATE TABLE statement. The below TRUNCATE statement is used to truncate the second and third partitions from the PartitionDemo2016 table, which will delete the data in these partitions:
TRUNCATE TABLE PartitionDemo2016
WITH (PARTITIONS (2 TO 3));
GO
Retrieving the PartitionDemo2016 tableís data again, the result will be like:

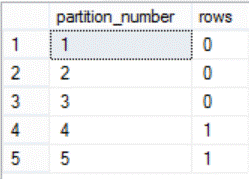
Again, letís query the sys.partitions table to check the number of records in each partition after applying the TRUNCATE TABLE statement:
SELECT partition_number, rows
FROM sys.partitions
WHERE OBJECT_NAME(OBJECT_ID)='PartitionDemo2016';
GO
As previously mentioned, the data from the second and third partitions are deleted using the TRUNCATE TABLE statement, keeping the data untouched in the fourth and fifth partitions as shown below:

As you can see from the previous demo, the DELETE statement is not the only choice to delete specific data from your table, you can get the benefits of the TRUNCATE TABLE statement which is faster and consumes less resources and now has the ability to delete a specific partition or set of partitions without deleting all the tableís data.
Next Steps
- To start using the new TRUNCATE TABLE statement option, make sure that all your table indexes are aligned with the source table. If there are non-aligned indexes in your table, drop or disable these indexes, truncate the partition(s) you want then rebuild the indexes again.
- Read more about Deleting Data in SQL Server with TRUNCATE vs. DELETE commands.
- Check out Minimum Permissions for SQL Server TRUNCATE TABLE.
- Check also SQL Server Partitioning Tips.
About the author
 Ahmad Yaseen is a SQL Server DBA with a bachelorís degree in computer engineering as well as .NET development experience.
This author pledges the content of this article is based on professional experience and not AI generated.
View all my tips


