By: John Miner | Comments | Related: > Azure
Problem
How can we deploy an Azure Data Warehouse in the same region as the Blob Storage?
The European Space Agency (ESA) recently published the preliminary findings from the GAIA satellite. The purpose of this satellite is to assemble a detailed 3D map of our Milky Way galaxy. Right now, we have a large number of data files staged in Azure Standard Blob Storage for consumption and our end goal is to load this dataset of stars into an Azure SQL Data Warehouse for analysis.
Solution
PowerShell has always been the language of choice to automate system deployment and configuration. It is not surprising that we have a series of cmdlets to help us deploy Azure SQL Data Warehouse using the resource manager model. Here is a reference to the cmdlets.
Overview of Azure SQL Data Warehouse
Before we create our own Azure SQL data warehouse (DW) service, I would like to go over the architectural design of the service at a high level.
Listed below are five key components shown in the diagram.
- Every Azure SQL DW has one CONTROL node. This node is powered by an Azure SQL database. It coordinates all of the data movement and computation required to run parallel queries on your distributed data. The intermediate results from the COMPUTE nodes are package up as a final query result by this node.
- Every Azure SQL DW has N COMPUTE nodes. Again, these nodes are powered by Azure SQL database. The number N is a whole number that divides evenly into 60. More on that magic number when we get to storage. In short, these nodes power the data warehouse by storing and retrieving data in parallel. We can scale up, scale down or pause the computing power of this service.
- Every TABLE is saved as 60 premium Windows Azure Storage Blobs (WASB). These blobs are distributed evenly between the number of COMPUTE nodes. This resilient scalable storage allows the warehouse to scale and store vast amounts of data.
- Eve COMPUTE node has a DATA MOVEMENT service (DMS). This service move data between the COMPUTE nodes. The resulting data is used by the local COMPUTE node for joins and aggregations. Every distributed query plan contains DMS operations.
- There are many different ways to load data into Azure SQL DW. However, PolyBase is the fastest since data is loaded directly via the COMPUTE nodes. Some technologies like Azure Data Factory have pipelines that leverage PolyBase. Other technologies send requests to the CONTROL node. The translation of the request into a parallel execution takes time. Take a peek at this article that compares loading techniques.
PowerShell Modules
The number of services available in Microsoft Azure is constantly changing. Before running any scripts that you are designing, it is best to download the most current cmdlets. The Install-Module cmdlet can be used to force an install of the up-to-date libraries. Please see the code below that performs this action for both the resource manager (new deployment model) and service manager (old deployment model).
# Resource Manager module (code #1)
(Find-Module *azurerm*).foreach({Install-Module -Name $PSItem.Name})

# Service Management Module (code #2)
Install-Module Azure -Force
Azure Subscription
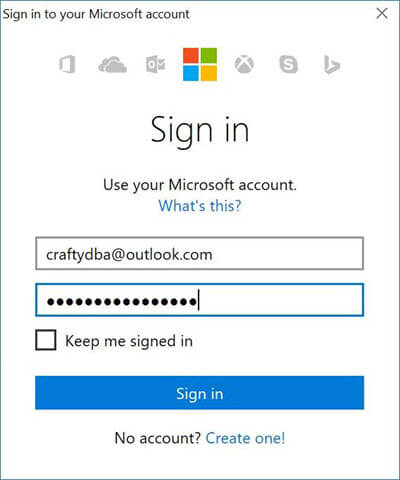
We must log in with a valid subscription owner before we can do any work. The Add-AzureRmAccount cmdlet will prompt you for credentials.
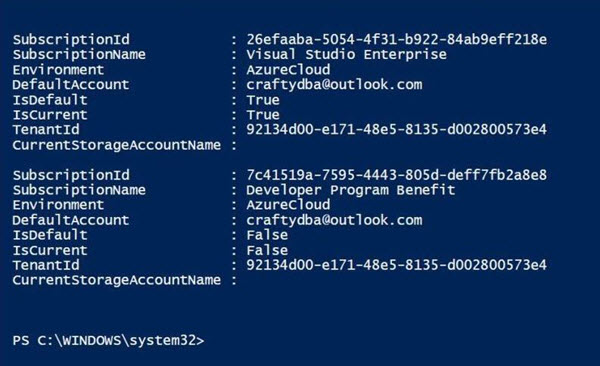
An account might have several subscriptions associated with it. Use the Get-AzureRmSubscription cmdlet to list the subscriptions associated with [email protected].
The output from this command shows two subscriptions. Since the Developer Program Benefit only has $25 associated with it, we want to make sure any new deployments are on the Visual Studio Enterprise subscription since it has a higher spending limit.
Last but not least, use the Set-AzureRmContext cmdlet to choose the correct subscription.
The PowerShell script below logs into the portal, lists the subscriptions and selects the correct subscription. Of course, manual intervention is needed for the sign in and coding the correct subscription id ahead of time.
#
# Azure Subscriptions
#

# Prompts you for azure credentials
Add-AzureRmAccount

# List my subscriptions
Get-AzureRmSubscription

# Pick my Developer one
$SubscriptionId = '26efaaba-5054-4f31-b922-84ab9eff218e'
Set-AzureRmContext -SubscriptionId $SubscriptionId
Choosing a data center
Most, if not all data centers support the Platform As A Service (PAAS) version of SQL Server known as Azure SQL Data Warehouse. Regardless of what service you want to deploy, you should always check the availability of the service at a particular location. Checking the Microsoft Azure web site for products by region is one way to do this.
Another way is to call the Get-AzureRmResourceProvider cmdlet which can be filtered to list all data centers for a particular service. The PowerShell script below lists data centers for Azure SQL database service. There is no specific identifier for the data warehouse service. Regardless, every region that has the database has the data warehouse.
#
# Data Centers with my service
#


# Get data centers with Azure SQL database
$AzureSQLLocations = (Get-AzureRmResourceProvider -ListAvailable | `
    Where-Object {$_.ProviderNamespace -eq 'Microsoft.SQL'}).Locations

# Show the results
$AzureSQLLocations
Output from PowerShell script listing data centers with Azure SQL database service.

Resource Group
The concept behind the Resource Manager model is that all Azure components that make up a solution are created or destroyed as a group. Thus, the key object that binds all the items together is a resource group.
When dealing with resource groups, there are three cmdlets you should know:
- New-AzureRmResourceGroup cmdlet - Creates a named group in a location that you select.
- Get-AzureRmResourceGroup cmdlet - Lists all resource groups defined for an account.
- Remove-AzureRmResourceGroup cmdlet - Removes a named resource group.
The PowerShell script below creates a resource group named rg4esa in the East US 2 location. Please note that this group is different from the rg4esadata group which contains our data files. Never the less, both resource groups are in the same region.
#
# Create a resource group
#

# New resource group
New-AzureRmResourceGroup -Name "rg4esa" -Location "East US 2"

# List resource groups
Get-AzureRmResourceGroup -Name "rg4esa"

# Delete resource group
# Remove-AzureRmResourceGroup -Name "rg4esa" -Force
The image below shows the newly created resource group.

SQL Server
A logical SQL Server needs to be created before any databases can be deployed. The administrator user name and password needs to be supplied as credentials. There are some limitations around this logical server. For instance, it can only have 5000 databases associated with it and a maximum of 45,000 Database Transaction Units (DTU).
Please see this article on Azure SQL database resource limits.
In contrast, Azure SQL Data Warehouse measures processing in Data Warehouse Transaction Units (DWU). For estimation purposes, it is roughly 7.5 DTU's per 1 DWU. Thus a DWU 100 uses 750 DTU's from the logical server total. Check out this Microsoft developer article for more details.
When dealing with SQL server, there are three cmdlets you should know:
- New-AzureRmSQLServer cmdlet - Creates a logical SQL Server in a location that you select.
- Get-AzureRmSQLServer cmdlet - Lists all logical SQL Servers defined for a resource group.
- Remove-AzureRmSQLServer cmdlet - Removes a named logical SQL Server.
The PowerShell script below creates a SQL Server named mssql4esa in the rg4esa resource group.
#
# Create a new server
#

# Create a credential
$User = "jminer"
$Pword = ConvertTo-SecureString –String 'ESA#gaia$2016' –AsPlainText -Force
$Credential = New-Object –TypeName System.Management.Automation.PSCredential `
  –ArgumentList $User, $Pword

# New sql server
New-AzureRmSqlServer -ResourceGroupName "rg4esa" -ServerName "mssql4esa" `
  -Location "East US 2" -ServerVersion "12.0" -SqlAdministratorCredentials $Credential

# List Sql Servers
Get-AzureRmSqlServer -ResourceGroupName "rg4esa"

# Remove the sql server
#Remove-AzureRmSqlServer -ResourceGroupName "rg4esa" -ServerName "mssql4esa"
Output for PowerShell script showing newly created SQL Server.

SQL Data Warehouse
This whole tip has been leading up to the point in which we create a Azure SQL Data Warehouse. Get ready to process some large data sets!
There are currently twelve different compute tiers. They range from DW 100 to DW 6000. Divide the DW number by 100 to figure out the distribution number. Remember, every table in the warehouse is broken into 60 files stored on Azure local premium blob storage (Premium_LRS). For instance, a DW 100 has 1 compute node and 60 files it can access. On the other hand, a DW 6000 has 60 compute nodes and 1 file it can access. This is how computation and files are distributed across the service to provide the massively parallel processing (MPP).
Please see this article for pricing details by compute power.
When dealing with SQL server, there are three cmdlets you probably already know. We have used them before for Azure SQL databases.
- New-AzureRmDatabase cmdlet - Creates a SQL data warehouse on a SQL Server you select.
- Get-AzureRmSQLDatabase cmdlet - Lists a SQL data warehouse on a SQL Server you select.
- Remove-AzureRmSQLDatabase cmdlet - Removes a named SQL data warehouse.
The PowerShell script below creates a SQL Server Data Warehouse named sqldw4esa on the mssql4esa logical server. Note the requested service object name and edition. These are the important parameters to set.
#
# Make the new database
#

# Create a new database
New-AzureRmSqlDatabase -RequestedServiceObjectiveName "DW100" -DatabaseName "sqldw4esa" `
-ServerName "mssql4esa" -ResourceGroupName "rg4esa" -Edition "DataWarehouse" `
-CollationName "SQL_Latin1_General_CP1_CI_AS" -MaxSizeBytes 10995116277760

# List the new database
Get-AzureRmSqlDatabase -ResourceGroupName "rg4esa" -ServerName "mssql4esa"


# Remove the database
# Remove-AzureRmSqlDatabase -ResourceGroupName "rg4esa" -ServerName "mssql4esa" `
#  -DatabaseName "sqldw4esa"
The image below is the output from the PowerShell script. Basically, the data warehouse is ready to be used.
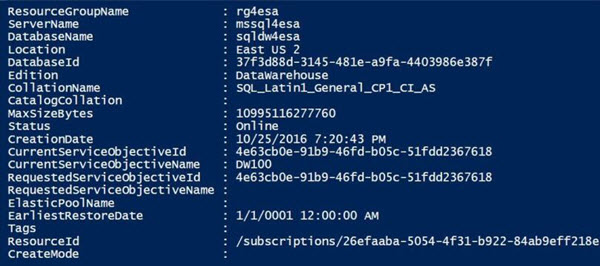
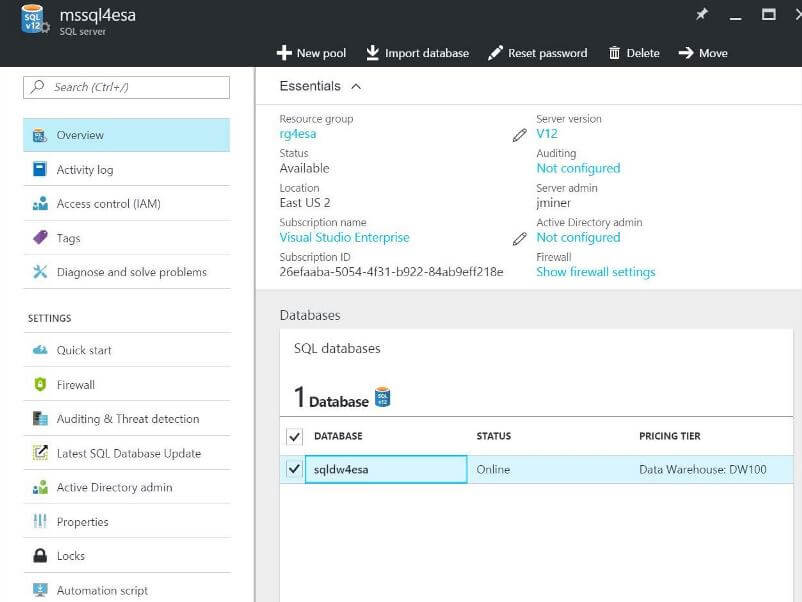
Do not forget about the Azure portal. Many of the actions that can be done in PowerShell can also be done within the portal. See our new data warehouse below.
SQL Server Management Studio
Microsoft has tried to make all the new Azure services available in the tools you use every day. Most Database Administrators work in SQL Server Management Studio (SSMS) on a daily basis. This tool will work fine with Azure SQL data warehouse. It is always important to download the latest version of the tool from the website. Unlike the on premises database engine, there seems to be a monthly release cadence of bug fixes and new features. See the change log for the product for details on what has changed.
Our first task is to log into the logical server named mssql4esa with our user name and password.
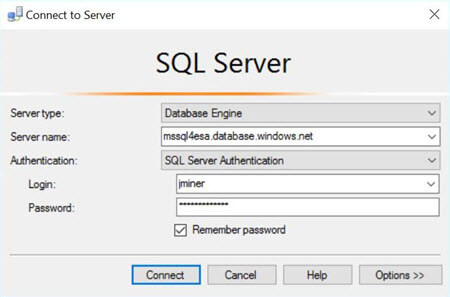
I purposely forget to add a firewall rule for my laptop. The SSMS tool is smart enough to recognize this fact. If I choose okay, it will prompt me to log in using the [email protected].
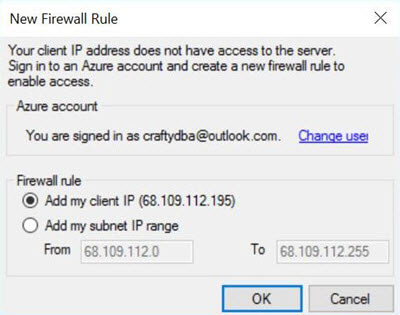
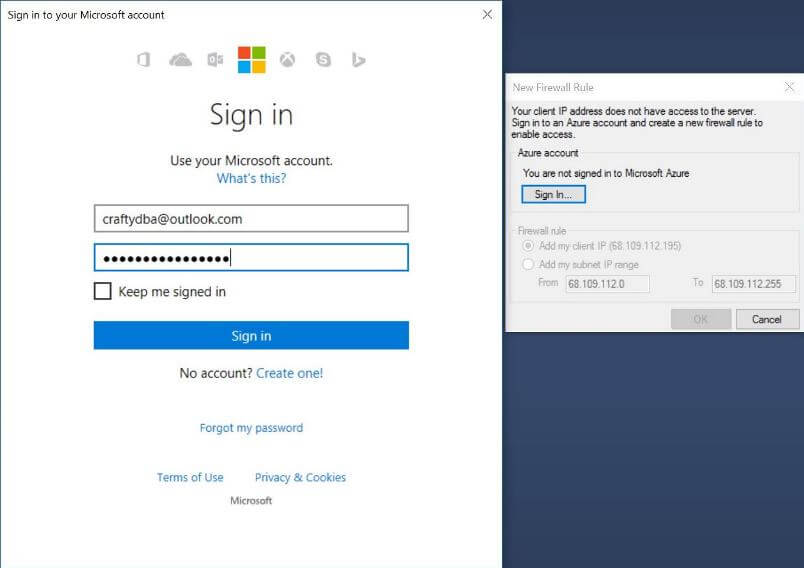
If I enter the correct credentials, it will add the firewall rule to Azure SQL Server and log me in.
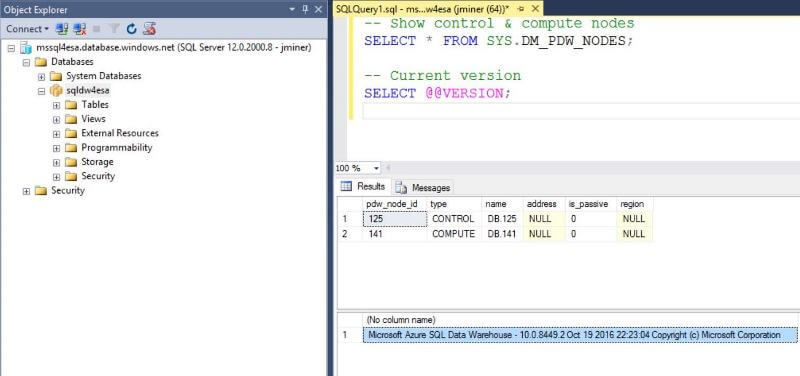
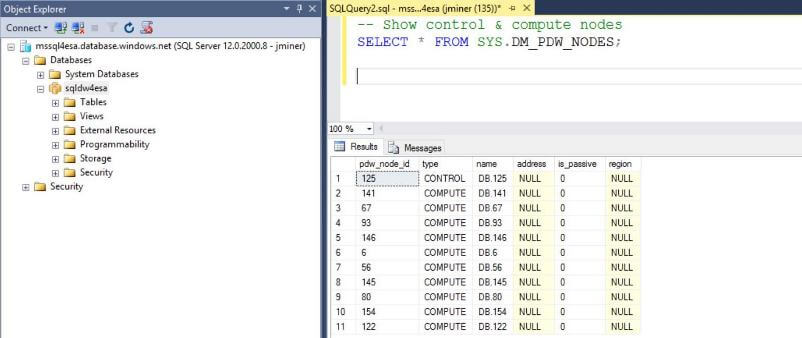
There are two T-SQL commands we can use to validate our environment. First, the @@VERSION configuration function can tell use the current release of the data warehouse engine. Second, the SYS.DM_PDW_NODES dynamic management view tells us the number of control and compute nodes in our MPP service.
Managing Resources
Unlike other vendors, Microsoft has separated the compute and storage components of the data warehouse. That means we can scale up or scale down on resources. Let's assume we have a big import that we want to execute. We might want to scale up the service to a DW 1000 level.
How can we change the service objective for the data warehouse?
More than likely, you are not logged into Azure via the PowerShell ISE. The Add-AzureRmAccount cmdlet can fix that problem. Next, call the Set-AzureRmSqlData cmdlet to change the service objective to DW 1000.
#
# Change the database size (DW1000)
#

# Log into Azure
Add-AzureRmAccount

# Give database size quota
Set-AzureRmSqlDatabase -ResourceGroupName "rg4esa" -ServerName "mssql4esa" `
  -DatabaseName "sqldw4esa" -Edition "DataWarehouse" -RequestedServiceObjectiveName "DW1000"
Again, we can call the SYS.DM_PDW_NODES dynamic management to check on the number of control and compute nodes in our MPP service. The service object DW 1000 means we have 1 control node and 10 compute nodes.
One major differentiator that Microsoft has over other competitors is the ability to pause the compute component of the service. What does this mean to the end users? Instead of paying every hour for processing power, you only pay when you process the data. The rest of the time, the data warehouse can be paused. Thus, the only charges that you accumulate every hour are the tables residing in Azure Blog Storage.
How can we pause the data warehouse service?
The PowerShell Script below uses the Get-AzureRmSqlDatabase cmdlet to obtain the database context. Next, this information is passed to the Suspend-AzureRmSqlDatabase cmdlet to pause the data warehouse.
#
# Pause the compute charges
#

$dbinfo = Get-AzureRmSqlDatabase –ResourceGroupName "rg4esa" `
  –ServerName "mssql4esa" –DatabaseName "sqldw4esa"
$result = $dbinfo | Suspend-AzureRmSqlDatabase
$result
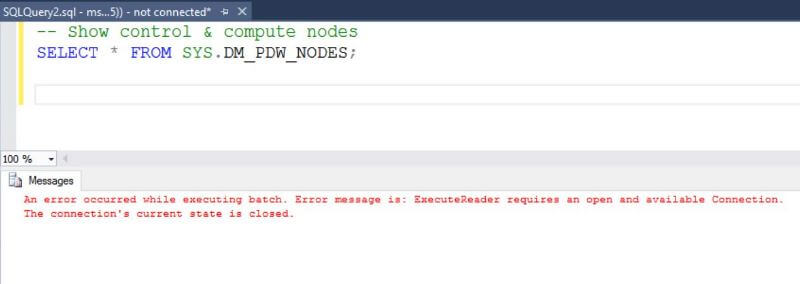
It is a best practice to check for active transactions before pausing and/or scaling the data warehouse service. Either wait for the session to complete or terminate the session and incur a rollback. The image below shows the error message that SSMS displays when trying to execute a query on a paused data warehouse.
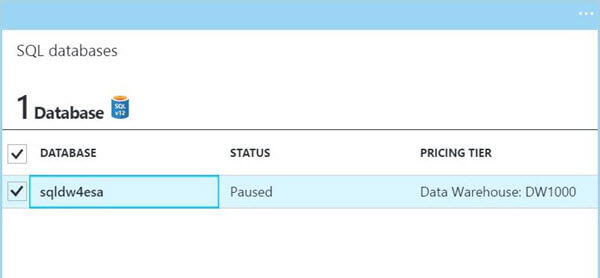
This same task can be executed in the Azure Portal. The image below shows our database being displayed as PAUSED.
If your user base has schedule work hours, you can save your company money by pausing the service at night and on weekends. I can envision that this task can be scheduled to automatically enforce that business requirement. Every paused database needs to be un-paused.
How can we resume work with the data warehouse service?
The PowerShell Script below uses the Get-AzureRmSqlDatabase cmdlet to obtain the database context. Next, this information is passed to the Resume-AzureRmSqlDatabase cmdlet to un-pause the data warehouse.
#
# Resume the compute charges
#

$dbinfo = Get-AzureRmSqlDatabase –ResourceGroupName "rg4esa" `
  –ServerName "mssql4esa" –DatabaseName "sqldw4esa"
$result = $dbinfo | Resume-AzureRmSqlDatabase
$result
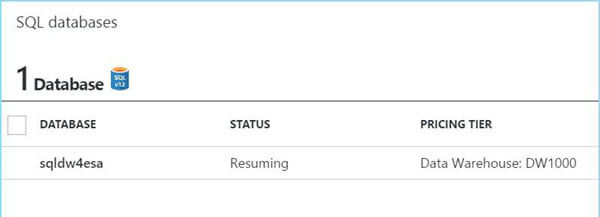
Again, we can verify the state of the data warehouse. The image below shows our database state as RESUMING. Wait for the status to become ONLINE before using the service.
Summary
We are one step closer to the end goal of loading the GAIA satellite dataset into Azure SQL Data Warehouse, which is a massively parallel processing (MPP) database engine in the cloud. Last time, we loaded a large number of compressed data files into Azure Standard Blob Storage. Today, we talked about the overall architecture of the Azure SQL Data Warehouse service. PowerShell was used to create our own service named sqldw4esa. A major cost consideration of the service is the separation of computing power and storage layer. To drive home the point, we used PowerShell to scale up, to scale down, to pause and to resume the computational power of the data warehouse service. I look forward to using Azure SQL data warehouse to solve BIG DATA problems.
If you want to learn more, check out Azure Documentation on this subject. Next time, we will work our third mini project. Leveraging PolyBase and Transact-SQL to load the compressed file data into tables and perform some basic analysis.
Next Steps
- We need to load the raw data from Azure Blob storage into tables in the Azure SQL Data Warehouse. How can we leverage PolyBase and Transact-SQL to load the data into tables and perform some basic analysis?
- There are many different ways to tune a database engine. How can we make the analysis of the data perform faster?
- There are many different ways to craft a solution to a problem. Are there any other faster Azure Cloud solutions to our problem?
- Check out these other Azure tips.
About the author
 John Miner is a Data Architect at Insight Digital Innovation helping corporations solve their business needs with various data platform solutions.
This author pledges the content of this article is based on professional experience and not AI generated.
View all my tips


