Problem
If you are hosting your database server in an on-premises or in-cloud virtual machine, you are responsible for operating system patches, database patches, periodic backups, disaster recovery, high availability, resource scaling and application code optimization. Microsoft’s Azure SQL Database, platform as a service (PAAS), offering allows companies to focus on the application optimization instead of the maintenance of the database platform. This service will save your staff time in the long run which equates to money. However, you are still responsible for restoring a database when things go wrong. Understanding the types of restores available in this service is key to your job.
Is there way to restore an Azure SQL database in a automated fashion?
Solution
PowerShell has always been the language of choice to automate system deployment and configuration. It is not surprising that we have a cmdlet to help us restore Azure SQL databases using the resource manager model. In this tip, we will cover restoring a database to a point in time, restoring a deleted database from an existing server and restoring a database from a geo-replicated backup.
Business Problem
Our boss has asked us to get a better understanding of how to restore an Azure SQL database using PowerShell.
First, we need to deploy a logical Azure SQL Server and a logical Azure SQL database to a given region. We are going to use the Azure Portal to perform this task.
Second, we need to create an instance of the MATH user defined database. The purpose of this database is to calculate prime numbers using a brute force algorithm. Part of the solution is a snippet of T-SQL code that can be executed in a job to find prime numbers in batches of any given size. For more information, see my prior article for details about the user defined database and job.
Third, we need to schedule the “find prime numbers in batches” job. Since Azure SQL database does not have a built in scheduler like SQL Server Agent, I am going to show you how to use Windows Task Scheduler to run the T-SQL code on a periodic interval. The Windows Task Scheduler job can either be executed from an on-premises or in-cloud virtual machine. This will give the data platform service log entries to backup up since the database is growing.
Last but not least, we need to execute test restores using PowerShell. The resulting scripts can be customized for your environment and saved in a convenient place for when you need them.
Azure Portal
This tip assumes you have an active Azure Subscription with money to spend. Our first task is to create an Azure SQL Server and Azure SQL Database using the Visual Studio Enterprise subscription that comes with MSDN. Each step listed below is part of the total solution.
The Azure Portal can be used to deploy these required objects. Just choose the new menu option which shows up as a plus sign when the menu is in minimized form. The market place will now be shown as the current blade (form). There is a broad offering of services that can be deployed in Azure. More services are being added monthly and these services are group into categories. Choose the databases category to continue on.
The first three choices are all Platform As A Service (PAAS) offerings. Select the Azure SQL database choice and click create.

I want to change the order of the blades (forms) that are presented to the user when talking about a new deployment. Logically, a server needs to exist before a database can be created. But in reality, both requests can be done as one transaction as long as the order is maintained. On the other hand, adding a database to an existing server does not require the blade (form) below.
There are several fill in the blank questions that need to be answered before the server can be created. The name of the server is mssqltips17, the server administrator is jminer, the default subscription is Visual Studio Enterprise, and the new resource group is named rg4tips17. The East US 2 region was chosen as the deployment location since I live in New England. Click the create button to deploy the server. The image below shows the choices that I made.

Now that we have a logical server, we need to deploy a blank database. Again, there are some fill in the blank questions that need to be completed. The blank (empty) MATH database is going to be associated with the mssqltips17 server and rg4tips17 resource group. The rest of the defaults are fine since we want a stand-alone database with a S1 standard service tier agreement. Make sure to check off the pin to dashboard check box before clicking create.

After waiting some time, we should see both the Azure SQL Server in an available state and Azure SQL database in an online state. The image below shows what your dashboard should look like with these two tiles.

Security is very important to Microsoft and its clients. Therefore, the new server is already hardened with a firewall. In the next section, we will be using the SQL Server Management Studio from a remote client laptop to create a schema in the blank database. Therefore, firewall rules have to be put in place for the remote client to have access. I have addressed this task in past tips. For more detailed information from Microsoft, please read this MSDN article.
User Defined Database
I will be using the SQL Server Management Studio to work with the newly created Azure database. New releases of the client tool come out on a monthly basis. Check the documentation and release site located here for updates that may affect you. The image below shows me logging into the Azure SQL Server using the administrator account.

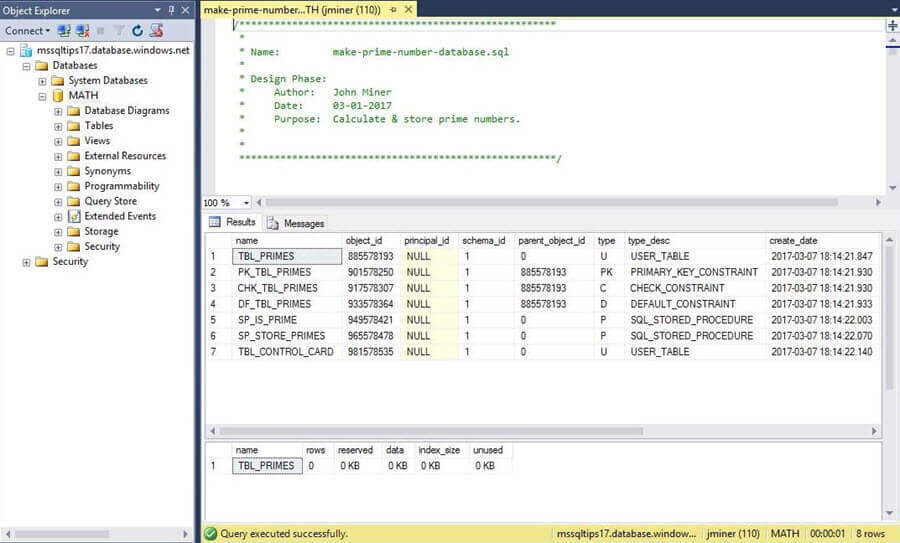
The MATH database stores the prime numbers from 2 to N where the value of N is constantly increasing each time the windows task scheduler job is executed. The TBL_CONTROL_CARD table contains the last number in a batch that was checked for being prime. The SP_IS_PRIME stored procedure uses a brute force division algorithm to determine if a number is prime. Any positive results are stored in the TBL_PRIMES table as a prime number. To round out the solution, the SP_STORE_PRIMES stored procedure checks a range of numbers from X to Y for primness.
The image below shows the objects that make up the MATH database. Use the following T-SQL script to create your own version of this schema for your Azure SQL database.
The Transact-SQL code should be executed on a scheduled basis.
Here is an overview of the code below. Retrieve last number that was checked for being prime and save as the low value variable. The high value variable is calculated by adding ten thousand to that number. This is the arbitrary batch size that can be changed. A transaction is started to logically group the next two actions. The first action is to find all prime numbers within a given range by calling our stored procedure with the low and high value variables. The second action is to update the control card table with the high value variable. If an error occurs with either action, roll back the entire transaction.
--
-- Job step to calculate primes in 10K batches
--
-- Calculate prime numbers
DECLARE @THE_LOW_VALUE [BIGINT];
DECLARE @THE_HIGH_VALUE [BIGINT];
-- Low & High water marks
SELECT @THE_LOW_VALUE = [MY_VALUE] FROM [DBO].[TBL_CONTROL_CARD];
SELECT @THE_HIGH_VALUE = @THE_LOW_VALUE + 10000 - 1;
-- Start error handling
BEGIN TRY
-- Start transaction
BEGIN TRANSACTION
    -- Search for prime numbers
    EXEC SP_STORE_PRIMES @THE_LOW_VALUE, @THE_HIGH_VALUE;

    -- Update batch control card
    UPDATE [DBO].[TBL_CONTROL_CARD]
    SET [MY_VALUE] = @THE_LOW_VALUE + 10000;
-- End transaction
COMMIT TRANSACTION;
-- End error handling
END TRY
-- Start Catch
BEGIN CATCH
    -- Rollback transaction
    ROLLBACK TRANSACTION;
 -- Unexpected error
    THROW 51000, 'Unexpected error in find-next-prime-numbers TSQL script.', 1;

-- End Catch
END CATCH
To recap this section, we now have an Azure database named math that is populated with seven different SQL objects. In the next section, we need to configure a Windows 10 machine to execute our Transact SQL code (job) on a regular schedule.
Windows Task Scheduler
Windows Task Scheduler allows a developer to perform a task at a specific time. Tasks can run once at a given time. For instance, execute the PowerShell code to email the daily sales report. Tasks can also start at a given time and repeat at a given interval. For example, start executing the find next prime numbers batch file at midnight and repeat this task every 5 minutes. Inside the batch file we can call the sqlcmd utility to submit the T-SQL script for processing. Windows Task Scheduler exists on both client operating systems such as Windows 10 and server operating systems such as Windows 2016.
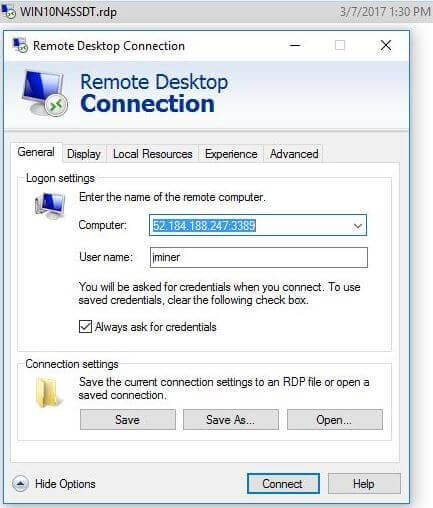
There are many ways to schedule a T-SQL task for an Azure SQL database. Today, we are going to use an Azure Virtual Machine running Windows 10. The image below shows that the name of our server is WIN10N4SSDT. This is a standard image from the market place gallery. After the initial deployment, I installed SQL Server Data Tools and SQL Server Management tools on this client. I am using the remote desktop protocol to log into and work with the virtual machine. Again, it is important to note the IP address of this client since the firewall for the Azure SQL Server needs to be updated.
The easiest way to launch the utility is to type “task scheduler” in the windows Cortana box. Another way to execute the utility is to browse to the administrative tools folder under the start menu. It is one of the icons in the set of tools. We want to group all the jobs for our Azure SQL Database underneath an aptly named folder. Choose the action menu and select the new folder item. Supply the name that you want to call the folder. Please see the image below for my results.

Make sure you are pointing to the Azure SQL Database folder in the Task Scheduler Library before continuing. Choose the action menu and select the create task item. Please choose a descriptive name for your task. I want to run this task (job) regardless of whether or not I am logged into the machine. Therefore, I chose to run the task under the LOCAL SERVICE account. Also, I am running the job under the highest privileges since I did not want to have any permissions issues during my test. I suggest you remove this check box before releasing the code to production.
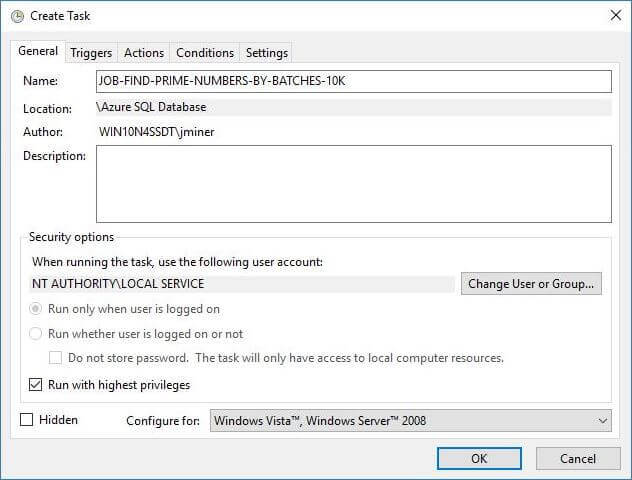
There are five sections of the tab folder shown in the picture above. The action section describes what to do when a trigger or condition are met. Conditions refer to either the computer, power or network status. For instance, run the file defragment job if the computer has been idle for ten minutes. Triggers refer to a time frame being met. Run the email sales report status job every Friday at 5 pm.
Let’s work on getting the action section completed. The table below shows the correct information to fill in the form.
| Section | Value |
|---|---|
| Script | C:\Windows\System32\cmd.exe |
| Arguments | /c start “” “C:\Math\find-next-prime-numbers.bat” |
| Start In | c:\math |
In short, we want to call the find-next-prime-numbers.bat batch file from the directory in which it stored in.

The batch file below calls the sqlcmd utility. The server name, user name, password secret and database name are passed as simple arguments. The T-SQL script file is passed as an input and any output is directed to a report file named find-next-prime-numbers.rpt.
REM *
REM * Execute T-SQL script
REM *
"C:\Program Files (x86)\Microsoft SQL Server\Client SDK\ODBC\130\Tools\Binn\sqlcmd.exe" ^
-S mssqltips17.database.windows.net -U jminer -P MS#tips$2017 -d MATH ^
-i .\find-next-prime-numbers.sql -o .\find-next-prime-numbers.rpt
REM *
REM * Return exit code
REM *
EXIT %ERRORLEVEL%
The next section to complete is the trigger section. We want to run the task daily and repeat the task every 5 minutes for the duration of the day. This statement is where most people get confused. If we choose a start time of midnight, 12:00:00 am, a task thread will start executing at that time. Upon completion, the thread waits for the next 5 minute mark before starting again.
This is where it becomes interesting. If you reboot the system, a new thread will not be launched since it is past midnight. Therefore, we would have to wait until end of day. Manually kicking off or enabling the job does not restart this thread that runs on a five minute interval. The best way to fix this issue is to advance the start time to current time plus a few minutes. A new thread will be launched (triggered) in a few minutes that runs for the rest of the day. Afterwards, do not forget to reset the start time.

The last part of the task is to confirm your selections before clicking okay.

Most choices in life have both pros and cons. Choosing to use Windows Task Scheduler is no different.
The positive aspect of this solution is the ability to schedule jobs without paying for SQL Server Agent running in a infrastructure as a service (IAAS) environment. As we know, there is a big difference in cost. Another positive trait is the use of the sqlcmd utility. We do not have to know another language to get this to work. The negative aspect of this solution is the lack of error notifications via email. It is very simple to add in operator to an SQL Agent Job and notify upon completion, failure or success.
Task Validation
Windows Task Scheduler writes all execution entries to the Windows Event Logs. This log can be found under the following path: Application & Services Logs, Microsoft, Windows, and Task Scheduler. It is just a lot easier to view the logs from the Windows Task Scheduler utility. Look under the history tab for details. In our task, we only have one action which corresponds to an event id 200, action start and to an event id 201, action complete.

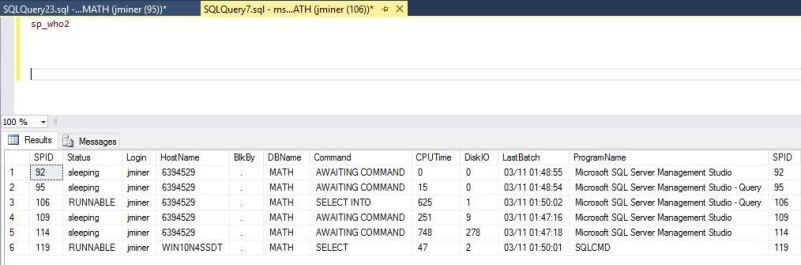
To validate the task, we are going to use SQL Server Management Studio. Use the task scheduler library view and find our job in the tree. Jot down the next run time from the window. This information is located after the triggers column in the right topmost section of the window. We should have zero to five minutes to wait. We are going to use the sp_who command to identify the host computer name and application program name that is communicating with our database server.
The first execution of our job should find and store prime numbers from one to ten thousand. We can take a look at the last ten records saved by executing the following code. It seems like our task scheduler job is running correctly.

Backups for Azure SQL database
It is very important to understand how backups are taken by the data platform service. With this knowledge, we can pick the correct restore strategy.
Backups for business continuity planning (BCP) are taken automatically. A full backup is taken on a weekly basis with a differential backup is taken on a hourly-basis. To round out the backup chain, a transaction log backup is taken every 5 minutes. Please see Azure documentation on BCP for full details by service tier. For a simple outage, we will lose at most 5 minutes of data. However, all these backups are stored on Local Redundant Storage (LRS) in the current data center (location).
Both the full and differential backups are additionally stored on Geo Redundant Storage (GRS) in a paired region (data center location). In case of a disaster at our primary data center, we will lose at most 1 hour of data. The retention period Standard and Premium tier databases is 35 days. This retention period is cut down to 7 days for the Basic tier database.
Two additional features can be configured by the administrator to limit the amount of data loss and increase the retention period of weekly backups. If we enable Active Geo-Replication, we reduce the possible amount of data loss to five seconds. This is due to the fact that one or more replicas are always in sync with the primary database. I have already covered this topic in a previous article. If we enable long term backup retention using a recovery services vault, the weekly backups can be retained for a maximum of ten years.
There are a couple important things to note. Azure databases and backups are associated with a logical Azure SQL Server. If you delete an Azure SQL Server, you delete all objects associated with it. If you delete an Azure SQL database, the state of the database at time of deletion is saved as a backup in which you can restore from. All intermediate backup files are removed.
Azure Subscription
We must log in with a valid subscription owner before we can do any work. The Add-AzureRmAccount cmdlet will prompt you for credentials.

An account might have several subscriptions associated with it. Use the Get-AzureRmSubscription cmdlet to list the subscriptions associated with craftydba@outlook.com. The output from this command shows two subscriptions. Since the Developer Program Benefit only has $25 associated with it, we want to make sure any new deployments are on the Visual Studio Enterprise subscription since it has a higher spending limit. Last but not least, use the Set-AzureRmContext cmdlet to choose the correct subscription.

The PowerShell script below logs into the portal, lists the subscriptions and selects the correct subscription. Of course, manual intervention is needed for the sign on and coding the correct subscription id ahead of time.
#
# Azure Subscriptions
#
# Prompts you for azure credentials
Add-AzureRmAccount
# List my subscriptions
Get-AzureRmSubscription
# Pick my Developer one
$SubscriptionId = '26efaaba-5054-4f31-b922-84ab9eff218e'
Set-AzureRmContext -SubscriptionId $SubscriptionId
Restore To Point In Time
The most common type of restore is a point in time. Sometimes a new process is implemented which has an unexpected side effect. The business line will notice the issue and you know what time the automated job ran. Restoring the database to a point in time before the unexpected event allows for data retrieval. Many times this event goes undetected for hours or days. In that case, there might be some type of data stitching that needs to take place if you need information from both the current database and point in time database.
The first piece of information we need is “What is the earliest point in which we can restore?”. The Get-AzureRmSqlDatabaseRestorePoints cmdlet returns this information to us. Please see the PowerShell script below for a sample call. The following three arguments are common among the PowerShell cmdlets used for restoring databases: name of resource group, name of server and name of database.
#
# Earliest restore point
#
Get-AzureRmSqlDatabaseRestorePoints -ResourceGroupName "rg4tips17" `
    -ServerName "mssqltips17" -DatabaseName "MATH"
Please see the image below for information about our MATH database.

After some investigation, I know that my database contained the first ten thousand primes at 1:50 am. That is my restore point for this database. The Get-AzureRmSqlDatabase cmdlet returns a PowerShell object that has key information about our database. We can use the Get-Date cmdlet to convert our date and time string to a required object. The most important cmdlet for this task is the Restore-AzureRmSqlDatabase cmdlet. Please note that I am using the Resource Manager version of these Azure PowerShell cmdlets. All new development should be using this deployment model. The -FromPointInTimeBackup parameter is very important since this same cmdlet is used for all three restore types.
The PowerShell script below restores the MATH database from 1:50 am on 11 Mar 2017 to a database named MATH-AT-10K.
#
# Point in time restore database
#
# Get database info
$Database = Get-AzureRmSqlDatabase -ResourceGroupName "rg4tips17" `
    -ServerName "mssqltips17" -DatabaseName "MATH"

# UTC date & time
$RestorePoint = Get-Date "3/11/2017 1:50:00 AM"
# Restore to point in time
Restore-AzureRmSqlDatabase -FromPointInTimeBackup `
    -PointInTime $RestorePoint -ResourceGroupName $Database.ResourceGroupName `
    -ServerName $Database.ServerName -TargetDatabaseName "MATH-AT-10K" `
    -ResourceId $Database.ResourceID -Edition "Standard" -ServiceObjectiveName "S1"
The image below shows the output from the script in the PowerShell Integrated Scripting Environment (ISE) output window.

After restoring the database, we want to look at the contents of the prime numbers and control card tables. This action will validate the restored database. The image below depicts the correct database state after restoring. We validated this state by running two SELECT statements.

Restore From Geo-Backup
It is rare but possible to have the Azure SQL database service be down for a particular location. Microsoft guarantees a service level agreement (SLA) of 99.99% up-time. What does that truly mean? There are at most 31 days in a month and 24 hours in day. That means a given month has 744 hours of computing time. Thus, the service can be down 7.44 hours a month without breaking this agreement. If the agreement is broken, Microsoft will refund part of the monthly service charge as a credit.
The last hourly backup chain is waiting to be restored from the paired region (data center location). When writing this article, I already had a existing MATH database that contained the prime numbers between 1 and 5.5 million. I deleted this database, not server, before recreating the schema from scratch and building the task scheduler job. Since one hour has not officially elapsed, I am going to restore that database right now. The Get-AzureRmSqlDatabaseGeoBackup cmdlet returns a PowerShell object that has key information about our geo-backup.
Again, we are going to use the Restore-AzureRmSqlDatabase cmdlet in our final script. Please note that I am using the Resource Manager version of these Azure PowerShell cmdlets. All new development should be using this deployment model. The -FromGeoBackup parameter is very important since this same cmdlet is used for all three restore types.
The PowerShell script below restores the MATH database from a geo backup taken at 12:56 am on 11 Mar 2017 to a database named GEO-MATH.
#
# Restore database from geo backup
#
# Get the information
$GeoBackup = Get-AzureRmSqlDatabaseGeoBackup -ResourceGroupName "rg4tips17" `
    -ServerName "mssqltips17" -DatabaseName "MATH"
# Restore from geo backup
Restore-AzureRmSqlDatabase -FromGeoBackup -ResourceGroupName "rg4tips17" `
    -ServerName "mssqltips17" -TargetDatabaseName "GEO-MATH" `
    -ResourceId $GeoBackup.ResourceID -Edition "Standard" -ServiceObjectiveName "S1"
The image below shows the output from the script in the PowerShell Integrated Scripting Environment (ISE) output window.

After restoring the database, we want to look at the contents of the prime numbers and control card tables. This action will validate the restored database. The image below depicts the correct database state after restoring. We validated this state by running two SELECT statements.

Restore Deleted Database
The last restore type is not advertised too much. A database administrator can restore a deleted database if it is still within the retention period of the database tier. In the script below, the Remove-AzureRmSqlDatabase cmdlet is called to remove the current database. We are going to restore this database within a couple minutes with a new name. Please note the database at this time contains prime numbers from one to eighty thousand.
One important thing to note, the task scheduler job will start failing since the database no longer exists. I suggest you disable this job before removing the database.
A vital piece of information that we need is “What are the deleted backups that we can restore?”. The Get-AzureRmSqlDeletedDatabaseBackup cmdlet returns a PowerShell object that has this information for a given server. Optionally, this information can be narrowed down by database.
The PowerShell script below restores the MATH database from the deleted database backups to a database named POINT-MATH. In short, this is the point in which the MATH database was deleted.
#
# Restore deleted database
#
# Remove the sql server
Remove-AzureRmSqlDatabase -ResourceGroupName "rg4tips17" `
    -ServerName "mssqltips17" -DatabaseName "MATH"
# Get deleted database info
$DeletedDatabase = Get-AzureRmSqlDeletedDatabaseBackup -ResourceGroupName "rg4tips17" `
    -ServerName "mssqltips17" -DatabaseName "MATH"
# Show all deleted databases
$DeletedDatabase | Select-Object ServerName, DatabaseName, Edition, `
    ServiceLevelObjective, CreationDate, DeletionDate
# Show recent deleted database
$DeletedDatabase = $DeletedDatabase | Select-Object -first 1
$DeletedDatabase
# Restore deleted database
Restore-AzureRmSqlDatabase -FromDeletedDatabaseBackup `
    -DeletionDate $DeletedDatabase.DeletionDate `
    -ResourceGroupName $DeletedDatabase.ResourceGroupName `
    -ServerName $DeletedDatabase.ServerName -TargetDatabaseName "POINT-MATH" `
    -ResourceId $DeletedDatabase.ResourceID -Edition "Standard" -ServiceObjectiveName "S1"
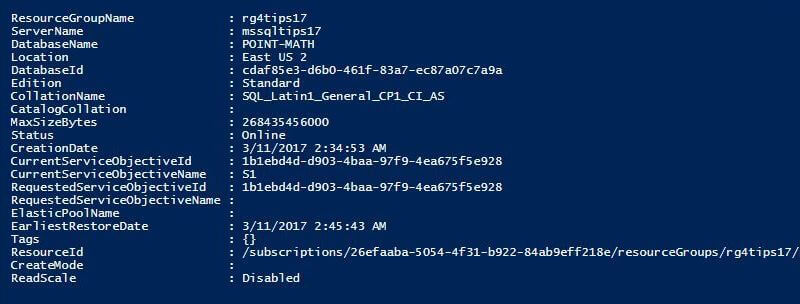
The image below shows the output from the script in the PowerShell Integrated Scripting Environment (ISE) output window. We can see that the mssqltips17 server has three databases that were deleted. The Select-Object cmdlet can be called to retrieve the most recently deleted database.

Once again, we are going to use the Restore-AzureRmSqlDatabase cmdlet in our final script. Please note that I am using the Resource Manager version of these Azure PowerShell cmdlets. All new development should be using this deployment model. The -FromDeletedDatabaseBackup parameter is very important since this same cmdlet is used for all three restore types.
After restoring the database, we want to look at the contents of the prime numbers and control card tables. This action will validate the restored database. The image below depicts the correct database state after restoring. We validated this state by running two SELECT statements.

I am going to talk about long term backup retention using a recovery services in my next article. Therefore, it is important to have a database named MATH. The script below uses the New-AzureRmSqlDatabaseCopy cmdlet to create a copy of the POINT-MATH database. Additionally, you might want to remove the other three databases to save money. This can be done either using SSMS or PowerShell. It is up to you to decide.
#
# Copy point in time to original name
#
# Copy restored database to orginal
New-AzureRmSqlDatabaseCopy -ResourceGroupName "rg4tips17" -ServerName "mssqltips17"  `
    -DatabaseName "POINT-MATH" -CopyDatabaseName "MATH"
The image below shows the output from the script in the PowerShell Integrated Scripting Environment (ISE) output window. To keep the database growing with prime numbers, please enable the task scheduler job. For details, please see the above section under task scheduler.

Summary
Microsoft’s Azure SQL Database, platform as a service (PAAS), offering allows companies to focus on the application optimization instead of the maintenance of the database platform. This service will save your staff time in the long run which equates to money. However, you are still responsible for restoring a database when things go wrong. Understanding the types of restores available in this service is key to your job
This managed service does not have a built in job scheduler. However, there are many ways to schedule a TSQL task for an Azure SQL database. Today, we used Windows task scheduler to execute a batch file at a predefined time and repeat interval. The batch file called the sqlcmd utility to execute the TSQL script. On positive feature of this solution is it does not require any programming skills. However, this solution lacked email alerting when the job completes, fails or succeeds. This short coming can be fixed by using PowerShell which is a programming (scripting) language. To recap, there was a definite cost savings between deploying an Azure Virtual Machine running SQL Server standard and deploying a Windows machine of the same size. Use the Azure pricing calculator to figure out real savings in dollars.
The three main restore strategies where talked about in today’s article.
A restore to point in time task is available with a sliding retention window. The basic database tier retains 7 days of backups and the other database tiers have 35 days of backups. Thus, you can restore to any 5 minute interval during those retention periods. The restore service is dealing with locally redundant storage (LRS) to find the backup files. One great use of this restore is to recovery from an unexpected user action.
A restore from geo-backup task uses the backup saved to a paired region that occurred within the last hour. The restore service is dealing with geo-redundant storage (GRS) to find the backup file. This backup can be used to bring a copy of the database on line if the primary region (data center) is having an outage. I would only suggest this for tier 3 applications if the Estimated Recovery Time (ERT) is up to 12 hours and the Recovery Point Objective (RPO) is up to 1 hour.
A restore deleted database task can be performed if the delete action occurred within the retention period. Even database administrators can make mistakes. This restore is great for recovering an accidental deletion.
In summary, the backup and recovery services provided by Azure SQL database satisfy the needs of most companies. Yet, there are some use cases in which a custom backup plan might be warranted. Many financial institutions require that an end of month or end of quarter backup be taken. With the service, you are guaranteed weekly backups. But you have no control over when they occur. Creating a database copy from a Azure Automation job will satisfy this requirement. Please see my tip on database copies. Other companies might want the backup in a format that can be used for SQL Server located either in-cloud or on-premises. Again, exporting a point in time copy of the database to Azure blob storage will satisfy this requirement. Please see my tip on the export database cmdlet.
Next Steps
- How can we extend the retention period of full backups for Azure SQL Databases? Use recovery services to store weekly backups for up to ten years.

John Miner is a Senior Data Architect at Insight Digital Innovation helping corporations solve their business needs with various data platform solutions.
He has over thirty years of data processing experience, and his architecture expertise encompasses all phases of the software project life cycle, including design, development, implementation, and maintenance of systems.
His credentials include undergraduate and graduate degrees in Computer Science from the University of Rhode Island. Also, he has earned certificates from Microsoft for Database Administration (MCDBA), System Administration (MCSA), Data Management & Analytics (MCSE), Data Science (MPP), Databricks Certified, and Fabric Certified.
John has been recognized with the Microsoft MVP award nine times for his outstanding contributions to the Data Platform community.
When he is not busy talking to local user groups or writing blog entries on new technology, he spends time with his wife and daughter enjoying outdoor activities. Some of John’s hobbies include wood working projects, crafting a good beer and playing a game of chess.
- MSSQLTips Awards: Author of the Year – 2019, 2022, 2023 | Champion (100+tips) – 2023