Problem
I see that I need to restore an Azure SQL VM to a point in time. I had already backed up the Azure VM using the Recovery Services vault. What are the steps I need to perform to accomplish this task?
Solution
This tip assumes that you already have resources in your Azure environment and you are familiar with using the Azure portal. If you are new to Azure, you can subscribe to a trial account here, which will give you access to Azure services for a year and a credit of USD $200. You can refer this link which provides a detailed step by step instructions for creating a Windows based Azure VM. The steps are straight forward and you can get a SQL Server Azure VM running in a few minutes. You can refer to this link where you can see detailed step by step instructions to set up a Recovery Services Vault and backup SQL databases on SQL Server. In this link you can see detailed step by step instructions to restore a SQL database that was backed up using the Recovery Services Vault.
Backup an Azure SQL VM using Recovery Services Vault
This tip assumes you already have an existing Azure SQL VM running and it is backed up using Recovery Services Vault as described in the referral links mentioned above. Just make sure that you select this option to back up the entire VM.

After selecting this option, go through the sequence of steps as described in the earlier link to enable backup for the virtual machine. This will ensure that your Azure VM is backed up and you will be able to continue with this demo. When you click on the ‘Backup Items’ option on the Recovery Services Vault, you will be able to view details of the Azure virtual machine as shown.
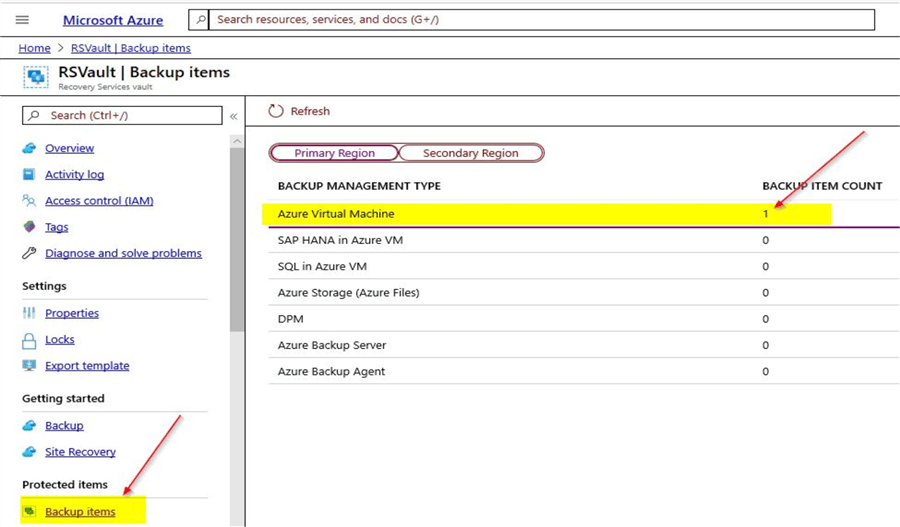
You can click on the ‘Azure Virtual Machine’ option to check if the VM is backed up. Here, you can see confirmation of the backup status. In your case, if the backup is not done yet, you may trigger a manual backup by clicking on the ellipsis on the right-hand corner.

From the screenshot, you can see the backup for the Azure VM is completed and details of the latest restore point is available.
Databases on the Azure SQL VM before performing backup
For the purpose of this demo, I had taken a screenshot of the databases on the Azure SQL VM before the backup was performed using the Recovery Services Vault.

You can see couple of databases – A and B. After the backup was performed, I created two more databases as shown. These new databases will not be part of the backup available on the Recovery Services Vault.

Steps to restore the Azure SQL VM
In order to restore the Azure SQL VM, go to the ‘Backup items’ option on the Recovery Services Vault and click on ‘Azure Virtual Machine’. Once you click on the ‘Azure Virtual Machine’ option, you will view details of the backup items.

As you can see, on the left-hand corner is the name of the Azure Virtual machine. Just click on it, and you will see details of the backup that is available.

You can also see that the snapshot available is application consistent. As you can see there are three types of snapshot consistency- crash consistent, application consistent and file-system consistent. As the name suggests, with an application consistent snapshot, the VM can be recovered with no data loss and in an entirely consistent state.
Restore the Azure VM
You can click on the option ‘Restore VM’ which will take you to this screenshot. Here, you can select the restore point.

When you click on the ‘All restore points’ option, you will be able to view the different types of snapshot consistent restore points that are available. In our case, as this is just a demo, you see the application consistent snapshot restore point which is available. Select the snapshot restore point and click on ‘Ok’. Once done, you will see this screen.

Here, you can see the option to create a new VM using the snapshot or to replace the existing VM. In this tip, we will try the option to replace existing VM. On clicking on the ‘Replace existing’ option, you will see this screen.

Here, you can see that the disks from the selected restore point will get replaced in your existing VM. Select the ‘Restore Type’ and the ‘Staging Location’ which is a temporary location used during the restore process. Click on ‘OK’. You may see this validation error.

From the validation error, you see that the VM needs to be shut down for the replace disk operation to occur.
Try replacing disks again after shutting down VM
Just shut down the Azure VM and retry the same replace disk steps as shown before. Once the VM is successfully shutdown, you will see this screen when you try the replace disk option.

Click on the ‘Restore’ option and this will take you back to the ‘Backup Item’ page as shown below.

Click on ‘View all jobs’ option and you can see the status of the jobs currently running.

As you can see the backup and restore jobs get triggered at the same time. Backup job will backup the existing VM and restore will replace the existing VM. You can click on each of the jobs to view more details. The status of the backup job is as shown.

You can see the snapshot of the existing VM is completed and it is waiting on transferring data to the vault. You will also see a new crash consistent snapshot showing up under backup items as you can see a snapshot of a virtual machine that was shutdown is completed. The crash consistent snapshot is the backup of the VM that you had shutdown earlier.

The status of the restore job is as shown.

You can see the transfer of the data from vault is completed and the process is waiting on updating the virtual machine. Also, you can see details of the data that (2.12 TBs) is transferred. Both the backup and restore processes take a while to complete.
Status of backup and restore jobs
In this demo, the restore job completed in around 21 minutes.

The backup job is still running and you can see the ‘Transfer data to vault’ option is still in progress.

Test the Virtual Machine after restore
As the restore operation is completed, start the VM again as it was shut down for the restore and connect to it. Once done, connect to the SQL instance to validate that the databases – A and B exists.

You can see that these databases were backed up earlier in the snapshot and the two other databases that we had created after the backup was performed are no longer available. With this, you can confirm that the restore of the Azure VM using the Recovery Services Vault has completed successfully with expected results.
Next Steps
- In this tip, you saw a reference to a tip to create a new Azure windows SQL VM
- In the tip, you saw a reference to a tip on backing up SQL databases using Recovery Services Vault
- In this tip, you saw a reference to a tip on restoring SQL databases using Recovery Services Vault
- In the demo, you learnt about the different snapshot consistent states that are available
- In the demo, you saw how we can restore an Azure VM using the snapshots that are available
- In the demo, you saw how we can view the status of the jobs that are running under the ‘Backup Item’ section of the Recovery Services Vault
- Try out this demo on your own Azure environment
- Refer other articles available on MSSQLTips related to Azure

Mohammed has been a SQL Server DBA since 2005 and has had the opportunity to work on different versions of SQL Server starting from SQL Server 2000 with exposure to Sybase as well. He is based in Wellington, New Zealand and works at Datacom Systems Ltd, as a SQL Database Administrator. He can be reached at: moinu@live.com.
- MSSQLTips Awards: Author of the Year Contender – 2016, 2018-2021 | Achiever (75+ tips) – 2021