Problem
I have a number of files stored on Azure file shares which I use in my SQL Server environment. I had already configured backups of the file shares using the Azure Recovery Services vault. I had accidently deleted a few files from the Azure file shares. Is there a way I can either restore the deleted files or restore the file share from the backups available on the Recovery Services vault? What are the steps I need to perform to accomplish this task?
Solution
In a previous tip, you saw step by step instructions for backing up the Azure file shares on the Recovery Services vault. In this tip, we will see how to restore file shares or individual files present on the file shares using the Recovery Service Vault.
This tip assumes that you already have resources in your Azure environment and you are familiar with using the Azure portal. If you are new to Azure, you can subscribe to a trial account here, which will give you access to Azure services for a year and a credit of USD $200. Steps to create file shares in Azure is quick and easy. You can refer to this link where there is a section to create a file share in Azure step by step. You can refer to this link where you can see detailed step by step instructions to set up a Recovery Services Vault. This tip assumes that you have already created Azure file shares and you have configured backups for these file shares using the Recovery Services vault.
Delete some files from the Azure file share for this demo
For the purpose of this demo, I deleted some files from the file share for validating a successful file share restore.

Restore Azure file share using Recovery Services Vault
From the Azure Recovery Services vault, you can validate if the file share is backed up by checking the ‘Backup Items’ option on the left-hand pane.

Here, you can see there are 2 items being backed up under the Azure storage (Azure files) backup type. Once you click on the ‘Backup item count’, you will be able to view the actual file shares that are part of the backup regime. In the next screenshot, you can see details of the file shares that are backed up.
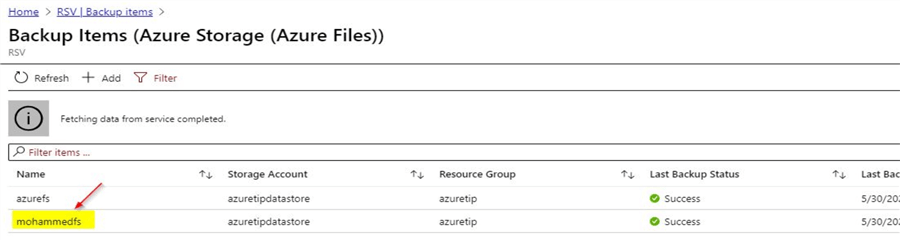
In this tip, we will use the ‘mohammedfs’ file share for the demo. When you click on the file share, you will see this screen where you can see details of the backup status.
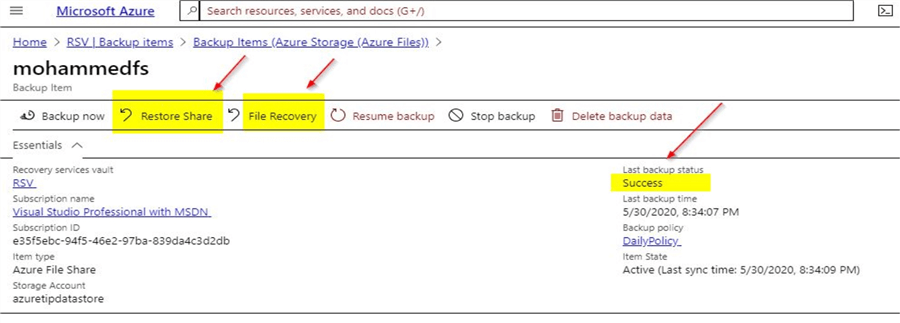
You can confirm that the last backup status was a success and you can get more details of the backup policy for this file share.
Perform a full file share recovery
From the above screenshot, you can see that there are two options for the restore: restore the entire file share or perform a file recovery. In this section, we will perform a full file share restore. Just click on the option to ‘Restore Share’ which will take you to this screen.
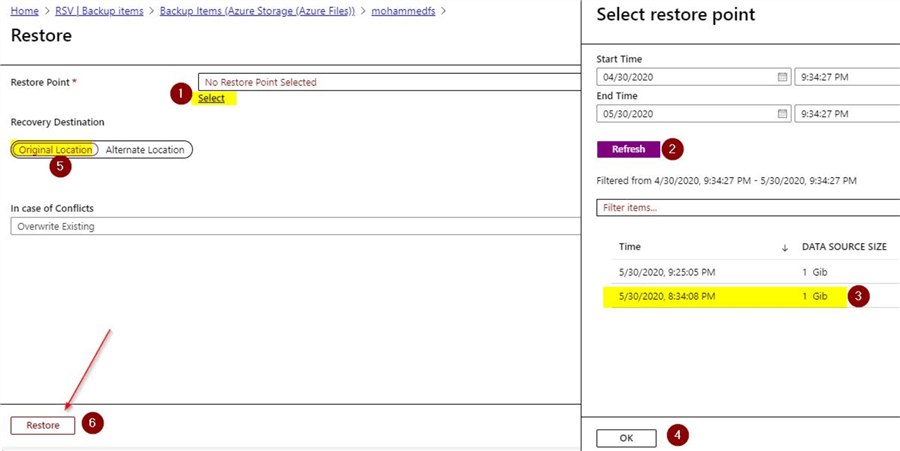
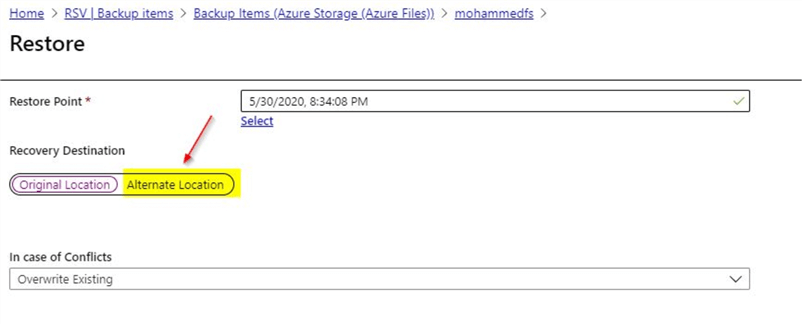
Just follow the sequence of steps for performing a full file restore. You first need to select the restore point to recover the lost file. Once you select the restore point, you can view the backups that are available to restore. Select the required backup file and once you click on ‘Ok’, you get the option to restore the backup to the original location or to an alternate location. In the case of conflicts during the restore, you have the option to either overwrite the existing file or skip. In this demo, we will use the ‘Overwrite Existing’ option.

Finally, click on the option to ‘Restore’ which will start the restore process. You can view the status of this step by checking the notifications section on the top right-hand side of the Azure portal.

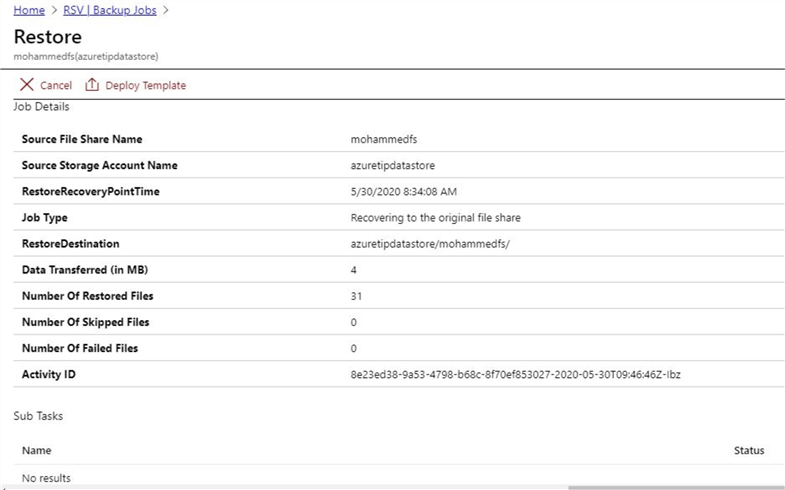
You can check the status of the restore job by monitoring the progress on the ‘Backup Jobs’ section of the Recovery Services vault.

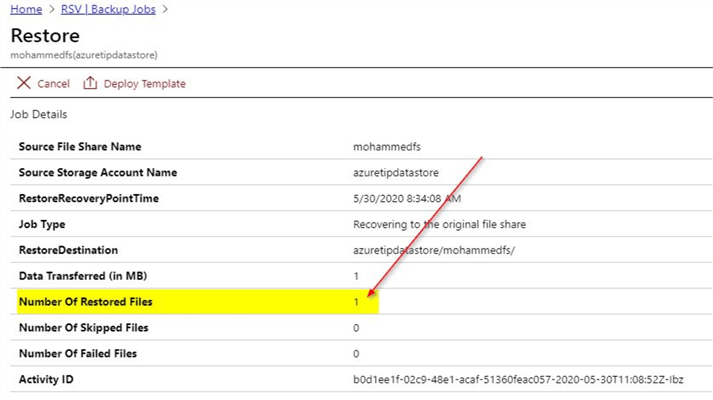
You can see that the restore job completed in 48 seconds. When you click on the job status, you can get more details on the restore operation. You can see details of the number of restored files, failed files, skipped files, etc.
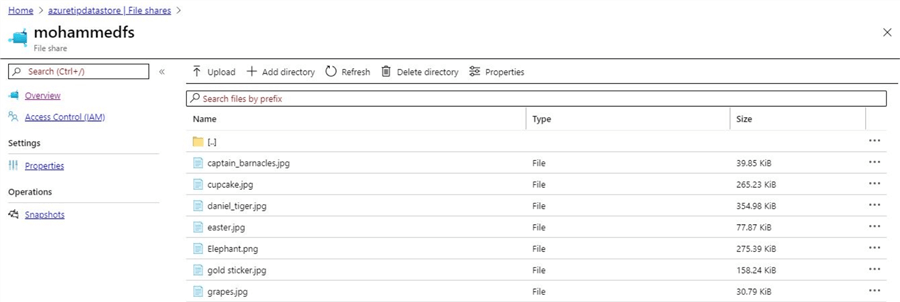
You can now navigate to your file share to ensure that the deleted files are restored to the same file share location.

From the above screen, you can see that the files that were deleted earlier are restored to the original location successfully.
Restoring file share to an alternate location
In the earlier section while restoring the file share, you saw there was another option to restore to an alternate location. Let us now try this option to restore to an alternate location.
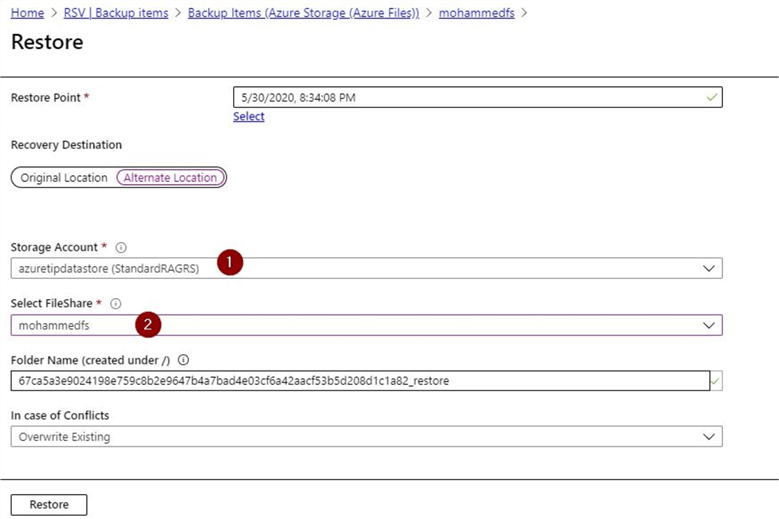
Once you click on ‘Alternate Location’, you will get these options. Select the correct storage account and file share and click on ‘Restore’.
The restore job gets triggered like before and you can check the status of the restore job on the ‘Backup Jobs’ section of the Recovery Services vault. Once the restore job shows as completed, go to the file share to validate that the file share is restored to an alternate location.

Here, you can see that a new directory is created where all the files are restored from backup. Once you navigate to the new directory, you can view all the files that were restored.
Restore individual files
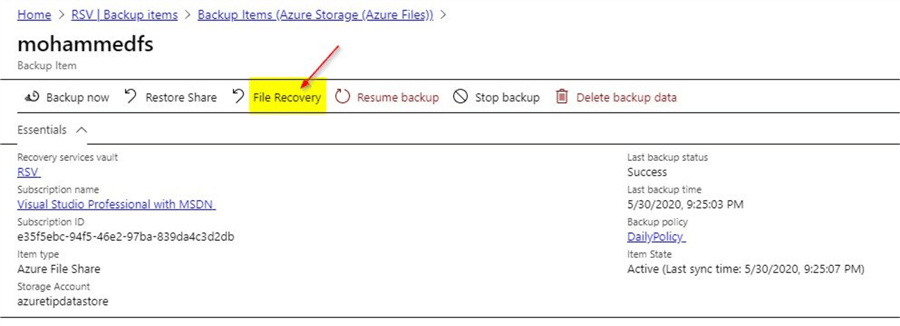
In the earlier section, we performed a full file share restore, now let us perform a restore of an individual file. When you navigate to the ‘Backup Items’ section of the Recovery Services vault, you can view the option to perform a ‘File Recovery’.
Once you click on the ‘File Recovery’ option, you will get this screen where you need to select the restore point.
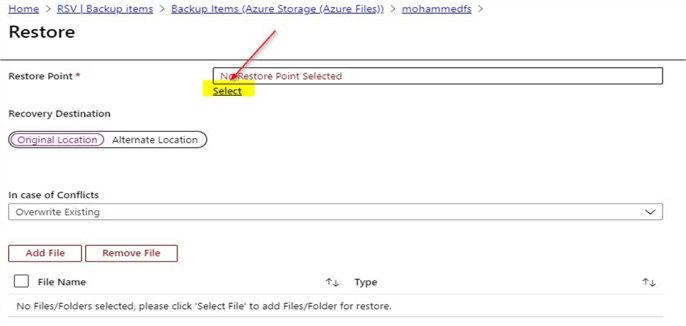
Click on the ‘Select’ restore point option to review the backup files that are available and to select the restore point.
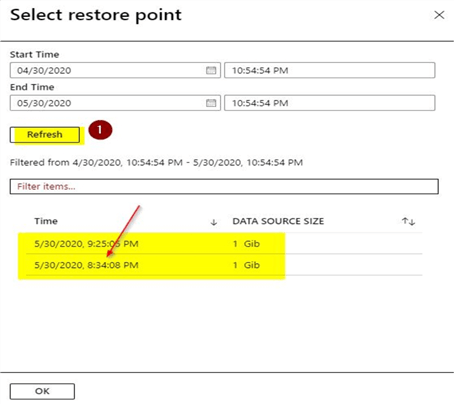
In this demo, I have selected the backup from 8:34 pm. Click ‘Ok’ once done. Once done, you will see the earlier screen again.
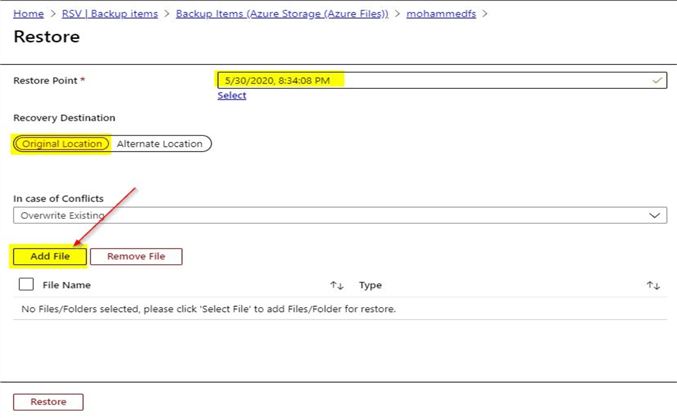
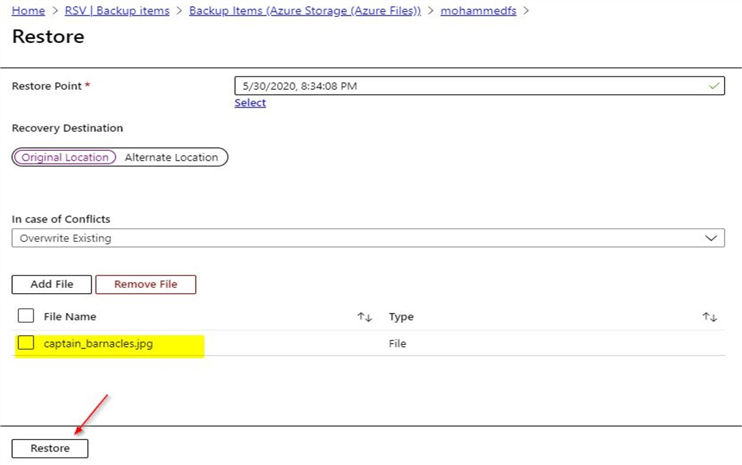
Here, you can see the restore point from 8:34 pm is selected. We selected the restore destination to the original location. Lastly, click on the ‘Add file’ option to select the file to recover. Once done, you will get to see the list of all the files available in the backup.
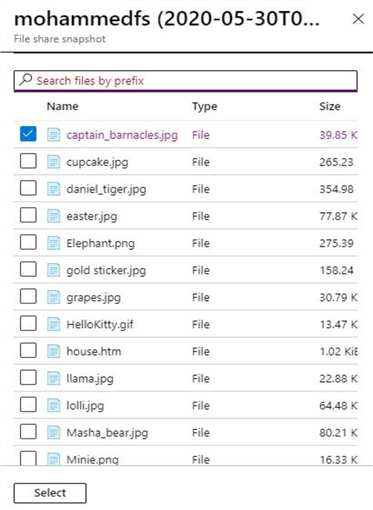
Make the required selection and click on ‘Select’. Once done, click on the ‘Restore’ option which will complete the restore of the file.
As shown earlier, the restore job gets triggered and you can check the status of the job in the ‘Backup jobs’ section of the Recovery Services vault. You can click on the status of the restore job to confirm that the file is restored.
Restore individual files to an alternate location
Similar to performing a full file share restore to an alternate location, we could perform the restore to an alternate location for a file as well. You may have noticed in the earlier screenshots already, where there is an option available to restore the file to an alternate location. Make sure to select the ‘Alternate location’ option after making the selection for the restore point. You will see that a new folder will be created for the file to be restored. Make the required selection for the file and click on ‘Restore’.

As described earlier, the restore job will be triggered and you can check the status of the restore job on the ‘Backup jobs’ section of the Recovery Services vault. Once the restore job completes, you can navigate to the file share to see the alternate destination folder that gets created.
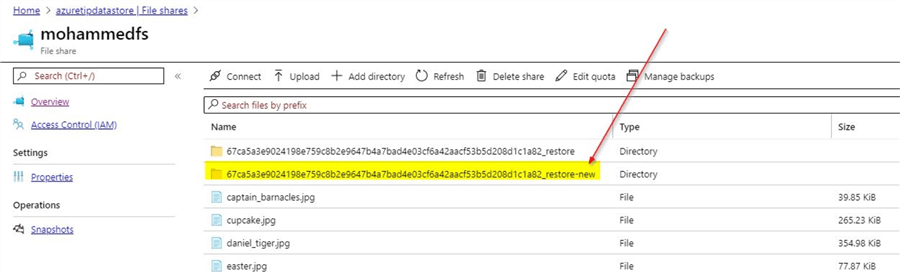
Click on the destination directory to confirm that the selected file is restored successfully.

Next Steps
- In this tip, you saw a reference to a tip to create Azure file shares step by step
- In the tip, you saw a reference to a tip on creating Azure Recovery Services Vault step by step
- In this tip, you saw a reference to an earlier tip to back up the Azure file shares using Recovery Services vault
- In the demo, you learned how easily Azure file shares can be restored using Recovery Services Vault
- In the demo, you learned how easily individual files from the Azure file share can be restored using Recovery Services Vault
- In the demo, you saw how file shares or individual files can be restored to an alternate destination directory
- In the demo, you saw how we can view the status of the restore jobs under the ‘Backup Item’ section of the Recovery Services Vault
- Try out this demo on your own Azure environment
- Refer other articles available on tips related to Azure

Mohammed has been a SQL Server DBA since 2005 and has had the opportunity to work on different versions of SQL Server starting from SQL Server 2000 with exposure to Sybase as well. He is based in Wellington, New Zealand and works at Datacom Systems Ltd, as a SQL Database Administrator. He can be reached at: moinu@live.com.
- MSSQLTips Awards: Author of the Year Contender – 2016, 2018-2021 | Achiever (75+ tips) – 2021