Problem
We have an on-premises SQL Server database and we have used the Data Migration Assistant (DMA) to check for compatibility issues before migration to Azure SQL database. Is it possible to use this tool to perform the actual migration of the database to SQL Server on an Azure virtual machine?
Solution
In part 1, of the tip, you learned about using the Data Migration Assistant (DMA) tool to check for any compatibility issues before the migration. You can refer to part 1, to follow the steps to download and install the tool.
In this tip, we will perform a demo of the actual migration of the SQL Server database from on-premises SQL Server to an Azure virtual machine.
Migrate from SQL Server Database to Azure Virtual Machine
For this demo, I downloaded the sample WideWorldImporters database and restored on my on-premises SQL instance. The plan is to migrate this WideWorldImporters database to a SQL Server on an Azure virtual machine. Start the Data Migration Assistant tool and begin the migration. You can refer to the screenshot below.

Provide a project name, select the “Target server type” as shown and click on “Create”. Once done, you will see the screen below where you need to enter the details for the source and target servers.
Connect to Source and Target Servers
On the screen below you will need to enter information about your source and target servers.
In the “Target server details”, we have provided details of a SQL Server on Azure VM. You can refer this tip to create your own SQL Server on the Azure platform.

Once you click on “Next”, you will be able to see the list of databases on the source server as shown below. Select the database on the source server that you plan to migrate.
You will need to have a shared folder setup that both your on-premises and Azure VM can access. This is used to migrate the database. Enter details of the shared folder on the source server. The source SQL Server service account needs to have read\write access to this folder. During the migration process, the source database will get backed up to this location. As the database needs to be restored on to a SQL Server on an Azure VM, ensure to create a shared directory that will have access from the Azure VM. In this demo, a file share on Azure is provided for the restore operation. The SQL service account on the Azure VM must have read privileges to this Azure file share. Also, the user account used for running the Data Migration Assistant tool must have sufficient privileges to perform the migration.

On the lower side of this window is the “Restore options” sections as shown. The drive path locations get loaded by default, but can be changed as needed. Before you click on “Next”, if you don’t already have an Azure file storage to use, refer below steps to create one.

Steps to Create Azure File Share (if needed)
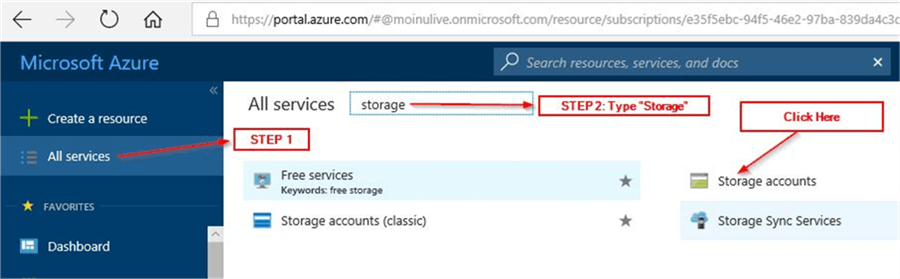
If you don’t already have an Azure file share, it can be created in a few minutes. Go to the Azure portal https://portal.azure.com and click on the “Storage accounts” section as shown.
Once you click on “Storage accounts”, you will see this option to create a storage account. Refer to this screenshot to follow the steps.

Once you click on “Create”, the storage account gets created in a few minutes. Click on the newly created storage account as shown.

Once you click on the storage account, you will see this screen where you have the option to create a new file share.

Click on the “Files” section to create a new file share.

When you click on the + symbol, it will give you the option to enter the file share name and allocate a size for the share.

For this demo, 10 GB is sufficient as we are only migrating one sample database. Click on “Ok” and the file share gets created. When you navigate to the newly created file share, you will get the option to connect to the file share as shown. In order to connect to this file share from the source server and target server, copy the command section as shown and run them using PowerShell and this will create the necessary access.

Run the PowerShell commands on both source and target servers to connect to the file share.
On the source and target servers, run the PowerShell command as shown below. Just click on the copy icon and run it in PowerShell. The below screenshot shows a successful run of the command.

Once the command runs successfully on the source and target server locations, you will see that the file share gets automatically created.

You will see that the drive letter allocation is Y as we had used that while running the PowerShell commands. This drive letter (Y) is visible at the Windows layer, but wouldn’t be visible on the SQL Server side which is evident when we run the below command on SQL Server on the Azure VM.

In order to make Y drive accessible from SQL Server, we need to run the same PowerShell command from within SQL Server using xp_cmdshell. Just copy it like before and embed it within xp_cmdshell and run the command as shown. This step is required for the restore operation to complete successfully on the target server otherwise the Data Migration Assistant tool will have issues.
Now you can see that the Y drive is visible to SQL Server.

Continue Data Migration Assistant Steps
After the Azure file share is successfully created, you can review the “Restore Options” section in the Data Migration Assistant wizard and click on “Next”. This will take you to the “Select logins” window. In this demo, I didn’t select any logins and left them as shown. Here, you have the option to review and select logins for migration.

After reviewing, click on the “Start Migration” option to begin the migration process. You can view the progress of the migration as shown in this window.

Once the migration process completes, you will see the status as shown. Migration is successful and the entire process took 4 minutes to complete.

Check Migrated SQL Server Database on Azure Virtual Machine
You can connect to the SQL Server Azure instance and confirm the database was restored successfully.

Next Steps
- With this tip, you were able to use the Data Migration Assistant (DMA) tool to migrate an on-premises SQL Server database to SQL Server on an Azure Virtual Machine
- Try this tip using your own sample on-premises database
- Refer this tip to check for any compatibility issues while migrating to Azure
- To get familiar with Azure, refer to these Azure tips

Mohammed has been a SQL Server DBA since 2005 and has had the opportunity to work on different versions of SQL Server starting from SQL Server 2000 with exposure to Sybase as well. He is based in Wellington, New Zealand and works at Datacom Systems Ltd, as a SQL Database Administrator. He can be reached at: moinu@live.com.
- MSSQLTips Awards: Author of the Year Contender – 2016, 2018-2021 | Achiever (75+ tips) – 2021


I need to migrate DBs with user and login from On Prem to Azure, What level of access I need on Azure SQL
Thank you so much for this guide. It helped me a lot!
You can use Transaction Relication or Datasync option to refresh Azure db from On-premises.