Problem
In a previous tip on Installing SQL Server vNext CTP1 on Red Hat Linux 7.2, we have read about how we can now install SQL Server 2017 on a Linux operating system. We would like to evaluate running SQL Server 2017 Availability Groups on Linux. How do we go about building the Linux environment for SQL Server 2017 Availability Groups?
Solution
To continue this series on Step-by-step Installation and Configuration of SQL Server 2017 Availability Groups on a Linux Cluster, we will look at creating the SQL Server 2017 Always On Availability Group on the Linux cluster. In Part 1, you learned how to install and configure SQL Server 2017 on Linux. This tip will walk you through enabling SQL Server Always On Availability Groups feature and installing the Linux resource Agent. You will also prepare the security requirements for authenticating the replicas of the Always On Availability Group.
Create the SQL Server 2017 Always On Availability Group on Linux
Creating the SQL Server 2017 Always On Availability Group on Linux is similar to how you create it on a Windows environment without Active Directory. Review Part 1 and Part 2 of the series on Implement a SQL Server 2016 Availability Group without Active Directory as they provide a framework on the process.
Here’s a high-level overview of the steps for your reference. Be very careful with going thru all of the steps. It’s not as simple as you think it is. There are steps that are specific to the Linux operating system and will be highlighted in this tip.
- Enable SQL Server Always On Availability Groups feature
- Install Linux resource agent for SQL Server Always On Availability Groups on all servers
- Enable Always On Availability Group endpoint port on the firewall for all Linux hosts
- Create a database master key on the primary replica
- Create the certificate that will be used to encrypt the Availability Group endpoint
- Create the Always On Availability Group endpoint for the primary replica using the certificate for authentication
- Export the certificate to a file
- Copy the certificate file to the secondary replicas
- Grant the SQL Server account permissions on certificate files
- Create a login on the primary replica for use by the secondary replicas
- Create a user for the login
- Associate the certificate created in Step #5 with the user
- Grant the CONNECT permission on the login
- Create the Always On Availability Group with a listener name
Step #1: Enable SQL Server Always On Availability Groups feature
NOTE: Perform these steps on all of the Linux servers. Remember to log in with super user (root) privileges when performing these steps.
Run the command below to enable the SQL Server Always On Availability Groups feature. This is similar to enabling the Always On High Availability feature using the SQL Server Configuration Manager.
sudo /opt/mssql/bin/mssql-conf set hadr.hadrenabled 1

Similar to enabling the Always On High Availability feature on Windows, you will need to restart the SQL Server daemon (service) in order for the changes to take effect. Run the command below to restart SQL Server.
sudo systemctl restart mssql-server

This is a new feature in SQL Server 2017 - the ability to enable, create and configure Always On Availability Groups without an underlying cluster resource manager (Windows Server Failover Clustering or Pacemaker). Previous versions of SQL Server will not allow you to enable the Always On High Availability feature without WSFC. Starting with SQL Server 2017, you can initially create and configure Always On Availability Groups without a cluster resource manager and simply add it later on. However, the behavior between how Always On Availability Groups interacts with the cluster resource manager differs between Windows and Linux and is beyond the scope of this tip.
Step #2: Install the Linux cluster resource agent for SQL Server Always On Availability Groups
NOTE: Perform these steps on all of the Linux servers. Remember to log in with super user (root) privileges when performing these steps.
Run the command below to install the Linux cluster resource agent for SQL Server Always On Availability Groups. A cluster resource agent is an executable that manages a cluster resource. This will be used to coordinate the SQL Server Always On Availability Group with the Linux cluster resource manager, similar to how Always On Availability Groups is managed by the WSFC on Windows via the cluster resource DLL. This is the same cluster resource agent that you will use to configure a SQL Server failover clustered instance on Linux.
sudo yum install mssql-server-ha

Run the command below to verify the installation of the Linux cluster resource agent for SQL Server Always On Availability Groups.
sudo yum info mssql-server-ha

Step #3: Enable Always On Availability Group endpoint port on the firewall for all Linux hosts
NOTE: Perform these steps on all of the Linux servers. Remember to log in with super user (root) privileges when performing these steps.
Run the command below to enable the Linux firewall to allow the Always On Availability Group endpoint port. This uses the default SQL Server port number 5022 for the Always On Availability Group data replication traffic. By default, FirewallD is the firewall solution available on RHEL/CentOS.
sudo firewall-cmd --zone=public --add-port=5022/tcp --permanent

Run the command below to reload the new firewall rule added.
sudo firewall-cmd --reload

Step #4: Create a database master key on the primary replica
Each SQL Server instance that will function as a primary replica requires a database master key. The database master key is a symmetric key that is used to protect the private keys of certificates and asymmetric keys that are present in the database. The certificates referred to in this configuration will be used by the SQL Server logins that will connect to the Always On Availability Group endpoint.
Starting with LINUXHA-SQLAG1 as the primary replica, create the database master key.
--Run this on the primary replica/LINUXHA-SQLAG1. Just to be sure, enable SQLCMD mode in SSMS
--Pass the SQL Server credentials since this is configured for mixed mode authentication
:CONNECT LINUXHA-SQLAG1 -U sa -P y0ur$ecUr3PAssw0rd
USE master

CREATE MASTER KEY ENCRYPTION BY PASSWORD = 'y0ur$ecUr3PAssw0rd';
GO
Step #5: Create the certificate that will be used to encrypt the Availability Group endpoint
Next, create the certificate that will be used to secure the Always On Availability Group endpoint on the primary replica. This will also be used to secure the inbound traffic on the secondary replicas. Note that the primary replica will be sending transaction log records on the secondary replicas on a regular basis. Hence, the primary replica has to be authenticated on the secondary replicas.
--Run this on the primary replica/LINUXHA-SQLAG1. Just to be sure, enable SQLCMD mode in SSMS
--Pass the SQL Server credentials since this is configured for mixed mode authentication
:CONNECT LINUXHA-SQLAG1 -U sa -P y0ur$ecUr3PAssw0rd
USE master

CREATE CERTIFICATE LINUXHA_SQLAG1_cert
WITH SUBJECT = 'LINUXHA-SQLAG1 certificate for Availability Group'
GO
Step #6: Create the Always On Availability Group endpoint on the primary replica using the certificate for authentication
Next, create the endpoint that the Always On Availability Group will use on the primary replica. The endpoint type is DATABASE_MIRRORING. The default port number is used - 5022. Also, the certificate created in Step #5 - LINUXHA_SQLAG1_cert – is used to authenticate the endpoint.
--Run this on the primary replica/LINUXHA-SQLAG1. Just to be sure, enable SQLCMD mode in SSMS
--Pass the SQL Server credentials since this is configured for mixed mode authentication
:CONNECT LINUXHA-SQLAG1 -U sa -P y0ur$ecUr3PAssw0rd
USE master

CREATE ENDPOINT Endpoint_AvailabilityGroup
STATE = STARTED
AS TCP
(
   LISTENER_PORT = 5022, LISTENER_IP = ALL
)
FOR DATABASE_MIRRORING
(
   AUTHENTICATION = CERTIFICATE LINUXHA_SQLAG1_cert,
   ENCRYPTION = REQUIRED ALGORITHM AES,
   ROLE = ALL
);
GO
Step #7: Export the certificate to a file
After creating the certificate and assigning it to authenticate the endpoint, you can proceed to export it to the file system. The example below stores the certificate file to the default SQL Server data folder – /var/opt/mssql/data.
--Run this on the primary replica/LINUXHA-SQLAG1. Just to be sure, enable SQLCMD mode in SSMS
--Pass the SQL Server credentials since this is configured for mixed mode authentication
:CONNECT LINUXHA-SQLAG1 -U sa -P y0ur$ecUr3PAssw0rd
USE master

BACKUP CERTIFICATE LINUXHA_SQLAG1_cert
TO FILE = '/var/opt/mssql/data/LINUXHA_SQLAG1_cert.cer';
GO
Step #8: Copy the certificate file to the secondary replicas
You need to copy the certificate file to all of the secondary replicas - in this case, LINUXHA-SQLAG2 and LINUXHA-SQLAG3. As mentioned in Step #5, this certificate will also be used for authenticating and securing the endpoint on the secondary replicas as the primary replica connects to them to send transaction log records.
Run the command below to copy the certificate file from the primary replica to the secondary replicas’ default SQL Server data folder. Execute one line at a time as it will prompt you for the credentials of the root user on the secondary replicas.
sudo scp /var/opt/mssql/data/LINUXHA_SQLAG1_cert.* root@LINUXHA-SQLAG2.TESTDOMAIN.COM:/var/opt/mssql/data/
sudo scp /var/opt/mssql/data/LINUXHA_SQLAG1_cert.* root@LINUXHA-SQLAG3.TESTDOMAIN.COM:/var/opt/mssql/data/

Alternatively, you can use a graphical tool like WinSCP to perform this task from within a Windows machine.
Repeat steps #4 to #8 on all secondary replicas
Since all of the replicas will function as a primary replica in the event of either an automatic or manual failover (plus the fact that the secondary replicas need to send an acknowledgement to the primary replica after hardening the transaction log records on disk), you need to repeat steps #4 to #8 on all of them.
A complete script for the secondary replica LINUXHA-SQLAG2 is shown below.
--Run this on the secondary replica/LINUXHA-SQLAG1. Just to be sure, enable SQLCMD mode in SSMS
--Pass the SQL Server credentials since this is configured for mixed mode authentication
--Repeat the same process for steps #4 to #8 on the secondary replicas
:CONNECT LINUXHA-SQLAG2 -U sa -P y0ur$ecUr3PAssw0rd
USE master

--STEP #4:
CREATE MASTER KEY ENCRYPTION BY PASSWORD = 'y0ur$ecUr3PAssw0rd';
GO

--STEP #5:
CREATE CERTIFICATE LINUXHA_SQLAG2_cert
WITH SUBJECT = 'LINUXHA-SQLAG2 certificate for Availability Group'
GO

--STEP #6:
CREATE ENDPOINT Endpoint_AvailabilityGroup
STATE = STARTED
AS TCP
(
LISTENER_PORT = 5022, LISTENER_IP = ALL
)
   FOR DATABASE_MIRRORING
(
   AUTHENTICATION = CERTIFICATE LINUXHA_SQLAG2_cert,
   ENCRYPTION = REQUIRED ALGORITHM AES,
   ROLE = ALL
);
GO

--STEP #7:
BACKUP CERTIFICATE LINUXHA_SQLAG2_cert
TO FILE = '/var/opt/mssql/data/LINUXHA_SQLAG2_cert.cer';
GO
--STEP #8: Copy the certificate to the other replicas
A complete script for the secondary replica LINUXHA-SQLAG3 is shown below.
--Run this on the secondary replica/LINUXHA-SQLAG3. Just to be sure, enable SQLCMD mode in SSMS
--Pass the SQL Server credentials since this is configured for mixed mode authentication
--Repeat the same process for steps #4 to #8 on the secondary replicas
:CONNECT LINUXHA-SQLAG3 -U sa -P y0ur$ecUr3PAssw0rd
--STEP #4:
USE master

CREATE MASTER KEY ENCRYPTION BY PASSWORD = 'y0ur$ecUr3PAssw0rd';
GO

--STEP #5:
CREATE CERTIFICATE LINUXHA_SQLAG3_cert
WITH SUBJECT = 'LINUXHA-SQLAG3 certificate for Availability Group'
GO

--STEP #6:
CREATE ENDPOINT Endpoint_AvailabilityGroup
STATE = STARTED
AS TCP
(
   LISTENER_PORT = 5022, LISTENER_IP = ALL
)
FOR DATABASE_MIRRORING
(
   AUTHENTICATION = CERTIFICATE LINUXHA_SQLAG3_cert,
   ENCRYPTION = REQUIRED ALGORITHM AES,
   ROLE = ALL
);
GO

--STEP #7:
BACKUP CERTIFICATE LINUXHA_SQLAG3_cert
TO FILE = '/var/opt/mssql/data/LINUXHA_SQLAG3_cert.cer';
GO
--STEP #8: Copy the certificate to the other replicas
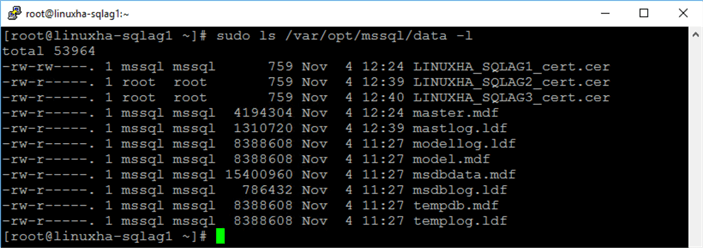
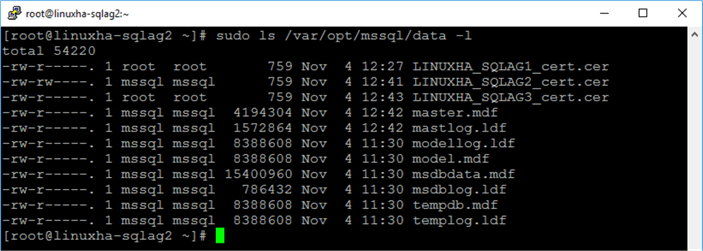
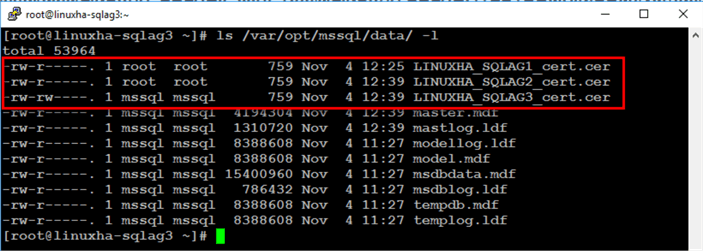
Once completed, you should have three (3) certificate files on all of your SQL Server instances. Run the command below to list the contents of the default SQL Server data directory.
sudo ls /var/opt/mssql/data -l
On LINUXHA-SQLAG1:
On LINUXHA-SQLAG2:
On LINUXHA-SQLAG3:

Step #9: Grant the SQL Server account permissions on certificate files
NOTE: Perform these steps on all of the Linux servers. Remember to log in with super user (root) privileges when performing these steps.
Because the certificate files are created by different SQL Server instances, only the certificate file created by the specific instance can be accessed within the security context of that instance. And since you copied the certificate files by passing the root user, the root owns and has access to those certificate files. In the screenshot below from LINUXHA-SQLAG3, only the certificate file LINUXHA_SQLAG3_cert.cer is owned by the mssql user since it was created by the LINUXHA-SQLAG3 instance. This is referenced by the rw permissions.
You need to grant the mssql user on each of the Linux servers ownership permissions of the certificates that came from the other servers. This is so you can read the certificates using the security context of the local SQL Server instance. Run the command below to list the contents of the default SQL Server data directory.
chown mssql:mssql /var/opt/mssql/data/LINUXHA_SQLAG*

After granting the mssql user ownership of the certificates, you can proceed to assign those certificates to a SQL Server login.
Step #10: Create a login on the primary replica for use by the secondary replicas
The SQL Server login created on the primary replica is used by the secondary replicas to connect to the Always On Availability Group via the endpoint. You can think of the secondary replicas as client applications that require credentials to connect to the SQL Server instance - the primary replica.
--Run this on the primary replica/LINUXHA-SQLAG1. Just to be sure, enable SQLCMD mode in SSMS
--Pass the SQL Server credentials since this is configured for mixed mode authentication
:CONNECT LINUXHA-SQLAG1 -U sa -P y0ur$ecUr3PAssw0rd
USE master

CREATE LOGIN login_AvailabilityGroup
WITH PASSWORD = 'y0ur$ecUr3PAssw0rd';
GO
Step #11: Create a user for the login
Create a user to associate with the login that was created.
--Run this on the primary replica/LINUXHA-SQLAG1. Just to be sure, enable SQLCMD mode in SSMS
--Pass the SQL Server credentials since this is configured for mixed mode authentication
:CONNECT LINUXHA-SQLAG1 -U sa -P y0ur$ecUr3PAssw0rd
USE master

CREATE USER login_AvailabilityGroup
FOR LOGIN login_AvailabilityGroup
GO
Step #12: Associate the certificate created in Step #5 with the user
The secondary replicas will use the database user created in Step #11 to connect to the primary replica. Since each secondary replica has a corresponding certificate, you need to associate those certificates with the user. The script below creates two certificates based on the ones generated by the secondary replicas and assigns both to the user.
--Run this on the primary replica/LINUXHA-SQLAG1. Just to be sure, enable SQLCMD mode in SSMS
--Pass the SQL Server credentials since this is configured for mixed mode authentication
:CONNECT LINUXHA-SQLAG1 -U sa -P y0ur$ecUr3PAssw0rd
USE master

--Associate certificate from LINUXHA-SQLAG2 with user
CREATE CERTIFICATE LINUXHA_SQLAG2_cert
AUTHORIZATION login_AvailabilityGroup
FROM FILE = '/var/opt/mssql/data/LINUXHA_SQLAG2_cert.cer'
GO

--Associate certificate from LINUXHA-SQLAG3 with user
CREATE CERTIFICATE LINUXHA_SQLAG3_cert
AUTHORIZATION login_AvailabilityGroup
FROM FILE = '/var/opt/mssql/data/LINUXHA_SQLAG3_cert.cer'
GO
Step #13: Grant the CONNECT permission on the login
You, then, need to grant CONNECT permissions on the login to successfully establish the communication between Always On Availability Group replicas.
--Run this on the primary replica/LINUXHA-SQLAG1. Just to be sure, enable SQLCMD mode in SSMS
--Pass the SQL Server credentials since this is configured for mixed mode authentication
:CONNECT LINUXHA-SQLAG1 -U sa -P y0ur$ecUr3PAssw0rd
USE master

GRANT CONNECT ON ENDPOINT::Endpoint_AvailabilityGroup
TO [login_AvailabilityGroup];
GO
Repeat steps #10 to #13 on all secondary replicas
Again, since all of the replicas will function as a primary replica in the event of either an automatic or manual failover, you need to repeat steps #10 to #13 on all of them.
A complete script for the secondary replica LINUXHA-SQLAG2 is shown below.
--Run this on the secondary replica/LINUXHA-SQLAG2. Just to be sure, enable SQLCMD mode in SSMS
--Pass the SQL Server credentials since this is configured for mixed mode authentication
--Repeat the same process for steps #10 to #13 on the secondary replicas
:CONNECT LINUXHA-SQLAG2 -U sa -P y0ur$ecUr3PAssw0rd
USE master

--STEP #10:
CREATE LOGIN login_AvailabilityGroup
WITH PASSWORD = 'y0ur$ecUr3PAssw0rd';
GO

--STEP # 11:
CREATE USER login_AvailabilityGroup
FOR LOGIN login_AvailabilityGroup
GO

--STEP # 12:
--Associate certificate from LINUXHA-SQLAG1 with user
CREATE CERTIFICATE LINUXHA_SQLAG1_cert
AUTHORIZATION login_AvailabilityGroup
FROM FILE = '/var/opt/mssql/data/LINUXHA_SQLAG1_cert.cer'
GO

--Associate certificate from LINUXHA-SQLAG3 with user
CREATE CERTIFICATE LINUXHA_SQLAG3_cert
AUTHORIZATION login_AvailabilityGroup
FROM FILE = '/var/opt/mssql/data/LINUXHA_SQLAG3_cert.cer'
GO
--STEP # 13:
GRANT CONNECT ON ENDPOINT::Endpoint_AvailabilityGroup
TO [login_AvailabilityGroup];
GO
A complete script for the secondary replica LINUXHA-SQLAG3 is shown below.
--Run this on the secondary replica/LINUXHA-SQLAG3. Just to be sure, enable SQLCMD mode in SSMS
--Pass the SQL Server credentials since this is configured for mixed mode authentication
--Repeat the same process for steps #10 to #13 on the secondary replicas
:CONNECT LINUXHA-SQLAG3 -U sa -P y0ur$ecUr3PAssw0rd
USE master

--STEP #10:
CREATE LOGIN login_AvailabilityGroup
WITH PASSWORD = 'y0ur$ecUr3PAssw0rd';
GO

--STEP # 11:
CREATE USER login_AvailabilityGroup
FOR LOGIN login_AvailabilityGroup
GO

--STEP # 12:
--Associate certificate from LINUXHA-SQLAG1 with user
CREATE CERTIFICATE LINUXHA_SQLAG1_cert
AUTHORIZATION login_AvailabilityGroup
FROM FILE = '/var/opt/mssql/data/LINUXHA_SQLAG1_cert.cer'
GO

--Associate certificate from LINUXHA-SQLAG2 with user
CREATE CERTIFICATE LINUXHA_SQLAG2_cert
AUTHORIZATION login_AvailabilityGroup
FROM FILE = '/var/opt/mssql/data/LINUXHA_SQLAG2_cert.cer'
GO

--STEP # 13:
GRANT CONNECT ON ENDPOINT::Endpoint_AvailabilityGroup
TO [login_AvailabilityGroup];
GO
This process is very similar to the one described in the previous tip on Implement a SQL Server 2016 Availability Group without Active Directory. In fact, the scripts used in this tip are a variation of the ones from the previous tip with modifications that specifically apply to Linux. Complicated as it already is, this is just to prepare the SQL Server instances that you will use as Always On Availability Group replicas to meet the security requirements of authenticating the logins and securing the endpoints. It doesn’t even cover the creation and configuration of the Always On Availability Group just yet.
In the next tip in this series, you will go thru the process of creating the Always On Availability Group and a corresponding listener name.
Next Steps
- Review the previous tips on SQL Server on Linux
- Implement a SQL Server 2016 Availability Group without Active Directory Part 1
- Implement a SQL Server 2016 Availability Group without Active Directory Part 2
- Using ssh to connect to Linux for the SQL Server DBA
- Configure SQL Server on Linux
- SQL Server Configuration Manager for Linux
- How to Stop, Start, Enable and Disable SQL Server Services on Linux
- Top 10 Linux Commands for SQL Server DBAs
- SQL Server on Linux Tips
- Read more on the following topics

Edwin M. Sarmiento is the Managing Director of 15C, a consulting and training company that specializes on designing, implementing and supporting SQL Server infrastructures. He is a Microsoft SQL Server MVP and Microsoft Certified Master from Ottawa, Canada specializing in high availability, disaster recovery and system infrastructures running on the Microsoft server technology stack ranging from Active Directory to SharePoint and anything in between. He is very passionate about technology but has interests in music, professional and organizational development, and leadership and management matters when not working with databases. Edwin lives up to his primary mission statement: “To help people and organizations grow and develop their full potential.”
- MSSQLTips Awards: Champion Award (100+ tips) – 2017 | Author of the Year Contender – 2020, 2017
