Problem
Some technical problems lend themselves to storing and retrieving data from a relational database management system (RDBMS). Edgar Codd came up with the idea of a relational model when he was working at IBM’s San Jose Research Library in 1970. The purpose of this model was to abstract the relational database so that it was not bound to any particular application.
Today’s database systems are based upon the original mathematical model defined back then. Three key terms used by the model are relations, attributes, and domains. A relation is a table with columns and rows. The named columns of the relation are called attributes, and the domain is the set of values the attributes are allowed to take.
Other technical problems do not lend themselves to storing and retrieving data from a predefined table. The popularity of NoSQL databases started with companies such as Facebook, Google and Amazon when working with big data problems and/or real time web applications. This set of technology is coined “Not Only SQL” since they might support a SQL syntax for retrieving data.
While there are many NoSQL database systems, most systems can be place into one of four widely implemented data stores.
A key value store uses the concept of an associative array to save and retrieve data. The Webster dictionary is the physical implementation of this concept.
A document store encapsulates all the data for an entity (document) using a popular encoding format such as XML or JSON. Sets of documents can be grouped or arranged using collections. This technology is popular with applications that have a variety documents with different attributes.
A graph store contains a bunch of elements with a finite number of connections between them. Data such as social relationships, road maps and/or network topologies can be easily represented with this technology. The shortest route between two points in a graph database is used by your phone’s GPS navigation software.
A column store saves the data using columns instead of rows. This means that columns with discrete values can be highly compressed. When querying data that uses a column store, columns (data pages) that are not of interest are never read. If we query a typical table, we have to read in all rows (data pages) that might have only a few columns we are interested in.
How can we use a key value store technology in Azure to save and retrieve data?
Solution
PowerShell has always been the language of choice to automate system deployment and configuration. It is not surprising that we have a series of cmdlets to help us work with Azure Table Storage. Please see the MSDN reference on table storage cmdlets and the PowerShell gallery reference for details on row oriented cmdlets.
Business Problem
There are many financial companies that invest in the stock market via mutual funds. Our fictitious company named Big Jon Investments is such a company. They currently invest in the S&P 500 mutual fund but are thinking of investing in individual funds starting in 2018.
The investments department will need historical data to make informed choices when picking stocks. Our boss has asked us to load summarized daily trading data for the 505 stocks that make up the list into a key value store. We have five years’ worth of data stored in comma separated files. Each file has the stock symbol and year as part of the name.
How can we insert, update, delete and select records from Azure Table Storage using PowerShell?
Saving Azure Credentials
In the past, I have used the Add-AzureRmAccount cmdlet to login into a given Azure subscription. This action requires the user to enter a user name and password. How do we automate an on-premises PowerShell script if we always need user interaction?
Do not fret.
The Save-AzureRmContext cmdlet allows us to save the user credentials as a local JSON file and the Import-AzureRmContext cmdlet can be used in the future to load the credential file for an automated process. If you have multiple subscriptions, you should use the Set-AzureRmContext cmdlet to pick the correct one before saving to the JSON file. Of course, changing your password will require the regeneration of this file for your automated processes.
The PowerShell code below saves the user credentials as a file named ‘azure-creds.json’.
#
# Azure Subscriptions
#

# Prompts you for azure credentials
Add-AzureRmAccount

# Pick my internal subscription
Set-AzureRmContext -SubscriptionId 'cdfb69bf-3533-4c89-9684-1ba6ba81b226'

# Save security credentials
Save-AzureRmContext -Path "C:\COMMUNITY WORK\STAGING\ATS\AZURE-CREDS.JSON" -Force

# Import security credentials
Import-AzureRmContext -Path "C:\COMMUNITY WORK\STAGING\ATS\AZURE-CREDS.JSON"
Creating Azure Objects
I am assuming you are familiar with logging into an Azure subscription, creating a resource group, and deploying a storage account. If you are not comfortable with these tasks, please see my article named “Using Azure to Store and Process Large Amounts of SQL data” for details.
The image below shows a login into the Visual Studio Enterprise – MPN subscription via the PowerShell code executed from the Integrated Scripting Environment (ISE).

The image below shows the creation of a resource named rg4tips18 in the eastus2 region.

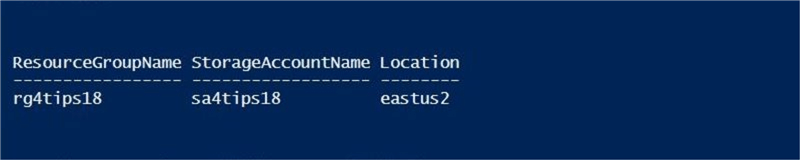
The image below shows the deployment of a storage account named sa4tips18 with the resource group.
Azure Table Storage
Table storage has been a long-time service in Microsoft Azure. This offering has been grouped under the storage services even though one can consider this a key value store or a NoSQL database.
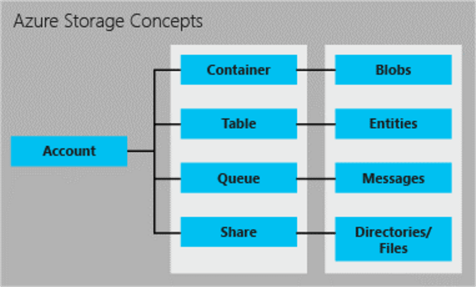
The image below shows the relationship between the storage account, the storage table, and user defined entities. The last two objects will be the focus of today’s discussion.
There are no official cmdlets to support entity/row management inside the tables from a Azure PowerShell module; However, Paulo Marques developed a custom module that fills in this gap. Please see the GIT repository for details.
If you have never used this module, you have to import the module using the Install-Module cmdlet to get access to the row oriented cmdlets. Of course, you might be interested in the cmdlets that are available. Filter the results of the Get-Command cmdlet to get a full list of cmdlets.
The below PowerShell code loads the required module and lists available cmdlets.
# # Azure Storage Table
#

# Make sure we have the module
Install-Module AzureRmStorageTable

# List cmdlets
Get-Command | Where-Object { $_.Source -match 'Storage' -and $_.Name -match 'StorageTableRow' }
The image below shows the cmdlets available with this service for dealing with rows (entities).

Before deploying an object to a data center (region), we need to check the availability of the service. The code below filters the output of the Get-AzureRmResourceProvider cmdlet for table services located in the United States (US).
#
# Data Centers with my service
#

# Data centers with table storage
$AzureSQLLocations = (Get-AzureRmResourceProvider -ListAvailable |
    Where-Object {$_.ResourceTypes.ResourceTypeName -eq 'storageAccounts/tableServices'}).Locations

# Us locations
$AzureSQLLocations | where {$_ -match " US"}
The image below shows the regions that have the service available in the United States (US). We will continue using eastus2 as our chosen data center.

Table Storage Object
Most Azure services have three cmdlets defined to create new, list current, and remove existing services. The Table Storage object is no different.
| Cmdlet | Description |
|---|---|
| New-AzureStorageTable | Create a new storage table. |
| Get-AzureStorageTable | List the current storage table. |
| Remove-AzureStorageTable | Remove the existing storage table. |
The PowerShell cmdlets still have an issue with passing the storage context as a parameter. A work around for this issue is to use the pipeline | to pass the required context to the cmdlet. The code below creates an Azure Table Storage object (context) named ts4stocks.
#
# Create storage table
#

# Grab storage context - work around for RM
$StorageContext = Get-AzureRmStorageAccount -Name 'sa4tips18' -ResourceGroupName "rg4tips18"

# Create a storage table
$StorageContext | New-AzureStorageTable -Name "ts4stocks"
The image below was taken from the PowerShell ISE application. We can see that this service uses an HTTP end point for communication.

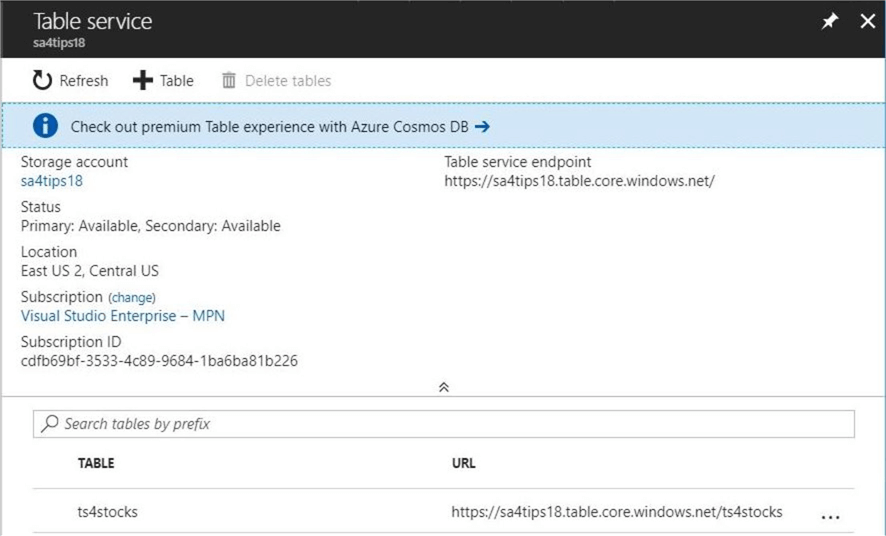
I always like verifying the objects that I create using PowerShell with the Azure Portal. Again, the same information is displayed in the image below.
In summary, PowerShell code can be used to login into a subscription, create a resource group, deploy a storage account and provision a table storage object. I am enclosing a completed script here for your use.
Custom Log Object
It is very important to keep track of load times versus total number of inserted records. This allows the developer to see possible performance issues with the load process and change the design accordingly.
The custom cmdlet below takes an action, file name, record count, and time stamp as input. It returns a custom Power Shell object. We are passing a new time stamp object on the first call of the cmdlet. The second call uses the existing object and calculates the total elapsed time in milliseconds.
#
# Custom-Log-Object() - Custom stop watch
#

function Custom-Log-Object {
    [CmdletBinding()]
    param(
        [Parameter(Mandatory = $true)]
        [String] $Action,

        [Parameter(Mandatory = $true)]
        [String] $FileName,

        [Parameter(Mandatory = $true)]
        [String] $RecCnt,

        [Parameter(Mandatory = $true)]
        [String] $TimeStamp
    )

    # Create time span object
    $Span = New-TimeSpan -Start $TimeStamp

    # Create properties
    $Properties = @{'Action'="$Action"; 'File' = "$FileName"; 'Recs'="$RecCnt";'Total'=$Span.TotalMilliseconds}

    # Create object
    $Object = New-Object -TypeName PSObject -Prop $Properties

    # Return object
    Return $Object
}
In a nutshell, we will be using the Custom-Log-Object cmdlet to capture performance data.
Custom Cmdlet Overview
There is a need for a custom cmdlet to read data stored in a comma separated value files and create new entities in our key value store or NoSQL database. The devil is in the details when it comes to crafting code. Instead of going over each line in the cmdlet, I am going to describe the parameters passed to the cmdlet and the actual pseudo code of the algorithm.
The name of the custom cmdlet is Load-Stocks-2-TableStorage.
The resource group name, storage account name, and storage table name are passed to the cmdlet as parameters. This information is required to insert rows of data or entities in Azure Table Storage.
Additional parameters such as root file path, file extension and starting letter of file are used to partition the file load into separate jobs for concurrency.
The following table describes the algorithm for loading historical stock data files into Azure table storage.
| Task | Description |
|---|---|
| 1.0 | Get a full list of files to load. |
| 2.0 | Grab table storage context. |
| 3.0 | For each file, do the following: |
| 3.1 | Mark the start of the file load process. |
| 3.2 | Read in the comma separated value file. |
| 3.3 | For each row read, create an entity in table storage. |
| 3.4 | Mark the end of the file load process. |
The code snippets in the following details section are meant to demonstrate coding techniques. More than likely, they will be missing the definition of local variables and will not run correctly.
Custom Cmdlet Details
I have talked about “Using PowerShell to Work with Directories and Files” in a prior article. The Get-ChildItem cmdlet is very powerful since it can be used to recursively search for files given a path that is considered the root of the search path.
The image below shows the staging data directory containing sub directories for each year. Inside each directory there are 505 comma separated files representing the S&P 500 stock list for a given year.

The snippet below creates an array of files that match the given file extension and starting letter of the file name. This code is used by task 1.0 in the algorithm.
#
# Get list of files
#
$List = @()
Get-ChildItem $RootPath -recurse |
   Where-Object {$_.extension -eq "$FileExt" -and $_.Name -match "^$FileStart.*"} |
   Foreach-Object {
        $List += $_.FullName
    }
$List
The code snippet below uses the custom log object to capture performance timings. The array is initialized at the start of the program. The timestamp and counter is initialized for each file during the start processing event. The counter is implemented for every row in the file that is processed. The end processing event records the number of records processed during a total elapsed time. This code is used by tasks 3.1 and 3.4.
#
# Capture file processing time
#

# Initialize array
$Time2 = @()

# Record Start
$Start = Get-Date -Format o
$Time2 += Custom-Log-Object -Action 'Start Processing' -FileName "$FileName" -RecCnt "$Cnt" -TimeStamp $Start
The Add-StorageTableRow cmdlet requires a hash table of properties to define an entity. Picking the correct data type for each value ensures domain integrity. The code below creates a hash table is for each row in the comma separated values file. This code is used by task 3.2.
#
# Convert row to hash table entity
#

# Read in csv file
$Data = Import-Csv $FileName

# For each row
$Data | Foreach-Object {

    # Row Details - Hash table from PS Object
    $RowData = @{"symbol"=[string]$_.symbol;
        "date" = [datetime]$_.date;
        "open" = [float]$_.open;
        "high" = [float]$_.high;
        "low" = [float]$_.low;
        "close" = [float]$_.close;
        "adjclose" = [float]$_.adjclose;
        "volume" = [long]$_."volume"}

    # Show the results
    $RowData
}
Before we can call the Add-StorageTableRow cmdlet, we need to define a partition key and row key.
The partition key is used to segregate the data. I am going to partition the stocks based on the first letter in the stock symbol. A given partition is not guaranteed to be located on the same computing resource in the data center. This is very important to note.
The row key uniquely identifies the data set. I am going to choose the trading date and stock symbol as the composite row key. This makes sense since a given stock is only traded once on a given day.
The code snippet below saves the data set (entity) as a row in Azure Tables Storage. You can see this code matches task 3.3.
#
# Pick a partition and row key before saving entity
#

# Partition Key - First letter in stock symbol
$First = (Split-Path -Path $FileName -Leaf).Substring(0, 1)
$PartKey = $First + "-STOCKS"

# Row key - symbol + date
$RowKey = $_.symbol + "-" + $_.date
$RowKey = $RowKey -replace "/", ""

# Add to table storage
Add-StorageTableRow -table $Table -partitionKey $PartKey -rowKey $RowKey -property $RowData | Out-Null
The fully functional PowerShell program can be called from the command line. It takes the first letter of stock symbol as a command line parameter. It saves the timing information to a sub-directory named ATS so that we can monitor and improve performance of the code over time.
Executing in parallel
Today’s laptops have multiple logical processors. Executing a load process using one CPU is not efficient as compared to using all the CPU’s. Developers have been using batch files for a long time.
The following batch file sets the working directory to the location of the PowerShell program. Then it calls the load-table-storage-partition program 26 times. One for each letter in the alphabet that represents a stock symbol. In short, we are loading the data files in parallel into Azure Table Storage.
REM
REM Run import process in parallel
REM

REM Set path
cd "C:\MSSQLTIPS\MINER2018\ARTICLE-2018-03-TABLE-STORAGE"

REM Each file that starts with %%i
for %%i in (A B C D E F G H I J K L M N O P Q R S T U V W X Y Z) do call :for_body %%i
exit /b

REM Execute the powershell script
:for_body
    start "cmd" powershell.exe -file load-table-storage-partition.ps1 %1
exit /b
The image below taken from Windows task manager shows the 26 command shell sessions working in parallel. There are additional programs running since our total number of applications is 31.

I am outputting the name of the file to the console at the start of the program as well as a progress indicator every 25 records. Each file has around 250 rows and there are a little over 2,500 files to process. We have more than five hundred thousand rows of data to load.

If you wait long enough, all the command shell sessions executing the PowerShell program will close. At that point, all S&P 500 Stock data for years 2013 thru 2017 will be in our Azure Table Storage object or NoSQL database.
Increasing performance
After running the import process for the first time, I gather the total number of records per file and the total time to load a file. With a little division, I calculated the number of milliseconds to add an entity to the storage. I graphed the number file imports that have a observed value versus import time for one record. On average, it takes around 109 milliseconds to insert an entity. This load time can vary from 103 to 117 milliseconds depending upon conditions.

This process loads about 9 records per second. This is extremely slow. Is there any way to increase the performance?
This Azure service is dependent upon the HTTPS protocol. This protocol runs over TCP/IP. I started researching why are so many calls with very little packet data are running so slow? The image below shows that we are not seeing a bottle neck at the network card.

I found an article by the Azure Storage team that describes a low level algorithm named Nagle that is supposed to clear up network congestion. The purpose of this algorithm is to hold back small segments either until TCP has enough data to transmit a full-sized segment or until all outstanding data has been acknowledged by the receiver. Nagle interacts poorly with TCP Delayed ACKs, which is a TCP optimization on the receiver.
By the way, this algorithm is on by default. A one-line call to the Dot.Net library turns off this algorithm for the whole session.
# Turn off this algorithm
[System.Net.ServicePointManager]::UseNagleAlgorithm = $false

The above image shows the performance timings from running the import process a second time with the Nagel algorithm turned off. We can see that the total time went down from 110 to 36 milliseconds for an average insert. This number can vary between 34 and 39 milliseconds depending upon conditions.
In short, we reduced the time to insert an entity into Azure Table Storage by 67 percent.
Azure Storage Explorer
Microsoft has provided power users with the Azure Storage Explorer application. See this web page for details on how to download this program. This application is like a big Swiss army knife since you can work with blob storage, table storage, queue storage, file storage, data lake storage, and cosmos database.
Today, we are going to focus on how to use this tool to explore the data we recently uploaded into Table Storage. Let’s start our exploration of this application. Please find the account management icon menu and click ‘add an account’.

Security is always the first line of defense. Please enter a valid Azure subscription owner.

Next, enter the correct password associated with this account.
Each Azure user can have more than one subscription. The application is smart enough to recognize the name of my subscription. Click the apply button to continue.

You can use the storage explorer to look at different objects in the same session. Since I have a container named sc4tips18, we could look at the comma separated value files stored in blob storage. See my article on “Bulk Insert Data Into Azure SQL database” for details on these staged files.
The image below shows the storage account, resource group and access keys associated with my account. If we drill into the ts4stocks storage table, we can start searching for entities.

The storage explorer supports select, insert, update and delete actions against the entities. The image below shows a typical search for all stocks with the symbol MSFT or Microsoft.

A typical business task might be the correction of the data for Agilent Technologies, Inc. (A) since it has an invalid close price on May 2, 2017. To correct this data, I would search for the entity. Upon finding the entity, I would choose the edit action.

The above image shows the partition and row keys that were used when we saved the data. An automatic timestamp is added to the record for record consistency. After making the change in the text box, we can click the update button to persist the data to Table Storage.
To recap, the Azure Storage Explorer is a free application that can be used to manager your key value data.
Get By Column Name
The PowerShell interface for Table Storage comes with a bunch of row-oriented operations or cmdlets. There are several ways to select, update, and delete data from the key value store. For each technique, I am going to use the following snippet of code. A section of code is wrapped with two comments stating code varies. This is where I will be making code changes to demonstrate the use of each cmdlet.
The Get-AzureStorageTableRowByColumnName cmdlet can be used to search a particular column (key) for a particular value. The example below is looking for all entities that have a symbol equal to MSFT. The cmdlet returned 1,258 records in 26.43 seconds.
#
# Typical test sequence - Search by column name
#

# Capture total time
$Time2 = @()

# Mark start ~ query
$Start = Get-Date -Format o
$Time2 += Custom-Log-Object -Action 'Start Select By Column' -FileName "MSFT" -RecCnt "0" -TimeStamp $Start

# Get storage and table context
$StorageContext = Get-AzureRmStorageAccount -Name 'sa4tips18' -ResourceGroupName "rg4tips18"
$StorageTable = $StorageContext | Get-AzureStorageTable -Name "ts4stocks"

# Code Varies
$DataSet = Get-AzureStorageTableRowByColumnName -table $StorageTable `
    -columnName "symbol" `
    -value "MSFT" `
    -operator Equal
# Code Varies

# Data set size
$Recs = $DataSet.Length

# Mark end ~ query
$Time2 += Custom-Log-Object -Action 'Start Select By Column' -FileName "MSFT" -RecCnt "$Recs" -TimeStamp $Start

# Show timing info
$Time2
Get By Partition Key
The Get-AzureStorageTableRowByPartitionKey cmdlet can be used to search a partition key for a particular value. The example below is looking for all entities that have a partition key equal to M-STOCKS. The cmdlet returned 42,804 records in 285.27 seconds.
#
# Search by partition key
#

# Just M stocks
$DataSet = Get-AzureStorageTableRowByPartitionKey -table $StorageTable -partitionKey "M-STOCKS"
Get By Custom Filter
The Get-AzureStorageTableRowByCustomFilter cmdlet can be called for a custom search. A search string that looks like a where clause in a SQL statement is passed to the cmdlet. Searching by row and partition key returns the data very quickly. It took a total of 1.27 secs to find one record in over half a million records.
#
# Search by custom filter
#

# Find my record
$DataSet = Get-AzureStorageTableRowByCustomFilter `
    -table $StorageTable `
    -customFilter "(RowKey eq 'MSFT-01132013') and (PartitionKey eq 'M-STOCKS')"
Update Table Row
The Update-AzureStorageTable Row cmdlet can be used to update a record. Updating is a two-part operation. First, we need to retrieve the record with a GET cmdlet. Next, we update the entity with a new value. The entity is then piped to the UPDATE cmdlet. The whole sequence of commands took about 8.5 seconds to execute.
#
# Update by custom filter
#

# Before update
$OneRec = Get-AzureStorageTableRowByCustomFilter `
    -table $StorageTable `
    -customFilter "(RowKey eq 'MSFT-01202017') and (PartitionKey eq 'M-STOCKS')"


# Change entity
$OneRec.low = 61.04

# Pipe entity to update cmdlet
$OneRec | Update-AzureStorageTableRow -table $StorageTable
There is one optimistic concurrency problem that you might come across. If you execute a GET operation and another thread UPDATES the record before you do, you might receive a 412 error. There is an excellent article, written by a program manager on the storage team, that goes over the entity tag (ETAG) and optimistic currency. It is a must read if you are developing a multi-threaded application using Table Storage.

Remove Table Row
The Remove-AzureStorageTable Row cmdlet can be used to delete a record. Deleting is a two part operation. First, we need to retrieve the record with a GET cmdlet. The entity is then piped to the DELETE cmdlet. The whole sequence of commands took about 10.5 seconds to execute.
#
# Delete by custom filter
#

# Before delete
$OneRec = Get-AzureStorageTableRowByCustomFilter `
    -table $StorageTable `
    -customFilter "(RowKey eq 'MSFT-04052017') and (PartitionKey eq 'M-STOCKS')"

# Pipe entity to delete cmdlet
$OneRec | Remove-AzureStorageTableRow -table $StorageTable
Can I use this sequence of PowerShell cmdlets to empty the Table Storage of all entities? The answers is yes. However, I would not suggest it!
You will face the same issue as a loading a large data set. Thousands of small HTTPS calls over the internet which is inherently slow. Instead, drop the old table storage object and reload the data into a new object. If you need to save a small portion of the data before dropping the object, use a GET and ADD cmdlets repeatedly to copy the data from the old to the new table storage.
Add Table Row
The Add-AzureStorageTable Row cmdlet can be used to insert a record. I already talked about this Azure cmdlet when crafting the custom PowerShell cmdlet named Load-Stocks-2-TableStorage. However, there might be one issue that I did not warn you about.
The code snippet below is adding an entity to a Table Storage context using a Partition Key and Row Key.
# Add to table storage
Add-StorageTableRow -table $Table -partitionKey $PartKey -rowKey $RowKey -property $RowData
This combination has to be a unique combination in the key value store. For instance, let’s say you stopped the load process in the middle of execution. If you re-run the process, you will receive a 409 error. Basically, you have a key violation in your NoSQL database.

Now drop and rebuild the Table Storage object. Then re-execute the load process. The insert statement will complete with no errors. See the REST API document for the Table Storage service for status codes by method. The 204 status code seen in the image below represents a successful execution.

I skipped over the Get-AzureStorageTableRowAll cmdlet since it is useless unless you are using a very tiny table store. In a nutshell, I cover almost all of the row-based cmdlets available for you to use in your programs.
Storing Heterogeneous Data
The data that we save in the ts4stocks table storage had the same structure. This does not have to be the case. It is up to you on how to save your data.
I am going to manually create a storage table named ts4tips18 via the Azure Portal. Our hypothetical company Big Jon’s investments is located in Rhode Island. One of our investment brokers was able to sell some shares of stock to the movie star, James Wood who happen to grew up in the area.
Again, this is all make believe. So, we have one customer record and three buy records for purchased stock. I used the Azure Storage explorer to add this heterogeneous data to the table.

The above image shows a sparse matrix in which key value pairs are missing between different record types. In a nutshell, data saved in Azure table storage does not need to have the same structure.
Summary
Today, we talked about how a NoSQL database can be categorized as either a key value store, a document store, a graph store or a column store. Azure Table Storage is a service that implements a key value store. Of course, we can manage and manipulate the data in table storage using PowerShell cmdlets.
The S&P 500 historical data set contains data on roughly 500 stocks over the past five years. I am including CSV files (2013, 2014, 2015, 2016 and 2017) as zip files just in case you want to use the data set for your own prototypes.
The business problem we solved today was inserting, updating, deleting and selecting data from Azure Table Storage using PowerShell cmdlets. Almost all Azure data services are based upon some type of REST API, meaning network traffic is using the HTTPS protocol over TCP/IP. During our performance testing, we found out that the Nagle algorithm negatively effects performance. By turning off this algorithm, our data load process saw a 67% decrease in time.
Last but not least, Microsoft supplies the power user with Azure Storage Explorer. This application is like a Swiss army knife for Azure Storage. You can perform all the typical CRUD operations using this tool.
In a nutshell, Azure Table Storage is our first introduction to No SQL databases. Cloud born applications can effectively use this database since a single CRUD operation completes within a given amount of time.
In my next article, I want to investigate Azure Cosmos database, which is Microsoft’s new globally distributed, multi-model database service. There is support for four different application programming interfaces today. This includes both a Document DB and Mongo DB for a document storage engine.
Next Steps
- Using table storage API with Azure Cosmos database
- Using document storage API with Azure Cosmos database
- Using graph storage API with Azure Cosmos database
- Exploring the data migration tools for Azure Cosmos database
- Exploring the different consistency models in Azure Cosmos database

John Miner is a Senior Data Architect at Insight Digital Innovation helping corporations solve their business needs with various data platform solutions.
He has over thirty years of data processing experience, and his architecture expertise encompasses all phases of the software project life cycle, including design, development, implementation, and maintenance of systems.
His credentials include undergraduate and graduate degrees in Computer Science from the University of Rhode Island. Also, he has earned certificates from Microsoft for Database Administration (MCDBA), System Administration (MCSA), Data Management & Analytics (MCSE), Data Science (MPP), Databricks Certified, and Fabric Certified.
John has been recognized with the Microsoft MVP award nine times for his outstanding contributions to the Data Platform community.
When he is not busy talking to local user groups or writing blog entries on new technology, he spends time with his wife and daughter enjoying outdoor activities. Some of John’s hobbies include wood working projects, crafting a good beer and playing a game of chess.
- MSSQLTips Awards: Author of the Year – 2019, 2022, 2023 | Champion (100+tips) – 2023


