By: Siddharth Mehta | Comments (1) | Related: > SQL Server 2017
Problem
Images are an integral part of any user interface and they have similar characteristics as data. Images are of diverse types like jpeg, png, gif, etc. which are synonymous data types. Images need to be processed like scaling images, applying effects, animating multiple images in a single graphic as well as transforming from one image to another by applying techniques like morphing. Images are stored in databases and treated in an analogous manner as data values.
Traditionally, the access to image processing has been limited to front-end or middleware services that process images. With the advancement in databases and the pattern of storing images in databases, there is an increasing need to process images right out of databases as the database layer is closest to the physical storage of images.
In this tip, we will learn how to apply diverse types of processing to images just by using SQL Server 2017 and R.
Solution
R contains a powerful set of open-source libraries, some of which can be used for image processing. SQL Server 2017 ships with an option to install and use R language with T-SQL. In this tip we will use R along with an image processing library for the above-mentioned purpose.
To demonstrate the image processing capabilities and effects, we need sample images which can be processed. I will be using sample images from Wikipedia. We will be referring to those images from the web and reading it directly from its source.
Installing R Package for Image Processing in SQL Server
It's assumed that SQL Server 2017 or higher version of SQL Server is installed with SSMS, and R is installed as well as configured on this instance of SQL Server. If you need to refer to the installation steps, you can follow the installation section of this R tutorial.
We will need to install a R package named – magick. You can read the instructions from this link on how to install packages on a R server.
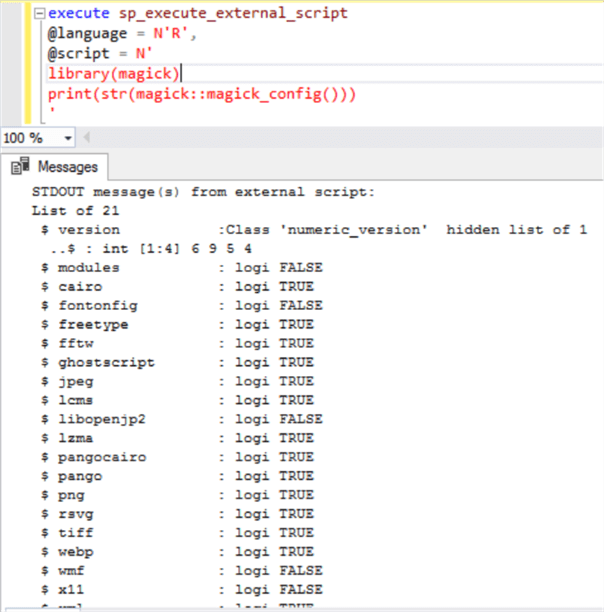
Once you have installed these packages, open a new query window and type the code below. After the code is executed, you will be able to see the output as shown below the code. In this code we are referencing this library and printing the configuration supported by this library. It’s shows the different formats and options supported by this library.
Understanding the code.
- sp_execute_external_script is the store procedure using which external scripts can be executed in SQL Server.
- @language parameter signifies the script language being used, which is R in this case.
- @script parameter contains the actual R script which will be executed
execute sp_execute_external_script
@language = N'R',
@script = N'
library(magick)
print(str(magick::magick_config()))
'

Reading an Image File with R and SQL Server
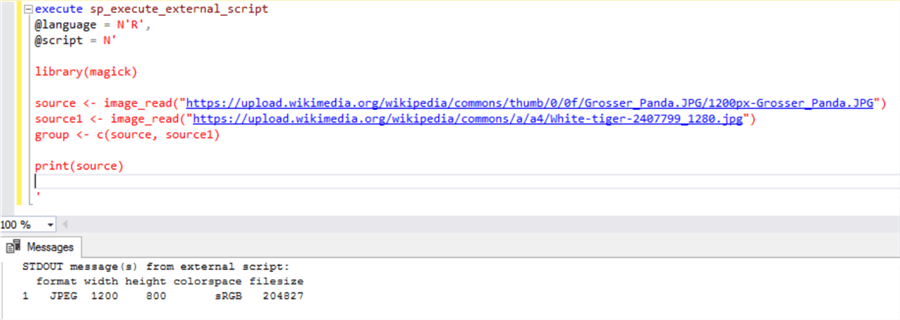
Now it’s time to read an image file. We can do this by using the image_read function and provide a URL that references an image on the web. You can also reference any image file locally from your machine.
Execute the below code and you should be able to see the output as shown below. In the below code we are reading two files and creating a list of two vectors that we will use in the upcoming steps. In the print function, we are printing the properties of one of the files that we referenced in the source vector. The output shows properties of the file like size, color, dimensions, etc.
execute sp_execute_external_script
@language = N'R',
@script = N'

library(magick)

source <- image_read("https://upload.wikimedia.org/wikipedia/commons/thumb/0/0f/Grosser_Panda.JPG/1200px-Grosser_Panda.JPG")
source1 <- image_read("https://upload.wikimedia.org/wikipedia/commons/a/a4/White-tiger-2407799_1280.jpg")
group <- c(source, source1)

print(source)

'

Converting Image File Formats with R and SQL Server
After reading the file, we have the option to apply different processing options on this image. One of the most common processing applied to an image is converting the file formats.
Using the image_convert function, we are converting the file format from jpeg to png. After converting the format, one may want to stage this file and verify it. Using the image_write function we are saving the file to disk. In this function we again have an option to save the file in yet another format.
In the below code, we are saving this file as a .gif file on local machine. The saved file looks as shown below the code.
execute sp_execute_external_script
@language = N'R',
@script = N'

library(magick)

source <- image_read("https://upload.wikimedia.org/wikipedia/commons/thumb/0/0f/Grosser_Panda.JPG/1200px-Grosser_Panda.JPG")
source1 <- image_read("https://upload.wikimedia.org/wikipedia/commons/a/a4/White-tiger-2407799_1280.jpg")
group <- c(source, source1)

target <- image_convert(source, "png")
print(target)

image_write(target, path = "c://temp//target.gif", format = "gif")
'

Adding Annotation to Images with R and SQL Server
From a data confidentiality perspective, images are required to be classified. Generally, this is achieved by adding an attribute to the table in which the image is stored. One may also want to annotate on the image itself that it’s a classified / confidential image.
The below code demonstrates how you can add annotation on the image using the built-in function image_annotate. We pass the annotation text and the position of the annotation in the image as parameters. Pre- or post-annotation, the image may need to be scaled to make the size of the image match the font-size of the annotation. The same can be achieved using the image_scale function which takes the dimension of the image as input parameters.
After you execute this code, your rescaled and annotated image would get saved in the file path mentioned in the code and should look as shown below.
execute sp_execute_external_script
@language = N'R',
@script = N'

library(magick)

source <- image_read("https://upload.wikimedia.org/wikipedia/commons/thumb/0/0f/Grosser_Panda.JPG/1200px-Grosser_Panda.JPG")
source1 <- image_read("https://upload.wikimedia.org/wikipedia/commons/a/a4/White-tiger-2407799_1280.jpg")
group <- c(source, source1)

target <- image_convert(source, "png")

target <- image_annotate(target, "COPYRIGHT RESERVED", size = 30, color = "red", degrees = 30, location = "+530+200")

target <- image_scale(target, "800x600")

image_write(target, path = "c://temp//target.gif", format = "gif")

'

Adding Images Effects with R and SQL Server
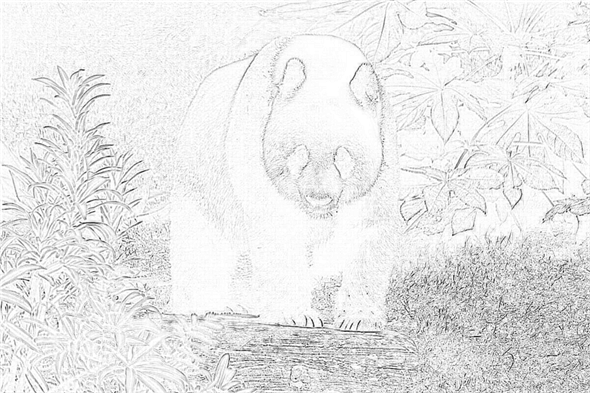
Image effects are a popular form and use-case of image processing that is often found in various applications. There are a variety of effects available in the magick library which can be readily applied to the image. Below is an example of the charcoal effect which can be easily applied using the image_charcoal function and the processed output file would look as shown below.
execute sp_execute_external_script
@language = N'R',
@script = N'

library(magick)

source <- image_read("https://upload.wikimedia.org/wikipedia/commons/thumb/0/0f/Grosser_Panda.JPG/1200px-Grosser_Panda.JPG")
source1 <- image_read("https://upload.wikimedia.org/wikipedia/commons/a/a4/White-tiger-2407799_1280.jpg")
group <- c(source, source1)

target <- image_convert(source, "png")
target <- image_charcoal(target)

image_write(target, path = "c://temp//target.gif", format = "gif")

'

Creating Animated Images with R and SQL Server
Some image formats like GIF support animation, and we have inevitably seen animated images on many websites. Creating an animated image by combining a set of images allows storing multiple images in a single file, and it can be a very useful processing technique in certain use-cases.
The below code uses two images and combines it in a single image with an animation. The animation speed is determined by the fps parameter in the image_animate function. The image_scale function is used inside the animate function to scale both the images to the same size, which is desirable when multiple images are being animated in the same frame.
execute sp_execute_external_script
@language = N'R',
@script = N'

library(magick)

source <- image_read("https://upload.wikimedia.org/wikipedia/commons/thumb/0/0f/Grosser_Panda.JPG/1200px-Grosser_Panda.JPG")
source1 <- image_read("https://upload.wikimedia.org/wikipedia/commons/a/a4/White-tiger-2407799_1280.jpg")
group <- c(source, source1)

target <- image_convert(source, "png")

target <- image_animate(image_scale(group, "500x500"), fps = 1, dispose = "previous")

image_write(target, path = "c://temp//target.gif", format = "gif")

'
Once the above query is executed the output file looks as shown below. If you are unable to see animation in the below image, it may be the case that your browser does not support animation. In that case, you can save the image locally and open it in a browser or application that supports animation.

Morphing Images with R and SQL Server
We often have use-cases where we need to show data on a time-life which explains how one state of data transformed to another. In the imaging area, the synonymous example would be morphing one image to another. For this example, I have used the images of former US presidents. I have selectively chosen the father and son images, so that morphing can look as seamless as possible. The only function we need to use in this case is image_morph function and reduce the frame rate to 100 so the morphing speed is not too fast. After the below code is executed, the morphed image should get saved in the form of gif file as shown below.
execute sp_execute_external_script
@language = N'R',
@script = N'

library(magick)

president1 <- image_read("https://upload.wikimedia.org/wikipedia/commons/d/d4/George-W-Bush.jpeg")
president2 <- image_read("https://upload.wikimedia.org/wikipedia/commons/d/d9/George_HW_Bush.jpg")
presidents <- c(president2, president1)

target <- image_morph(image_scale(presidents, "500x500"), frames = 100)

image_write(target, path = "c://temp//target.gif", format = "gif")

'
To see the morphed image, click here.
If you are not able to see the animation in the below image, its possibly due to the reason that your browser does not support animated images. In that case, try saving this image and view it in a browser or application that supports animated images.
Storing Images in SQL Server
Finally, one may want to store the processed images inside SQL Server, by importing the processed file on the local disk into a table in SQL Server. This can be done easily using a set of T-SQL statements. You can read about this approach from here.
Summary
In this way, you can use the magick image processing library in R and process images using a few lines of T-SQL code, without any dependency on external / front-end / middleware framework just to process images.
Next Steps
- This tip demonstrates a very tiny portion of image processing options supported by the magick library. Try exploring other images processing options available in this library. You can read the library usage documentation from here.
About the author
 Siddharth Mehta is an Associate Manager with Accenture in the Avanade Division focusing on Business Intelligence.
This author pledges the content of this article is based on professional experience and not AI generated.
View all my tips


