By: Nai Biao Zhou | Comments | Related: More > Database Administration
Problem
We always need to preload some data into a Microsoft SQL Server database before end users access the database. A typical method is to execute many SQL insert statements immediately after the database is created. To enable data traceability, we then commit all these SQL scripts into a version control system. When the number of script files increases, tracing the changes of the predetermined data becomes burdensome. A Microsoft database project can improve this method by including all these insert statements into post-deployment script files, which are automatically executed in the database project deployment process. However, this approach still mixes data and scripts in the same files. Occasionally, we need to preload a large amount of data that is provided by other parties. Sometimes, we expect that the predetermined data is well-formatted for ease of maintenance. Therefore, we want the database project to read data from external data files and then load them into the database.
Solution
We store predetermined data in XML files, then use "OPENROWSET" function [1] to read data from an XML file into an XML data type variable. In the next step, we call the "OPENXML" function [2] to obtain a rowset view over the XML variable. Finally, we utilize the SQL MERGE command [3] to perform INSERT, UPDATE and DELETE operations on a target table in a single statement. We are going to start with a Microsoft sample database project [4], then walk through this solution step by step.
The solution was tested with SQL Server Management Studio V17.4 and Microsoft Visual Studio Community 2017 on Windows 10 Home 10.0 <X64>. The DBMS is Microsoft SQL Server 2017 Enterprise Edition (64-bit).
Reviewing WideWorldImporters Sample Database Project
We can use Microsoft sample projects as starting points for our own projects. The WideWorldImporters sample project provides a data warehousing solution and demonstrates how to design a database with best leveraging SQL Server features [4]. After having downloaded the entire package, we have found there are four projects in this package. This tip utilizes the database project "WideWorldImporters", whose folder structure is "Schema\Object Type", as shown in Figure 1.
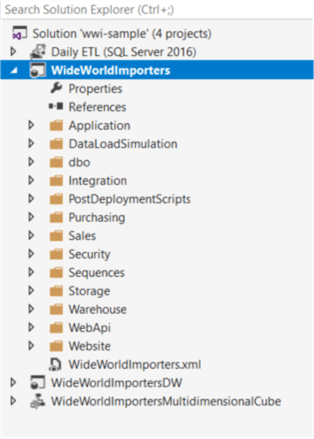
Figure 1 - Database Project Folder Structure
Expand the folder "PostDeploymentScripts", shown in the preceding screenshot, and open the script file "Script.PostDeployment1.sql". The file uses "SQLCCMD" syntax to include other script files in the post-deployment script. If some error messages indicate incorrect syntax in the "Error List" window, we can solve these errors by switching the execution settings to the "SQLCMD Mode" as demonstrated in Figure 2.
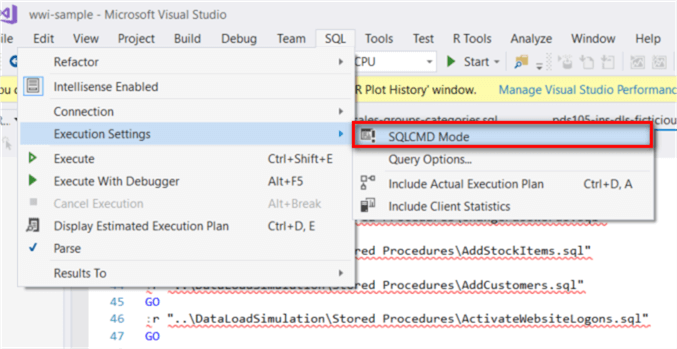
Figure 2 - Switch to SQLCMD Mode
We open the file "pds100-ins-app-people.sql" and look at the content. As illustrated in Figure 3, both SQL scripts and data reside in this file. Furthermore, the mapping between a column name and its corresponding value is not obvious. These cause the inconvenience of maintaining the predetermined data. By the way, the "Properties" panel in the figure shows that the build action for this file is selected as "None".
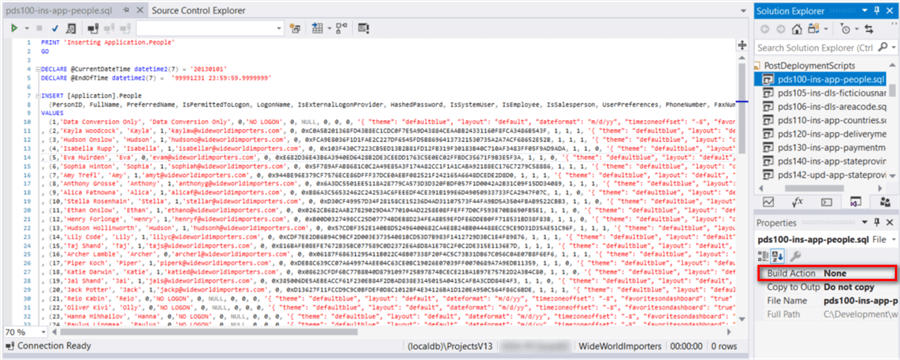
Figure 3 - pds100-ins-app-people.sql
It is noteworthy that the first line in the file "pds100-ins-app-people.sql" prints "Inserting Application.People" in the "Data Tools Operations" window, shown in Figure 4, during publishing the project. If we deploy this project with command "sqlpackage.exe", the output of the "print" command also show up in the command window. This allows us to monitor the deployment process.
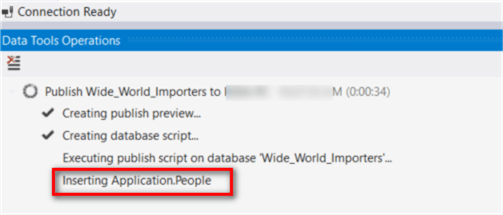
Figure 4 - Data Tools Operators Window
Before publishing the database project, we build the project. Then we can find the "DACPAC" file in the "bin" folder. Right-click on the file name and select "Unpack" menu item from the context menu, illustrated in Figure 5.
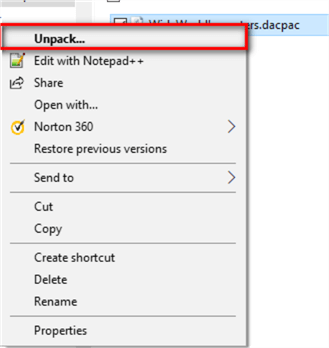
Figure 5 - Select "Unpack" Item from Context Menu
Select a folder path and then click on the "Unpack" button In the pop-up window, shown in Figure 6.
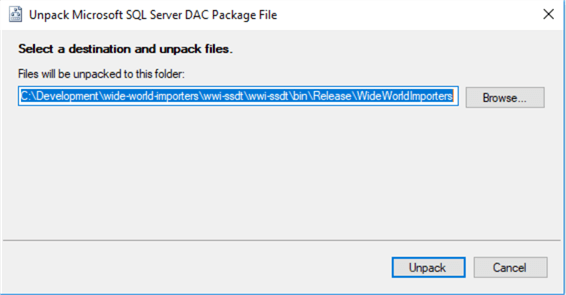
Figure 6 - Select a Destination and Unpack File
The Figure 7 illustrates all files in the "DACPAC" package. The build process created a new script file "postdeploy.sql" that contains all the files included in the "Script.PostDeployment1.sql" file. This reminds us that we should avoid using the same variable name in different script files. The sample project uses "GO" command to wrap multiple Transact-SQL statements into an execution batch. The scope of local variables is limited to a batch and can’t be referenced in another batch [5]. This enables different batches to use the same variable names in the sample project.
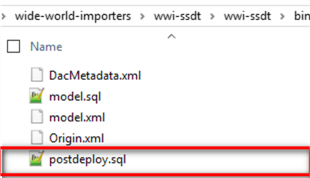
Figure 7 - Files in the DACPAC Package
The sample project used the same variable name, "@CurrentDateTime", in different script files. Without using "GO" command, the scripts cannot work correctly. We can conduct a test to verify this inference. Comment all the "GO" commands in the scripts files "pds120-ins-app-deliverymethods.sql" and "pds130-ins-app-paymentmethods.sql". The local variable "@CurrentDateTime" was declared in both files and now they are in the same batch. We receive the following error message in the publishing process:
Inserting Application.Countries
(17583,1): SQL72014: .Net SqlClient Data Provider: Msg 134, Level 15, State 1, Line 26 The variable name '@CurrentDateTime' has already been declared. Variable names must be unique within a query batch or stored procedure.
Loading Data from an External XML File
We are going to rewrite the "pds105-ins-dls-ficticiousnamepool.sql" file to demonstrate a step-by-step process to read data from an external file. An XML file, shown in the following code snippet, was generated by an application. The XML document is self-describing; thus, non-technical users can manage the data in the file. Our objective is to extract data from the XML file and transport the data into the database. We also put the XML file under a version control system. This ensures that the new version of the database always has the most up-to-date predetermined data.
<ROOT>
   <FicticiousNamePool FullName="Tereza Prikrylova" ToEmail="[email protected]">
     <PreferredName>Tereza</PreferredName>
     <LastName>Prikrylova</LastName>
   </FicticiousNamePool>
   <FicticiousNamePool FullName="Chin-Sun Chang" ToEmail="[email protected]">
     <PreferredName>Chin-Sun</PreferredName>
     <LastName>Chang</LastName>
   </FicticiousNamePool>
   <FicticiousNamePool FullName="Tuulikki Linna" ToEmail="[email protected]">
     <PreferredName>Tuulikki</PreferredName>
     <LastName>Linna</LastName>
   </FicticiousNamePool>
   <FicticiousNamePool FullName="Jiri Vacha" ToEmail="[email protected]">
     <PreferredName>Jiri</PreferredName>
     <LastName>Vacha</LastName>
   </FicticiousNamePool>
   <FicticiousNamePool FullName="Antonin Klaus" ToEmail="[email protected]">
     <PreferredName>Antonin</PreferredName>
     <LastName>Klaus</LastName>
   </FicticiousNamePool>
   <FicticiousNamePool FullName="Sointu Aalto" ToEmail="[email protected]">
     <PreferredName>Sointu</PreferredName>
     <LastName>Aalto</LastName>
   </FicticiousNamePool>
   <FicticiousNamePool FullName="Hyun-Doo Song" ToEmail="[email protected]">
     <PreferredName>Hyun-Doo</PreferredName>
     <LastName>Song</LastName>
   </FicticiousNamePool>
   <FicticiousNamePool FullName="Yu-jin Jee" ToEmail="[email protected]">
     <PreferredName>Yu-jin</PreferredName>
     <LastName>Jee</LastName>
   </FicticiousNamePool>
</ROOT>
Step 1: Create a new folder "Data" in the database project and add the XML file in the folder. Check the properties for the XML file and make sure the build action for the file is selected as "None".
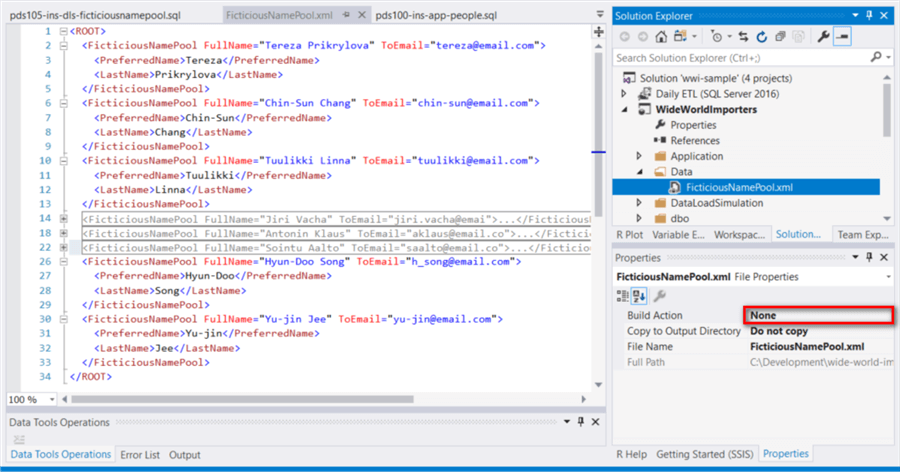
Figure 8 - Add Data File to the Data Project
Step 2: Create a SQLCMD variable "preload_data_path" through the project properties window and assign the "Data" folder path as the default value. The value of this variable will pass to SQL script to find the physical location of the XML file.
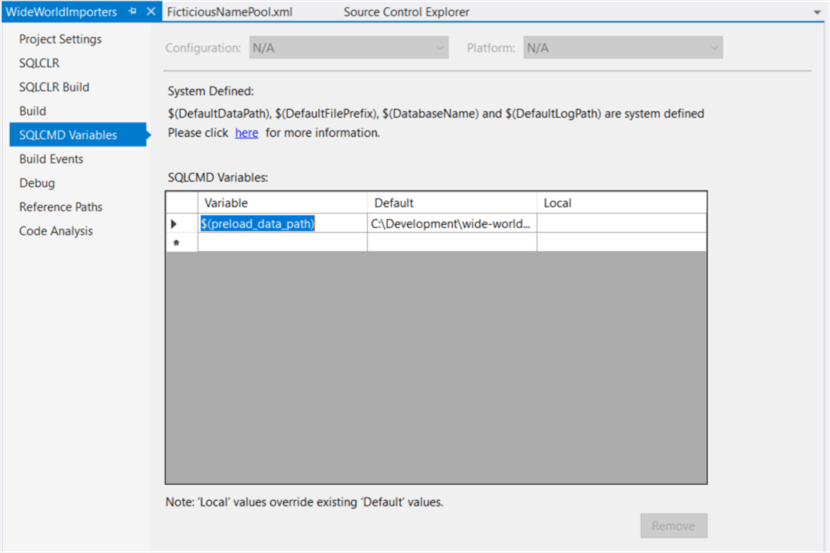
Figure 9 - Create SQLCMD Variables
Step 3: Publish the database project. In the pop-up window, provide the variable a value that points to the physical location of the "Data" folder.
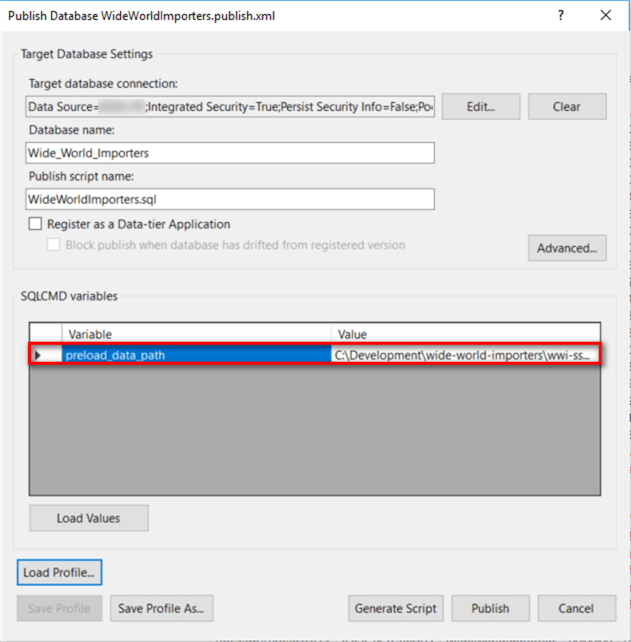
Figure 10 - Target Database Settings in the Publish Database Window
Step 4: Call the "OPENROWSET" function to read data from the XML file. Run these scripts in SQL Server Management Studio.
DECLARE @xml_ficticious_name_pool XML

SET @xml_ficticious_name_pool = (
  SELECT * FROM OPENROWSET (
    BULK 'C:\Development\wide-world-importers\wwi-ssdt\wwi-ssdt\Data\FicticiousNamePool.xml', SINGLE_CLOB
  ) AS xmlData
)
PRINT cast(@xml_ficticious_name_pool as varchar(max))
Step 5: Call the "OPENXML" function to create a rowset view of the XML data. Before we call the "OPENXML" function, we executed the "sp_xml_preparedocument" stored procedure to obtain a document handle that is passed to "OPENXML" function. After XML data have been handled, we need to execute the stored procedure "sp_xml_removedocument" to free up the memory [2].
DECLARE @xml_ficticious_name_pool XML
SET @xml_ficticious_name_pool = (
  SELECT * FROM OPENROWSET (
    BULK 'C:\Development\wide-world-importers\wwi-ssdt\wwi-ssdt\Data\FicticiousNamePool.xml', SINGLE_CLOB
  ) AS xmlData
)

DECLARE @handle_ficticious_name_pool INT

-- Create an internal representation of the XML document.
EXEC sp_xml_preparedocument @handle_ficticious_name_pool OUTPUT, @xml_ficticious_name_pool

-- Execute a SELECT statement using OPENXML rowset provider.
SELECT *
FROM OPENXML (@handle_ficticious_name_pool, '/ROOT/FicticiousNamePool',1)
      WITH (
            [FullName]      [nvarchar](50) '@FullName',
            [PreferredName] [nvarchar](25) 'PreferredName',
            [LastName]      [nvarchar](25) 'LastName',
            [ToEmail]       [nvarchar](75) '@ToEmail'
           )

--Free up the memory
EXEC sp_xml_removedocument @handle_ficticious_name_pool
Figure 11 presents a rowset view of the XML data that we have retrieved from the XML file.
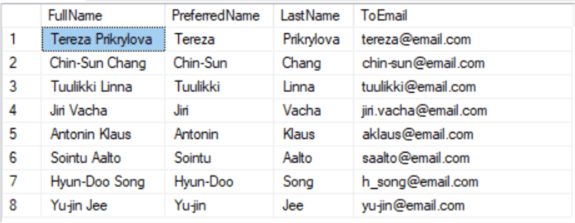
Figure 11 - A Rowset View of the XML Data
Step 6: Execute the "MERGE" command to read data from the rowset view into the database table. Here are the testing scripts to load the data from the XML file into the database table:
DECLARE @xml_ficticious_name_pool XML
SET @xml_ficticious_name_pool = (
  SELECT * FROM OPENROWSET (
    BULK 'C:\Development\wide-world-importers\wwi-ssdt\wwi-ssdt\Data\FicticiousNamePool.xml', SINGLE_CLOB
  ) AS xmlData
)

DECLARE @handle_ficticious_name_pool INT

-- Create an internal representation of the XML document.
EXEC sp_xml_preparedocument @handle_ficticious_name_pool OUTPUT, @xml_ficticious_name_pool
MERGE [DataLoadSimulation].[FicticiousNamePool] AS target
USING
(

-- Execute a SELECT statement using OPENXML rowset provider.
SELECT *
FROM OPENXML (@handle_ficticious_name_pool, '/ROOT/FicticiousNamePool',1)
      WITH (
            [FullName]      [nvarchar](50) '@FullName',
            [PreferredName] [nvarchar](25) 'PreferredName',
            [LastName]      [nvarchar](25) 'LastName',
            [ToEmail]       [nvarchar](75) '@ToEmail'
           )
) AS source
ON (source.[ToEmail] = target.[ToEmail])
WHEN MATCHED THEN
   UPDATE SET [FullName] = source.[FullName]
            ,[PreferredName] = source.[PreferredName]
            ,[LastName] = source.[LastName]
WHEN NOT MATCHED BY TARGET THEN
   INSERT(
          [FullName]
         ,[PreferredName]
         ,[LastName]
         ,[ToEmail]
         )
   VALUES(
          source.[FullName]
         ,source.[PreferredName]
         ,source.[LastName]
         ,source.[ToEmail]
         )
WHEN NOT MATCHED BY SOURCE THEN
       DELETE;

--Free up the memory
EXEC sp_xml_removedocument @handle_ficticious_name_pool
Step 7: Replace the "pds105-ins-dls-ficticiousnamepool.sql" file with scripts in step 6. Since the SQLCMD variable holds a value of data file path, we substitute the hard-coded path with the variable. The final version of the file is presented as follows:
PRINT 'Loading FicticiousNamePool.xml'
GO
DECLARE @xml_ficticious_name_pool XML
SET @xml_ficticious_name_pool = (
  SELECT * FROM OPENROWSET (
    BULK '$(preload_data_path)\FicticiousNamePool.xml', SINGLE_CLOB
  ) AS xmlData
)

DECLARE @handle_ficticious_name_pool INT

-- Create an internal representation of the XML document.
EXEC sp_xml_preparedocument @handle_ficticious_name_pool OUTPUT, @xml_ficticious_name_pool
MERGE [DataLoadSimulation].[FicticiousNamePool] AS target
USING
(

-- Execute a SELECT statement using OPENXML rowset provider.
SELECT *
FROM OPENXML (@handle_ficticious_name_pool, '/ROOT/FicticiousNamePool',1)
      WITH (
            [FullName]      [nvarchar](50) '@FullName',
            [PreferredName] [nvarchar](25) 'PreferredName',
            [LastName]      [nvarchar](25) 'LastName',
            [ToEmail]       [nvarchar](75) '@ToEmail'
           )
) AS source
ON (source.[ToEmail] = target.[ToEmail])
WHEN MATCHED THEN
   UPDATE SET [FullName] = source.[FullName]
            ,[PreferredName] = source.[PreferredName]
            ,[LastName] = source.[LastName]
WHEN NOT MATCHED BY TARGET THEN
   INSERT(
          [FullName]
         ,[PreferredName]
         ,[LastName]
         ,[ToEmail]
         )
   VALUES(
          source.[FullName]
         ,source.[PreferredName]
         ,source.[LastName]
         ,source.[ToEmail]
         )
WHEN NOT MATCHED BY SOURCE THEN
       DELETE;
--Free up the memory
EXEC sp_xml_removedocument @handle_ficticious_name_pool
GO
Deploying a Database Project
All the deployment scripts are included in the "DACPAC" package, but the data files are not. In addition, since the deployment process runs SQL functions on the target database server, the data files should be accessible to the OPENROWSET function. To avoid network security issues or permission issues, a typical solution is to copy the "Data" folder to the target server and pass the value of the physical location to the publishing wizard or the command "sqlpackage.exe". We can run the following PowerShell scripts to publish the database with predetermined data:
$sqlpackage_path="C:\Program Files (x86)\Microsoft SQL Server\140\DAC\bin\sqlpackage.exe"
$deployment_folder="C:\deployment"
$xml_data_folder = "C:\Data"
$target_server_name="[your server name]"
$target_database_name="Wide_World_Importers"

& $sqlpackage_path /Action:Publish /SourceFile:$deployment_folder\WideWorldImporters.dacpac /TargetDatabaseName:"$target_database_name" /TargetServerName:"$target_server_name" /v:preload_data_path=$xml_data_folder /p:GenerateSmartDefaults=True /p:DropObjectsNotInSource=True /p:UnmodifiableObjectWarnings=False
Loading Data from Business Requirements
Sometimes, the predetermined data are defined in the business requirements documents. We can manually create simple-format XML files. The first step is to enter all these data into a database table. I usually use Excel to generate many SQL insert statements and then execute these statements to insert data. For a small amount of data, we can use the "Edit" function in the Microsoft SQL Server Management Studio, as shown in Figure 12, to enter data to the table directly.
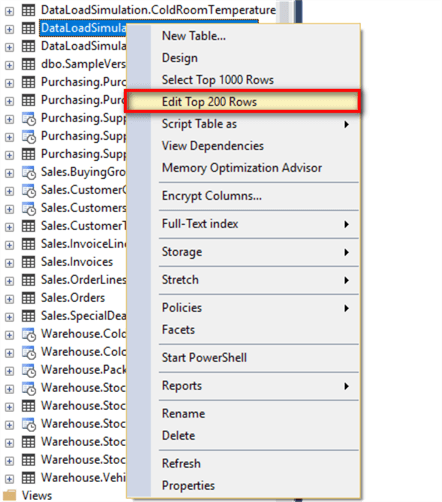
Figure 12 - Select Edit Menu Item from Context Menu
Step 1: Enter all data into the table "FicticiousNamePool".
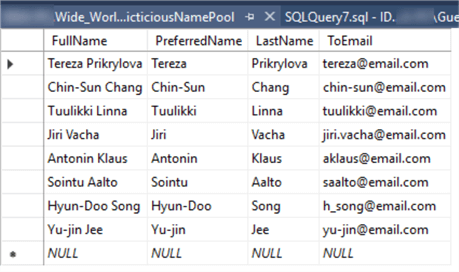
Figure 13 - View and Edit Data in a Table
Step 2: Run the following SQL scripts to retrieve a result of a SQL query as XML. Then, copy the result to a file "FicticiousNamePool.xml".
SELECT *
  FROM [DataLoadSimulation].[FicticiousNamePool]
FOR XML PATH ('FicticiousNamePool'),ROOT('ROOT')
The file "FicticiousNamePool.xml" contains XML elements and text contents. The file content is presented as follows:
<ROOT>
  <FicticiousNamePool>
    <FullName>Tereza Prikrylova</FullName>
    <PreferredName>Tereza</PreferredName>
    <LastName>Prikrylova</LastName>
    <ToEmail>[email protected]</ToEmail>
  </FicticiousNamePool>
  <FicticiousNamePool>
    <FullName>Chin-Sun Chang</FullName>
    <PreferredName>Chin-Sun</PreferredName>
    <LastName>Chang</LastName>
    <ToEmail>[email protected]</ToEmail>
  </FicticiousNamePool>
  <FicticiousNamePool>
    <FullName>Tuulikki Linna</FullName>
    <PreferredName>Tuulikki</PreferredName>
    <LastName>Linna</LastName>
    <ToEmail>[email protected]</ToEmail>
  </FicticiousNamePool>
  <FicticiousNamePool>
    <FullName>Jiri Vacha</FullName>
    <PreferredName>Jiri</PreferredName>
    <LastName>Vacha</LastName>
    <ToEmail>[email protected]</ToEmail>
  </FicticiousNamePool>
  <FicticiousNamePool>
    <FullName>Antonin Klaus</FullName>
    <PreferredName>Antonin</PreferredName>
    <LastName>Klaus</LastName>
    <ToEmail>[email protected]</ToEmail>
  </FicticiousNamePool>
  <FicticiousNamePool>
    <FullName>Sointu Aalto</FullName>
    <PreferredName>Sointu</PreferredName>
    <LastName>Aalto</LastName>
    <ToEmail>[email protected]</ToEmail>
  </FicticiousNamePool>
  <FicticiousNamePool>
    <FullName>Hyun-Doo Song</FullName>
    <PreferredName>Hyun-Doo</PreferredName>
    <LastName>Song</LastName>
    <ToEmail>[email protected]</ToEmail>
  </FicticiousNamePool>
  <FicticiousNamePool>
    <FullName>Yu-jin Jee</FullName>
    <PreferredName>Yu-jin</PreferredName>
    <LastName>Jee</LastName>
    <ToEmail>[email protected]</ToEmail>
  </FicticiousNamePool>
</ROOT>
Step 3: Call the "OPENXML" function to read the file "FicticiousNamePool.xml". Since the XML document does not contain any attribute, we can use the element-centric mapping and ignore the "ColPattern". Here are the simplified scripts:
DECLARE @xml_ficticious_name_pool XML
SET @xml_ficticious_name_pool = (
  SELECT * FROM OPENROWSET (
    BULK 'C:\Data\FicticiousNamePool.xml', SINGLE_CLOB
  ) AS xmlData
)

DECLARE @handle_ficticious_name_pool INT

-- Create an internal representation of the XML document.
EXEC sp_xml_preparedocument @handle_ficticious_name_pool OUTPUT, @xml_ficticious_name_pool

-- Execute a SELECT statement using OPENXML rowset provider.
SELECT *
FROM OPENXML (@handle_ficticious_name_pool, '/ROOT/FicticiousNamePool',2)
      WITH (
            [FullName]      [nvarchar](50),
            [PreferredName] [nvarchar](25),
            [LastName]      [nvarchar](25),
            [ToEmail]       [nvarchar](75)
           )

--Free up the memory
EXEC sp_xml_removedocument @handle_ficticious_name_pool
Step 4: Use the query result from the previous step as the "MERGE" command source data to populate the target table. And then replace the "pds105-ins-dls-ficticiousnamepool.sql" file with the modified scripts.
Summary
The tip provides an alternative approach to manage predetermined data in a database project and load them into a database. Comparing to the Microsoft sample database project, we stored the SQL scripts and data into script files and XML files, respectively. XML data is known as self-describing. Even non-technical users can understand and modify an XML document. We called the "OPENROWSET" function to read data from a XML file to a single-cell rowset of type varchar. Then, we passed the result to the "OPENXML" function and obtained a rowset view. In the end, we applied the "MERGE" command to read data from the rowset view to the target database. PowerShell scripts were provided to enable the deployment automation.
References
[1] Examples of Bulk Import and Export of XML Documents (SQL Server). Retrieved from https://docs.microsoft.com/en-us/sql/relational-databases/import-export/examples-of-bulk-import-and-export-of-xml-documents-sql-server?view=sql-server-2017
[2] Examples: Using OPENXML. Retrieved from https://docs.microsoft.com/en-us/sql/relational-databases/xml/examples-using-openxml?view=sql-server-2017
[3] MERGE (Transact-SQL). Retrieved from https://docs.microsoft.com/en-us/sql/t-sql/statements/merge-transact-sql?view=sql-server-2017
[4] Microsoft/sql-server-samples. Retrieved from https://github.com/Microsoft/sql-server-samples/tree/master/samples/databases/wide-world-importers/wwi-ssdt/wwi-ssdt
[5] SQL Server Utilities Statements - GO. Retrieved from https://docs.microsoft.com/en-us/sql/t-sql/language-elements/sql-server-utilities-statements-go?view=sql-server-2017
Next Steps
- In this tip, the SQL Server service account read data from the XML files. Thus, we need to ensure the account has a permission to access the folder. When deploying the database project to a remote server, we copied the data to the target server to avoid network security issue. When we use a value of "C:\Data" as the folder path, the OPENROWSET function accesses the folder on the C drive on the remote server rather than the C drive on the local workstation. In addition, we can reference [7] to load complex XML documents.
- Check out these related tips:
- Adding Reference Data in Database Continuous Integration (CI) Pipeline
- Defining Post Deployment Scripts in the SQL Server Data Tools
- Importing and Processing data from XML files into SQL Server tables
- SQL Server MERGE statement usage and examples
- Using MERGE in SQL Server to insert, update and delete at the same time
About the author
 Nai Biao Zhou is a Senior Software Developer with 20+ years of experience in software development, specializing in Data Warehousing, Business Intelligence, Data Mining and solution architecture design.
This author pledges the content of this article is based on professional experience and not AI generated.
View all my tips


