By: John Miner | Comments | Related: More > Import and Export
Problem
The core idea behind a Modern Data Platform (MDP) design is the ability for different organizational groups to use the information stored in one central place in the cloud. There are many different ways and technologies to import and process information stored in Azure Data Lake Storage (ADLS) which supports the development of an MDP.
Data stored in a data lake can be categorized into raw - unprocessed data and/or enriched - processed data. Our focus is going to be on enriched data files. Data enrichment is a general term that applies to the process of enhancing, refining, and improving raw data.
How can we import enriched data into ADLS in an automated way?
Solution
PowerShell is a scripting language that can be used to automate business processing. One attractive feature of PowerShell is the fact that most modern Microsoft Windows Operating Systems have the language pre-installed. Today, we are going to learn how to create an Extract, Transform and Load (ETL) script to save enriched data into the data lake storage.
Business Problem
Our boss has asked us to create a modern data platform for the World-Wide Importers Company. An on-premises Relational Database Management System (RDBMS), that is in third normal form, already exists. We have been asked to save enriched (de-normalized) Customer data from SQL Server to the Azure data lake.
Pseudo Code
Many companies are using the agile process in software development. The word agile means the ability to move quickly and easily. I think many developers skip the basic step of outlining a business process before actually coding the script or program.
I think this is a key mistake. Why would you start building a house without a blueprint? Same concept applies to building software.
I have always liked creating Pseudo Code and/or gathering functional design requirements before creating a program. This process ensures that my ideas are coherent, can be shared with others, and can be reviewed for logical errors. The table below shows each step that I want to implement in my PowerShell ETL script.
| Step | Description |
|---|---|
| 1 – Start logging steps. | Capture timestamp and message. |
| 2 – Create Customer Data File. | Steps to create enriched data file. |
| A – Grab data table. | For a given query, retrieve a data table. |
| B – Save as TSV file. | Save data table in tab delimited format. |
| C – Log end of task. | Capture timestamp and message. |
| 3 – Connect to Azure. | Log into Azure subscription. |
| A – Use service account. | Create credential and log into subscription. |
| B – Log end of task. | Capture timestamp and message. |
| 4 – Save file to ADLS. | Save file in correct ADLS folder. |
| A – Import file into Azure. | Call the correct cmdlet. |
| B – Log end of task. | Capture timestamp and message. |
| 5 – Archive Customer Data File. | Save file in local folder with timestamp. |
| A – Copy and rename file. | Make an archive copy of the file. |
| B – Log end of task. | Capture timestamp and message. |
| 6 – Stop logging steps. | Capture timestamp and message. |
Now that we have a solid plan on how to accomplish our business tasks, it is now time to start creating and/or re-using cmdlets. A cmdlet (pronounced "command-let") is a lightweight PowerShell script that performs a single function or task.
Program Logging
I think the most important part of any ETL program is logging. The mechanics of ETL programming have matured over the last few decades. Tools such as Integration Services have a whole database named SSISDB that is dedicated to capturing program lineage and logging execution messages. Since we are writing a custom ETL script, we need to write a custom logging cmdlet.
There are two places that we might want to log information about each successful or failed step.
First, writing to a flat file is the easiest option to capture program messages. We might want to capture the date/time, the name of the application (script), the status of the script (category), the application message and any other pieces of information that might help to debug a production issue. We can use the Test-Path cmdlet to determine if this is our first time writing to the log file. If it is, we want to create a header line for the new comma separated file. If it is not, we can create a string and use the Out-File cmdlet to append the string to the existing file.
Second, many organizations monitor events in the Windows Application Log using software packages such as Nagios, Nimsoft and/or System Center Operations Manager (SCOM). Business rules can be set up to automatically alert the correct support team when a business process, such as a custom ETL script, fails. Therefore, writing to the event log might be required for certain companies.
There are a couple PowerShell cmdlets that we can use in our design. I have decided to write our events to the Windows Application Log. Every windows event must be associated with a source. The New-EventLog cmdlet can be used to create a new source and the Write-EventLog can be used to place a new log entry. Both of these cmdlets take various parameters. I leave it up to you to get familiar with the details.
Most of the time, our script will log informational messages to the log. However, there are times in which we want to warn the support team about an issue the program fixed or an error that the program could not handle. That is why the entry type can be classified as information, warning or error.
The script below implements the Write-To-Log custom cmdlet using the components that we discussed.
#
# Name:      Write-To-Log
# Purpose:   Write message to log file or event log.
#

function Write-To-Log {
[CmdletBinding()]
param(
      [Parameter(Mandatory = $true)]
      [String] $Source,

      [Parameter(Mandatory = $true)]
      [String] $Message,

      [Parameter(Mandatory=$true)]
      [ValidateSet("Error", "Warning", "Information")]
      [string]$Category="Information",

      [Parameter(Mandatory = $false)]
      [Boolean] $IsFile=$false,

      [Parameter(Mandatory = $false)]
      [String] $Path="",

      [Parameter(Mandatory = $false)]
      [Boolean] $IsEvent=$false,

      [Parameter(Mandatory = $false)]
      [Int] $EventId=1000
   )


    # Windows application event log
    if ($IsEvent)
    {

        # Does the event source exist?
        New-EventLog –LogName "Application" –Source $Source -ErrorAction SilentlyContinue

        # Write out message
        Write-EventLog -LogName "Application" -Source $Source -EventID $EventId
        -EntryType $Category -Message $Message
    }

    # Flat file logging
    if ($IsFile)
    {

        # New file?  Write header line
        if (!(Test-Path $Path))
        {
            # Create first line
            $Line += "Date,"
            $Line += "Application,"
            $Line += "Category,"
            $Line += "Message"

            # Write to file
            $Line | Out-File $Path

            # Reset variable
            $Line = ""
        }

        # Log entry
        [String] $Line = ""

        # Date
        $Line += (Get-Date -Format o) + ", "

        # Application
        $Line += $Source + ", "

        # Category
        $Line += $Category + ", "

        # Message
        $Line += $Message

        # Write to file
        $Line | Out-File $Path -Append -NoClobber
    }

}
To recap, we now have the ability to satisfy the logging requirements for our ETL script.
Analyzing Source Data
To simulate an on-premises database system, I created a Virtual Machine in Microsoft Azure using the SQL Server 2016 template from the Azure gallery. Please see this Microsoft article for more details on this task.
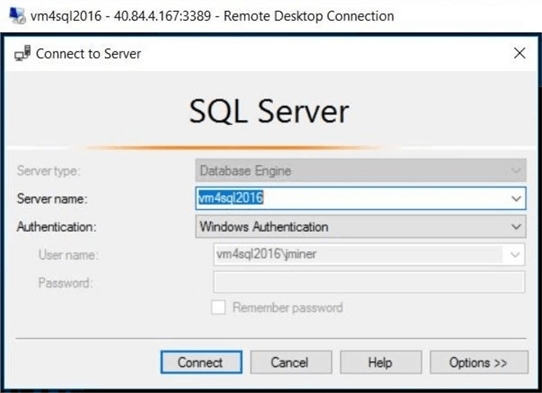
The image below shows a typical connection the Windows Operating System using the Remote Desktop Protocol (RDP). I am using the jminer local administrator account to log into the default instance of the database engine on the computer named vm4sql2016.
There have been many different sample databases from Microsoft over the years. I downloaded and installed the newest one for this test. Details about the WideWorldImporters sample database can be found on this Microsoft page.
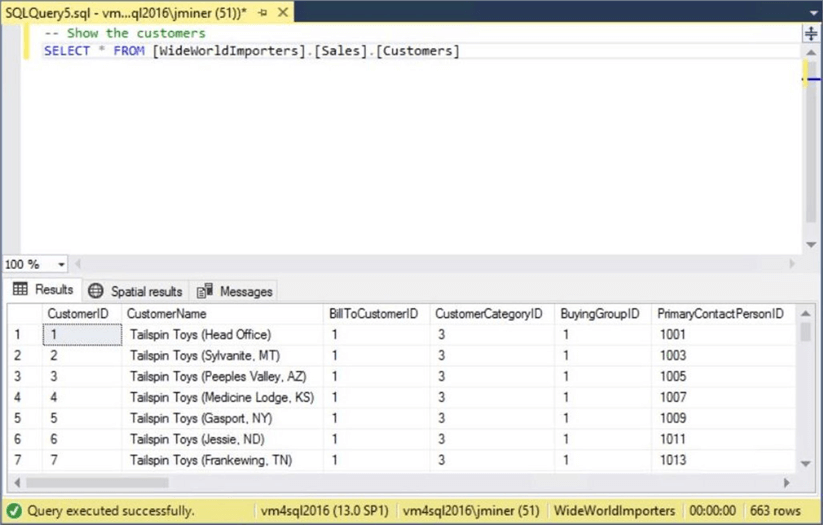
Selecting a few records from the Customers table starts our investigation of the data that is going to be saved in the data lake. The image bellows shows a highly normalized table with surrogate keys to other tables. Since our business purpose is to create an enriched data file, we want to understand the relationships between the Customer table and the reference tables. Given that information, we can flatten out the data so that each field is de-normalized.
Ralph Kimball and Bill Inmon came up with two different approaches to dimensional modeling. Kimball suggested a bottom up technique and Inmon suggested a top down technique. Regardless of the approach, the fact tables contain measures and dimensional tables that contain details describing the entry in the fact table.
The Kimball Group supplies the data modeler with an excel spreadsheet to enter in facts and dimensions. There are two tasks that this spreadsheet does well: create a visual diagram of the relationships and generate T-SQL code for the database.
Since the relationship between the Customers table and the surrounding reference tables can be described using this tool, I created the following diagram to visually understand the relationships.
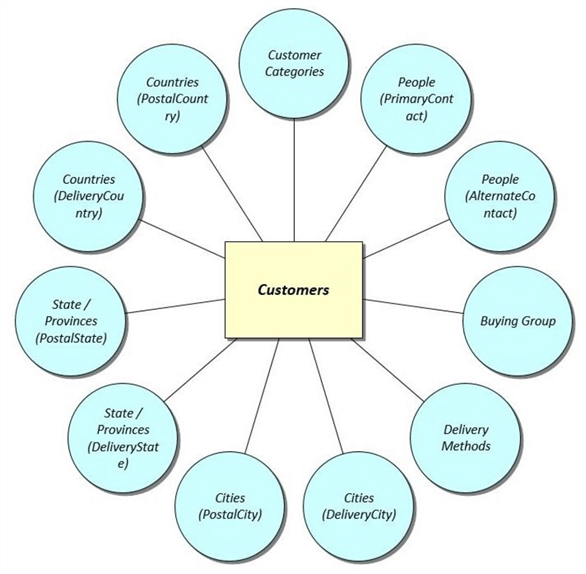
We can see there are 11 reference tables that are related to the main Customer table. To simplify the ETL process, we are going to create a view named vw_Customer_Data in the Reporting schema.
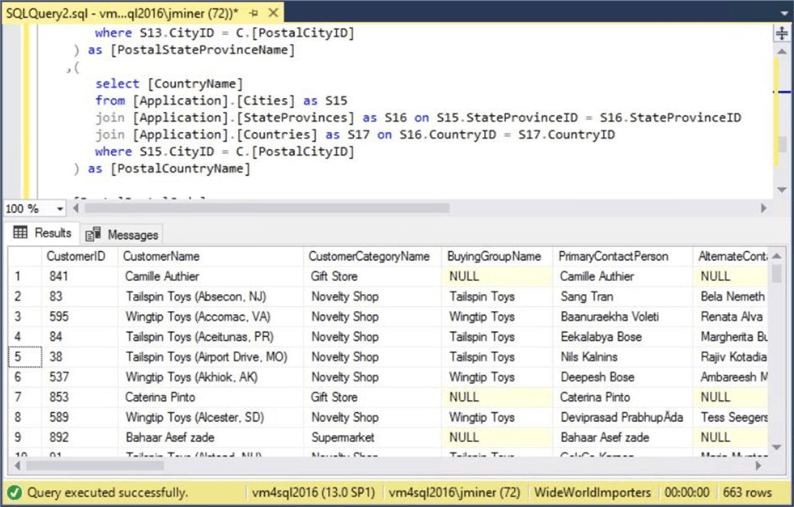
The image below shows the execution of the T-SQL statement that is at the heart of the view definition. It takes up to 17 joins to fully de-normalize the customer data. Enclosed is the T-SQL view for you to use in your very own sample database.
We now have a good understanding of the source tables that are going to be used to create the target file. The next step is to create local and remote directory structures to organize our program, data files, and logging file.
Directory Structures
Directory structures (folders) can be used to organize both program code files and business data files that reside in our local Virtual Machine and remote Azure Data Lake.
Let us start describing the local file system first.
| Directory | Description |
|---|---|
| archive | Historical data files saved with date/time stamp. |
| logging | Each script has a unique log file. |
| outbound | Contains the most recent data file. |
| psetl | Root directory that containing all ETL scripts |
| security | Credentials can be stored in encrypted files. |
The above table shows how to logically segregate the files using folders. The image below is an implementation of this design.

I am assuming that you created an Azure Data Lake Storage account named adls4wwi2. If you do not know how to perform this task, please see my prior article on “Managing Azure Data Lake Storage with PowerShell” for details.
Now, we can describe the remote file system.
| Directory | Description |
|---|---|
| Enriched | Archived enriched data files. |
| Raw | Archived raw data files. |
| Staged | Most recent data files. |
The above table shows how to logically segregate the files using folders. The image below is an implementation of this design using Azure Data Lake Storage. We can use the same storage account to represent the different environments by using the following parent folders: dev – development data lake, test – testing data lake and prod – production data lake.

Now that we have our directory structures in place, we can start working on creating and archiving the local data file.
Local Data Files
It is now time to start putting the cmdlets together to solve our business problem.
Creating the customer data file can be broken down into two steps: retrieving a data table representing the query and writing the data table to a tab separated value (TSV) format. One major assumption is the fact that the source data does not contain tabs.
First, we need to define a connection string and a T-SQL query to pass as arguments to the Get-DataSet-SqlDb custom cmdlet. A local variable can be used to capture the returned data.
Second, we need to define the name of the local data file that will be saved into the outbound directory. The Where-Object cmdlet is used to remove the record count from the multiple active result set (MARS) variable. This modified data is piped to the Export-Csv cmdlet to create the required data file.
The script below executes these two steps.
#
# Step 2 - Create Customer Data File
#

# Set connection string
$ConnStr = 'Server=vm4sql2016;Database=WideWorldImporters;Uid=jminer;Pwd=T4ymT3f7XVppYwk6E;'

# Make TSQL stmt
$SqlQry = "SELECT * FROM [Reporting].[vw_Customer_Data];"

# Grab the data
$Customers = Get-DataSet-SqlDb -ConnStr $ConnStr -SqlQry $SqlQry

# Data file
$DataFile = "c:\psetl\outbound\customers.tsv"

# Remove count line, save data as tab delimited file, clobber existing file
$Customers | Where-Object { $_.CustomerID -gt 0 }  |
    Export-Csv -NoTypeInformation -Path $DataFile -Delimiter `t -Force
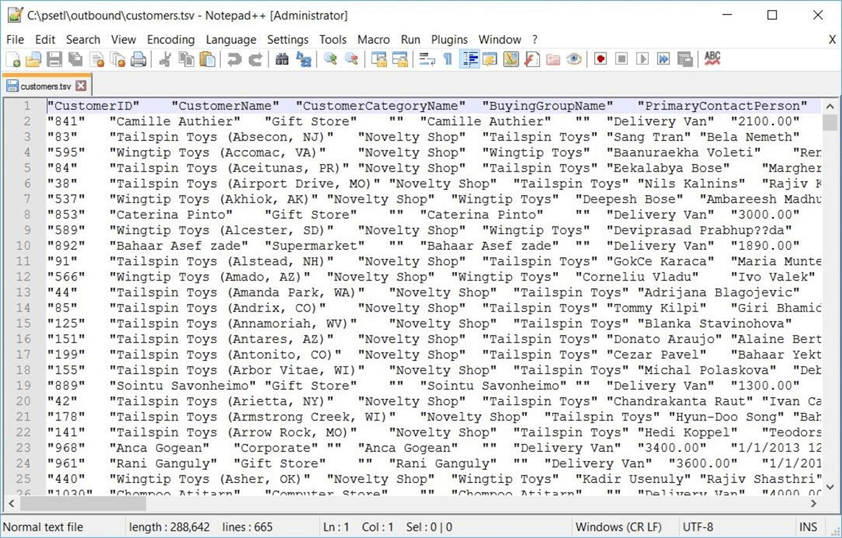
The notepad++ utility can be used to open the customer data file. The image below shows the first twenty file lines in the data file.
There is one more local data file to create during our program execution. We want to archive the outbound data file each time the PowerShell script is executed. The script below implements this step.
#
# Step 5 - Archive Customer Data File
#

# Time stamp
$Stamp = ('D' + (Get-Date -Format o).Substring(0, 19).Replace('-', '').Replace(':', '')).ToLower()

# Archive file
$ArcFile = "c:\psetl\archive\customers-$Stamp.txt"

# Data file
$DataFile = "c:\psetl\outbound\customers.tsv"

# Create file with timestamp
Copy-Item $DataFile $ArcFile –Force
The Get-Date cmdlet is used to retrieve a time stamp that can be added to the end of the file name. The Copy-Item cmdlet places a copy of the data file in the archive directory.
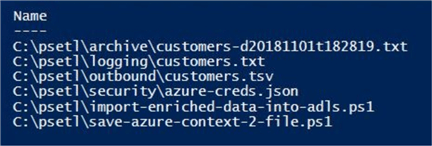
The screen shot below was captured from the PowerShell Integrated Scripting Environment (ISE). It is a sneak peek at all the files used in the proof of concept (POC). Both the archive and outbound data files are shown.
In a nutshell, creating and archiving the customer data files is very easy.
Logging Script Steps
Previously, we talked about how important program logging is when you need to debug a production issue. Let’s add some logging to the ETL script.
The fully qualified name of the log file, the program name and the step message are required parameters to our custom cmdlet. I want our ETL script to write messages to both a local log file and the Windows Event Log. If we have many different categories of messages, we might want to assign a unique event id to each category.
#
# Step 1 – Start Logging
#

# Log file
$LogFile = "c:\psetl\logging\customers.txt"

# Program description
$Program = “Import Enriched Data - Customer”

# Step Message
$Message = "Starting PowerShell script"

# Write 2 Log
Write-To-Log -Source $Program -Category Information -Message $Message -IsFile $true
    -Path $LogFile -IsEvent $true -EventId 1000
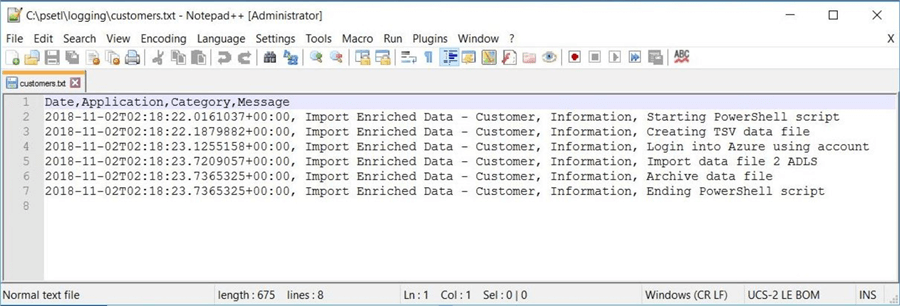
The above PowerShell writes our first entry to both the local log file and Windows Application Log. Again, we can use notepad++ to examine the contents of our log file after the first successful execution. We can see that logging is working as expected.
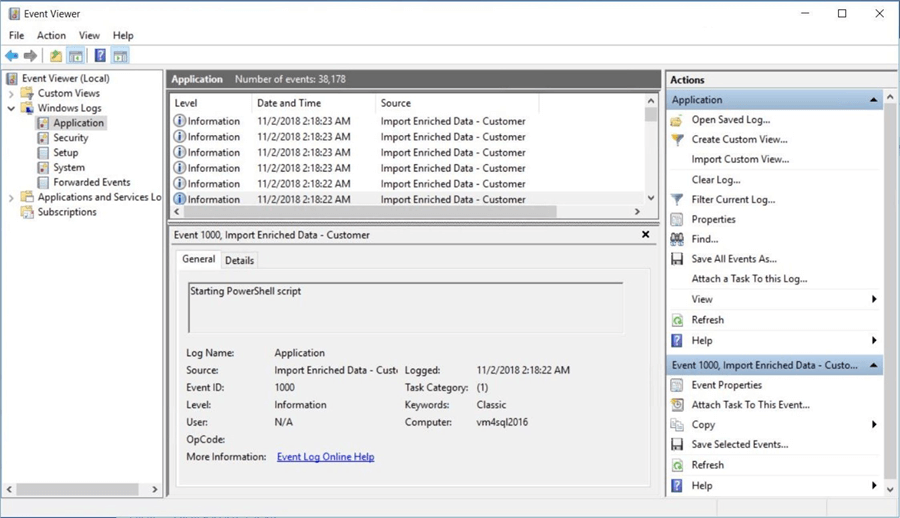
The windows application log can be viewed by using the Event Viewer console application. Typing and executing the eventvwr.msc command from a run prompt will bring up this application. The image below shows the details for the first log entry for the ETL program. Once again, our logging cmdlet captures the informational messages we want to store.
Connecting to Azure
Before we can do any work in Azure, we must log into the service using a valid user name and password. I currently have an account named [email protected] that is associated with my subscription.
If I execute the Select-AzureRmSubscription cmdlet from the PowerShell integrated scripting environment (ISE), I will see the account that is associated with the subscription.

In the past, I have shown that the Save-AzureRmContext cmdlet can be used to save the current login credentials to a file. This allows the credentials to be loaded by a executing, non-interactive script at run time by using the Import-AzureRmContext cmdlet.
This cmdlet failed to execute properly. I know this code worked before in a prior tip. What is going on here? I am going to try using the Connect-AzureRmAccount cmdlet. The script below is using the alias for this command.
# Save account name
$AccountName = "[email protected]"

# Create secure string
$PassWord = ConvertTo-SecureString "EBPWwPdmkCyXLwBy" -AsPlainText –Force

# Create credential
$Credential = New-Object System.Management.Automation.PSCredential($AccountName, $PassWord)

# Login into
Login-AzureRmAccount -Credential $Credential
I am still getting the same error. It must not be the code. Maybe it has something to do with the account?

After a little research, I found the issue listed on github.com. Microsoft accounts associated with a subscription cannot be used in a non-interactive way. Thus, connecting to Azure via a PowerShell script is not allowed.
How can we overcome this limitation?
Service Account
There are several ways to overcome this limitation. The first work around is to create an Azure Active Directory account that has the ability to log into the subscription. This account can’t be associated with the Microsoft Outlook service.
I am just in luck since I own my own domain named craftydba.com. In tribute to Ben Franklin, I have an account named Silence Dogood. This was a pen name use by Ben to trick his brother James to publish his articles for the New-England Currant.
The first step in setting up the service account is to add user account using the organizational email. This can be done by using the Azure portal. Choose to add a new user under the Active Directory menu.
The image below shows the successful creating of the user account.
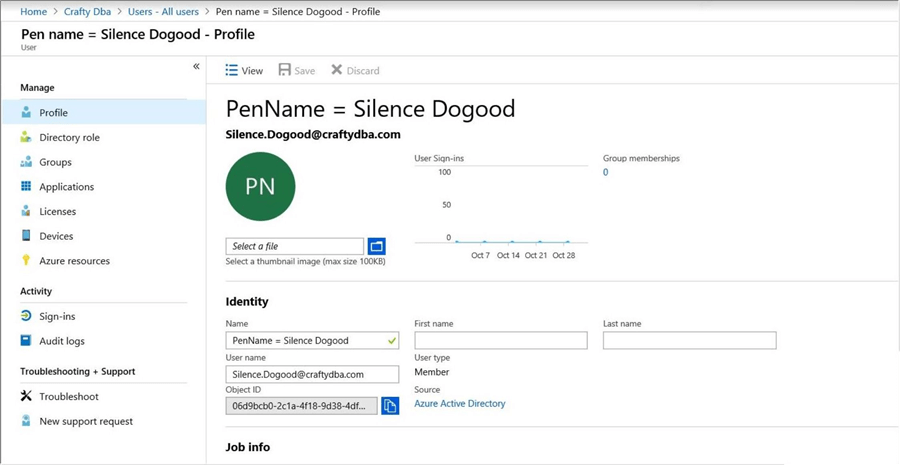
If we tried to log into the Azure subscription at this time with this new user, this action would fail. That is due to the fact that the user does not have any rights in the subscription.
The second step in creating an interactive service account is to give the user contributor rights to the subscription. This can be done by navigating to the Subscriptions menu. Use the Access Control (IAM) sub-menu to assign the rights to the user account.
The image below shows the successful completion of this task.
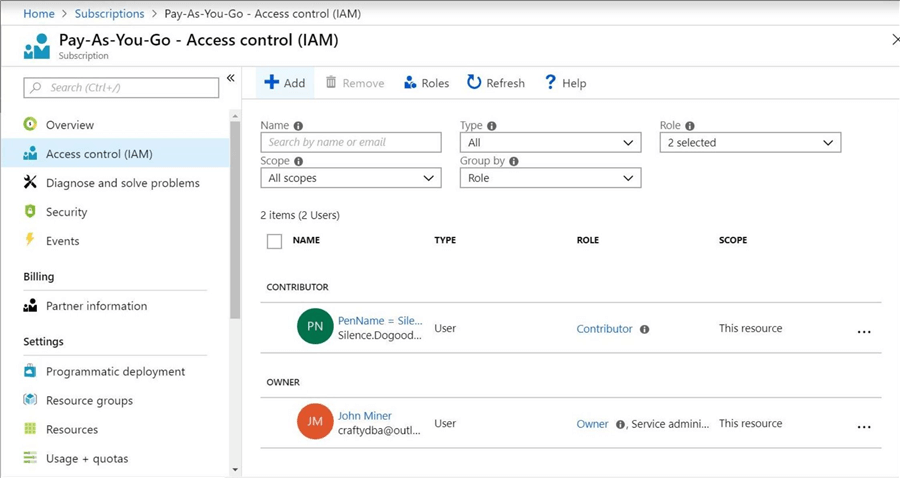
Now that we have access to the subscription, can we upload a file via PowerShell using this service account? The answer is NO since we do not have access to Azure Data Lake Storage.
Granting Rights
There are two layers of security to navigate when working with Azure Data Lake Storage. The image below was taken from an article that fellow MVP Melissa Coates did. The RBAC security layer gives a user access to the storage account. However, no file would be available to the user. The ACL security layer gives a user access to both folders and files. This completes the security model.
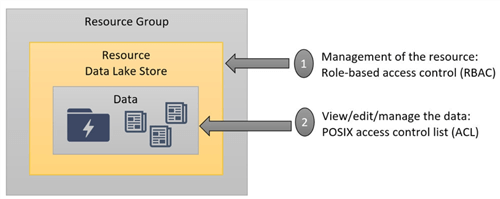
While there are four RBAC settings, I will cover three of them that are really important to ADLS. The lowest level of security is the reader setting. The next level of security is the contributor setting. This role can create and manage objects, but cannot delegate access to others. The highest level of security is the owner setting. This role has full access to all resources and can delegate access to other users.
I usually give out the least amount of security for an account to execute correctly. In our case, the contributor role (setting) will allow the program to create and manage files in our data lake. The image below shows the assignment of this permission via the Azure Portal.
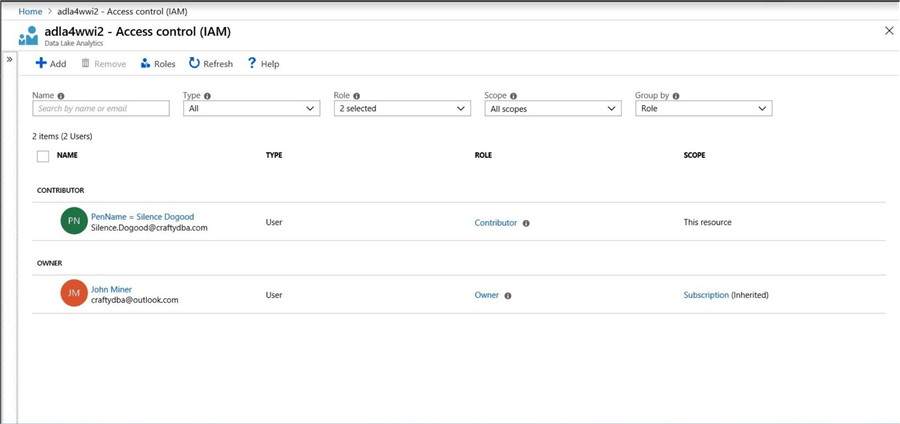
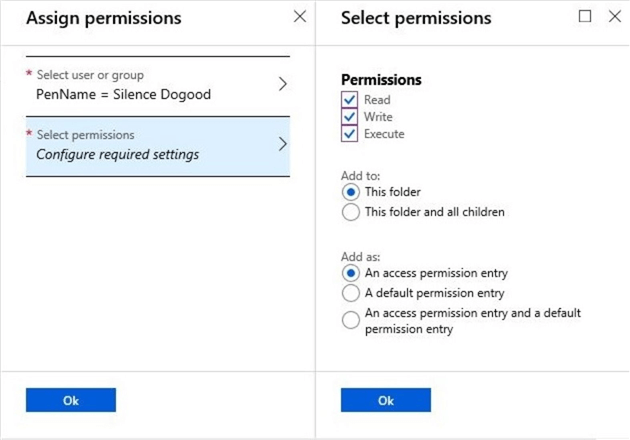
We need to start at the root directory in the data explorer and give the service account permissions to read, write and execute. If we choose to add the permissions to all the children of the root directory, we will be done in a jiffy. The screen shot below shows the ACL dialog box being used to assign permissions to the “Silence Dogood” user account.
Clicking the access menu option when exploring the PROD folder, we can see if the assigned permissions were recursively given to the child objects. The image below shows the correct assignment of privileges.
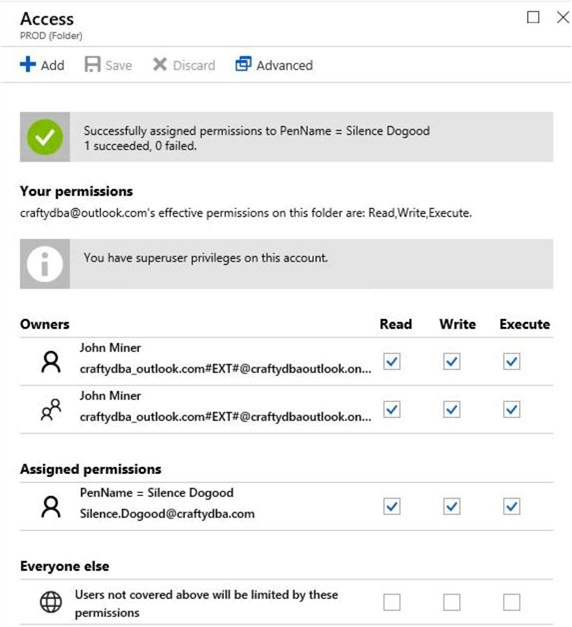
To reiterate the security model of ADLS, we need to review two concepts. The role-based access control (RBAC) is used to give rights to the storage account. This assignment is not enough since we would not have access to the storage system. The access control list (ACL) is used to grant rights to a user account at both the folder and file levels.
Importing Files
I have gone over the cmdlets to Manage Azure Data Lake Storage with PowerShell in a prior tip. We are going to use that knowledge here to finish off the ETL PowerShell script. The Import-AzureRmDataLakeStoreItem cmdlet saves a local data file to the remote ADLS storage system.
#
# Step 4 - Import file into ADLS
#

# Data lake source
$LocalName = "c:\psetl\outbound\customers.tsv"

# Data lake target
$RemoteName = "/PROD/STAGED/CUSTOMERS.TSV"

# Data lake account
$AccountName = "adls4wwi2"

# Upload file to azure
Import-AzureRmDataLakeStoreItem -AccountName $AccountName -Path $LocalName -Destination $RemoteName –Force
The above snippet will execute our business logic for section 4A of our algorithm. There following assumptions are required for a successful test: the outbound file exists on the local file system, the inbound remote folder structure exists and the service account has access to the remote storage system.

The above screen shot of the Azure Portal shows the enriched data file residing in the correct directory. We are now done coding all the sub-components of the ETL script.
Summary
Today, I showed how to save enriched data from a local SQL Server 2016 database as a formatted file in Azure Data Lake storage. Storing the data in the cloud is the first step in creating a Modern Data Platform (MDP).
There are two key concepts that I covered during the creation of the ETL PowerShell script. First, pseudo code is a great way to create a blue print for your program. Second, application logging is extremely important in designing enterprise grade systems.
Of course, organizing both local and remote systems with documented folder and/or file structures leads to a neat environment. For subscriptions associated with a non-Microsoft account, we can use the save and import context cmdlets for connecting to Azure. This technique does not work for subscriptions associated with a Microsoft account. One work around for this issue is to create a service account.
Last but not least, there are two levels of security when dealing with Azure Data Lake Storage. Make sure you give the account RBAC rights to the storage account and ACL rights to the folders and/or files.
I hope you enjoyed our exploration of PowerShell to create an ETL program. Enclosed is the full script for your use. Stay tuned for more articles related to the Modern Data Platform (Warehouse).
Next Steps
- Using Automation to load data files into Azure SQL Services
- Creating a service principle using PowerShell
- Importing Raw Data Into ADLS with PowerShell
- Converting raw data into enriched data with ADLS
- Using Azure Data Factory to orchestrate data processing
About the author
 John Miner is a Data Architect at Insight Digital Innovation helping corporations solve their business needs with various data platform solutions.
This author pledges the content of this article is based on professional experience and not AI generated.
View all my tips


