By: Edwin Sarmiento | Comments (4) | Related: 1 | 2 | 3 | 4 | 5 | 6 | > Containers
Problem
Our company is looking at evaluating Containers to modernize our existing applications, including our SQL Server databases. I have no prior knowledge of Containers. How do I get started with Containers to help me prepare for modernizing our SQL Server databases?
Solution
Container technology solves a unique problem that every IT organization faces: reliably run software when moved from one computing environment to another. As a SQL Server DBA, this is something that we must deal with every time we migrate or upgrade our databases – from physical machine to another physical machine, from physical machine to virtual machine, from older version to newer version or from on-premises to the cloud. A more common scenario is when a developer writes T-SQL code from their development environment and promotes the code in staging environment and even production. Even with a proper change management process, this can still be an issue because there is no guarantee that the different computing environments will be the same.
Container technology – or containers, as they are more commonly known – addresses this problem. It does this by packaging an application and all of its dependencies like binaries, kernel libraries, configuration files, system tools, etc. and creating an entire runtime environment. A container image is created and packaged with the application and all of its dependencies. The image is then deployed as a container at runtime.
Virtualization versus Containers
Given the nature of containers, you might get confused as to how different they are from virtual machines. To illustrate, below is a diagram of the hypervisor architecture.
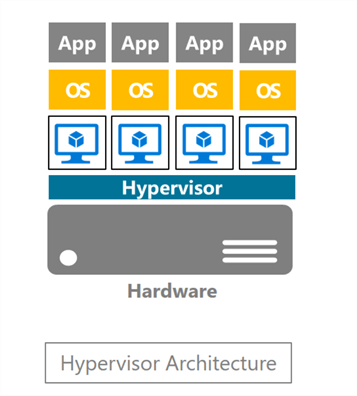
Virtualization solves a totally different IT problem on its own: hardware overprovisioning. In the past, IT would provision hardware that is barely even using half of the available resource. This is wasted resource. So, instead of buying expensive hardware for a specific application without knowledge of present or future capacity, you can run them on virtual machines with minimal resources. You can scale the virtual machines up in the future if and when the workload increases. Even better, you can run multiple virtual machines on a single physical machine. The only time IT would buy hardware is when there really is a need for it.
However, virtualization came with its own sets of challenges. For one, each virtual machine requires its own copy of the operating system before you can even run applications inside them. Each operating system consumes a fair amount of hardware resources from the physical host – virtual CPU, memory and storage. Plus, if every virtual machine runs the same operating system, you are basically creating and running multiple copies of the operating system, each requiring the same amount of administrative overhead like securing, patching and monitoring. Wouldn't it be great if you only had one operating system that runs the different applications but in an isolated process, so they don't interfere with one another, much like how one application is isolated from another thru virtual machines?
This is where containers come in.
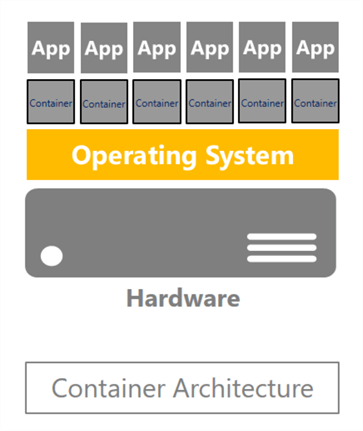
In the diagram above, you only have one operating system. The containers share the same operating system kernel with other containers, each one running as isolated processes in user space. Instead of abstracting the hardware like what virtualization does, containers abstract the operating system kernel. This reduces the amount of storage space requirement for containers, eliminating the inefficiencies of having multiple copies of the operating system running on guest virtual machines. It also significantly reduces the amount of administrative overhead necessary to manage operating systems. Plus, they use far fewer resources than virtual machines.
And since containers do not have a full-blown operating system, they can be easily started and stopped in a "just-in-time" fashion, quickly spinning up containers when the need arises. This is a huge benefit when dealing with fast software development lifecycles and having the right environment that comes with it. Imagine having a developer build an application and deploying it in a container that can be moved across different computing environments, from his workstation to a production server, while eliminating the very common "but it worked in my laptop" comment.
Linux, Containers and Docker
The idea behind containers started with virtualizing the Linux operating system kernel. This is the reason why it is very popular in the Linux community. As a SQL Server DBA who only worked with Windows in most of your career, this can be a little bit intimidating, especially if you haven't worked with Linux just yet. Don't fret. Windows Server 2016 has support for containers, so you can start working with it in a familiar environment. In fact, this tip will get you started on deploying containers on a Windows Server 2016 environment.
However, you do need to have a basic understanding of Linux to fully maximize containers.
And because containers were built to virtualize the operating system kernel, the container image needs to share the same operating system as the underlying engine. That's not to say that you cannot run both Windows and Linux containers on the same container engine, like running a Windows and Linux virtual machine on the same hypervisor. But it isn't a good idea from an operations standpoint.
In a previous tip on Run SQL Server vNext (CTP1) as a Docker Container on a Mac, you've seen how to leverage Docker with a SQL Server running in a container. But what is Docker?
Docker is a container engine developed by Docker, Inc. based on the concept of virtualizing the Linux operating system kernel. Docker is to container engine much like how VMWare is to virtualization. Learning the different docker commands to work with the Docker container engine – for SQL Server on both Windows and Linux - will be the focus of this series of tips.
Let's get started with setting up Docker on a Windows Server 2016 machine.
Setup Docker on Windows Server 2016
Here's a high-level overview of the process involved in setting up Docker and using the Windows container feature on Windows Server 2016. It is a clean installation of the operating system and directly connected to the Internet.
- Enable the Containers feature on Windows Server 2016
- Download and install the Docker-Microsoft PackageManagement provider
- Download and install the Docker package
Step #1: Enable the Containers feature on Windows Server 2016
To enable the Containers feature:
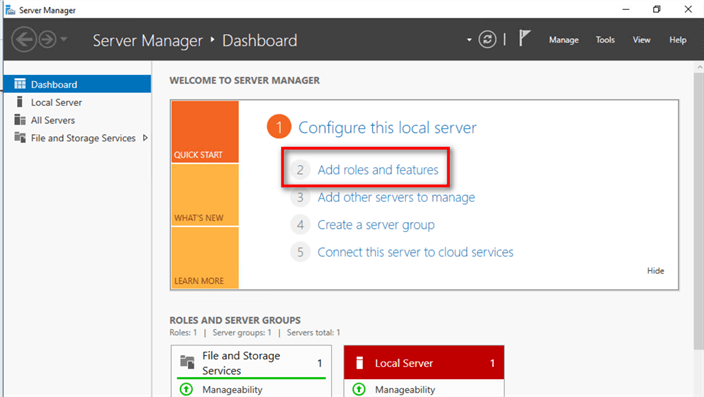
- Open the Server Manager Dashboard and click the Add roles and features link. This will run the Add Roles and Features Wizard.
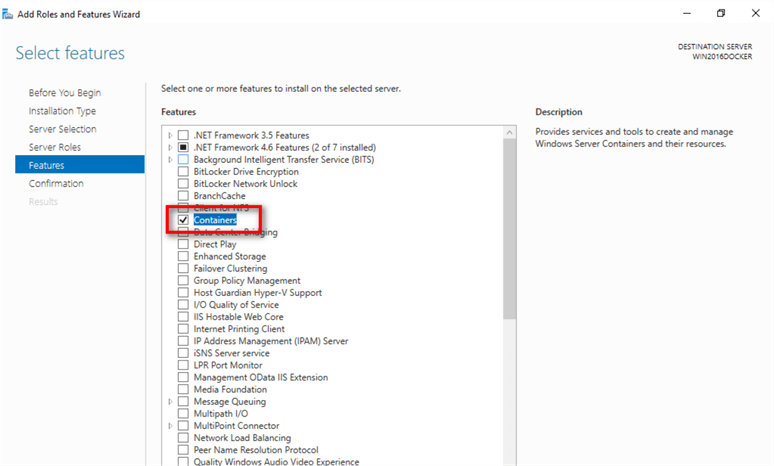
- Click thru the different dialog boxes until you reach the Select features dialog box. In the Select features dialog box, select the Containers checkbox and click Next.
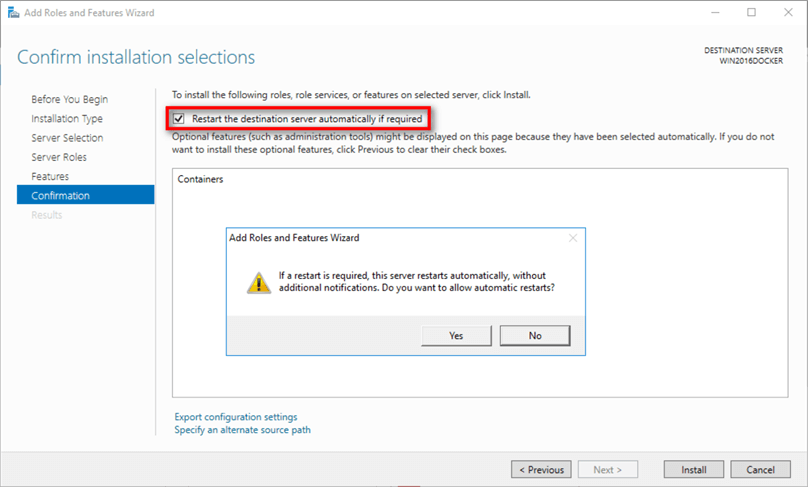
- In the Confirm installation selections dialog box, select the Restart the destination server automatically if required checkbox and click Install to proceed to do the installation. When prompted with the Add Roles and Features Wizard about restarting the server automatically, click Yes.
Another way of installing the Containers feature is by using the Install-WindowsFeature PowerShell cmdlet.
Install-WindowsFeature –Name Containers
NOTE: Be sure to run all PowerShell commands in an elevated Administrative PowerShell command shell.
You will be prompted to restart the server to finish the installation process. Use the Restart-Computer PowerShell cmdlet to do so.
Restart-Computer

Step #2: Download and install the Docker-Microsoft PackageManagement provider
Before you can install Docker, you need to use the PackageManagement provider to download and install the MicrosoftDockerProvider. This provider enables you to easily install Docker on your machine. Use the Install-Module PowerShell cmdlet for this.
Install-Module -Name DockerMsftProvider -Force
When prompted to download and install the NuGet provider, type Y to respond Yes.

Step #3: Download and install the Docker package
Finally, you can use the PackageManagement PowerShell module that you downloaded and installed in Step #2 - DockerMsftProvider - to install the latest version of Docker. This includes both the Docker Engine and the Docker client. Use the Install-Package PowerShell cmdlet for this.
Install-Package -Name docker -ProviderName DockerMsftProvider -Force

After installing the Docker Engine, you may need to start the Docker service (or daemon, in Linux). You can use the Services management console to do this.
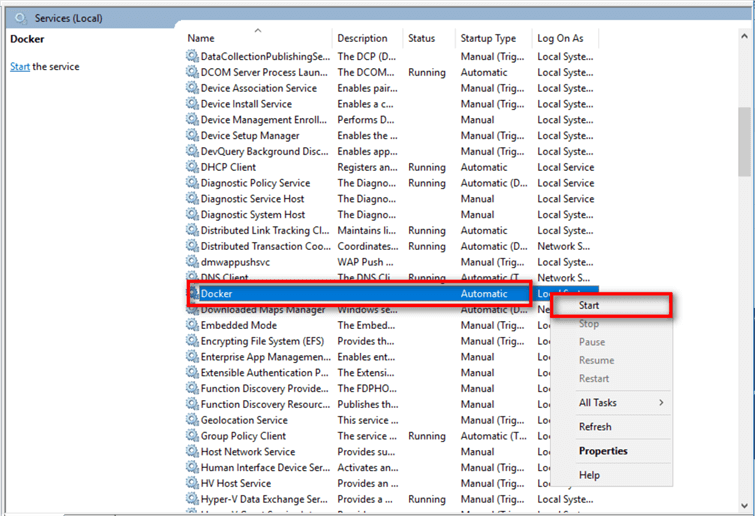
Alternatively, you can use the Get-Service and Start-Service PowerShell cmdlets for this.
Get-Service | Where-Object {$_.Name -like "docker*"} | Start-Service
NOTE: You may need to reboot the server after installing Docker in order to update the environment variables to point to the C:\Program Files\Docker path so you can run Docker commands from either the command prompt or the PowerShell command shell.
Verifying Docker Installation
You can verify the Docker installation by running the docker.exe command. In future tips, we will explore the most common docker.exe commands to perform the most common tasks.
You can either use the command prompt or the PowerShell command shell to run docker.exe commands. I prefer using PowerShell so I can use the available PowerShell cmdlets when working with the output of the docker.exe commands.
Run the command below to check the version of docker installed on the server.
docker version
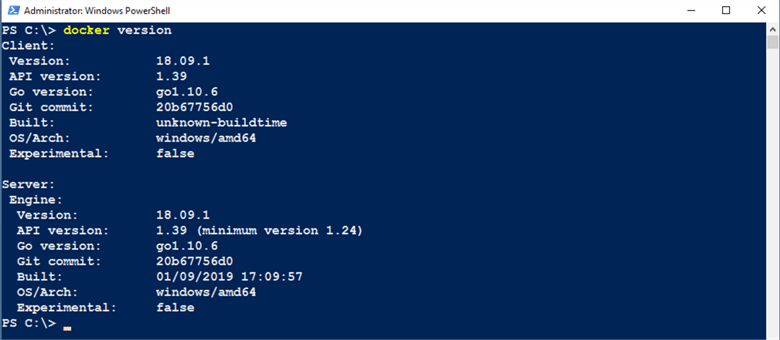
Here you can see the version of both the docker client and the docker engine. Obviously, the OS/Arch: property will display Windows since the Docker engine is running on a Windows Server 2016 machine.
Run the command below to display system-wide information regarding the docker installation on the server.
docker info
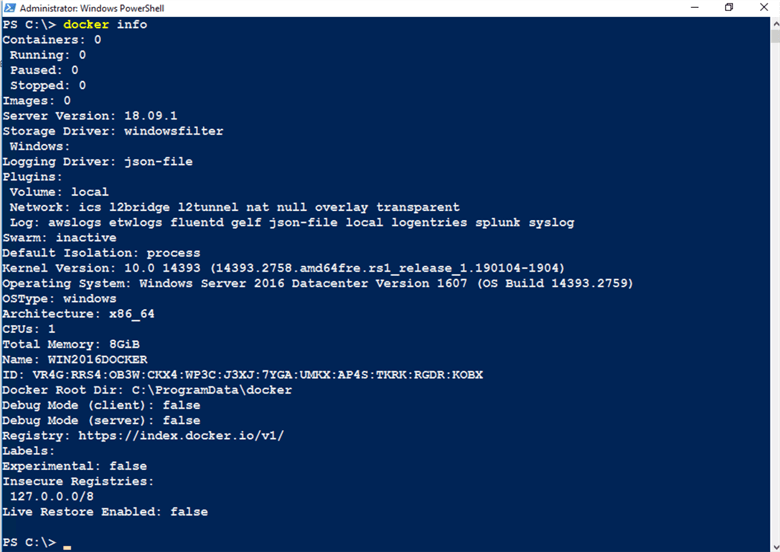
Congratulations! You now have a Docker engine running on your Windows Server 2016 server. In the next tip in this series, you will explore the most common docker.exe commands to perform the most common tasks.
Next Steps
- Read more on the following topics
- Review the previous tips on running SQL Server on Docker
About the author
 Edwin M Sarmiento is a Microsoft SQL Server MVP and Microsoft Certified Master from Ottawa, Canada specializing in high availability, disaster recovery and system infrastructures.
This author pledges the content of this article is based on professional experience and not AI generated.
View all my tips


