Problem
As I continue to write U-SQL scripts to query and aggregate my big data sets and then run those jobs in Azure Data Lake Analytics, I now want to be able to implement and schedule an Azure Data Factory pipeline which uses U-SQL to transform my data and then load it to an Azure SQL Database. This E-T-L data transformation is a critical need for my data integration, processing, and scheduling strategy.
Solution
Azure Data Factory is a cloud-based data integration service that allows me to orchestrate data driven workflows in the cloud by transforming, automating, and scheduling data pipelines with ease. This article specifically aims to describe a working example of the Azure Data Factory transformation layer by calling a U-SQL script which contains code to transform a large dataset before it is loaded to my Azure SQL Database.
Provisioning Azure Resources
I will need to provision a few Azure resources prior to building my Azure Data Factory pipeline that will run a U-SQL script to transform my data and then load it to Azure SQL Database. Let’s get started.
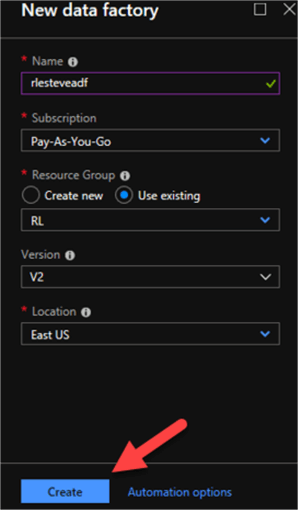
Creating a Data Factory
I’ll start by Creating a Data Factory by Navigating to the Azure Marketplace in the Azure Portal and then clicking Integration > Data Factory.

Once I enter the necessary details related to my new data factory, I will click Create.
Creating an Azure SQL Database
Next, I will create my Azure SQL Database by once again navigating to the Azure Marketplace, clicking Databases > SQL Database.
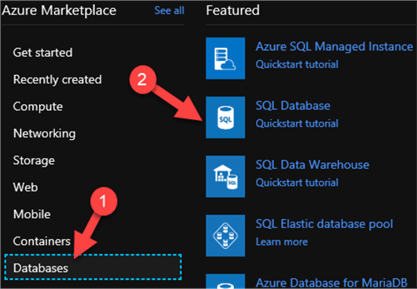
Once I enter the required details to configure my new database as seen below, I will click Create. The database will then be deployed and ready for data to be loaded in a later step of the process.

Creating an Azure Data Lake
The last resource that I will need to provision for this process is my Azure Data Lake, which will consist of an Azure Data Lake Store and an Azure Data Lake Analytics account. Once again, I will navigate to the Azure Marketplace in the Azure Portal, click Analytics > Data Lake Analytics.

After I enter the following configuration details for the New Data Lake Analytics account, I will click create.

Uploading the Source Data and U-SQL Scripts
Now that I have provisioned all the necessary Azure Resources in the portal, I will begin uploading the following source data files to Azure Data Lake Store (ADLS).

I will also upload a U-SQL Script file to ADLS. The U-SQL Script file, which I will call SummarizeLogs.usql, will contain the following code, which Extracts the schema of the log files, summarizes and counts certain fields, and then outputs the summary file to ADLA via a parameter that will be specified in the Azure Data Factory (ADF) pipeline later.
@log = EXTRACT date string,
               time string,
               client_ip string,
               username string,
               server_ip string,
               port int,
               method string,
               stem string,
               query string,
               status string,
               server_bytes int,
               client_bytes int,
               time_taken int,
               user_agent string,
               referrer string
       FROM @log_file
       USING Extractors.Text(' ', silent:true);

@summary = SELECT date,
               COUNT(*) AS hits,
               SUM(server_bytes) AS bytes_sent,
               SUM(client_bytes) AS bytes_received
           FROM @log
           GROUP BY date;

OUTPUT @summary
TO @summary_file
ORDER BY date
USING Outputters.Csv(outputHeader:true);
Creating an Azure SQL Database Table
Now that I’ve uploaded my files and U-SQL script, I will create an Azure SQL Database (ASQLDB) Table in the new Azure Database that I just created using the following Create table statement:
CREATE TABLE dbo.usql_logs (
   log_date varchar(12),
   requests int,
   bytes_in float,
   bytes_out float
);

Creating Azure Data Factory Linked Services
Now that I’ve created my ASQLDB table, I am ready to begin creating my Azure Data Factory (ADF) Linked Services. I’ll do this by clicking my Data Factory icon which I pinned to my dashboard.

Next, I will Click Author & Monitor. This will open my Azure Data Factory in a new tab.

Creating Azure Data Lake Store Linked Service
Within ADF, I will start by creating a new Linked Service connection by clicking the pencil icon to the left, then clicking connections, and then clicking New.

This will open a New Linked Service Box. I will then click Azure Data Lake Storage Gen1 and continue.

Once I select me Data Lake Store name, I’ll click test connection.

If I see the following Connection Failed message, I will need to grant the Data Factory Service Identity proper permissions in the Data Lake Store.
I can grant access as a source or a sink:
As source: In Data explorer > Access, grant at least Read + Execute permission to list and copy the files in folders and subfolders. Or, you can grant Read permission to copy a single file. You can choose to add to This folder and all children for recursive and add as an access permission and a default permission entry. There's no requirement on account level access control (IAM).
As sink: In Data explorer > Access, grant at least Write + Execute permission to create child items in the folder. You can choose to add to This folder and all children for recursive and add as an access permission and a default permission entry. If you use Azure integration runtime to copy (both source and sink are in the cloud), in IAM, grant at least the Reader role to let Data Factory detect the region for Data Lake Store. If you want to avoid this IAM role, explicitly create an Azure integration runtime with the location of Data Lake Store. Associate them in the Data Lake Store linked service as the following example.
For my Source scenario, I will navigate to my ADLS and click Data Explorer:

Next, I will click Access:

I will then ensure that Read, Write, and Execute Access has been granted.

I will then navigate to the firewall settings and enable firewall and allow access to Azure Services.

Once I do this, I will return to my New ADLS Linked Service and note that the Connection is successful this time, so I’ll click Finish to add this Linked Service.

Creating Azure SQL Database Linked Services
I will then follow the same steps to create a New Azure SQL DB Linked service.

Then I’ll click SQL Server > Continue.

I’ll then enter the Server Name, DB Name, User Name and PW, and click Test Connection. Once my connection is successful, I’ll click finish to create the Linked Service.

Creating Azure Data Lake Analytics Linked Services
There is one last Linked Service that will need to be created and this is the Azure Data Lake Analytics Linked Service. I intentionally saved this Linked Service for last because it involved the greatest number of steps. In fact, it involved so many steps that I have written a separate tip, titled ‘Creating an Azure Data Lake Linked Service Using Azure Data Factory’ on how to establish this Linked Connection. For more information, please read this article.
Once all my Linked Services are created, I should see 3 new Linked Services in the connections tab of ADF:

Creating Azure Data Factory Datasets
Before, I begin creating and configuring my ADF pipeline, I’ll need to create a Source and Destination Dataset.
Creating the Source Dataset
I’ll start by creating the source dataset by navigating to datasets and then clicking Add Dataset:

Next, I’ll click Azure Data Lake Store Gen 1 since my source file will be stored there. The source file is actually the output file generate by the U-SQL Transformation script, and not the actual raw source file.

I can then either configure the Data set with JSON code or using the GUI. In this scenario, I will create it using the following JSON code by clicking Code and then pasting the JSON.

     "name": "DS_Summary",
    "properties": {
        "linkedServiceName": {
            "referenceName": "LS_AzureDataLakeStore1",
            "type": "LinkedServiceReference"
        },
        "type": "AzureDataLakeStoreFile",
        "structure": [
            {
                "name": "dates",
                "type": "String"
            },
            {
                "name": "hits",
                "type": "Int32"
            },
            {
                "name": "bytes_sent",
                "type": "Double"
            },
            {
                "name": "bytes_received",
                "type": "Double"
            }
        ],
        "typeProperties": {
            "format": {
                "type": "TextFormat",
                "columnDelimiter": ",",
                "rowDelimiter": "",
                "quoteChar": "\"",
                "nullValue": "\\N",
                "encodingName": null,
                "treatEmptyAsNull": true,
                "skipLineCount": 0,
                "firstRowAsHeader": true
            },
            "fileName": "six_month_summary.csv",
            "folderPath": "output",
            "partitionedBy": [
                {
                    "name": "Year",
                    "value": {
                        "type": "DateTime",
                        "date": "SliceStart",
                        "format": "yyyy"
                    }
                },
                {
                    "name": "Month",
                    "value": {
                        "type": "DateTime",
                        "date": "SliceStart",
                        "format": "MM"
                    }
                }
            ]
        },
        "published": false,
        "availability": {
            "frequency": "Month",
            "interval": 1
        }
    },
    "type": "Microsoft.DataFactory/factories/datasets"
}
}
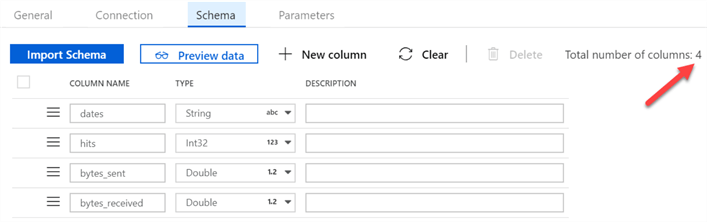
Note how the connection has been created.

Also, note how the schema contains the 15 columns specifies in the JSON.
Once I’m done creating my Source Data Set, I will click Publish All to complete creating this Source Dataset.

Creating the Database Table Dataset
Next, I’ll create the Destination Table Dataset, by clicking Add Dataset and selecting Azure SQL Database:


I’ll then enter the following JSON code to configure SQL Table Destination Dataset.
{
"name": "DS_SQLTable",
"properties": {
"linkedServiceName": {
"referenceName": "LS_SqlServer1",
"type": "LinkedServiceReference"
},
"type": "SqlServerTable",
"structure": [
{
"name": "log_date",
"type": "String"
},
{
"name": "requests",
"type": "Int32"
},
{
"name": "bytes_in",
"type": "Double"
},
{
"name": "bytes_out",
"type": "Double"
}
],
"typeProperties": {
"tableName": "[dbo].[usql_logs]"
}
},
"type": "Microsoft.DataFactory/factories/datasets"
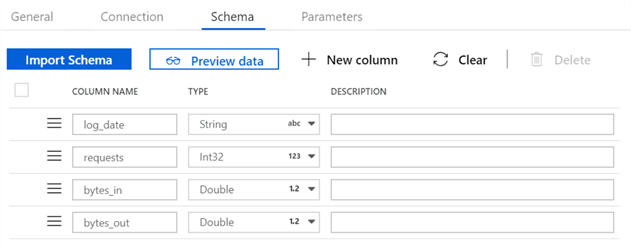
}I’ll check to make sure the configurations look correct:

And sure enough, I see that my 4 new fields are also created:
Creating the Azure Data Factory Pipeline
The last step to tie all the loose ends together would be to create a Data Factory pipeline which will call the U-SQL script that I saved my Data Lake Store and copy the data to my SQL DB Table. Conceptually, this is a simple source to destination mapping and flow and would look like this:
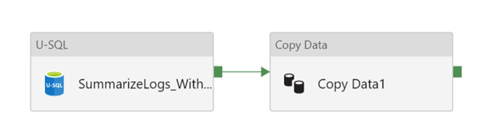
The JSON Code for the pipeline would be as follows:
{
    "name": "Transform_Data_With_USQL",
    "properties": {
        "activities": [
            {
                "name": "SummarizeLogs_With_USQL",
                "type": "DataLakeAnalyticsU-SQL",
                "policy": {
                    "timeout": "7.00:00:00",
                    "retry": 0,
                    "retryIntervalInSeconds": 30,
                    "secureOutput": false,
                    "secureInput": false
                },
                "typeProperties": {
                    "scriptPath": "SummarizeLogs.usql",
                    "degreeOfParallelism": 2,
                    "scriptLinkedService": {
                        "referenceName": "LS_AzureDataLakeStore1",
                        "type": "LinkedServiceReference"
                    },
                    "parameters": {
                        "log_file": "bigdata/{*}.txt",
                        "summary_file": "output/six_month_summary.csv"
                    }
                },
                "linkedServiceName": {
                    "referenceName": "AzureDataLakeAnalytics1",
                    "type": "LinkedServiceReference"
                }
            },
            {
                "name": "Copy Data1",
                "type": "Copy",
                "dependsOn": [
                    {
                        "activity": "SummarizeLogs_With_USQL",
                        "dependencyConditions": [
                            "Succeeded"
                        ]
                    }
                ],
                "policy": {
                    "timeout": "7.00:00:00",
                    "retry": 0,
                    "retryIntervalInSeconds": 30,
                    "secureOutput": false,
                    "secureInput": false
                },
                "typeProperties": {
                    "source": {
                        "type": "AzureDataLakeStoreSource",
                        "recursive": true
                    },
                    "sink": {
                        "type": "SqlSink",
                        "writeBatchSize": 10000
                    },
                    "enableStaging": false,
                    "translator": {
                        "type": "TabularTranslator",
                        "columnMappings": {
                            "dates": "log_date",
                            "hits": "requests",
                            "bytes_sent": "bytes_in",
                            "bytes_received": "bytes_out"
                        }
                    }
                },
                "inputs": [
                    {
                        "referenceName": "DS_Summary",
                        "type": "DatasetReference"
                    }
                ],
                "outputs": [
                    {
                        "referenceName": "DS_SQLTable",
                        "type": "DatasetReference"
                    }
                ]
            }
        ]
    },
    "type": "Microsoft.DataFactory/factories/pipelines"
}
Running the Azure Data Factory Pipeline
Now that the pipeline has been created and published, I’ll run the pipeline by clicking the Trigger and Trigger Now icon on the Pipeline canvas:

I’ll then head over to Monitor to view the job results by clicking the red monitor icon:

When the job completes running, I’ll see that the status of my Pipeline named ‘Transform_Data_With_USQL’ has Succeeded.

When I check the results of the Source to Destination copy activity data flow, I’ll see the following details:

Exploring the Results
Now that my job has succeeded, I’ll head over to my Azure SQL Database to explore my results in my u_sql_logs table. Upon querying the table, I see that the summarized results have been loaded to my SQL server table and my process is now complete.

Next Steps
- In this article, we learned how to transform data with U-SQL using Azure Data Factory and Azure Data Lake Analytics. My article titled ‘Creating an Azure Data Lake Linked Service Using Azure Data Factory’ describes how to set up a critical step in this process for our Data Lake Analytics Linked Service.
- Microsoft’s article ‘Transform Data with Azure Data Factory’, covers a list of additional Data Transformation Activities available in Azure Data Factory.
- For more information on understanding pipelines and activities in Azure Data Factory and how to use them to construct end-to-end data-driven workflows for data movement and data processing scenarios, check out the following Microsoft document titled Pipelines and Activities in Azure Data Factory.

Ron C. L’Esteve is a Data and AI Leader and professional Author residing in Chicago, IL, USA. He is well-known for his impactful books and article publications on Azure Data & AI Architecture, Engineering, and Leadership. Ron holds a Master of Business Administration (M.B.A.) and Master of Science in Corporate Finance (M.S.F.) from Loyola University Chicago. Ron possesses deep technical skills and experience in designing, implementing, leading, and delivering modern Azure Data & AI projects for numerous clients around the world. He is a Motorola Certified Six Sigma Green Belt, a Microsoft Global Challenger, and also holds numerous additional Microsoft, Snowflake, and Databricks professional certifications in Big Data Engineering, Artificial Intelligence, Apache Spark and Data Platform Architecture.
- MSSQLTips Awards: Champion (100+ tips) – 2023 | Author of the Year – 2020-2021 | Rookie of the Year – 2019