By: Siddharth Mehta | Comments (3) | Related: > Amazon AWS RDS
Problem
Transitioning or migrating database systems as well as data to cloud is a popular exercise that can be seen in every IT organization. One of the means can be exporting data in the form of files and uploading it to blob storage services offered by a cloud vendor. But in case of relational database systems, when the data is exported to file formats, there is a high chance of metadata being lost. Also, it’s not an efficient way of transitioning data from one instance of SQL Server to another. The standard mechanism of moving data between two instances of SQL Server is using the native backup mechanism. The cloud instances of SQL Server are generally trimmed down versions of SQL Server and often some features are not supported. This can be become a bottleneck with a cross cloud vendor like AWS, who is just supporting the SQL Server Engine as one of the databases on an AWS RDS service. Fortunately, it provides a specific way to import native SQL Server backups into an AWS RDS Instance of SQL Server. In this tip, we will learn how to import a native backup of SQL Server into AWS RDS Instance of SQL Server.
Solution
AWS RDS provides an option in option groups which we can use to import a SQL Server backup into an AWS RDS Instance of SQL Server.
In this tip, we are going to perform an exercise to import a sample SQL Server backup to an AWS RDS instance of SQL Server. It is assumed that you would have an AWS Account to try this exercise. Please keep in mind that performing the below exercise will incur cost. Some familiarity with basic AWS services like S3 (Simple Storage Service) which is an equivalent to Azure Blog Storage is required to perform this exercise. It is also assumed that you have an RDS Instance of SQL Server engine on your AWS account.
Steps to Restore a SQL Server Database on an AWS RDS Instance
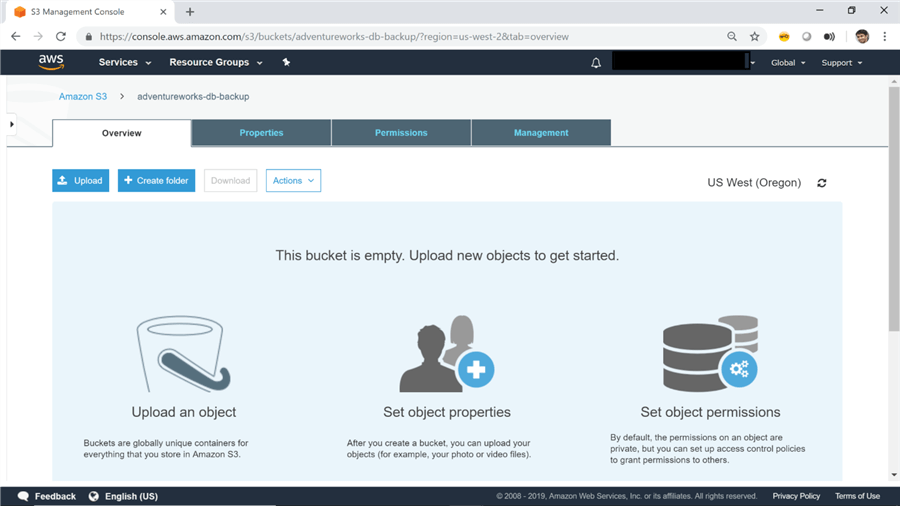
1) Login to your AWS account and create a bucket (which is like a folder) on the S3 dashboard as shown below. We are going to store the sample SQL Server backup in this bucket. Here I have named the bucket adventureworks-db-backup.
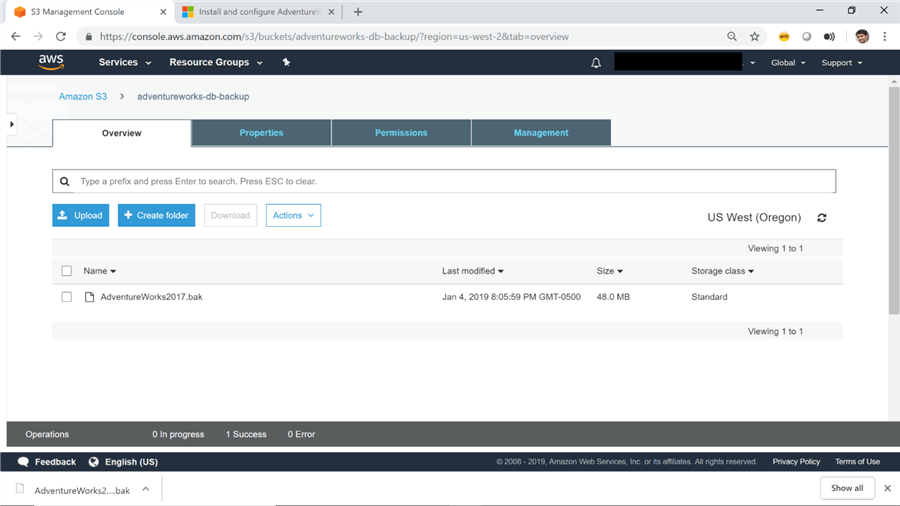
2) Upload the backup file to this bucket using the upload button. I have uploaded the AdventureWorks database backup file as shown below.
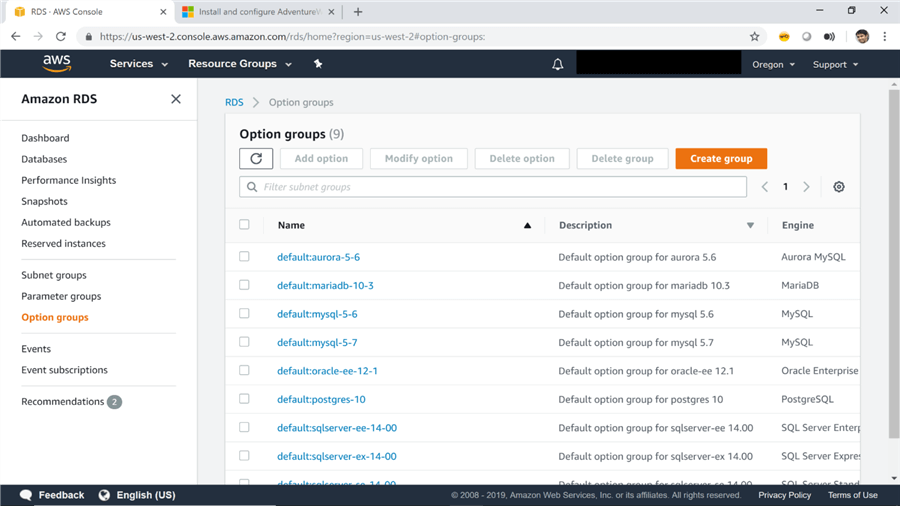
3) Once the backup is uploaded, you can navigate to the RDS dashboard by clicking the Relational Database Service option from the Database category on the Amazon Console home page. Assuming that you have stood up an RDS SQL Server instance using default options, you would have a default option group associated with that instance. The same can be found in the Options Groups tab as shown below.
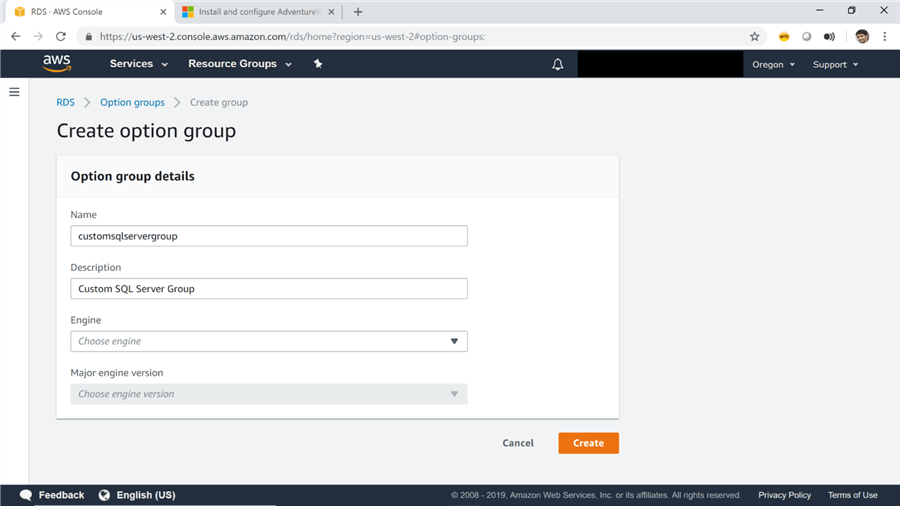
4) We need to create a custom option group first and then add the option of backup and restore. Once done, we will then associate this new option group to the AWS RDS instance of SQL Server. To create this new option group, click on the Create Group button as seen above, and you will be prompted to fill out the details for this new option group as shown below. Provide a relevant name and description, select SQL Server as the engine and select the latest major engine version from the list. After completing these details, click on the Create button to create the option group.
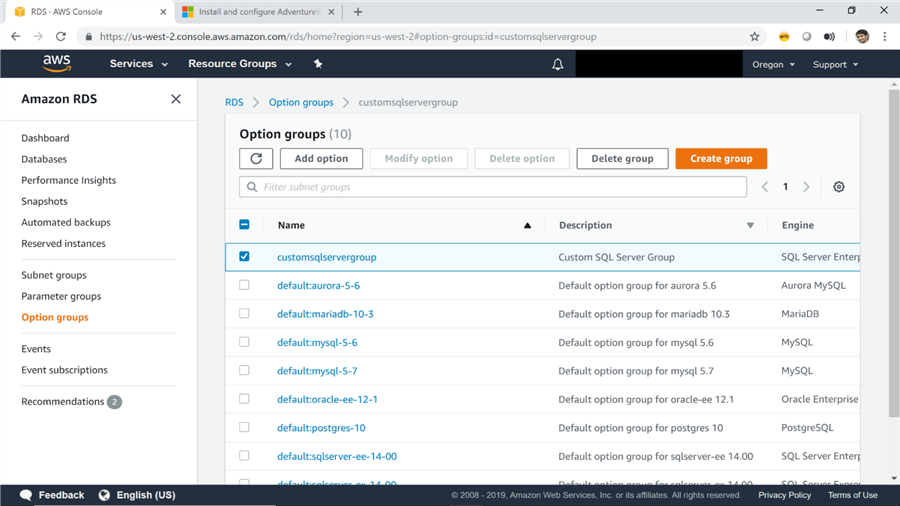
5) Once the option group is created, you will find it listed under the Option Groups tab as seen below. Select this option group, and you will find the Add option button getting activated. Click on this button to add the backup and restore option to the newly created option group.
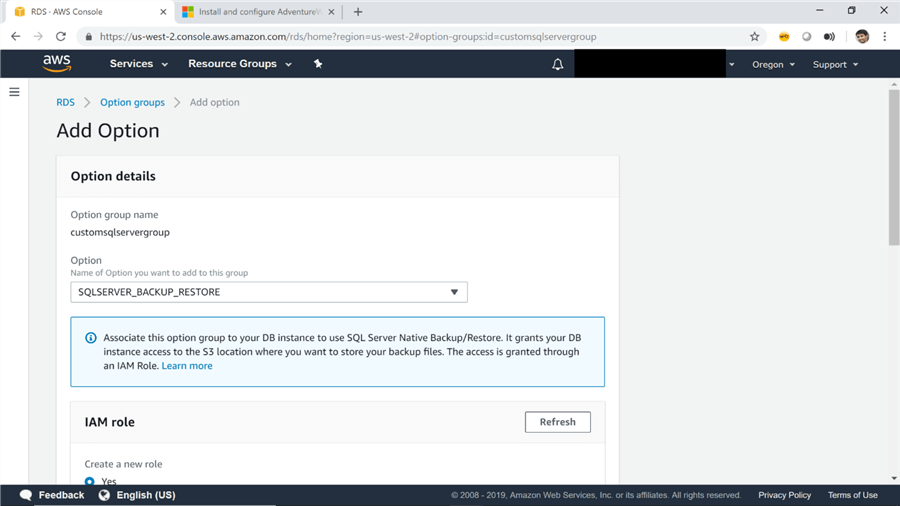
6) Select the SQLSERVER_BACKUP_RESTORE option from the list of options as that is the only relevant option related to backups and restores. The next detail requires an Identity and Access Management role for this option. The default option is to create a new role. Leave this option as the default and scroll down.
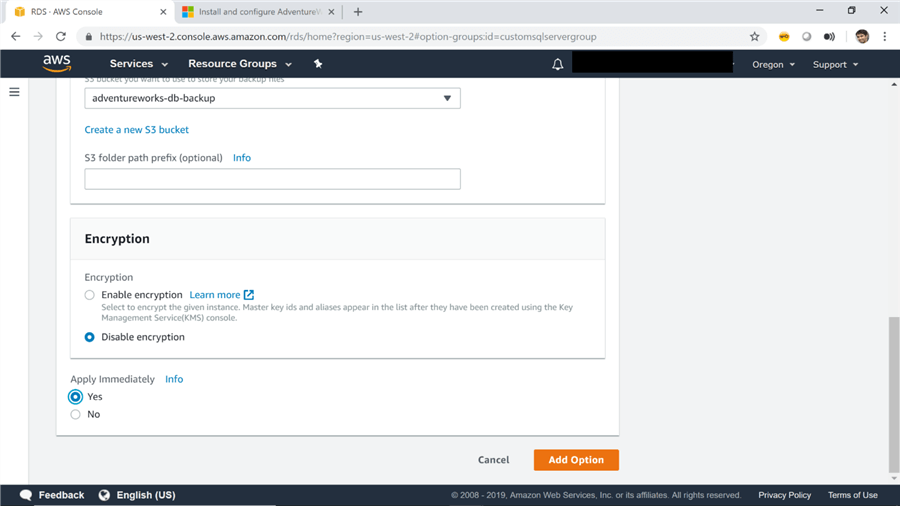
7) The next detail required is to select the S3 bucket that holds the backup files. Select the bucket in which we had placed the backup file as shown below. Leave the encryption option to default for now, select the Apply Immediately option and click on the Add Option button.
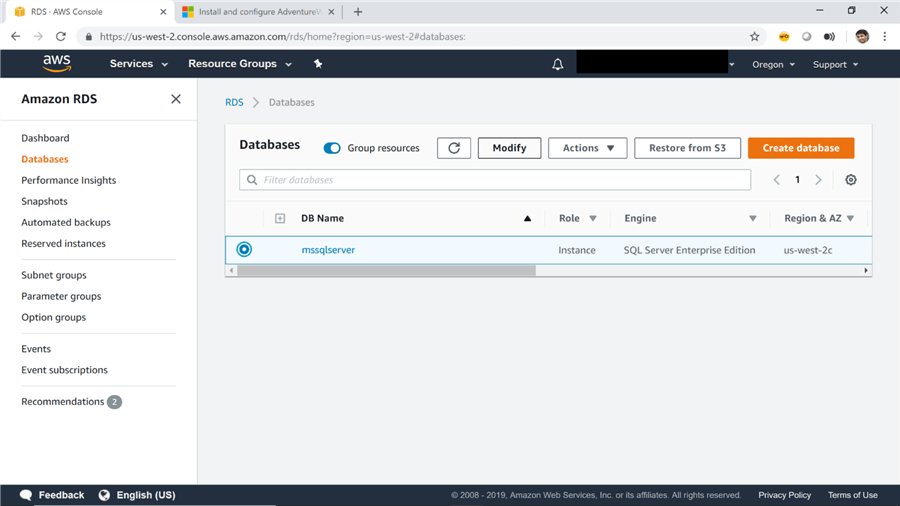
8) Now that we have created an option group and modified the option as well, its time to associate this with the SQL Server instance by modifying the instance. To do this click on the databases option, and click on the Modify button as shown below.
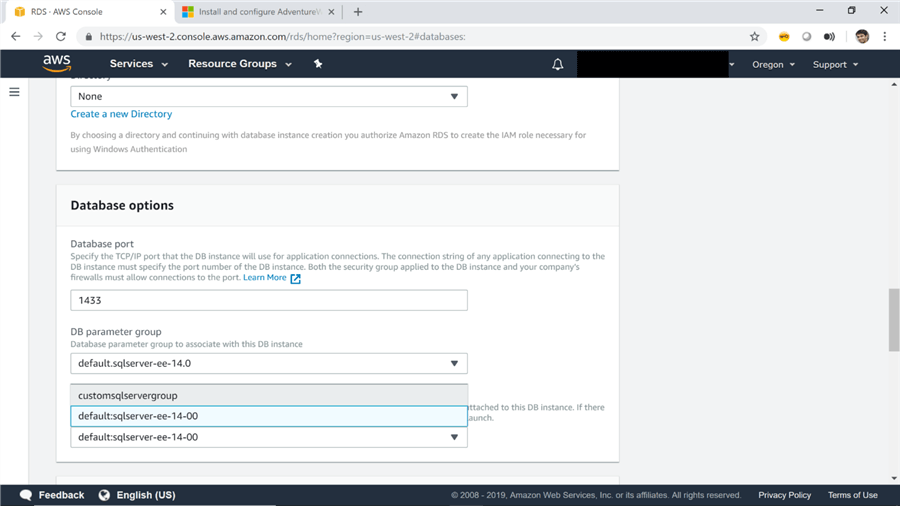
9) After clicking the modify button, a long list of details will open for modification. Scroll down to the database options and replace the newly created option group with the one we created in the previous steps. Once done, click on the Next button.
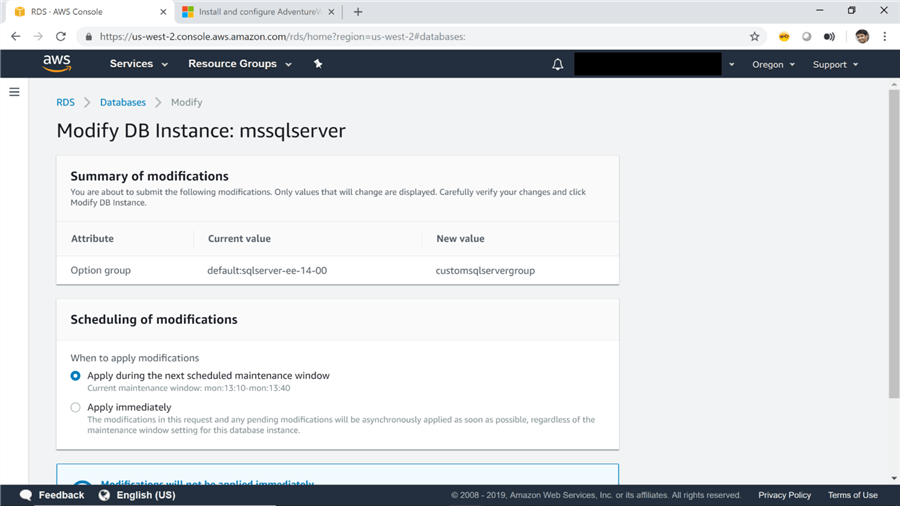
10) You will then be shown a summary of changes as shown below. Select Apply Immediately and click on the Apply button. This will apply the changes to the SQL Server instance immediately.
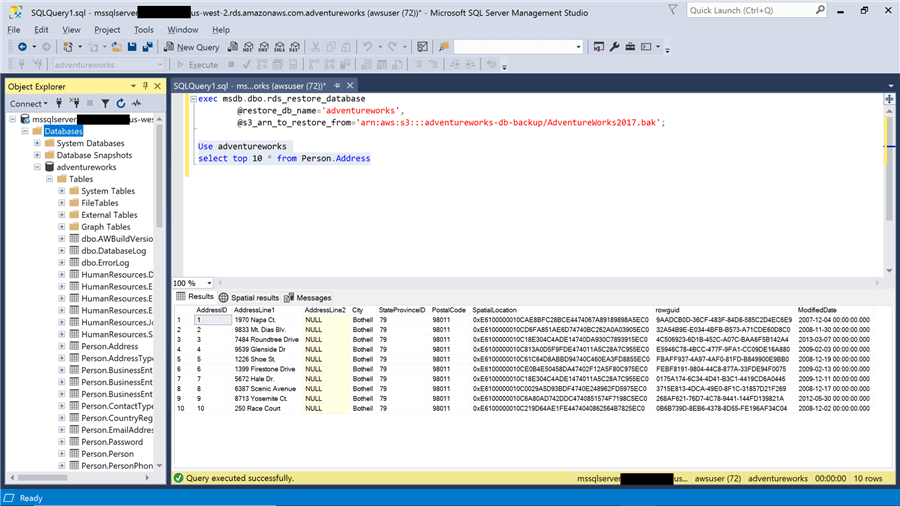
11) It’s now time to import the backup in SQL Server. Open SQL Server Management Studio (SSMS) and connect to the SQL Server instance on AWS, by using the server endpoint as the server name, authentication mode as SQL Server and using the server connection credentials. After successfully connecting to the server, execute the code shown below. We are executing the rds_restore_database stored procedure which is an AWS specific stored proc found in the msdb database. It needs two parameters, @restore_db_name (i.e. the name of the database that will be used once the database is restored on the SQL Server instance), and the second parameter is @s3_arn_to_restore_from (i.e. Amazon Resource Name (ARN) of the file which we are trying to restore). Once these parameters are provided and the code is executed, the database should be restored. After successful restoration, we can start querying the database like any other normal database as shown below.
In this way, using option groups SQL Server native backups can be restored on an AWS RDS instance of SQL Server.
Next Steps
- Consider exploring other AWS system procedures for SQL Server Engine on the Relational Database Service to exploit the maximum potential of SQL Server hosted on AWS cloud.
About the author
 Siddharth Mehta is an Associate Manager with Accenture in the Avanade Division focusing on Business Intelligence.
This author pledges the content of this article is based on professional experience and not AI generated.
View all my tips


